Tag Archives: python

TypeError: Required argument ‘mat‘ (pos 2) not found

Traceback (most recent call last):
  File "/Users/*******/*****.py", line 225, in <module>
    cv2.imshow(r_image)
TypeError: Required argument 'mat' (pos 2) not found

This error prompt means that the required parameter is not found, that is, the function in the code is missing the necessary parameter.

cv2.imshow()

There should be two parameters: one is the name of the image window, namely title, and the other is the pixel value matrix of the displayed image.
In addition, the data type of the matrix is np.uint8 , floating point type will display exception.
Error will be reported:

TypeError: img is not a numpy array, neither a scalar

Solution:
transform the data type

image = numpy.array(image)

Python selenium — webriver cheat sheet

Recently, I saw a webriver cheat sheet on axatrikx, which is only made in Java. I thought I could organize a python version, and I got this blog post. The main methods and key points in webriver are sorted into a table for easy reference.

Webdriver Cheat Sheet

If it helps you, or if you have any good suggestions, please let me know.

Pdf version can be downloaded here


For more articles on Python selenium, please pay attention to my CSDN column: Python selenium automated test details

Module ‘Seaborn’ has no attribute ‘scatterplot’ solution

First, Seaborn contains the scatterplot module. However, running the corresponding sentence without syntax error will report an error, because the current Seaborn version is 0.8 or below.

Examples of errors are as follows:

Solution: upgrade Seaborn version! The corresponding statement is: PIP install Seaborn = = number of corresponding versions, for example: PIP install Seaborn = = 0.9.0

Rerun the statement to draw a normal diagram

During this period, CMD may require upgrading, and run for many times: Python – M PIP install — upgrade PIP may be invalid

Error, feedback similar permission problems, specific debugging methods can refer to the following:

https://blog.csdn.net/weixin_ 43870646/article/details/90020874

If: no module named pip.basecommand

It is suggested that you can uninstall the old version and re install the new version. The corresponding steps are as follows. Or you can refer to the author’s method https://blog.csdn.net/GuaPiQ/article/details/100593848

After reloading pip, you can upgrade Seaborn according to the first step above.

How to install CONDA can refer to this article: https://www.jianshu.com/p/edaa744ea47d

Yield usage in Python


The function of yield in the function is similar to return. The difference is that the function does not exit after yield returns the result each time, but returns the result

Each time the yield keyword is encountered, the corresponding result is returned, and the current running state of the function is retained, waiting for the next call. If

A function needs to execute an action repeatedly, and the result of each execution is needed. This scenario is very suitable for using yield.

The function containing yield becomes a generator, which is also an iterator. It supports getting the next value through the next method.

Basic use of yield:

def func():
    for i in range(0,3):
        yield i

f = func()
f.next()
f.next()


For the generator, when the function next is called, the value of the expression after yield of the generator will be obtained;

When the yield statement ends after the last loop, the generator will throw stopiteration exception;

In addition to the next function, the generator also supports the send function. This function can pass parameters to the generator.

def func(n):
    for i in range(0,n):
        val = yield i        
        print val

f = func(10)
f.next()
#f.send(None)
f.send(2)
f.send(10)
print f.next()

Python — using Matplotlib to draw histogram

Python — using Matplotlib to draw histogram

1. Basic histogram


First, install Matplotlib( http://matplotlib.org/api/pyplot_ api.html#matplotlib . pyplot.plot )You can use the PIP command to install it directly

# -*- coding: utf-8 -*-
import matplotlib.pyplot as plt

num_list = [1.5,0.6,7.8,6]
plt.bar(range(len(num_list)), num_list)
plt.show()

2. Set color


# -*- coding: utf-8 -*-
import matplotlib.pyplot as plt

num_list = [1.5,0.6,7.8,6]
plt.bar(range(len(num_list)), num_list,fc='r')
plt.show()

# -*- coding: utf-8 -*-
import matplotlib.pyplot as plt

num_list = [1.5,0.6,7.8,6]
plt.bar(range(len(num_list)), num_list,color='rgb')
plt.show()

3. Set label

# -*- coding: utf-8 -*-
import matplotlib.pyplot as plt

name_list = ['Monday','Tuesday','Friday','Sunday']
num_list = [1.5,0.6,7.8,6]
plt.bar(range(len(num_list)), num_list,color='rgb',tick_label=name_list)
plt.show()

4. Stacked bar chart

# -*- coding: utf-8 -*-
import matplotlib.pyplot as plt

name_list = ['Monday','Tuesday','Friday','Sunday']
num_list = [1.5,0.6,7.8,6]
num_list1 = [1,2,3,1]
plt.bar(range(len(num_list)), num_list, label='boy',fc = 'y')
plt.bar(range(len(num_list)), num_list1, bottom=num_list, label='girl',tick_label = name_list,fc = 'r')
plt.legend()
plt.show()

5. Side by side bar chart

# -*- coding: utf-8 -*-
import matplotlib.pyplot as plt

name_list = ['Monday','Tuesday','Friday','Sunday']
num_list = [1.5,0.6,7.8,6]
num_list1 = [1,2,3,1]
x =list(range(len(num_list)))
total_width, n = 0.8, 2
width = total_width / n

plt.bar(x, num_list, width=width, label='boy',fc = 'y')
for i in range(len(x)):
    x[i] = x[i] + width
plt.bar(x, num_list1, width=width, label='girl',tick_label = name_list,fc = 'r')
plt.legend()
plt.show()

6. Bar chart

# -*- coding: utf-8 -*-
import matplotlib.pyplot as plt

name_list = ['Monday','Tuesday','Friday','Sunday']
num_list = [1.5,0.6,7.8,6]
plt.barh(range(len(num_list)), num_list,tick_label = name_list)
plt.show()

AttributeError:module“seaborn” has no attribute “lineplot”

When drawing with Seaborn, the following error occurs:

AttributeError: module 'seaborn' has no attribute 'lineplot'

Reason:
the version of Seaborn is a little old. I checked it. The version data of Seaborn is version 0.8.1, and it is lineplot after version 0.9, so I just need to update Seaborn.

pip install -U seaborn

Address of campus mailbox POP3 of Nankai University

text

This semester as a teaching assistant, the mailbox received homework, hundreds of e-mail, manual download attachment is too tired, it is suitable for Python to write an automatic download attachment program. The POP3 address of the mailbox is required for Python to download email attachments. After some trying and searching, we finally found the POP3 address of Nankai campus mailbox: “POP3 mail.nankai.edu .cn”。 Happy to write code to download email attachment.

Python download attachment code

The code I use refers to this blog https://www.cnblogs.com/chouxianyu/p/11270101.html

Detailed explanation of yield in Python — the simplest and clearest explanation

What I make complaints about is what closely reasoned and well argued. First, I want to talk about the process of yield. I found that no one could simply let me know. When I was talking about Baidu, it was all the same, what parameters and what was passed. It was also the simplest and the easiest way to read the TM tutorial. I would like to ask if I have not considered the feelings of the readers.

Next is the topic

First of all, if you don’t have a preliminary understanding of yield, you can regard yield as “return”. This is intuitive. First of all, it is a return. What does the common return mean? It means to return a value in the program. After returning, the program will no longer run down. See it as a return, and then see it as a part of the generator (the function with yield is the real iterator). Well, if you don’t understand this, first consider yield as a return, and then look at the following program directly, you will understand all the meaning of yield:

def foo():
    print("starting...")
    while True:
        res = yield 4
        print("res:",res)
g = foo()
print(next(g))
print("*"*20)
print(next(g))

Just a few lines of code will let you understand what yield is

starting...
4
********************
res: None
4

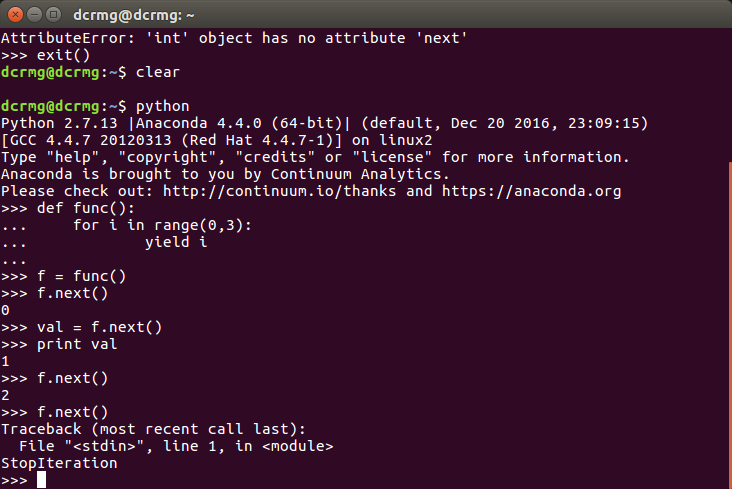
I directly explain the code running order, which is equivalent to single step debugging of code

1. After the program starts to execute, because there is yield keyword in foo function, foo function will not really execute, but get a generator g (equivalent to an object) first

2. Until the next method is called, the foo function is formally executed. First, the print method in the foo function is executed, and then the while loop is entered

3. When the program encounters the yield keyword, think of yield as return. After a return of 4, the program stops and does not execute the assignment to res operation. At this time, the next (g) statement is executed, so the first two lines of output (the first is the result of print above while, and the second is the result of return) are the result of print (next (g)),

4. The program executes print (“*” * 20) and outputs 20*

5. Start to execute the following print (next (g)), This time is similar to the one above, but the difference is that this time starts from the place where the next program just stopped, that is, the assignment operation of res is to be executed. At this time, it should be noted that there is no value on the right side of the assignment operation (because the return just went out, and no parameter was passed to the left side of the assignment operation), so this time Res is assigned to none, so the next output is res:None ,

6. The program will continue to run in while, and it will encounter yield again. At this time, it will return 4, and then the program will stop. The output 4 of the print function is the return 4


Here you may understand the relationship and difference between yield and return. The function with yield is a generator, not a function. One function of this generator is the next function. Next is equivalent to the number generated in the “next step”. The place where the next starts this time is the place where the next stops last time. Therefore, when calling next, the generator It doesn’t start from the start of foo function. It just starts from the place where the last step stopped. After yield is met, return the number to be generated. This step ends.

****************************************************************************************************************************************

def foo():
    print("starting...")
    while True:
        res = yield 4
        print("res:",res)
g = foo()
print(next(g))
print("*"*20)
print(g.send(7))

Take another example of the send function of this generator. This example replaces the last line of the above example. The output result is as follows:

starting...
4
********************
res: 7
4

Let’s talk about the concept of the send function: at this time, you should pay attention to the purple word above, and why the value of res above is none, which becomes 7. Why? This is because send sends a parameter to res, because it is mentioned above that when return, 4 is not assigned to res, so you have to continue the assignment next time , we have to assign it to none. If we use send, when we start execution, we first assign 7 to res in the last execution (after return 4), and then perform the function of next. When we meet the next yield, the result of return is finished.


5. The program executes g. send (7), the program will continue to run down from the yield keyword line, and send will assign the value of 7 to the res variable

6. Because the send method contains the next () method, the program will continue to run down, execute the print method, and then enter the while loop again

7. When the program encounters the yield keyword again, yield will return the following value, and the program will pause again until the next method or send method is called again.


That’s the end. Let’s talk about why we use this generator because if we use list, it will take up more space, such as 0,1,2,3,4,5,6,… 1000

You might be like this:

for n in range(1000):
    a=n

At this time, range (1000) generates a list containing 1000 numbers by default, so it takes up a lot of memory.

At this time, you can use the yield combination generator just now to realize it, or you can use xrange (1000) to realize it

Yield Combination:

def foo(num):
    print("starting...")
    while num<10:
        num=num+1
        yield num
for n in foo(0):
    print(n)

Output:

starting...
1
2
3
4
5
6
7
8
9
10

* xrange(1000):

for n in xrange(1000):
    a=n

It should be noted that there is no xrange () in python3. In python3, range () is xrange (). You can check the type of range () in python3. It is a & lt; class’ range ‘& gt; instead of a list. After all, it needs to be optimized.  

Thank you

If you feel helpful, your appreciation is my greatest support!

Division in Python

In the C / C + + language, the division of integer number will be carried out (rounding off the decimal part). For example, int a = 15 / 10; the result of a is 1.

The same is true in Java, so when dividing two int data and returning a floating-point data, you need to force type conversion. For example, float a = (float) BGC, where B and C are int data.

Python is divided into three kinds of division: traditional division, precise division and floor division.

Traditional division

If it is an integer division, perform the floor division, if it is a floating-point division, perform the precise division.

>>>1/2
0
>>>1.0/2.0
0.5

Precise division

Division always returns the real quotient, whether the operands are integer or floating-point. Execute from__ future__ The import division directive can do this.

>>>from __future__ import division
>>>1/2
0.5
>>>1.0/2.0
0.5

Floor removal

Starting from Python 2.2, an operator / / is added to perform floor Division: / / division. Regardless of the numeric type of the operands, the decimal part is always discarded and the nearest number in the number sequence smaller than the real quotient is returned.

>>>1//2
0
>>>1.0//2
0
>>>-1//2.0
-1

Built in function divmod()
divmod (a, b), return (A / / B, a% B)

>>>divmod(1,2)
(0,1)
>>>divmod(3.14159,1.5)
(2.0,0.4159000000000002)
>>>5+6j//3+2j
2+0j
>>>5+6j%3+2j
-1+2j
>>>divmod(5+6j,3+2j)
((2+0j),(-1+2j))

=

Solution of modulenotfounderror in running pychar

Solution of modulenotfounderror in running pychar

You need to load the corresponding module file in pychar. The specific steps are as follows: left click in file, select settings, and select【 python:xxx 】Click [Python interperter] in the toolbar to open the page and select [add] in the toolbar, After the page appears, select [existing environment] to load python.exe File my python.exe The file is in the following location: C: users, administrator, appdata, local, programs, python, python38

Common problems

one python.exe There is no required module file in the file

At this time, you need to use pip to install the corresponding files. The installation steps are as follows:
1. Open CMD
2. Enter the CD in the folder (the following is my path) C:: (users / administrator / appdata / local / programs / Python / python38 / scripts)
3. Start to install the file PIP install flash (take installing flash as an example)
4. Check if the installation is complete, you can use pip to install flash List to determine whether the installed file is in the list

2. “PIP” is not an internal or external command

1. Confirm that “PIP” is not an internal or external command, nor a runnable program or batch file.

2. Solution 1: go to the folder where pip is located, and copy the path
my path is: C:: (users, administrator, appdata, local, programs, python, python38, scripts)

3. Switch the working directory to the path of PIP
CD

4. Execute PIP again, method 1, success!

5. Method 2: add pip to environment variables
right click my computer and select properties

6. Select: Advanced – environment variable

7. Open path to edit, and add the directory path of PIP at the end

8. After confirming the setting of environment variables, method 2 is successful!

Pre initialization of list content and length in Python

If you want to set the same initial value and desired length

>>> a=[None]*4
>>> print(a)
[None, None, None, None]

If we know the length of the list in advance, we can initialize the list of that length in advance, and then assign values to each list, which will be faster than each time list.append () more efficient.

If you want the sequence initial value, you can use the range function, but note that the range function returns an iterative object, which needs to be converted into a list

>>> b=list(range(10))
>>> print(b)
[0, 1, 2, 3, 4, 5, 6, 7, 8, 9]

>>> b=range(10)
>>> print(b)
range(0, 10)

If you want to eliminate unwanted data, you can use the list derivation

>>> c=[i for i in range(10) if i%2==0 and i<8]
>>> print(c)
[0, 2, 4, 6]

Life is short, You need Python~