Tag Archives: Problems encountered

Failed to load plugin jsdoc: Cannot find module ‘eslint-plugin-jsdoc‘

In the egg project, NPM is installed for the first time   The following errors are reported when the package is:

Oops! Something went wrong! :(

ESLint: 5.16.0.
ESLint couldn't find the plugin "eslint-plugin-jsdoc". This can happen for a couple different reasons:

1. If ESLint is installed globally, then make sure eslint-plugin-jsdoc is also installed globally. A globally-installed ESLint cannot find a locally-installed plugin.

2. If ESLint is installed locally, then it's likely that the plugin isn't installed correctly. Try reinstalling by running the following:

     npm i eslint-plugin-jsdoc@latest --save-dev

Path to ESLint package: /Users/***/node_modules/eslint

If you still can't figure out the problem, please stop by https://gitter.im/eslint/eslint to chat with the team.

The eslint does not work normally, and when the file does not comply with the eslint rules, an error is reported in the console log as follows:

Failed to load plugin jsdoc: Cannot find module 'eslint-plugin-jsdoc'....

reason:

When NPM v8.0 installed the project dependency, it did not correctly install the project dependency (eslint config egg) dependency (eslint plugin JSDoc)

solve:

After upgrading NPM to v8.1.2, delete the node in the project_ Modules and package-lock.json, and then reinstall

rm -rf node_modules
rm package-lock.json
npm i

Supplement:

If you have the same error, you can search globally   Eslint plugin JSDoc to locate dependencies with NPM command

➜  *** git:(master) ✗ npm ls eslint-plugin-jsdoc
***@1.0.0 /Users/***
└─┬ [email protected]
  └── [email protected]

Then determine whether to install or upgrade NPM manually or for other reasons.

Weboffice Warning: OLE error 800A01A8 [How to Solve]

Solution:

This problem can be solved by reinstalling office
precautions:
1. Install the full version of office
2. After the installation of office is completed, create a new document and open it. If you open the document for the first time, you will be prompted whether to use the recommended settings. Select Yes or no, because in the process of WebOffice calling office, if a pop-up window appears in office, the call will fail.

Python Error: Failed to establish a new connection: [Errno -2] Name or service not known

Error Messages:

Traceback (most recent call last):
File "/usr/local/python3/lib/python3.7/site-packages/ddt.py", line 192, in wrapper
return func(self, *args, **kwargs)
File "/usr/hxy/auto-test/interface/test_start.py", line 49, in test
result = RequestsHandle().httpRequest(method, reparam.uri, data=reparam.data, headers=reparam.headers)
File "/usr/hxy/auto-test/common/request_handle.py", line 32, in httpRequest
headers=headers, verify=False, proxies=proxies)
File "/usr/local/python3/lib/python3.7/site-packages/requests/sessions.py", line 542, in request
resp = self.send(prep, **send_kwargs)
File "/usr/local/python3/lib/python3.7/site-packages/requests/sessions.py", line 655, in send
r = adapter.send(request, **kwargs)
File "/usr/local/python3/lib/python3.7/site-packages/requests/adapters.py", line 516, in send
raise ConnectionError(e, request=request)
requests.exceptions.ConnectionError: HTTPSConnectionPool(host='sync-test.helianhealth.com', port=443): Max retries exceeded with url: /sync-channel/channel/admin/hsp/template/isOnline (Caused by NewConnectionError('<urllib3.connection.HTTPSConnection object at 0x7fd369b643c8>: Failed to establish a new connection: [Errno -2] Name or service not known'))

I don’t get the error locally, but when I deploy the project on a Linux server, I get the error.
This is because there are other technicians using the server besides me, and the version of the request is outdated.
Solution: Update requests with the command: pip install -U requests

If the following error occurs.

ERROR: Cannot uninstall ‘requests’. It is a distutils installed project and thus we cannot accurately determine which files belong to it which would lead to only a partial uninstall.
After installing a package with distutils, you need to uninstall it with distutils. Unfortunately distutils does not contain an uninstall command, so “uninstall using distutils” means that you have to remove the package manually.

cd /usr/lib/python2.7/site-packages/
mkdir /opt/pylib_backup/
mv requests* /opt/pylib_backup/

PIP list sees that the requests package has been unloaded

[root@bareos_server site-packages]# pip list |grep request
DEPRECATION: Python 2.7 reached the end of its life on January 1st, 2020. Please upgrade your Python as Python 2.7 is no longer maintained. pip 21.0 will drop support for Python 2.7 in January 2021. More details about Python 2 support in pip can be found at https://pip.pypa.io/en/latest/development/release-process/#python-2-support pip 21.0 will remove support for this functionality.
[root@bareos_server site-packages]# 

Gunicorn timeout error: [1] [critical] worker timeout [How to Solve]

1. Problem description

In a web project built with gunicorn + flash, because the machine learning model is used, the model needs to be loaded when requesting the interface for the first time. The model is loaded quickly when running locally, so it runs normally. The application is deployed to the server using docker (the model is mounted to the container through volume), The first request to load the model takes a long time, and the following errors are reported:

[2021-09-11 07:22:33 +0000] [1] [CRITICAL] WORKER TIMEOUT (pid:12)
[2021-09-11 07:22:35 +0000] [12] [INFO] Worker exiting (pid: 12)

Gunicorn ‘green Unicorn’ is a python WSGI HTTP server for UNIX. It is a pre forked worker model transplanted from Ruby’s Unicorn project. Gunicorn server is widely compatible with various web frameworks, with simple implementation, less use of server resources and quite fast speed.

2. Cause analysis

It can be seen from the error message that gunicorn’s worker process timed out, causing the process to exit and restart
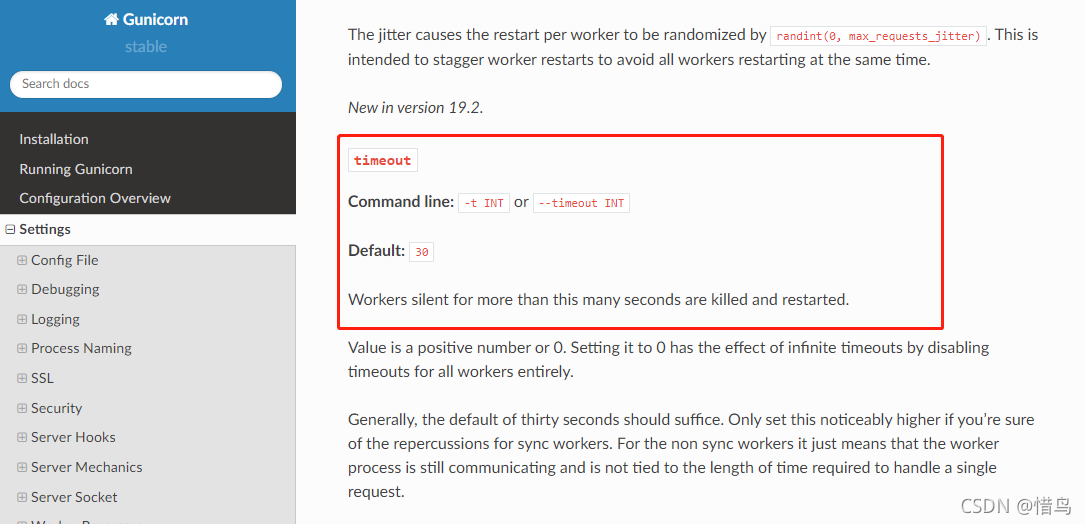
refer to the official document of gunicorn and the description shown in the figure below:

3. Solution

From the documentation on the official website, we can know that the default timeout of gunicorn is 30s. If it exceeds 30s, the worker process will be killed and restarted.

Therefore, to solve this problem, you only need to set a large timeout: gunicorn to set the timeout

gunicorn -w 2 -b 0.0.0.0:4343  manage:app --timeout 120 

Add: -- timeout 120 to gunicorn’s startup command, indicating that the timeout is set to 120 seconds. Configure the timeout in the gunicorn. Conf.py configuration file of gunicorn

workers = 4  # Define the number of processes to be opened for processing requests at the same time, adjusted appropriately according to site traffic
worker_class = "gevent" # Use the gevent library to support asynchronous processing of requests and improve throughput
bind = "0.0.0.0:8500" # Listen to IP relaxation to facilitate communication between Dockers and between Dockers and hosts
timeout = 120 # Set the timeout to 120 seconds

For more configuration of the gunicorn. Conf.py file, see the official website

[Solved] Vue Project Start Error: Support for the experimental syntax ‘jsx‘ isn‘t currently enabled

The project is built with Vue scaffold

As shown in the figure:

According to the prompt in the red box in the figure:

I need you in. Babelrc   Just add @ Vue/Babel preset JSX to the configuration file

{
  "presets": [
    ["@babel/preset-env", { "modules": false }],
    "@vue/babel-preset-jsx" 
  ],
  "plugins": [
    "@babel/plugin-proposal-class-properties", 
    "syntax-dynamic-import",
    [
      "component",
      {
        "libraryName": "element-ui",
        "styleLibraryName": "theme-chalk"
      }
    ]
  ]

}

The problem has been solved.

[Solved] Access /oauth/token in SpringCloud OAuth2 and report server_error

The problem I encountered was solved by myself:
using grant in spring cloud oauth2 project_ The type is password/OAuth/token to access and obtain the token_ error。 In postman, as shown in the figure below:

{
    "error": "server_error",
    "error_description": "Internal Server Error"
}

Java background error is as follows:

endpoint.TokenEndpoint : Handling error: NestedServletException, Handler dispatch failed; nested exception is java.lang.StackOverflowError

This problem is due to grant_ Type = password represents the user name and password authorization

/**
 * This configuration class, which mainly handles the verification of user names and passwords, etc.
 */
@Configuration
public class SecurityConfiger extends WebSecurityConfigurerAdapter {

    @Autowired
    private PasswordEncoder passwordEncoder;

    //register 1 authentication manager object to the container
    @Bean
    @Override
    public AuthenticationManager authenticationManagerBean() throws Exception {
        return super.authenticationManagerBean();
    }

    /**
     * Password encoding object (passwords are not encrypted)
     */
    @Bean
    public PasswordEncoder passwordEncoder() {
        return NoOpPasswordEncoder.getInstance();
    }

    /**
     * Handle username and password authentication
     * 1) The client passes username and password parameters to the authentication server
     * 2) Generally, username and password are stored in the database in the user table
     * 3) Verify the legitimacy of the currently passed user information based on the data in the user table
     */
    @Override
    protected void configure(AuthenticationManagerBuilder auth) throws Exception {
        super.configure(auth);

        // In this method you can go to the associated database, currently we first configure the user information in memory
        // instantiate 1 user object (equivalent to 1 user record in the data table)
        UserDetails user = new User("admin","123456",new ArrayList<>());
        auth.inMemoryAuthentication()
                .withUser(user).passwordEncoder(passwordEncoder);
    }
}

Problem solving: the following are purely personal views:

Common problems of shadow map in OpenGL

Shadow maps are a common technique in games,
The principle is to view the entire scene from the light space with the light viewing matrix (binding the depth cache with the frame cache), and the resulting scene is not rendered
The second drawing, the depth buffer into the shader, all point transformation to the light space, the z coordinates, and the depth of the original cache value contrast, if the resulting value is less than the value of the depth buffer is proved that the pixels in the most close to the rear of the light source location, so this point can’t render, reason for shadow covered place.
This is what I get, the light source is rotated around (0,0,0) with a radius of 50. In the middle is a physical model. The entire lighting system is the simplest (an improved version of Feng’s lighting).

Problem 1. Boundary problem: there is a plane in front of the light source, the space outside the plane is the area affected by light, and the area inside the plane is the area not affected by light.

The problem is very simple. In the light space analysis, the light space, like the view space, has a cone:

The areas outside the cone that are not located on the upper ledge are all clipped out of the light space.
To make the cone black outside the edge, since the second time the shader calls the depth cache, it will also call some areas in the depth cache, which will result in the wrong result on the boundary.
To solve this problem, when setting the depth cache, you need to set all colors outside the bounds to black :


And that will give you the right answer.
Problem 2. Texture error
Textures are rendered in striped red, blue and green colors.
This is because the texture is not formatted correctly, the image is formatted in RGBA format, but the texture is formatted in RGB format, which will result in the wrong result:

As shown in the figure above, setting the image format to GL_RGBA will solve this problem when reading the image from the library

Problem 3. Follow the tutorial, but there are no shadows, the whole scene is bright
If there is no compiler error in the shader, please check whether the two matrix Settings are consistent (that is, whether the matrix of optical space is directly passed into the second shader).
In the second shading, set the observation matrix to the light space matrix to see if the whole scene can be seen in the light space observation matrix.
If the whole scene is not visible in light space, the entire depth cache is infinite (i.e. 1.0F), and all the points are in front of the occlusion, so you will see the whole scene lit up.
Question 4. According to the tutorial to write, there is no shadow, the whole scene is dark
The problem may be that your light source is so close to the model that the whole scene is completely blocked by the model from the light space. Another possibility is that the first rendering of the depth cache was not written,
This also results in the equivalent of a large flat surface in front of you.
Question 5. Where there is shadow, there is light, and where there is light, there is shadow
The reason for this problem is that there is a logic error in the shader of the second rendering, and the shadow is 1, which means there is a shadow (for example in Learnopengl tutorial). Therefore, it is necessary to use (1-shadow) in the final calculation of Feng’s illumination.
Multiplied by stolid and ambient, not shadow
Problem six. A layer of gray, according to the tutorial to eliminate but not the effect
The gray is caused by the principle defect of Shadowmap. It is possible that multiple adjacent pixels of the rendered graph correspond to the depth value in the same depth cache, resulting in the wrong corresponding of the depth value, so there will be streaks.
If the tutorial minus the value of a fixed doesn’t work, minus the value can be more a little bit small. This means that you draw volume is very big, I draw when I was led to this situation, this is because the tutorial is a very small unit to draw, so it’s bigger than the offset, but I draw the unit is very big, (100.0 f) so I need to reduce the value of the more, you can test several times, each time reduce an order of magnitude, by the way, I use a value of 0.00001, this is a very small value, the results after the application of the this value is true.

There are some other problems, such as the resolution is not enough to lead to the edge is not clear and so on, this kind of problem can find some anti-aliasing method to solve, is to take the average edge.
If you have a problem can leave a message at the bottom, you can also find me to source.
(to be continued….)
Virtual environment: error: virtualenv is not compatible with this system or executable

I install the python virtual environment

with the following command

pip install --user virtualenv
#不行的话用下一句命令安装virtualenv
#sudo apt-get install python-virtualenv

python virtual environment installation successful, I created a Virtualenv directory in my home directory. I’m going to put all the virtual environments in this directory. Then, go to this directory and I’ll use the following command to create a virtual environment (I’ll call this virtual environment flask-env)

virtualenv helloworld

, however, it reports the following error message

solution:

open. Bashrc

with the following command

sudo gedit ~/.bashrc

add the following information

on the last line of the open file

export LD_LIBRARY_PATH=$LD_LIBRARY_PATH:/home/helloworld/anaconda3/lib

note: cannot have Spaces, on either side of the equal sign “=”/home/helloworld/anaconda3/lib this part is the python lib address, to write this part according to your specific situation.

and then rerun

virtualenv helloworld

virtual environment is created successfully, and the activation command is as follows:

vivian@vivian-Super-Server:~/HelloWorld$ virtualenv helloworldUsing base prefix '/home/vivian/anaconda3'
New python executable in /home/vivian/HelloWorld/helloworld/bin/python
Installing setuptools, pip, wheel...done.
vivian@vivian-Super-Server:~/HelloWorld$ source helloworld/bin/activate

close virtual environment

deactivate

note: the path of the virtual environment cannot have Chinese, otherwise this problem will also occur