Tag Archives: linux

[Solved] failed to start remount root and kernel file system

1. The problem that appears, this problem comes from the file system is backed up out. The problem does not occur if you install it yourself using the CD

failed to start remount root and kernel file system

What it means is: Failed to mount root and kernel. 2.

2. the cause of the problem:

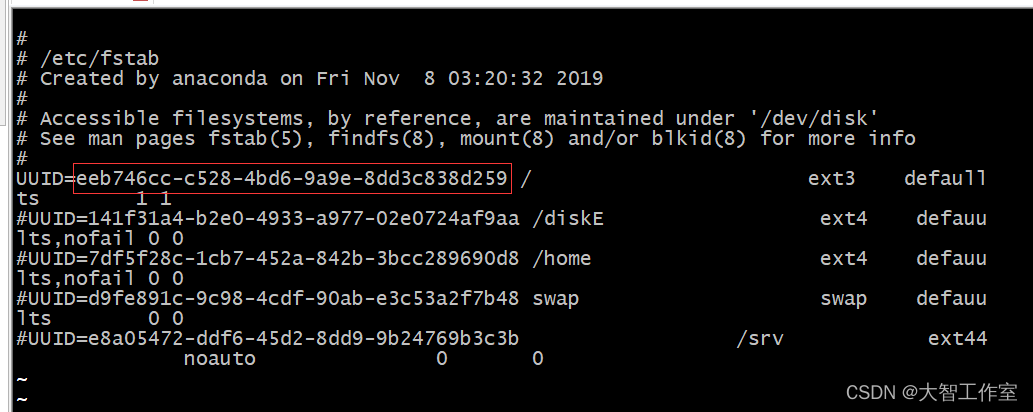
The uuid in /etc/fatab is different from the actual uuid.

It is better to comment the unused disk mount

When system boots, it will mount the file system in the order specified in fatab.

3. how to solve:

(1) Go to live cd (the disk where you install Ubuntu) or other linux system

(2) Open terminal, type sudo blkid, check the uuid of all partitions

(3) Go to the /etc folder under the root partition where you normally enter the system, open a terminal in the folder, and type sudo gedit fstab (or sudo vim fstab ) to modify fstab

Change it to your own and comment out the rest

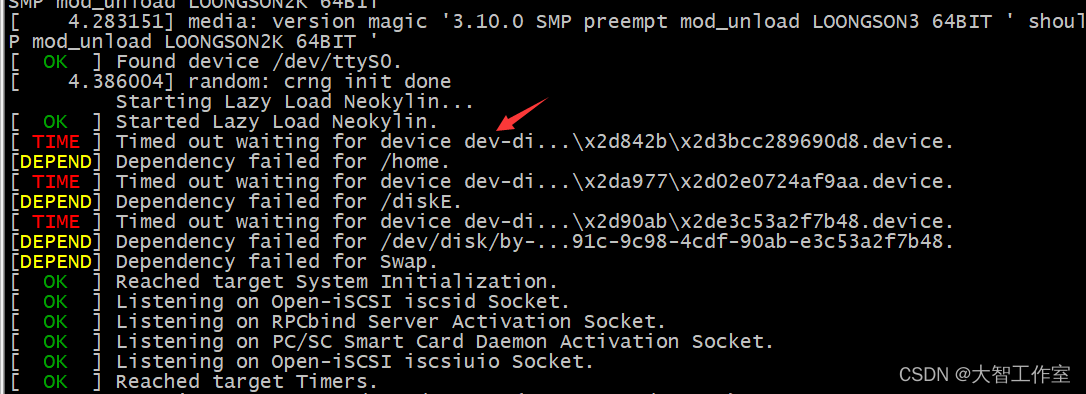
In addition to the above problems, it also causes the system to wait overtime:

The problem of waiting timeout can be solved by adding the above unused mount notes.

The timeout here is still caused by the file mount in the fstab.

[Solved] YarnClientSchedulerBackend: Yarn application has already exited with state FAILED

In starting spark shell –master yarn, we will find an error when spark shell is started

YarnClientSchedulerBackend: Yarn application has already exited with state FAILED

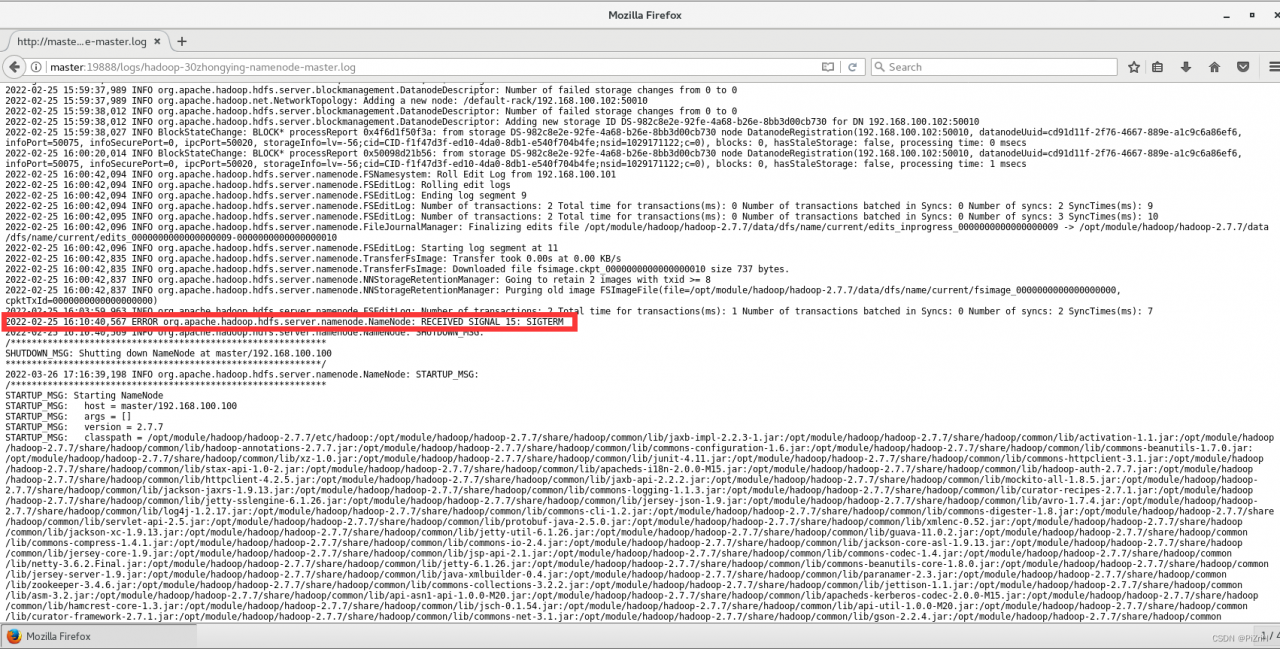
At this point we visit the yarn process to see the history of the start-up time error exception: ERRORorg.apache.hadoop.hdfs.server.namenode.NameNode: RECEIVED SIGNAL 15: SIGTERM (as shown), the general access to the port number is http://Localhost_name+8088 (default)

Solution:

This problem often occurs when the jdk version is 1.8. You can directly modify the configuration of yarn-site.xml in hadoop and distribute it to each cluster, and restart the cluster.
 <property>
    <name>yarn.nodemanager.vmem-pmem-ratio</name>
    <value>10</value>
</property>
<property>
    <name>yarn.nodemanager.vmem-check-enabled</name>
    <value>false</value>
</property>

[Solved] VScode Error: find_package(catkin) failed

Question:

In vscode, when using cmake for configure, I found that the CMakeLists.txt generated by catkin_init_workspace reported an error:
find_package(catkin) failed. catkin was neither found in the workspace···

analysis:

After investigation and analysis, it is found that there is a problem with the following code in CMakeLists.txt:

# use command ‘catkin_init_workspace’  to generate ‘CMakeLists.txt’
set(catkin_search_path "")
  foreach(path ${CMAKE_PREFIX_PATH})
    if(EXISTS "${path}/.catkin")
      list(FIND catkin_search_path ${path} _index)
      if(_index EQUAL -1)
        list(APPEND catkin_search_path ${path})
      endif()
    endif()
  endforeach()

Specifically, the path from the variable ${CMAKE_PREFIX_PATH} is not searched for .catkin.
By directly modifying the /opt/ros/melodic/share/catkin/cmake/toplevel.cmake print variable ${CMAKE_PREFIX_PATH} pointed to by CMakeLists.txt, the output was found to be empty.
However, the configure in the system terminal works, and the command executed is the same as the configure in vscde, as follows

# The actual command executed when configure with cmake-tool in vscode
/usr/bin/cmake \
--no-warn-unused-cli \
-DCMAKE_PREFIX_PATH=/opt/ros/melodic \
-DCMAKE_EXPORT_COMPILE_COMMANDS:BOOL=TRUE -DCMAKE_BUILD_TYPE:STRING=Release \
-DCMAKE_C_COMPILER:FILEPATH=/usr/bin/x86_64-linux-gnu-gcc-7 \
-DCMAKE_CXX_COMPILER:FILEPATH=/usr/bin/x86_64-linux-gnu-g++-7 \
-S/home/will/allpros/avp_slam_sim \
-B/home/will/allpros/avp_slam_sim/build_vsc \
-G "Unix Makefiles"

Also, even if you add export CMAKE_PREFIX_PATH=/opt/ros/melodic:$CMAKE_PREFIX_PATH to ~/.bashrc, you will still get an error after restarting the computer and doing configure, where the path /opt/ros/melodic was determined when installing ros Of course, you can also use the command find / -iname *.catkin or locate *.catkin to find the specific path.
To summarize.
The reason for this is unclear. It is suspected that the environment variable ${CMAKE_PREFIX_PATH} obtained by vscode during cmake-configure is empty, but when using the system terminal ${CMAKE_PREFIX_PATH} has the value /opt/ros/melodic, which comes from the source /opt/ros/melodic at boot time. source /opt/ros/melodic/setup.bash, which is already written in the ~/.bashrc auto-execution file when we installed ROS, and after booting, echo $CMAKE_PREFIX_PATH in system terminal can output /opt/ros/melodic normally. .

Solution:
1. modify the system file directly

$ sudo gedit /opt/ros/melodic/share/catkin/cmake/toplevel.cmake

Add the following in /opt/ros/melodic/share/catkin/cmake/toplevel.cmake

list(APPEND CMAKE_PREFIX_PATH "/opt/ros/melodic")

The results are as follows:

# toplevel CMakeLists.txt for a catkin workspace
# catkin/cmake/toplevel.cmake

cmake_minimum_required(VERSION 3.0.2)

project(Project)

set(CATKIN_TOPLEVEL TRUE)

list(APPEND CMAKE_PREFIX_PATH "/opt/ros/melodic")

# search for catkin within the workspace
set(_cmd "catkin_find_pkg" "catkin" "${CMAKE_SOURCE_DIR}")
execute_process(COMMAND ${_cmd}
  RESULT_VARIABLE _res
  OUTPUT_VARIABLE _out
  ERROR_VARIABLE _err
  OUTPUT_STRIP_TRAILING_WHITESPACE
  ERROR_STRIP_TRAILING_WHITESPACE
)
...
...
...

2. add attribute in cmake setting of vscode

Ctrl+Shift+P –> preferences: open settings (JSON)
add:

"cmake.configureArgs": [
        "-DCMAKE_PREFIX_PATH=/opt/ros/melodic"
    ],

[Solved] Kubernetes Error: failed to list *core.Secret: unable to transform key

While installing a Kubernetes local cluster, I happened to encounter the following problem:

E0514 07:30:58.627632 1 cacher.go:424] cacher (*core.Secret): unexpected ListAndWatch error: failed to list *core.Secret: unable to transform key “/registry/secrets/default/default-token-nk77g”: invalid padding on input; reinitializing…
W0514 07:30:59.631509 1 reflector.go:324] storage/cacher.go:/secrets: failed to list *core.Secret: unable to transform key “/registry/secrets/default/default-token-nk77g”: invalid padding on input
E0514 07:30:59.631563 1 cacher.go:424] cacher (*core.Secret): unexpected ListAndWatch error: failed to list *core.Secret: unable to transform key “/registry/secrets/default/default-token-nk77g”: invalid padding on input; reinitializing…
W0514 07:31:00.633540 1 reflector.go:324] storage/cacher.go:/secrets: failed to list *core.Secret: unable to transform key “/registry/secrets/default/default-token-nk77g”: invalid padding on input
E0514 07:31:00.633575 1 cacher.go:424] cacher (*core.Secret): unexpected ListAndWatch error: failed to list *core.Secret: unable to transform key “/registry/secrets/default/default-token-nk77g”: invalid padding on input; reinitializing…


Reason:

We know that after running the cluster master, we need to create the TLS Bootstrap Secret to provide an automatic visa using.

cat <<EOF | kubectl create -f -
apiVersion: v1
kind: Secret
metadata:
  name: bootstrap-token-${TOKEN_ID}
  namespace: kube-system
type: bootstrap.kubernetes.io/token
stringData:
  token-id: "${TOKEN_ID}"
  token-secret: "${TOKEN_SECRET}"
  usage-bootstrap-authentication: "true"
  usage-bootstrap-signing: "true"
  auth-extra-groups: system:bootstrappers:default-node-token
EOF

secret "bootstrap-token-65a3a9" created

where BOOTSTRAP_TOKEN=T O K E N I D . {TOKEN_ID}.TOKEN
I

D.{TOKEN_SECRET} can be found in bootstrap-kubelet.conf.

One of the reasons for the problem shown in the title is that the command may have been run multiple times and multiple secrets exist, e.g. the node side was found to be not working properly and a bootstrap-kubelet.conf was regenerated for it, etc.

Then when installing the kubernetes cluster manually, we will find that the online information is backward after all, so we will use the kubeadm post-installation information for comparison and verification, and then I accidentally added the following codes:

spec:
hostNetwork: true
priorityClassName: system-cluster-critical
securityContext:
seccompProfile:
type: RuntimeDefault

spec.securityContext.seccompProfile.type=RuntimeDefault, this setting will automatically generate a self-signed secret when the cluster is running, which will lead to a contradiction with the manual generation and the problem in the title.


Solution:

1) First clear the cluster cache, delete all files under /var/lib/etcd/ and /var/lib/kubelet/, and keep the config.xml file in the latter.
2) Delete the spec.securityContext.type=”seccompProfile” in /etc/kubernetes/manifests under kube-apiserver.yml, kube-controller-manager.yml and kube-scheduler.yml. seccompProfile.type=RuntimeDefault.
3) Re-run the kubelet: systemctl start kubelet and you are done.

[Solved] nova-compute.log Error: Instance failed block device setup

Project scenario:

Openstack private cloud failed to create a virtual machine

nvoa-compute.log prompt:
instance failed block device setup
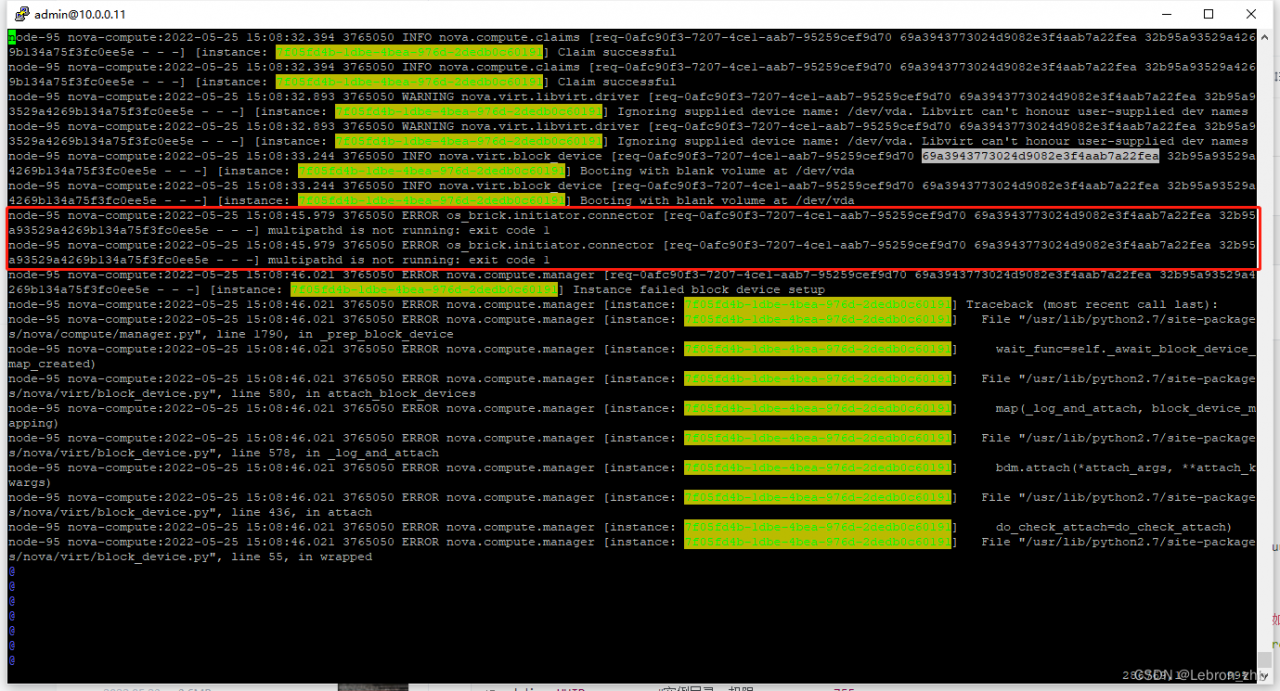
multipathd is not running exit code 1

Problem description

Create a new virtual machine, select the corresponding image, network, storage, etc., and the creation fails. The host status is error

Cause analysis:

If the cloud host creation fails, you need to first determine the node that the cloud host was scheduled to, then go to that node and check the nova-compute logs and search for that log record by UUID. It is better to determine the request ID, req-id, that created that task and go to the error log, as shown in the figure showing that the node is not running the multipath service causing the volume creation to fail.

Solution:

Start the corresponding node multipath service, and check whether the multipath service of all nodes is running normally.

systemctl restart multipathd.service
systemctl status multipathd.service

Then re-create the virtual machine.

[Solved] npm install Error: Error: EACCES: permission denied

Questions

When: NPM install @sentry/cli -g is executed as root, an error is reported:

npm ERR! Error: EACCES: permission denied, mkdir '/root/.npm/sentry-cli'

Cause

npm does not support running as root for security reasons. Even if you run it as root, npm will automatically redirect to a user named nobody, who has almost no privileges. In this case, if there are operations in the script that require permissions, such as writing files (especially to /root/.node-gyp), it will crash.

To avoid this, either follow the npm rules and create a privileged user specifically for running npm, or add the –unsafe-perm argument so that it doesn’t switch to nobody and runs as whatever user it is, even if it’s root.


Solution

Add parameter after executing command: –unsafe-perm

npm install --unsafe-perm @sentry/cli -g

Error: ENOSPC: no space left on device [How to Solve]

In case of the above error, generally speaking, the server cannot create the file. At this time, we can find the problem from two directions

1. The disk is full of blocks or inodes

1. The disk block is full. Check the command df -h

[root@S100900 ~]# df -h
Filesystem      Size  Used Avail Use% Mounted on
/dev/vda3        35G   28G  5.6G  83% /
tmpfs           504M     0  504M   0% /dev/shm
/dev/vda1       194M   47M  138M  26% /boot
/dev/vdb1       325G  118G  192G  38% /home/wwwroot/vdb1data

2. Disk inode is full. Check the command df -i

[root@S1000900 ~]# df -i
Filesystem       Inodes    IUsed   IFree IUse% Mounted on
/dev/vda3       2289280  1628394  660886   72% /
tmpfs            128827        1  128826    1% /dev/shm
/dev/vda1         51200       44   51156    1% /boot
/dev/vdb1      21626880 21626880       0  100% /home/wwwroot/vdb1data

We found after comparison that the disk block occupied 38%, but the inode occupied 100%, it can be imagined that the disk fragmentation of small files are particularly large, we can go to the corresponding disk under the deletion of useless small files to solve the problem; we have to keep the following two ideas, of course, to solve the fundamental problem also need to buy mount more disks to solve;

Idea one: inode is full: delete useless small files as much as possible to release enough inode

Idea two: block full: delete as many useless large files as possible to free up enough blocks


2. Error: ENOSPC: no space left on device, watch

node project reactnative Error: Error: ENOSPC: no space left on device, watch

[root@iz2zeihk6kfcls5kwmqzj1z JFReactNativeProject]# npm start
 
> [email protected] start /app/jenkins_workspace/workspace/JFReactNativeProject
> react-native start
 
┌──────────────────────────────────────────────────────────────────────────────┐
│                                                                              │
│  Running Metro Bundler on port 8081.                                         │
│                                                                              │
│  Keep Metro running while developing on any JS projects. Feel free to        │
│  close this tab and run your own Metro instance if you prefer.               │
│                                                                              │
│  https://github.com/facebook/react-native                                    │
│                                                                              │
└──────────────────────────────────────────────────────────────────────────────┘
 
Looking for JS files in
   /app/jenkins_workspace/workspace/JFReactNativeProject
 
Loading dependency graph...fs.js:1413
    throw error;
    ^
 
Error: ENOSPC: no space left on device, watch '/app/jenkins_workspace/workspace/JFReactNativeProject/node_modules/.staging/react-native-ddd311e5/ReactAndroid/src/androidTest/java/com/facebook/react/testing/idledetection'
    at FSWatcher.start (fs.js:1407:26)
    at Object.fs.watch (fs.js:1444:11)
    at NodeWatcher.watchdir (/app/jenkins_workspace/workspace/JFReactNativeProject/node_modules/[email protected]@sane/src/node_watcher.js:159:22)
    at Walker.<anonymous> (/app/jenkins_workspace/workspace/JFReactNativeProject/node_modules/[email protected]@sane/src/common.js:109:31)
    at Walker.emit (events.js:182:13)
    at /app/jenkins_workspace/workspace/JFReactNativeProject/node_modules/[email protected]@walker/lib/walker.js:69:16
    at go$readdir$cb (/app/jenkins_workspace/workspace/JFReactNativeProject/node_modules/[email protected]@graceful-fs/graceful-fs.js:187:14)
    at FSReqWrap.oncomplete (fs.js:169:20)
npm ERR! code ELIFECYCLE
npm ERR! errno 1
npm ERR! [email protected] start: `react-native start`
npm ERR! Exit status 1
npm ERR!
npm ERR! Failed at the [email protected] start script.
npm ERR! This is probably not a problem with npm. There is likely additional logging output above.
 
npm ERR! A complete log of this run can be found in:
npm ERR!     /root/.npm/_logs/2019-09-25T06_57_58_754Z-debug.log

Solution:

Enospc means error no more hard disk space available

First, use df -hTto find that there is still a lot of disk space

Then find FSWatcher and Object.fs.watch field, and then view the contents related to the number of files that the system allows users to listen to

#Indicates the number of watches that can be added by the same user at the same time (watches are generally directory-specific and determine the number of directories that can be monitored by the same user at the same time)
[root@iz2zeihk6kfcls5kwmqzj1z JFReactNativeProject]# cat /proc/sys/fs/inotify/max_user_watches
8192
[root@iz2zeihk6kfcls5kwmqzj1z JFReactNativeProject]# echo 100000 > /proc/sys/fs/inotify/max_user_watches
[root@iz2zeihk6kfcls5kwmqzj1z JFReactNativeProject]# cat /proc/sys/fs/inotify/max_user_watches
100000

The permanent effective method is as follows: (this method is recommended)

vim /etc/sysctl.conf
fs.inotify.max_user_watches = 100000(The latter value can be adjusted according to the actual situation)
Just add and run /sbin/sysctl -p 

Start validation:

Restart, normal

[Solved] FTP Setup Error: Job for vsftpd.service failed because the control process exited with error code…

Error in setting up FTP: job for vsftpd service failed because the control process exited with error code. See “systemctl status vsftpd.service” and “journalctl -xe” for details.


Solution:

First check whether our port 21 is occupied:

[root@VM-12-16-centos lighthouse]# lsof -i:21
COMMAND     PID USER   FD   TYPE  DEVICE SIZE/OFF NODE NAME
pure-ftpd 16235 root    4u  IPv4 1014289      0t0  TCP *:ftp (LISTEN)
pure-ftpd 16235 root    5u  IPv6 1014290      0t0  TCP *:ftp (LISTEN) 

We need to kill the process pure-ftpd with process number 16235:

[root@VM-12-16-centos lighthouse]# kill -9 16235 
[root@VM-12-16-centos lighthouse]# lsof -i:21

If there is no prompt, it means that kill is successful!

The next step is to solve the vsftpd configuration file:

[root@VM-12-16-centos lighthouse]# sudo vim /etc/vsftpd/vsftpd.conf

The content of vsftpd configuration file is, which can be copied directly. Just change the IP:

# Example config file /etc/vsftpd/vsftpd.conf
#
# The default compiled in settings are fairly paranoid. This sample file
# loosens things up a bit, to make the ftp daemon more usable.
# Please see vsftpd.conf.5 for all compiled in defaults.
#
# READ THIS: This example file is NOT an exhaustive list of vsftpd options.
# Please read the vsftpd.conf.5 manual page to get a full idea of vsftpd's
# capabilities.
#
# Allow anonymous FTP?(Beware - allowed by default if you comment this out).
anonymous_enable=NO
#
# Uncomment this to allow local users to log in.
# When SELinux is enforcing check for SE bool ftp_home_dir
local_enable=YES
#
# Uncomment this to enable any form of FTP write command.
write_enable=YES
#
# Default umask for local users is 077. You may wish to change this to 022,
# if your users expect that (022 is used by most other ftpd's)
local_umask=022
#
# Uncomment this to allow the anonymous FTP user to upload files. This only
# has an effect if the above global write enable is activated. Also, you will
# obviously need to create a directory writable by the FTP user.
# When SELinux is enforcing check for SE bool allow_ftpd_anon_write, allow_ftpd_full_access
#anon_upload_enable=YES
#
# Uncomment this if you want the anonymous FTP user to be able to create
# new directories.
#anon_mkdir_write_enable=YES
#
# Activate directory messages - messages given to remote users when they
# go into a certain directory.
dirmessage_enable=YES
#
# Activate logging of uploads/downloads.
xferlog_enable=YES
#
# Make sure PORT transfer connections originate from port 20 (ftp-data).
connect_from_port_20=YES
#
# If you want, you can arrange for uploaded anonymous files to be owned by
# a different user. Note! Using "root" for uploaded files is not
# recommended!
#chown_uploads=YES
#chown_username=whoever
#
# You may override where the log file goes if you like. The default is shown
# below.
#xferlog_file=/var/log/xferlog
#
# If you want, you can have your log file in standard ftpd xferlog format.
# Note that the default log file location is /var/log/xferlog in this case.
xferlog_std_format=YES
#
# You may change the default value for timing out an idle session.
#idle_session_timeout=600
#
# You may change the default value for timing out a data connection.
#data_connection_timeout=120
#
# It is recommended that you define on your system a unique user which the
# ftp server can use as a totally isolated and unprivileged user.
#nopriv_user=ftpsecure
#
# Enable this and the server will recognise asynchronous ABOR requests. Not
# recommended for security (the code is non-trivial). Not enabling it,
# however, may confuse older FTP clients.
#async_abor_enable=YES
#
# By default the server will pretend to allow ASCII mode but in fact ignore
# the request. Turn on the below options to have the server actually do ASCII
# mangling on files when in ASCII mode. The vsftpd.conf(5) man page explains
# the behaviour when these options are disabled.
# Beware that on some FTP servers, ASCII support allows a denial of service
# attack (DoS) via the command "SIZE /big/file" in ASCII mode. vsftpd
# predicted this attack and has always been safe, reporting the size of the
# raw file.
# ASCII mangling is a horrible feature of the protocol.
#ascii_upload_enable=YES
#ascii_download_enable=YES
#
# You may fully customise the login banner string:
#ftpd_banner=Welcome to blah FTP service.
#
# You may specify a file of disallowed anonymous e-mail addresses. Apparently
# useful for combatting certain DoS attacks.
#deny_email_enable=YES
# (default follows)
#banned_email_file=/etc/vsftpd/banned_emails
#
# You may specify an explicit list of local users to chroot() to their home
# directory. If chroot_local_user is YES, then this list becomes a list of
# users to NOT chroot().
# (Warning! chroot'ing can be very dangerous. If using chroot, make sure that
# the user does not have write access to the top level directory within the
# chroot)
chroot_local_user=YES
chroot_list_enable=YES
# (default follows)
chroot_list_file=/etc/vsftpd/chroot_list
#
# You may activate the "-R" option to the builtin ls. This is disabled by
# default to avoid remote users being able to cause excessive I/O on large
# sites. However, some broken FTP clients such as "ncftp" and "mirror" assume
# the presence of the "-R" option, so there is a strong case for enabling it.
#ls_recurse_enable=YES
#
# When "listen" directive is enabled, vsftpd runs in standalone mode and
# listens on IPv4 sockets. This directive cannot be used in conjunction
# with the listen_ipv6 directive.
listen=YES
#
# This directive enables listening on IPv6 sockets. By default, listening
# on the IPv6 "any" address (::) will accept connections from both IPv6
# and IPv4 clients. It is not necessary to listen on *both* IPv4 and IPv6
# sockets. If you want that (perhaps because you want to listen on specific
# addresses) then you must run two copies of vsftpd with two configuration
# files.
# Make sure, that one of the listen options is commented !!
#listen_ipv6=YES

pam_service_name=vsftpd
userlist_enable=YES
tcp_wrappers=YES
local_root=/var/ftp/test
allow_writeable_chroot=YES
pasv_enable=YES
pasv_address=xxx.xxx.xxx.xxx#Please change it to the public IP of your lightweight application server, you need to change it yourself
pasv_min_port=40000
pasv_max_port=45000

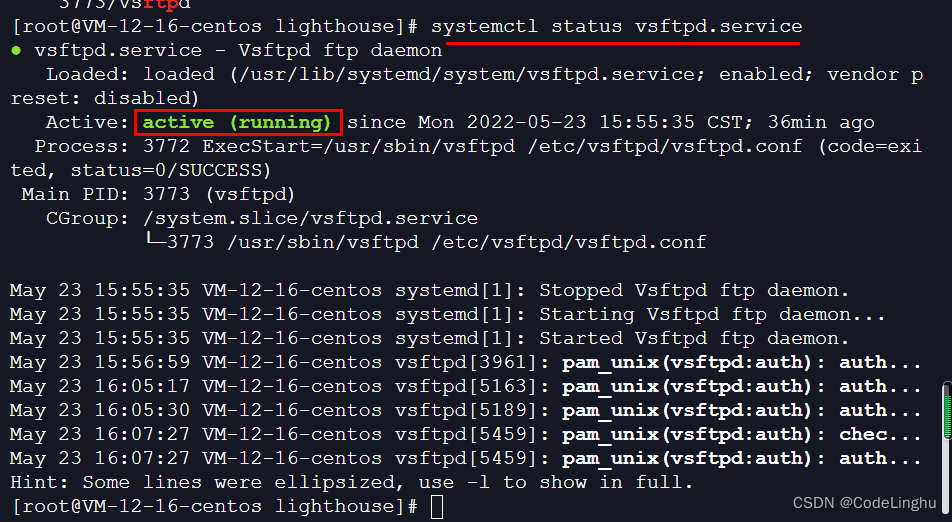
Finally, take a look at your vsftp on state:

[root@VM-12-16-centos lighthouse]# systemctl status vsftpd.service

[Solved] CentOS Start Neo4j Database Error: Error: A JNI error has occurred, please check your installation and try again

CentOS Start Neo4j Database Error: Error: A JNI error has occurred, please check your installation and try again

This is because when installing neo4j, it comes with:

java-11-openjdk-headless-11.0.15.0.9-2.el7_9.x86_64
java-11-openjdk-11.0.15.0.9-2.el7_9.x86_64

This is caused by a conflict with the version of JDK previously installed on the server

So now you just need to uninstall all JDK versions and reinstall neo4j
check the existing JDK

rpm -qa | grep jdk

Uninstall all jdks (it’s easy to uninstall some files in CUDA, but it doesn’t affect deep learning and GPU training model)

yum -y remove(Uninstall all the packages that appear above)

Reinstall neo4j

sudo yum install neo4j

[Solved] Error response from daemon: driver failed programming external connectivity on endpoint mysql

Error response from daemon: driver failed programming external connectivity on endpoint mysql

docker command:
docker start container_name/id
Container Start Error:

Error response from daemon: driver failed programming external connectivity on endpoint mysql (cf1ba9f9e0613e14f42332d187a51429f8213aaf91d775f2ec3600614c78e6e1): (iptables failed: iptables --wait -t nat -A DOCKER -p tcp -d 0/0 --dport 3306 -j DNAT --to-destination 172.17.0.2:3306 ! -i docker0: iptables: No chain/target/match by that name.
(exit status 1))
Error: failed to start containers: mysql


Solution: restart docker:systemctl restart docker

https://blog.csdn.net/qq_45652428/article/details/124870923

[Solved] sed -i error: sed: -e expression #1, char 44: invalid reference \1 on `s’ command’s RHS

How to Solve sed -i error:

sed -i.bak '/.*CMDLINE_LINUX.*/s#(.*)"#\1 net.ifnames=0"#' /etc/default/grub

always report the error: sed: -e expression #1, char 44: invalid reference \1 on `s’ command’s RHS

sed -i -r '/.*CMDLINE_LINUX.*/s#(.*)"#\1 net.ifnames=0"#' /etc/default/grub

Later we know that you need to add -r, because there is a backward reference – \1, and -i and -r should be written separately