Tag Archives: linux

macbook golang zsh: exec format error

On the Mac computer, compile the code of golang. After the code is successfully compiled, execute it. An error is reported

exec format error

After a long time of investigation, I finally found the problem: my computer’s configuration of golang is as follows:

GOOS="linux"

After compiling, I run it on MacOS, so I report an error.

When you know where the problem is, it’s very easy to solve it. When compiling, the execution is as follows:

GOOS=darwin GOARCH=amd64 go build -o  http -v ./main.go

[Solved] ln: failed to create symbolic link ‘/usr/bin/java’: File exists

Install Java environment in CentOS, add soft link times: ln: failed to create symbolic link ‘/ usr/bin/Java’: file exists

[root@iZbp12f9404um3f6avsm29Z /]# ln -s /usr/local/java/jdk1.8.0_291/bin/java /usr/bin/java
ln: failed to create symbolic link ‘/usr/bin/java’: File exists

Failed to create symbolic link, file exists.

-s   The meaning of the command is to add symbolic links to play the role of a link

resolvent

[root@iZbp12f9404um3f6avsm29Z /]# ln -sf /usr/local/java/jdk1.8.0_291/bin/java /usr/bin/java
[root@iZbp12f9404um3f6avsm29Z /]# java -version
java version "1.8.0_291"
Java(TM) SE Runtime Environment (build 1.8.0_291-b10)
Java HotSpot(TM) 64-Bit Server VM (build 25.291-b10, mixed mode)

Modify the – s command to – SF command- The f command means to enforce, which means to create if it does not exist and to override if it does exist

So far, the creation of soft connection is completed

Yum source error: [errno 14] HTTP Error 404 – not found

Trying other mirrors.
To address this issue please refer to the below knowledge base article 

https://access.redhat.com/articles/1320623

If above article doesn't help to resolve this issue please create a bug on https://bugs.centos.org/


 One of the configured repositories failed (onlyoffice repo),
 and yum doesn't have enough cached data to continue. At this point the only
 safe thing yum can do is fail. There are a few ways to work "fix" this:

     1. Contact the upstream for the repository and get them to fix the problem.

     2. Reconfigure the baseurl/etc. for the repository, to point to a working
        upstream. This is most often useful if you are using a newer
        distribution release than is supported by the repository (and the
        packages for the previous distribution release still work).

     3. Run the command with the repository temporarily disabled
            yum --disablerepo=onlyoffice ...

     4. Disable the repository permanently, so yum won't use it by default. Yum
        will then just ignore the repository until you permanently enable it
        again or use --enablerepo for temporary usage:

            yum-config-manager --disable onlyoffice
        or
            subscription-manager repos --disable=onlyoffice

     5. Configure the failing repository to be skipped, if it is unavailable.
        Note that yum will try to contact the repo. when it runs most commands,
        so will have to try and fail each time (and thus. yum will be be much
        slower). If it is a very temporary problem though, this is often a nice
        compromise:

            yum-config-manager --save --setopt=onlyoffice.skip_if_unavailable=true

failure: repodata/repomd.xml from onlyoffice: [Errno 256] No more mirrors to try.
http://download.onlyoffice.com/repo/centos/noarch/repodata/repomd.xml: [Errno 14] HTTP Error 404 - Not Found

Reason: there is a problem with the yum source address. Either check the yum source or replace it with a new one.

The following is Baidu’s search result (error): Yum source file has a problem, not index cache. Clear cache is useless; So the way down here is a little bit big. Either view the yum source file, or change it to the yum source file on a normal machine</ mark>

This error is caused by a problem with the yum repository and can be solved by using the following two commands.
`yum clean all` # Clear the index cache of all yum commands
`rpm --rebuilddb` # The command to rebuild the RPM database

Solution 1: find the error report: http://download.onlyoffice.com/repo/centos/noarch/ Repair or delete the yum source file
solution 2: copy a Yum source from another normal Yum machine
verification method: Yum makecache verify whether the yum index cache can be generated normally, and remember to clear all the index caches first Yum clean all to verify

Collection and solution of error reporting on various platforms of pyspider

Collection and solution of error reporting in pyspider

Command “python setup.py egg_ info” failed with error code 10

This means that pycurl installation reported an error

Download address of WHL file of pycurl in win10 solution

# Follow the link above to download the pycurl whl file, pay attention to your own python version, I'm using python 3.7 here
# locate the path to change the file
pip3 install pycurl-7.43.0.4-cp37-cp37m-win_amd64.whl

CentOS solution

yum install python-devel curl-devel
pip3 install pycurl

Ubuntu solution

sudo apt-get install libcurl4-gnutls-dev
pip install pyspider

SyntaxError: invalid syntax

Async cannot be used as a keyword and needs to be changed as a variable

Run pyspider to find the error file and replace async to know that the error was not reported

ImportError: cannot import name ‘Disp

[Solved] Denseflow Install Error: fatal error: opencv2/cudaarithm.hpp: No such file or directory

Installing denseflow compiles with the following error./home/m/src/denseflow/src/denseflow_gpu.cpp:2:10: fatal error: opencv2/cudaarithm.hpp: No such file or directory
#include “opencv2/cudaarithm.hpp”
where the keywords are
/home/m/src/denseflow/src/denseflow_gpu.cpp
cudaarithm.hpp
The solution is as follows.
1、Find the path where cudaarithm.hpp is located

sudo find/-name "cudaarithm.hpp"

A path similar to:

/home/m/src/opencv_contrib/modules/cudaarithm/include/opencv2/cudaarithm.hpp
/home/m/include/opencv4/opencv2/cudaarithm.hpp
............
..............

Then fill the absolute path into denseflow_ Gpu.cpp replaces relative path

#You have to fill in the absolute paths, and our paths may be different, you have to follow your own
sudo vim /home/m/src/denseflow/src/denseflow_gpu.cpp

Before replacing
#include “opencv2/cudaarithm.hpp”
After replacement
#include “/home/m/include/opencv4/opencv2/cudaarithm.hpp”
Compile again, the problem is solved.

[Solved] httpd:httpd:Could not reliably determine the server‘s fully qualif domain name,using ::1 for Se

In the process of building lamp environment, installing Apache reported an error: starting httpd:httpd :Could not reliably determine the server’s fully qualif domain name,using ::1 for ServerName

Solution:

Edit server profile

vi /etc/httpd/conf/httpd.conf

Find the servername in the file www.example.com : 80 “change to” servername ” www.localhost.com : 80 ”
you can use ‘/’ to find (/ servername) www.example.com : 80)
and remove the previous # cancel comment

Set the server to boot

chkconfig httpd on

Restart Apache

/etc/init.d/httpd restart

SSH Remote ulimit does not work

SSH Remote ulimit does not work

Problem description

The contents of the operating system/etc/security/limits.conf file are as follows:


* soft memlock unlimited

* hard memlock unlimited

Use the remote connection tool MoBa to connect to the server, and use ulimit - a to view ulimit value, which is consistent with /etc/security/limits. Conf file configuration.

When using SSH command line remote connection, use ulimit - a to view ulimit value, which is the default value, which is inconsistent with /etc/security/limits. Conf file configuration.

When the operation and maintenance program starts the system remotely, it uses the SSH connection to execute in the past, and the ulimit value in the SSH connection does not take effect. As a result, the system cannot use RDMA because the default configuration of memlock is too small.

Investigation

After a series of investigation, we found that the SSH version of the customer environment (openssh)_ 4p1) and the default SSH version of the operating system (openssh)_ 7.4p1). It is suspected that the client’s recompiled version will cause the limit value of remote SSH login not to take effect
at the same time/etc/SSH/sshd_ The usepam value of the config file is No. when this item is configured to yes, restart the sshd server and view the system log. The error is as follows:
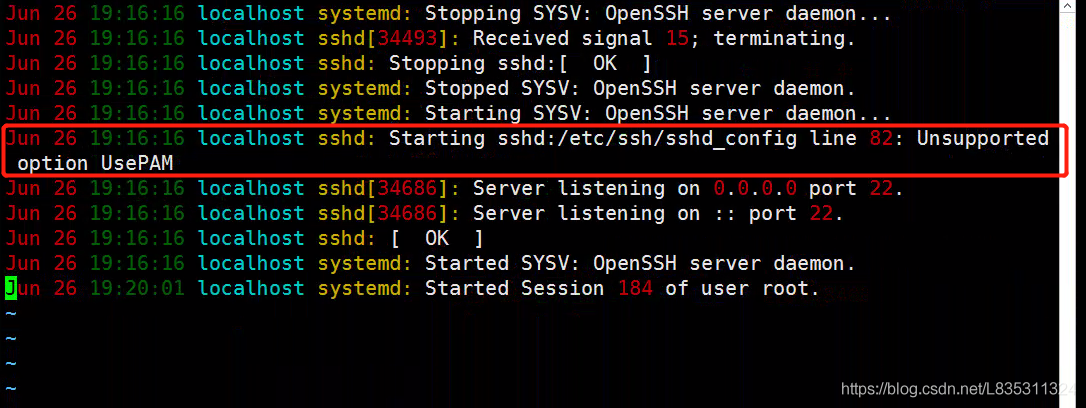
It is suspected that upgrading and compiling SSH to add – with PAM (this module is not compiled by default) will cause this problem.

solve

It is recommended that customers recompile the openssh version with the – with PAM parameter. Problem solving after customer operation.

Suggestions

The – with PAM parameter is required for the subsequent upgrade and compilation of openssh.

Expansion

Introduction of PAM module

Linux PAM (i.e. Linux pluggable authentication module) is a set of shared libraries, which enables local system administrators to choose the authentication mode of programs at will. In other words, you can change the authentication mechanism without recompiling an application with PAM function. In this way, even if you upgrade the local authentication mechanism, you don’t need to modify the program.

PAM uses the configuration file under/etc/pam.d/ to manage the authentication mode of the program. The application program calls the corresponding configuration file to call the local authentication module. The module is placed under/lib/security to load the dynamic library. For example, when we use the Su command, the system will prompt you to enter the password of the root user. This is what the Su command realizes by calling the PAM module.

SSH login will also refer to the modification module, and the configuration file is/etc/pam.d/sshd

#%PAM-1.0
auth       required     pam_sepermit.so
auth       substack     password-auth
auth       include      postlogin
# Used with polkit to reauthorize users in remote sessions
-auth      optional     pam_reauthorize.so prepare
account    required     pam_nologin.so
account    include      password-auth
password   include      password-auth
# pam_selinux.so close should be the first session rule
session    required     pam_selinux.so close
session    required     pam_loginuid.so
# pam_selinux.so open should only be followed by sessions to be executed in the user context
session    required     pam_selinux.so open env_params
session    required     pam_namespace.so
session    optional     pam_keyinit.so force revoke
session    include      password-auth
session    include      postlogin
# Used with polkit to reauthorize users in remote sessions
-session   optional     pam_reauthorize.so prepare

The session section will include the password auth configuration, and the/etc/pam.d/password-auth-ac file is as follows:

#%PAM-1.0
# This file is auto-generated.
# User changes will be destroyed the next time authconfig is run.
auth        required      pam_env.so
auth        required      pam_faildelay.so delay=2000000
auth        sufficient    pam_unix.so nullok try_first_pass
auth        requisite     pam_succeed_if.so uid >= 1000 quiet_success
auth        required      pam_deny.so
account     required      pam_unix.so
account     sufficient    pam_localuser.so
account     sufficient    pam_succeed_if.so uid < 1000 quiet
account     required      pam_permit.so
password    requisite     pam_pwquality.so try_first_pass local_users_only retry=3 authtok_type=
password    sufficient    pam_unix.so sha512 shadow nullok try_first_pass use_authtok
password    required      pam_deny.so
session     optional      pam_keyinit.so revoke
session     required      pam_limits.so
-session     optional      pam_systemd.so
session     [success=1 default=ignore] pam_succeed_if.so service in crond quiet use_uid
session     required      pam_unix.so

PAM_ Limits.so is the so module that will be called when creating an SSH connection, that is, the core so that the/etc/security/limits.conf file takes effect.

Reference documents

https://www.cnblogs.com/kevingrace/p/8671964.html

RabbitMQ Error: {:plugins_not_found:[xxxx]}

Enter the instruction rabbitmq plugins enable rabbitmq management

appear   RabbitMQ Error: {:plugins_ not_ Found, [: rabbitmq management]} error prompt

It’s because the instruction is misspelled. It’s correct as follows:

rabbitmq-plugins enable rabbitmq_ Management (“-” changed to “)

You can also view the help through the rabbitmq plugins list command