Tag Archives: linux

Ubuntu20.04 Installing WslRegisterDistribution failed with error: 0xc03a001a

After installing Ubuntu in the software store, the following prompt appears after opening, indicating that you have compressed the file to save space (if two opposite blue arrows appear in the upper right corner of your file, you have enabled this function).

Installing, this may take a few minutes...
WslRegisterDistribution failed with error: 0xc03a001a
Error: 0xc03a001a ???????????????????????????????????????????????????

Solution:

1. Go to the C: \ users \ user name \ appdata \ local \ packages folder. If you can’t find some files that may be hidden files, you need to click View in the file manager and select the option of hidden items.

  2. Enter the directory and enter “Ubuntu” to search the subdirectory.

3. After finding the subdirectory, right-click properties & gt& gt; Advanced & gt& gt; Uncheck compressed content to save disk space & gt& gt; determine

4. The blue arrow on the file disappears and it’s OK.
[ERROR] [1632398141.557684, 290.045000]: Spawn service failed. Exiting.

When executing the gazebo startup file it appears:

[ERROR] [1632398141.557684, 290.045000]: Spawn service failed. Exiting.

[urdf_spawner-6] process has died [pid 5510, exit code 1, cmd /opt/ros/noetic/lib/gazebo_ros/spawn_model -urdf -model mrobot -param robot_description __name:=urdf_spawner __log:=/home/wyf/.ros/log/28660358-1c66-11ec-aa75-efd91e7f34ce/urdf_spawner-6.log].
log file: /home/wyf/.ros/log/28660358-1c66-11ec-aa75-efd91e7f34ce/urdf_spawner-6*.log

Solution:

source ~/catkin_ws/devel/setup.bash

Execute the launch file again

Another problem is that the model file is not added

[Solved] Rabbitmq Server Error: unable to perform an operation on node ‘rabbit@nscczzms‘. P

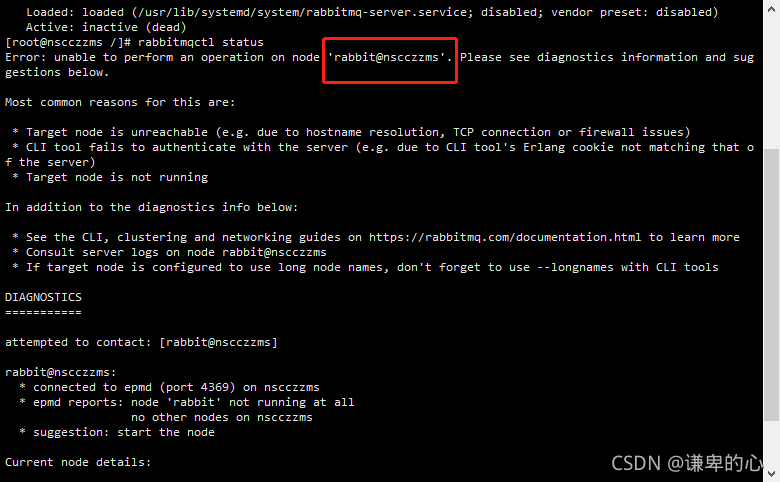
Rabbitmq server reports error: unable to perform an operation on node ‘ rabbit@nscczzms ‘. Please see diagnostics information and suggestions below

Step 1: check the rabbitmq service status:

systemctl status rabbitmq-server.service

Viewing rabbitmq error message: rabbitmqctl status

The above problem occurs: modify the hosts file CD/etc VI hosts

127.0.0.1 the name nscczzms// nscczzms must be consistent with the name circled in the picture above.

Then save and exit

Finally, restart rabbitmq: systemctl restart rabbitmq server

[Solved] error while loading shared libraries: libmysqlclient.so.20: cannot open shared object file: No such…

Exception: error while loading shared libraries: libmysqlclient.so.20: cannot open shared object file: No such file or directory
Solution:

# find/ -name 'libmysqlclient*'
/usr/local/mysql/lib/libmysqlclient.a
/usr/local/mysql/lib/libmysqlclient.so.20.3.10
/usr/local/mysql/lib/libmysqlclient.so
/usr/local/mysql/lib/libmysqlclient.so.20
/usr/lib64/mysql/libmysqlclient.so.18
/usr/lib64/mysql/libmysqlclient.so.18.0.0

# ln -s /usr/local/mysql/lib/libmysqlclient.so.20 /usr/local/lib/libmysqlclient.so.20
# vim /etc/ld.so.conf
/usr/local/lib				#Write
# ldconfig -v

[Solved] Error in installing backups.lzma for Python on Linux

Error in installing backups.lzma for Python on Linux

pip3.9 install backports.lzma

Error Message:

Running setup.py install for backports.lzma … error
ERROR: Command errored out with exit status 1:
command: /usr/bin/python3.9 -u -c ‘import io, os, sys, setuptools, tokenize; sys.argv[0] = ‘”’”’/tmp/pip-install-pnrkhuf9/backports-lzma_24feded447a34e5a8b1c53cb80e10341/setup.py’”’”’; file=’”’”’/tmp/pip-install-pnrkhuf9/backports-lzma_24feded447a34e5a8b1c53cb80e10341/setup.py’”’”’;f = getattr(tokenize, ‘”’”‘open’”’”’, open)(file) if os.path.exists(file) else io.StringIO(’”’”‘from setuptools import setup; setup()’”’”’);code = f.read().replace(’”’”’\r\n’”’”’, ‘”’”’\n’”’”’);f.close();exec(compile(code, file, ‘”’”‘exec’”’”’))’ install –record /tmp/pip-record-tcqknwy3/install-record.txt –single-version-externally-managed –compile –install-headers /usr/local/python3.9/include/python3.9/backports.lzma
cwd: /tmp/pip-install-pnrkhuf9/backports-lzma_24feded447a34e5a8b1c53cb80e10341/
Complete output (21 lines):
This is backports.lzma version 0.0.14
running install
running build
running build_py
creating build
creating build/lib.linux-x86_64-3.9
creating build/lib.linux-x86_64-3.9/backports
copying backports/init.py -> build/lib.linux-x86_64-3.9/backports
creating build/lib.linux-x86_64-3.9/backports/lzma
copying backports/lzma/init.py -> build/lib.linux-x86_64-3.9/backports/lzma
running build_ext
building ‘backports.lzma._lzma’ extension
creating build/temp.linux-x86_64-3.9
creating build/temp.linux-x86_64-3.9/backports
creating build/temp.linux-x86_64-3.9/backports/lzma
gcc -pthread -Wno-unused-result -Wsign-compare -DNDEBUG -g -fwrapv -O3 -Wall -fPIC -I/usr/local/python3.9/include -I/root/include -I/opt/local/include -I/usr/local/include -I/usr/local/python3.9/include/python3.9 -c backports/lzma/_lzmamodule.c -o build/temp.linux-x86_64-3.9/backports/lzma/_lzmamodule.o
backports/lzma/_lzmamodule.c:115:10: fatal error: lzma.h: No such file or directory
#include <lzma.h>
^~~~~~~~
compilation terminated.
error: command ‘/usr/bin/gcc’ failed with exit code 1
—————————————-
ERROR: Command errored out with exit status 1: /usr/bin/python3.9 -u -c ‘import io, os, sys, setuptools, tokenize; sys.argv[0] = ‘”’”’/tmp/pip-install-pnrkhuf9/backports-lzma_24feded447a34e5a8b1c53cb80e10341/setup.py’”’”’; file=’”’”’/tmp/pip-install-pnrkhuf9/backports-lzma_24feded447a34e5a8b1c53cb80e10341/setup.py’”’”’;f = getattr(tokenize, ‘”’”‘open’”’”’, open)(file) if os.path.exists(file) else io.StringIO(’”’”‘from setuptools import setup; setup()’”’”’);code = f.read().replace(’”’”’\r\n’”’”’, ‘”’”’\n’”’”’);f.close();exec(compile(code, file, ‘”’”‘exec’”’”’))’ install –record /tmp/pip-record-tcqknwy3/install-record.txt –single-version-externally-managed –compile –install-headers /usr/local/python3.9/include/python3.9/backports.lzma Check the logs for full command output.

Solution:

apt install -y liblzma-dev #ubuntu
yum install -y xz-devel    #centos

At this point, there is no problem when executing pip3.9 install backups.lzma

Centos7 Error: initramfs not found

Problem description

Centos7 reports an error: file ‘/ initramfs -… Img’ not found

Problem solving

This problem occurred after I set up the mount. After some guidance from Baidu and Lao Han, it was finally solved

Solution:

yum reinstall kernel

Is to reinstall the kernel

[Solved] Rocketmq error: service not available now, may disk full, CL: 0.95, CQ: 0.95, index: 0.95

Rocketmq reports an error: service not available now, may disk full, CL: 0.95, CQ: 0.95, index: 0.95, may
the error is caused by the large log file in the/store/commitlog folder. Df-h instructs to view the memory occupied by the current disk   By default, rocketmq will treat the ratio of remaining disks less than 75% as insufficient disk space

Solution:

1. Delete the useless log files in the/store/commitlog folder first

2. Edit/conf/2m-2s-async/broker-a.properties file and add   Diskmaxusedspaceratio = 98. An error will be reported when the disk occupies 98%

3. Check whether other processes occupy a lot of space. My problem is the logstash problem of elk. Just kill the process

How to Fix PVE Issues: ERROR: migration aborted

2021-09-24 22:11:47 # /usr/bin/ssh -e none -o 'BatchMode=yes' -o 'HostKeyAlias=st-10' [email protected] /bin/true
2021-09-24 22:11:47 [email protected]: Permission denied (publickey,password).
2021-09-24 22:11:47 ERROR: migration aborted (duration 00:00:00): Can't connect to destination address using public key
TASK ERROR: migration aborted

Enter the failed server
root@st -22:~#

ssh-keygen -t rsa

Retract y to generate public key

View public key

cat /root/.ssh/id_rsa.pub

Copy the public key and edit the public key into authorized_Keys file. Delete the wrong part.

Distribute authorized copies to various servers.

scp /root/.ssh/authorized_keys [email protected]:/root/.ssh/

[Solved] Jenkins+Ant Error: Error reading project file xxxxx

My colleague used Jenkins + ant + JMeter to build the interface automation shelf. Today, my colleague asked me to help look at a problem

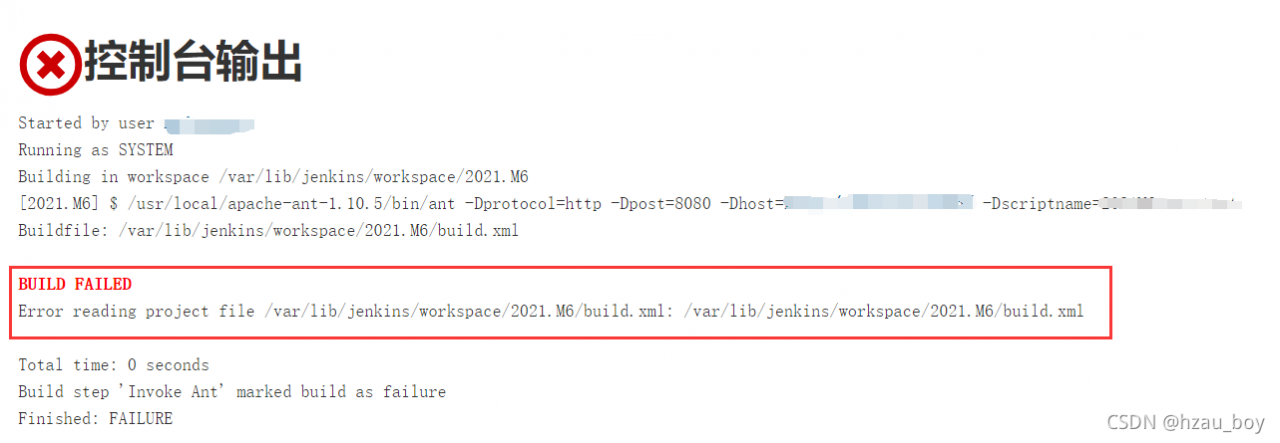
The error reports are as follows:
error reading project file/var/lib/Jenkins/workspace/2021. M6/build. XML

at first, I thought the file could not be found. Later, I went to the server to check it. The file is in. (after thinking about it carefully, it should be not find if the file cannot be found. This error means that there is an error reading the file. In fact, there is an error reading and writing due to insufficient permissions)
later, I can successfully execute the ant command on the server
after step-by-step analysis and troubleshooting, it is found that it is a problem of permissions. After Jenkins is installed on the server, a user named Jenkins is automatically created. By default, the permissions of this user are also used
when I switch the Linux user to Jenkins and execute the ant command, the above error is reported. The root user will not report an error
therefore, the solution is to increase the permissions of Jenkins to root
1. Add the Jenkins user to the root group

gpasswd -a root jenkins

2[UNK]vim /etc/sysconfig/jenkins

JENKINS_USER="root"
JENKINS_GROUP="root"

3. Restart Jenkins

service jenkins restart

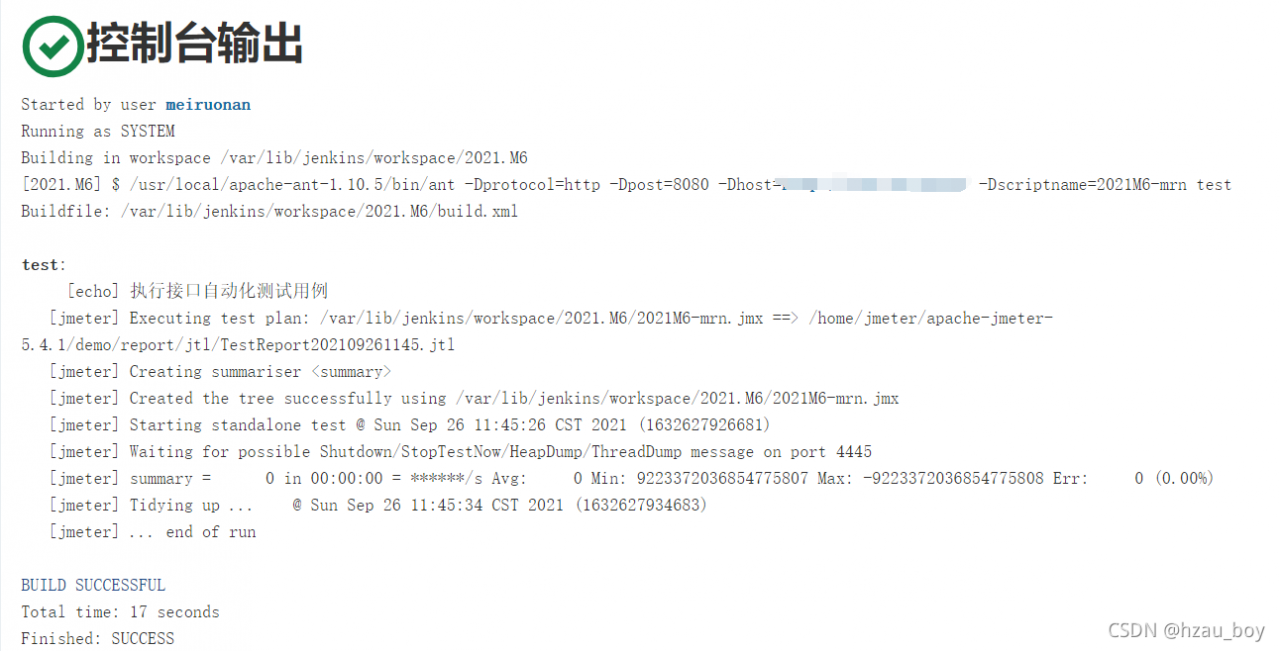
Final effect:

[Solved] CRITICAL:yum.cli:Config error: Error accessing file for config file:///opt/++

report errors

[root@localhost opt]# ls
apr-1.6.2.tar.gz
apr-util-1.6.0.tar.gz
boost_1_59_0.tar.gz
httpd-2.4.29.tar.bz2
mysql-boost-5.7.20.tar.gz
rh
[root@localhost opt]# yum install -y \
> gcc \
> gcc -c++ \
> ncurses-devel \
> bison \
> cmake
CRITICAL:yum.cli:Config error: Error accessing file for config file:///opt/++
error:
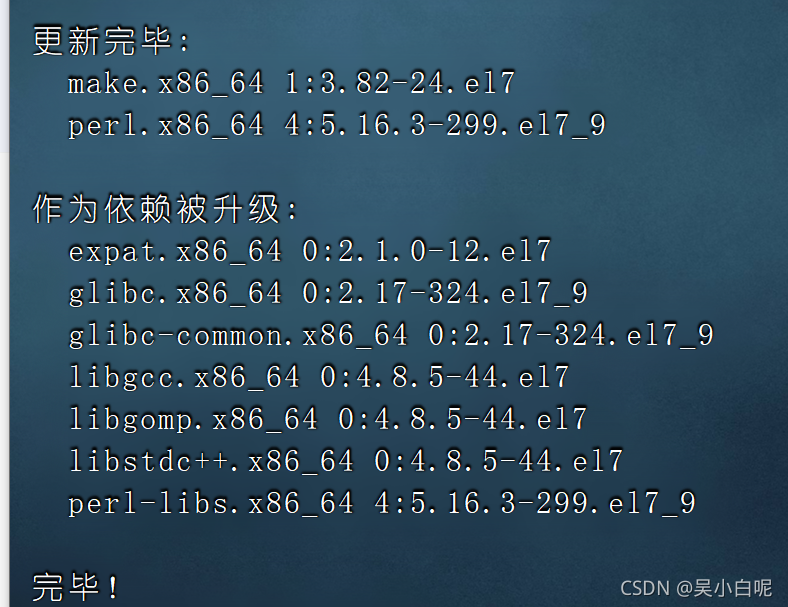
[root@localhost opt]# yum -y install gcc gcc-c++ make pcre pcre-devel expat-devel perl
Enter this command to solve the installation problem!!!

solve!