Tag Archives: https

PHP function file_ get_ Contents() reports an error when using HTTPS protocol: SSL operation failed

Scenario:

file_ get_ The contents () function is used to read the contents of a file into a string. It is one of the commonly used functions to read the contents of a file.

But sometimes file is used on the server_ get_ When the contents() function requests the URL file of HTTPS protocol, an error will be reported, and the file content cannot be read correctly,

reason:

The server is not properly configured with HTTPS certificate

Solution: (three solutions)

Method 1:

Download HTTPS certificate to server

The server downloads this certificate, http://curl.haxx.se/ca/cacert.pem
Php.ini configuration
openssl.cafile = “/ etc/SSL/certs/cacert. PEM”// the path where you actually download the certificate
Restart PHP

Method 2:

Use the curl function to process HTTPS parameters and obtain the file content

<?php
function getSSLPage($url) {
    $ch = curl_init();
    curl_setopt($ch, CURLOPT_HEADER, false);
    curl_setopt($ch, CURLOPT_URL, $url);
    curl_setopt($ch, CURLOPT_SSLVERSION,3); 
    $result = curl_exec($ch);
    curl_close($ch);
    return $result;
}

var_dump(getSSLPage("https://xxx.xxx.xxx"));
?>

Method 3:

Make file_ get_ The contents() function skips HTTPS authentication

$stream_opts = [
    "ssl" => [
        "verify_peer"=>false,
        "verify_peer_name"=>false,
    ]
]; 

$response = file_get_contents("https://xxx.xxx.xxx",false,stream_context_create($stream_opts));

  It is recommended to use curl function instead of file in development_ get_ Contents() function.

Linux environment setup – Update https://apt.repos.intel.com report errors

Linux environment setup – Update https://apt.repos.intel.com report errors

Problem description and solution

Problem description

After sudo apt get update, the https://apt.repos.intel.com Error message

Hit https://mirrors.tuna.tsinghua.edu.cn focal-security/multiverse Translation-en
Hit https://mirrors.tuna.tsinghua.edu.cn focal-security/restricted Translation-en
Hit https://mirrors.tuna.tsinghua.edu.cn focal-security/universe Translation-en
Err https://apt.repos.intel.com all/main amd64 Packages
  gnutls_handshake() failed: Handshake failed
Err https://apt.repos.intel.com all/main i386 Packages
  gnutls_handshake() failed: Handshake failed
Ign https://apt.repos.intel.com all/main Translation-en_US
Ign https://apt.repos.intel.com all/main Translation-en
Err https://apt.repos.intel.com binary/ Packages
  gnutls_handshake() failed: Handshake failed
Ign https://apt.repos.intel.com binary/ Translation-en_US
Ign https://apt.repos.intel.com binary/ Translation-en
Err https://apt.repos.intel.com all/main amd64 Packages
  gnutls_handshake() failed: Handshake failed
Err https://apt.repos.intel.com all/main i386 Packages
  gnutls_handshake() failed: Handshake failed
Ign https://apt.repos.intel.com all/main Translation-en_US
Ign https://apt.repos.intel.com all/main Translation-en
W: There is no public key available for the following key IDs:
871920D1991BC93C
W: There is no public key available for the following key IDs:
871920D1991BC93C
W: There is no public key available for the following key IDs:
871920D1991BC93C
W: There is no public key available for the following key IDs:
871920D1991BC93C
W: Failed to fetch https://apt.repos.intel.com/mkl/dists/all/main/binary-amd64/Packages  gnutls_handshake() failed: Handshake failed

W: Failed to fetch https://apt.repos.intel.com/mkl/dists/all/main/binary-i386/Packages  gnutls_handshake() failed: Handshake failed

W: Failed to fetch https://apt.repos.intel.com/intelpython/binary/Packages  gnutls_handshake() failed: Handshake failed

W: Failed to fetch https://apt.repos.intel.com/ipp/dists/all/main/binary-amd64/Packages  gnutls_handshake() failed: Handshake failed

W: Failed to fetch https://apt.repos.intel.com/ipp/dists/all/main/binary-i386/Packages  gnutls_handshake() failed: Handshake failed

W: Failed to fetch https://apt.repos.intel.com/tbb/dists/all/main/binary-amd64/Packages  gnutls_handshake() failed: Handshake failed

W: Failed to fetch https://apt.repos.intel.com/tbb/dists/all/main/binary-i386/Packages  gnutls_handshake() failed: Handshake failed

W: Failed to fetch https://apt.repos.intel.com/daal/dists/all/main/binary-amd64/Packages  gnutls_handshake() failed: Handshake failed

W: Failed to fetch https://apt.repos.intel.com/daal/dists/all/main/binary-i386/Packages  gnutls_handshake() failed: Handshake failed

W: Failed to fetch https://apt.repos.intel.com/mpi/dists/all/main/binary-amd64/Packages  gnutls_handshake() failed: Handshake failed

W: Failed to fetch https://apt.repos.intel.com/mpi/dists/all/main/binary-i386/Packages  gnutls_handshake() failed: Handshake failed

E: Some index files failed to download. They have been ignored, or old ones used instead.

Solution

sudo rm intelproducts.list -rf
sudo rm intel-mkl.list intel-mkl.list.save -rf

[Nginx] solution: it can’t be accessed on the background API interface after HTTPS (access the specified port through the domain name)

Demand

Original address: http://ip :54774/api_ Name
now requires you to access the specified port through the domain name: https://api.example.com/api_ name
realization

The most important thing is to configure the reverse proxy address of location

When we enter the domain name/API_ Name
will be mapped by nginx to IP or domain name: 54774/API_ Name path go to the nginx directory, open nginx. Conf , add reverse proxy :

server
{
    listen 80;
	listen 443 ssl http2;
    server_name https://api.example.com;
    
    # Reverse Proxy
    location ~ ^/api_name {
        proxy_pass http://ip:54777;
    }
    
    #SSL-START SSL-related configuration, please do not delete or modify the next line with the comment 404 rules
    #error_page 404/404.html;
    ssl_certificate    /www/server/panel/vhost/cert/api.example.com/fullchain.pem;
    ssl_certificate_key    /www/server/panel/vhost/cert/api.example.com/privkey.pem;
    ssl_protocols TLSv1.1 TLSv1.2 TLSv1.3;
    ssl_ciphers EECDH+CHACHA20:EECDH+CHACHA20-draft:EECDH+AES128:RSA+AES128:EECDH+AES256:RSA+AES256:EECDH+3DES:RSA+3DES:!MD5;
    ssl_prefer_server_ciphers on;
    ssl_session_cache shared:SSL:10m;
    ssl_session_timeout 10m;
    add_header Strict-Transport-Security "max-age=31536000";
    error_page 497  https://$host$request_uri;


    #SSL-END
    
    #ERROR-PAGE-START  Error page configuration, which can be commented, deleted or modified
    #error_page 404 /404.html;
    #error_page 502 /502.html;
    #ERROR-PAGE-END
    
    #PHP-INFO-START  PHP reference configuration, can be commented or modified
    #include enable-php-72.conf;
    #PHP-INFO-END
    
    #REWRITE-START URL rewrite rule reference, the modification will cause the panel to set the pseudo-static rules are invalid
    #include /www/server/panel/vhost/rewrite/api.example.com.conf;
    #REWRITE-END
    
    #Files or directories to which access is prohibited
    location ~ ^/(\.user.ini|\.htaccess|\.git|\.svn|\.project|LICENSE|README.md)
    {
        return 404;
    }
    
    #One Click Application for SSL Certificate Verification Directory Related Settings
    location ~ \.well-known{
        allow all;
    }
}
    1. overload configuration file:
./nginx -s reload

Configure HTTPS and self signed certificate for nginx

1、 Get the certificate ready.

The steps are similar to those described in using OpenSSL to self issue the server’s HTTPS certificate. Again here.

Making CA certificate:
1 ca.key CA private key:
OpenSSL gensa - DES3 - out ca.key 2048
making the decrypted CA private key (generally unnecessary):
OpenSSL RSA - in ca.key -out ca_ decrypted.key
ca.crt CA root certificate (public key):
OpenSSL req - New - x509 - days 7305 - key ca.key -out ca.crt make and generate the certificate of the website and use CA signature for authentication. Here, assume that the website domain name is blog.creke.net generate blog.creke.net Certificate private key: OpenSSL genrsa - DES3 - out blog.creke.net .pem 1024 Making the decrypted blog.creke.net Certificate private key: OpenSSL RSA - in blog.creke.net .pem -out blog.creke.net . key generate signature request: OpenSSL req - New - key blog.creke.net .pem -out blog.creke.net . CSR in common Fill in the website domain name in the name, such as blog.creke.net Can generate a certificate to change the site, but also can use the pan domain name, such as * creke.net To generate site certificates available for all secondary domain names. Sign with Ca:

openssl ca -policy policy_anything -days 1460 -cert ca.crt -keyfile ca.key -in blog.creke.net.csr -out blog.creke.net.crt

Among them, the policy parameter allows the signed Ca and website certificate to have different country, place name and other information, and the days parameter is the signature time limit. If "I am unable to access the /… /Ca/newcerts directory/etc/PKI/TLS/ openssl.cnf Then: MKDIR - P Ca/newcerts touch CA/ index.txt Touch Ca/serial echo "01" & gt; then re execute the signature command. Finally, put ca.crt Paste the contents of to blog.creke.net . CRT. This is more important! If not, some browsers may not support it. OK, now you need the private key of the website blog.creke.net . key and website certificate blog.creke.net . CRT is ready. Next, start to configure the server.

2、 Configure nginx

Open a new virtual host and set it in the server {} section

listen 443;

ssl on;

ssl_certificate /path/to/blog.creke.net.crt;

ssl_certificate_key /path/to/blog.creke.net.key;

The path is the path of the website certificate just generated. Then use the following command to detect configuration and reload nginx: detect configuration: nginx - T reload: nginx - s reload

3、 Optimize nginx configuration

    optimize nginx performance by adding:

    ssl_session_cache shared:SSL:10m;
    ssl_session_timeout 10m;
    

    According to the official documents, the 1m cache can store 4000 sessions. Add: keep alive to the virtual host server {} configured with HTTPS_ Timeout 70; sometimes, you will find that after the program such as phpMyAdmin logs in, it will jump to HTTP by mistake. The solution is to locate "location ~. * (PHP | PHP5)?${}" in include fcgi.conf ; or in fastcgi_ Add after param configuration:

    fastcgi_param HTTPS on;
    
    fastcgi_param HTTP_SCHEME https;
    

    Here is the official document of nginx about HTTPS, which can be used as a reference.

Note: transferred from http://blog.creke.net/762.html

Implementation of HTTPS file server based on nginx in win2012

Nginx and openssl: http://nginx.org/en/download.html

http://slproweb.com/products/Win32OpenSSL.html
Environment variable:
c:\ openssl-win64 \bin
th variable add %OPENSSL_HOME%

openssl genrsa -des3 -out xxx.key 1024
openssl req -new -key xxx.key -out xxx.csr
cp xxx.key xxx.key.org
openssl rsa -in xxx.key.org -out xxx.key
openssl x509 -req -days 365 -in xxx.csr -signkey xxx.key -out xxx.crt

Start nginx after modifying nginx.conf

server {
        listen       443 ssl;
        server_name  localhost;
		ssl_certificate      C://nginx-1.18.0//ssl//xxx.crt;
	    ssl_certificate_key  C://nginx-1.18.0//ssl//xxx.key;
        
		#charset koi8-r;

        #access_log  logs/host.access.log  main;

	    ssl_session_cache    shared:SSL:1m;
	    ssl_session_timeout  5m;
	
	    ssl_ciphers  HIGH:!aNULL:!MD5;
	    ssl_prefer_server_ciphers  on;

     location /update {
	        alias C:/hy-8000;
			allow all;
			autoindex on;

	        proxy_set_header   X-Real-IP            $remote_addr;
	        proxy_set_header   X-Forwarded-For  $proxy_add_x_forwarded_for;
	        proxy_set_header   Host                   $http_host;
	        proxy_set_header   X-NginX-Proxy    true;
	        proxy_set_header   Connection "";
	        proxy_http_version 1.1;
     }

Using Fiddler to capture mobile app

Use Fiddler to capture mobile APP package detailed tutorial
There were two very difficult problems in the process of grasping the package in the mobile APP with Fiddler. One was that the phone could not connect To the network after setting the proxy, and the download certificate on the phone always indicated that the download failed. The other was that the information of grasping the package on the Fiddler was all displayed as Tunnel To. It took a long time to solve, and now share it to let some novices walk less detours, maybe my method can solve your problem, may not solve it, but also provide a way to try.
To set the fiddler
1. Download Fiddler from the website and install it. https://www.telerik.com/download/fiddler
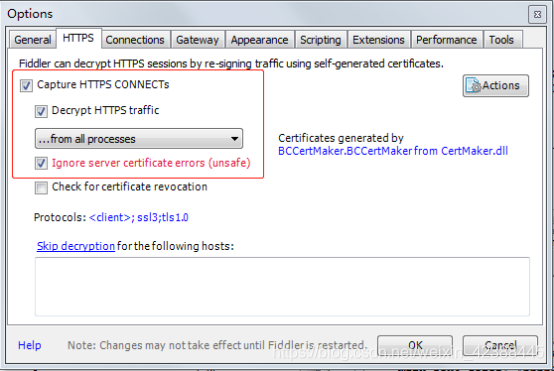
2. First configure Fiddler, open Fiddler, and then click Tools –>; The Options… – & gt; HTTPS, check and install the certificate as shown in the installation diagram.


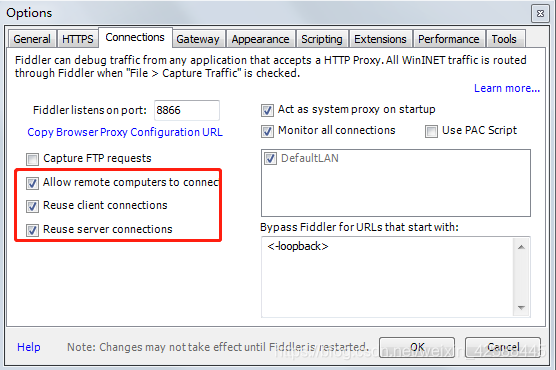
3 4.

3 4.

3 4 Click the OK button to close Fiddler and reopen it again. At this point, the Fiddler part is set up in the normal way, followed by some Settings on the phone.
5. Here I use millet portable WiFi, mobile phone connected to millet portable WiFi, so that the phone and computer connected is the same network segment.
Set the cell phone
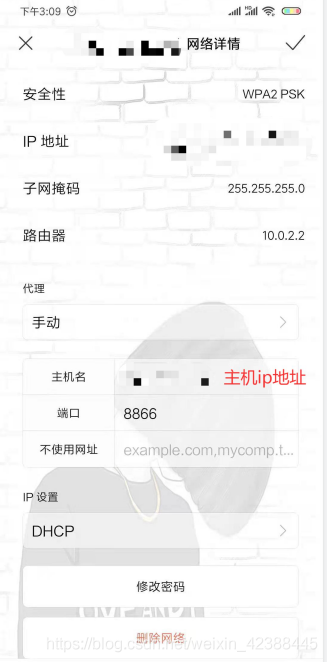
6. Go to the WiFi Settings page on the mobile phone, change the agent to “Manual”, and the hostname is the IP address

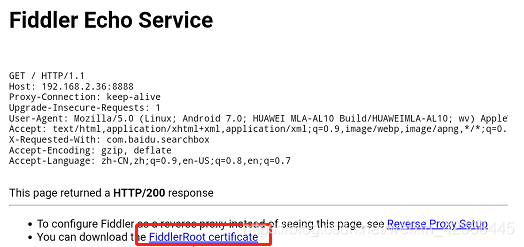
after the computer is connected to the WiFi network. Open the mobile browser, enter the address open http://ipv4.fiddler:8866, (because I set the port number is 8866), click in the page FiddlerRoot certificate, certificate of download. I have encountered a problem here, is the certificate can not download, keep telling download failed. Up to now, I have encountered two problems that are difficult to solve. One is that the download certificate in the webpage fails to download; the second is that after opening the APP on the mobile phone, all the packages caught in Fiddler are displayed as Tunnelto. Now, how do I solve these two problems
Solution to the problem:
1. Download Cermaker from the Fiddler website, download it and run the plug-in.
download address: https://www.telerik.com/fiddler/add-ons

2. After the installation, we found that the TunnelTo problem was still not solved, and there is a new problem. On the mobile phone, open http://ipv4.fiddler:8866, instead, it shows No Root Certificate was found.Have you enabled HTTPS traffic decryption in fiddler yet?
3. So I tried the following solutions.
makecert.exe-r-ss my-n “CN= do_not_trust_fiddlerRoot, O=DO_NOT_TRUST, OU=Created by http://www.fiddler2.com “-Sky Signature -EKU 1.3.6.1.5.5.7.3.1-h 1-cy Authority -a sha1-m 120-b 09/05/2012
If you want to run the fiddler, you can restart the fiddler
4. Then open http://ipv4.fiddler:8866 in the browser on the phone, download the certificate, download and install it successfully, open the test APP, and find that the packet was captured successfully. HTTPS can catch the packet normally, but HTTP still shows Tunnel to, but it does not affect the use.

SSL appears when Firefox accesses HTTPS_ error_ weak_ server_ ephemeral_ Dh_ Key error

The above error will occur if the company website is accessed using Firefox and Samsung devices using HTTPS. The certificate is really bought. The following method works. From http://www.cnblogs.com/milton/p/4624559.html

The following error occurred when ff visited a self-signed internal website
SSL received a weak ephemeral Diffie-Hellman key in Server Key Exchange handshake message. (Error code: ssl_error_weak_server_ephemeral_dh_key)
Tomcat is used by the server. The solution is to modify Tomcat /conf/server.xml, change the configuration, and add sslEnabledProtocols and Ciphers

<Connector protocol="org.apache.coyote.http11.Http11Protocol"
     port="9443" minSpareThreads="5" maxSpareThreads="75"
     enableLookups="true" disableUploadTimeout="true"
     acceptCount="100" maxThreads="200"
     scheme="https"
     secure="true" SSLEnabled="true"
     keystoreFile="/home/tomc/apache-tomcat-7.0.33/conf/server.keystore"
     keystorePass="111111"
     clientAuth="true"
     sslEnabledProtocols="TLSv1,TLSv1.1,TLSv1.2"
     ciphers="TLS_ECDHE_RSA_WITH_AES_128_CBC_SHA256, TLS_ECDHE_RSA_WITH_AES_128_CBC_SHA,TLS_ECDHE_RSA_WITH_AES_256_CBC_SHA384,TLS_ECDHE_RSA_WITH_AES_256_CBC_SHA,TLS_ECDHE_RSA_WITH_RC4_128_SHA,TLS_RSA_WITH_AES_128_CBC_SHA256,TLS_RSA_WITH_AES_128_CBC_SHA,TLS_RSA_WITH_AES_256_CBC_SHA256, TLS_RSA_WITH_AES_256_CBC_SHA,SSL_RSA_WITH_RC4_128_SHA"
     URIEncoding="UTF-8"/>

Error 9 at 1 depth lookup:certificate is Not yet valid error

Environment: ubuntu16.04 does HTTPS server (implemented by libevent for server)
Arm developer board for HTTPS client (libcurl implementation)
Root certificate, server certificate and private key, client certificate and private key are generated on Ubuntu. Error “Error 9 at 1 Depth Lookup: Certificate is not Yet Valid” is reported when verifying the certificate on the development board or connecting HTTPS.

openssl verify -CAfile cacert.pem  cert.pem

Reason: The time zones don’t correspond. It is UTC time zone on the development board and CST time zone on Ubuntu. If the certificate is generated at 7 o ‘clock on the development board and executed on Ubuntu, the time on Ubuntu is only 11 o ‘clock and the certificate does not reach the legal start time. So the certificate will report an illegal error.
Solution: Change CST time zone on Ubuntu to UTC time zone:

ln -sf /usr/share/zoneinfo/UTC /etc/localtime


When we crawl to the HTTPS website, the SSL certificate error is solved

SSL certificate error occurs when we crawl HTTPS sites

HTTPS in plain English is our HTTP + SSL (certificate), some small companies make their own SSL, so sometimes when we visit the website of some small companies it will remind us to download some SSL certificates, and the website that we don’t have to download has been CA certified

we are going to crawl an SSL certificate that is not a CA certified web address to verify.
when we climb to find the problem of error.