Tag Archives: hardware

How to Solve Altium designer Rule Check Without an Error Issue

Today, I found my ad lying flat on the drawing board. No matter how inhumane I operate, I won’t display a green fork to report an error.

Reason 1: press the shortcut key D + R to check whether enable in rules and constraints is checked

Reason 2: the shortcut key t + D determines whether all rules in the rules to check of the rule checker are online. My ad doesn’t know when the online tick is gone, so the rule checker directly fishes, resulting in no error reporting.

kernel: [ 3166.869181] EDAC MC2: 1 CE memory read error on CPU_SrcID#1_Ha#1_Chan#1_DIMM#0

Sysptom:
Sun Nov 14 19:08:17 2021 ID ffff P1 ECC CE /SYS/MB/P1/D3, 1 errors on MC1-CH1, dimm 0, rank 0.
Sun Nov 14 19:08:17 2021 ID ffff  ******** Home Agent(HA1) Shadow Errors ********
Sun Nov 14 19:15:08 2021 ID ffff P1 ECC CE /SYS/MB/P1/D3, 1 errors on MC1-CH1, dimm 0, rank 0.
Sun Nov 14 19:15:08 2021 ID ffff  ******** Home Agent(HA1) Shadow Errors ********
Sun Nov 14 19:29:45 2021 ID ffff P1 ECC CE /SYS/MB/P1/D3, 1 errors on MC1-CH1, dimm 0, rank 0.
Sun Nov 14 19:29:45 2021 ID ffff  ******** Home Agent(HA1) Shadow Errors ********
Sun Nov 14 19:49:17 2021 ID ffff P1 ECC CE /SYS/MB/P1/D3, 1 errors on MC1-CH1, dimm 0, rank 0.
Sun Nov 14 19:49:17 2021 ID ffff  ******** Home Agent(HA1) Shadow Errors ********
Sun Nov 14 20:02:59 2021 ID ffff P1 ECC CE /SYS/MB/P1/D3, 1 errors on MC1-CH1, dimm 0, rank 0.
Sun Nov 14 20:02:59 2021 ID ffff  ******** Home Agent(HA1) Shadow Errors ********
Sun Nov 14 20:05:35 2021 ID ffff P1 ECC CE /SYS/MB/P1/D3, 1 errors on MC1-CH1, dimm 0, rank 0.
Sun Nov 14 20:05:35 2021 ID ffff  ******** Home Agent(HA1) Shadow Errors ********
Sun Nov 14 20:09:00 2021 ID ffff P1 ECC CE /SYS/MB/P1/D3, 1 errors on MC1-CH1, dimm 0, rank 0.
Sun Nov 14 20:09:01 2021 ID ffff  ******** Home Agent(HA1) Shadow Errors ********
Sun Nov 14 20:17:57 2021 ID ffff P1 ECC CE /SYS/MB/P1/D3, 1 errors on MC1-CH1, dimm 0, rank 0.
Sun Nov 14 20:17:58 2021 ID ffff  ******** Home Agent(HA1) Shadow Errors ********

There are a lot of mce log we can check from the mcelog file. Indeed, this is a HW issue and some part is defective one, almost is memory. But a lot of vender don’t want to replace it for this is a correctable error. And we can also check this error at ilom (different vendor have different name but almost of them is built by polit 3,4 arch) as bellow.

2021-11-14/20:09:00  ereport.cpu.intel.quickpath.mem_ce@/SYS/MB/P1/D3
                        count                     = 0x1
                        system_component_firmware_versions = (ILOM)5.0.1.28 r140973,(BIOS)38340900

2021-11-14/20:17:57  ereport.cpu.intel.quickpath.mem_ce@/SYS/MB/P1/D3
                        count                     = 0x1
                        system_component_firmware_versions = (ILOM)5.0.1.28 r140973,(BIOS)38340900

If you want to disable them for some monitor policy pls check as bellow

Solution:

Machine Check Exception
   mce=off
        Disable machine check
   mce=no_cmci
        Disable CMCI(Corrected Machine Check Interrupt) that
        Intel processor supports.  Usually this disablement is
        not recommended, but it might be handy if your hardware
        is misbehaving.
        Note that you’ll get more problems without CMCI than with
        due to the shared banks, i.e. you might get duplicated
        error logs.
   mce=dont_log_ce
        Don’t make logs for corrected errors.  All events reported
        as corrected are silently cleared by OS.
        This option will be useful if you have no interest in any
        of corrected errors.
   mce=ignore_ce
        Disable features for corrected errors, e.g. polling timer
        and CMCI.  All events reported as corrected are not cleared
        by OS and remained in its error banks.
        Usually this disablement is not recommended, however if
        there is an agent checking/clearing corrected errors
        (e.g. BIOS or hardware monitoring applications), conflicting
        with OS’s error handling, and you cannot deactivate the agent,
        then this option will be a help.
   mce=bootlog
        Enable logging of machine checks left over from booting.
        Disabled by default on AMD because some BIOS leave bogus ones.
        If your BIOS doesn’t do that it’s a good idea to enable though
        to make sure you log even machine check events that result
        in a reboot. On Intel systems it is enabled by default.
   mce=nobootlog
        Disable boot machine check logging.
   mce=tolerancelevel[,monarchtimeout] (number,number)
        tolerance levels:
        0: always panic on uncorrected errors, log corrected errors
        1: panic or SIGBUS on uncorrected errors, log corrected errors
        2: SIGBUS or log uncorrected errors, log corrected errors
        3: never panic or SIGBUS, log all errors (for testing only)
        Default is 1
        Can be also set using sysfs which is preferable.
        monarchtimeout:
        Sets the time in us to wait for other CPUs on machine checks. 0
        to disable.

The mcelog is loging to message by default but you want to check this HW issue separately, audit the /etc/mcelog/mcelog.conf as bellow.
Before:
/usr/sbin/mcelog –ignorenodev –syslog –foreground

After:
/usr/sbin/mcelog –ignorenodev –syslog –foreground –logfile=/var/log/mcelog
Now restart the service
#service mcelog restart
You can find the /var/log/mcelog as expected.
 

Update ad schematic to PCB, failed to match

*Background: in the process of updating the schematic to PCB, there is often a mismatch between the components on the schematic and those on the PCB, so we should be very careful and check them one by one, otherwise there will be a lesson of blood and tears (the components in the PCB are lost).

1、 Update the schematic diagram to pcb
II. Perform device matching

There are automatic and manual. For the time being, demonstrate manual operation

for example: C35, find the first column and the second column, then select and click & gt

perform operations similar to C35 one by one

3、 Execute the change

in this figure, the remove operation is to delete the routing

in this figure, the remove operation is to delete the device

Do this carefully. You’d better take a picture, and then check whether any devices are lost one by one Is there any wiring missing!!!

Summary:
(1) this situation is generally caused by the person who changed the drawing before, just for a moment, directly changed the PCB without changing the schematic diagram or updating it
also, the PCB library path corresponding to the device is not specified.

(2) If a lot of network nodes are gone and the routing is gone as soon as the update is executed, it is the layout engineer’s method of drawing lines without nodes in pcbdoc!!!

[Solved] Error reading comm device when writing serial communication with MSComm control

1. Problem description

In the process of serial communication written with MSComm control, when receiving the data sent by the serial port under the message response function OnComm function, in get_ An error reading comm develop error occurs in the input() function. The specific codes are as follows:

void XXXDlg::OnCommMscommLaser()
{
	memset(chstrLaser, 0, 1024);    //chstrLaseris a global variable.

	short i = m_mscomLaser.get_InBufferCount(); // statement 1.
	if(m_mscomLaser.get_CommEvent() == 2) // An event value of 2 means there are characters in the receive buffer.
	{
		/*m_recivedMsg = "";
		
		CString csstr = "";*/

		VARIANT InputData = m_mscomLaser.get_Input(); //Statement 2, read buffer.

		COleSafeArray csa = InputData; //VARIANT variable is converted to COleSafeArray variable.

		//translate to byte class.
		DWORD size = csa.GetOneDimSize();
		for(long k = 0; k < size; k++)
			csa.GetElement(&k, chstrLaser + k);
	}

    // Further processing of the received data ......

	return;
}

Each time the function is triggered, the data length of the receive buffer obtained by statement 1 is 30, which means that the receive buffer has data with a length of 30. However, the above error prompt will appear in statement 2, and the code after statement 2 will not be executed.

2.Method exploration

1. At first, I thought it was a data line problem. By changing the data line and making the data line myself, the problem could not be solved.

2. I suspected that there was a problem with the communication equipment. I also changed the equipment for debugging, but the same problem still occurred.

3. Suspected that the communication protocol was not clear.

4. Wait

3. Solution

After many serial port debugging assistants failed, I found that a serial port debugging assistant can communicate normally. I will provide the debugging assistant later. The current problem may be that the code is written incorrectly, and the data cable and equipment are OK.

Through a large number of searches, I found that one solution was to update the serial driver. After trying, I found that it was really possible. After a whole day, I finally solved this problem. I was very excited.

Here is the solution:

1. Download serial driver

My is a USB to 232 data cable, so I downloaded the prolific USB to serial comm port driver. You can download the corresponding driver according to your actual situation. Here I provide the driver that solves my problem: Click to download the serial port driver.

2. Update driver

After downloading the driver, start updating the driver:

a. Click Manage – > Click device manager -> Locate the serial port configured through the MSComm control

b. Right click the serial driver and click Update Driver Software – > Select browse computer for driver software

c. Click Browse to find the downloaded serial driver

d. Click next to solve the above problems after updating.

(Keil MDK) UCOS floating point support abnormal solution

Recently, we encountered a problem, that is, the printf display of floating-point calls in uCOSII is abnormal, but the support for floating-point calls on bare metal machines is normal. Here are the details.

When calling printf to debug floating-point numbers in UCOS, it is correct in memory, but print data is 0, and other shaping data are normal.

The running result on bare metal is completely normal, that is to say, the problem lies in UCOS.

According to the information, this is because the user task stack is not aligned with octets. When running bare metal programs, the system’s default stack octets are aligned, but UCOS’s user task stack is not.

Align the user stack octets.


Solution:

1. Solutions under IAR: (untested)

Through # pragma data_ Alignment specifies the number of bytes to align

For example:


#pragma data_alignment=8

OS_STK Task1_LED1_Stk[Task1_LED1_Stk_Size];

#pragma data_alignment=8

OS_STK T

2. Solutions under keil MDK: (available for personal testing)

Add the force octet alignment command before the task stack declaration, as follows:

__align(8) static OS_STK  TaskEquipmentStk[TASK_EQUIPMENT_STK_SIZE];
__align(8) static OS_STK  TaskUartRcvStk[TASK_UARTRCV_STK_SIZE];
__align(8) static OS_STK  TaskFileRcvStk[TASK_FILERCV_STK_SIZE];
__align(8) static OS_STK  TaskFtpStk[ TASK_FTP_STK_SIZE ];
__align(8) static OS_STK  TaskErrorRateRS485Stk[ TASK_ERROR_RATE_RS485_STK_SIZE ];


Detailed explanation of the reasons

The history of this is that arm itself does not support non aligned data access; Therefore, with a 64bit data operation instruction, the instruction requires 8-byte alignment.

Furthermore, after a certain version of the compiler (rvct3?) AAPCs requires stack 8-byte alignment.

AAPCs with 8-byte alignment first, then cm3. Pay attention to the sequence. Before cm3 r2p0, automatic stack pressing does not require 8 alignment, and r2p0 seems to be forced alignment.

Printf’s 8-alignment is required by the C runtime and has nothing to do with hardware. The C RTL manual is written and can be read. Its root lies in the requirements of AAPCs; AAPCs is rooted in instructions like LDRD.

In other words, in the future, if 128bit data operation is available and arm does not support non alignment, AAPCs may be upgraded to 16 byte alignment.

A TPM error (7) occurred attempting to read a pcr value

A TPM error (7) occurred attempting to read a pcr value
E2fsck-f-y-v /dev/sdxx
2. If the system does not need TPM (reboot after setting), either of the following methods is ok.
(1) Echo Blacklist TPM_tis & GT; The/etc/modprobe. D/tpm_tis. Conf
The tPM_tis.conf file needs to be created by itself
(2) $sudo vim /etc/modprobe.d/tpm_tis.conf
Add the following: “Blacklist TPM_tis” and the color will change automatically
 

Disk read error solution for new hard disk installation

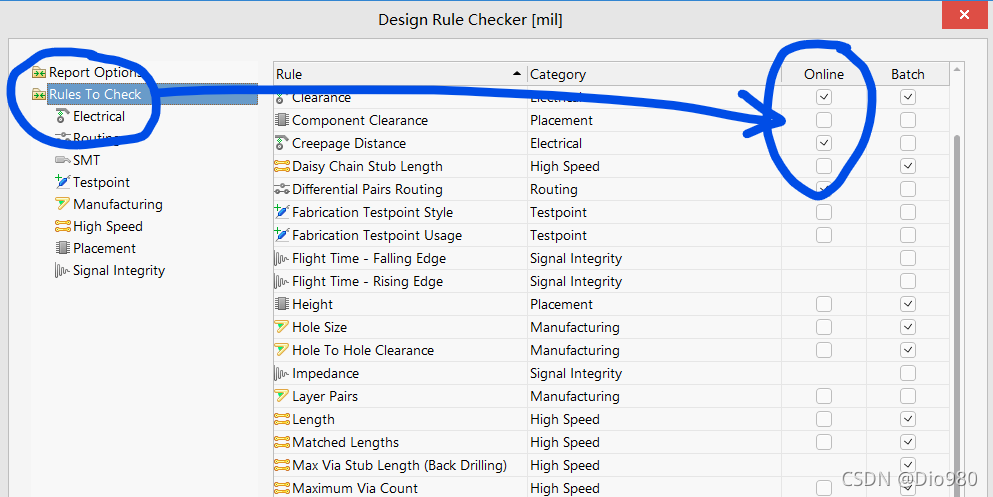
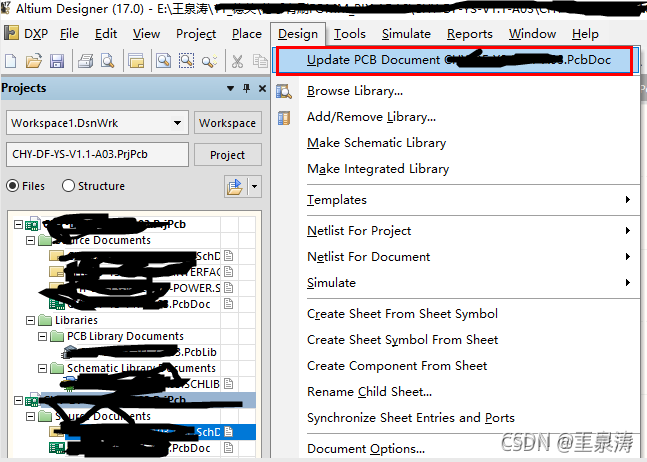
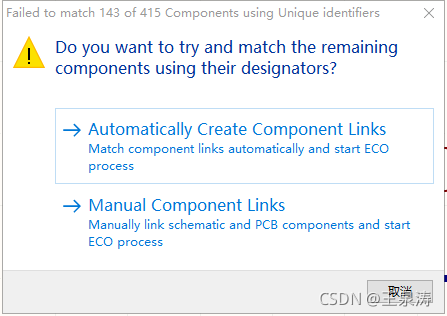
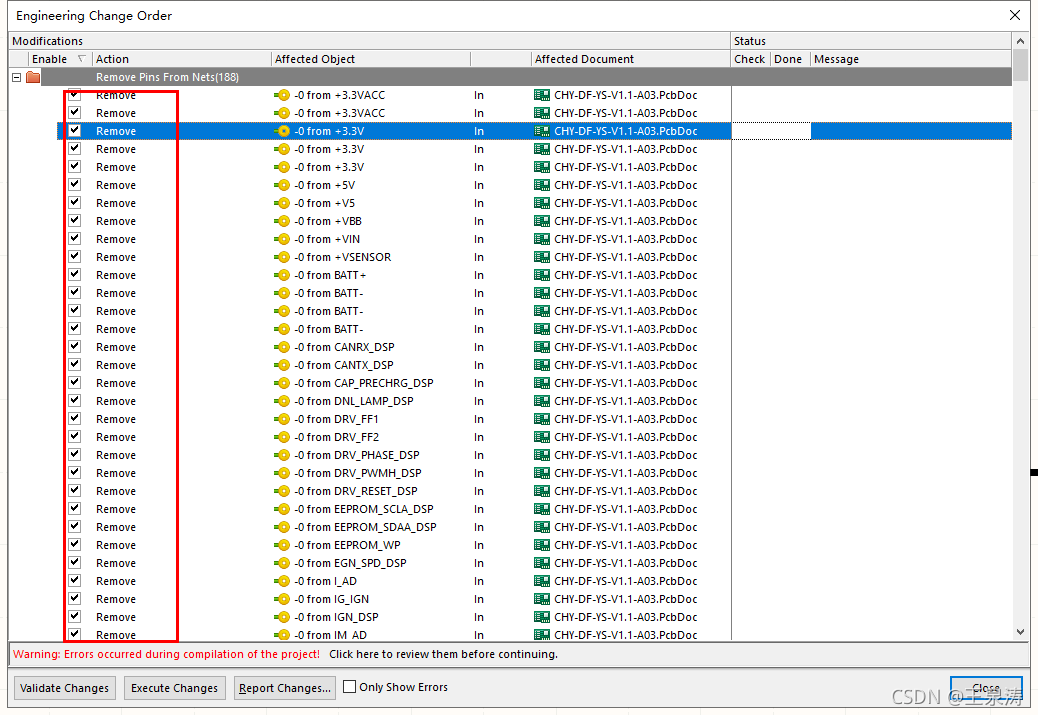
below first said the process of the problems I encountered and the process of solving, more detailed and verbose, if you are more urgent, directly see the last summary.
 
(Problems arise)
In response to my mother’s strong request, I bought some accessories on JINGdong two weeks ago and installed a new machine. I officially eliminated the old desktop computer that I had used for nearly 10 years at home. My mother said that I would not be able to play QQ dream now.
The neighbor saw, also want to update his machine, I basically the same as before and under a single (at the request of the neighbor to add an OPTICAL drive, my home machine is not equipped with optical drive), the weekend back home to install the machine. The installation went well, but there was a very strange problem when installing the OS.
Listen to me slowly.
The hard disk USES Seagate 1TB (ST1000DM003) disk, and the motherboard USES Giga GA-A75KM-D2H disk. At first, I found some problems with these models, but I found it has nothing to do with the hard disk model after I studied it.
First of all, everything worked fine when I installed the system myself.
In the neighbor installed, I use my pre-carved rain forest wind Win7 Ghost plate, the first use of a key in four areas, four areas. (In fact, this function is to do a complete partition image, disk to disk, ghost will automatically adjust the size of the partition in proportion). Then use a key will win7 Ghost to c disk installation, but ghost is always a failure, generally go less than 50% of the card is dead, after a while optical drive read disk also stopped.
Later, if you boot from hard Disk, sometimes failure will prompt that OS cannot be detected, and sometimes failure will prompt “A Disk Read Error Occurred. Press Ctrl+Alt+del to RESTART”.
 
(Disc-Mounted system)
But the hard disk can only be unplugged, attached to my machine as a slave disk, the system installed in.
Now that I’m hanging them all off the slave disk, I’ll use Disk Genius to reprogram the slave disk partitions.
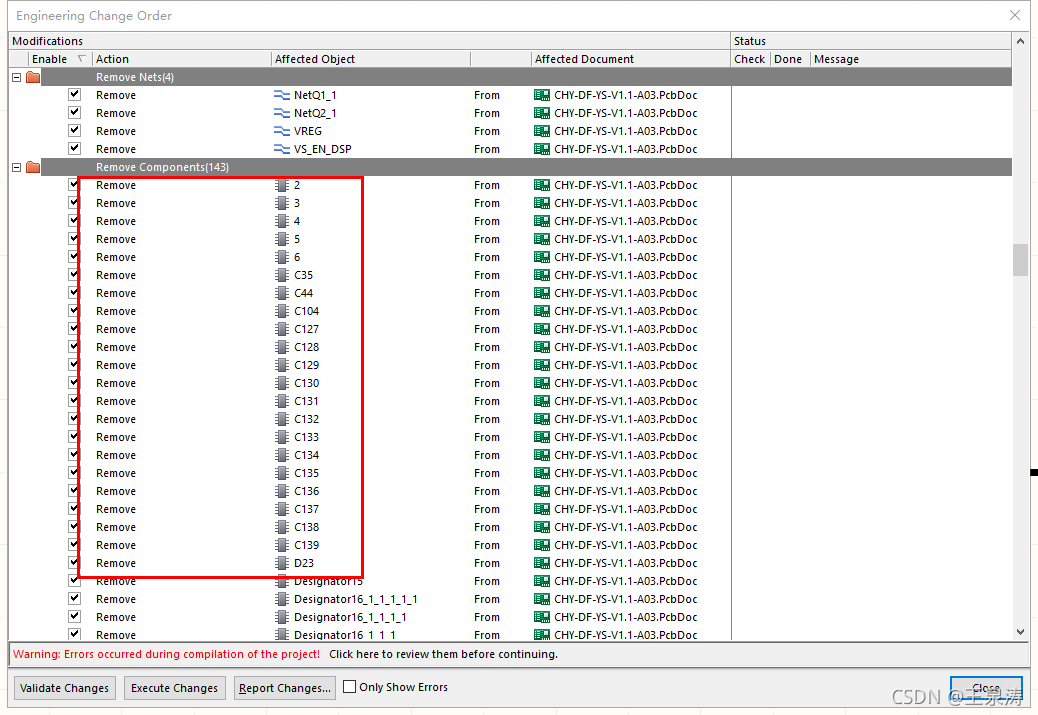
(The knowledge of primary partition, extended partition, logical partition is very important in manual partition, also not complex, a diagram plus three or two sentences can be explained, do not understand the students please baidu yourself first)
Specific methods:
1, copy win7 ghost from the disc image to the hard disk (or mount the image to the virtual optical drive)
2, if you use GHost32, you can directly ghost-> To partition – & gt; From image, when you select the target hard drive, don’t select your own hard drive or it will be a tragedy
(This is what I did for the first time since I already use Disk Genius.) To use the disk image widget, you need to first use software like Disk Genius to convert the primary partition from the disk to a logical partition and assign a drive letter.
3, ghost, note that the drive letters from each partition are probably not in order, need to pay attention to who is the first partition (Disk Genius, Win7 comes with disk management tools can be).
4. Convert from the first partition of the disk to the primary partition and set it to Active.
 
(New questions)
Restart and start from Disk. Once again, “A Disk Read Error Occurred. Press Ctrl+Alt+del to RESTART”. At first I thought I had damaged the hard drive, so I was taken aback (I had just dropped it accidentally). However, after starting with the master disk and entering the system, it was found that each partition of the slave disk was working normally and the files could be read and written normally.
Suspect is the new motherboard problem, will my hard disk unplug, put the neighbor’s disk on my motherboard to restart again, still invalid.
Put my hard drive on the neighbor’s machine and everything’s fine. It’s not the motherboard.
Things have come to an impasse.
 
(Real solution)
When depressed, use Disk Gunius to observe the partition parameters of two hard disks. Because I used to practice assembly when I wrote the operation of the partition table program, on the disk structure and various parameters or more familiar, boring want to calculate the partition capacity and it is not the same. Suddenly it is found that the starting head and sector from the first partition of the disk is not 1,1, but 31,1. This is not normal!
While the normal should be something like this (this picture was re-cut by the laboratory machine when I posted to illustrate the point) :

This means that after the BIOS has read Boot Sector, the primary partition of the boot partition should start at an abnormal position, with an inexplicably blank space in front of it. Disk Read Error occurs when the BIOS loads the operating system with a strict check and thinks it has read something wrong.
This explains why the BIOS will load the OS incorrectly, while the BIOS will load the OS correctly when it is suspended from the disk (follow the boot Sector start/stop parameter, regardless of OS loading).
I think: this may be caused by my conversion of the primary partition to logical partition, and then to the primary partition. Since this logical partition needs an extended partition header to record the starting and ending positions of each logical partition under it, naturally its real free space is moved back, and the primary partition is not moved back.
After knowing this is easy, I manually modify the partition parameters in the software, will start magnetic head and sector to 1,1, so the partition of the natural thing is not, with a new ghost into a system. Mount startup, everything is OK!
 
 
Some other information on the Internet is summarized as follows:
Occurred: “A Disk Read Error Occurred once again. Press Ctrl+Alt+del to RESTART”, there are generally several possibilities:
1. Hardware failure: Data line aging, interface loosing, motherboard aging (capacitor)
Performance: normal use, sudden occurrence of this problem, on and off.
Solution: Clean the ash and reinsert. Check the capacitance. In addition, someone on the Internet said that UDMA support was cancelled in the BIOS. I found the original post, and the original author said that the capacitor was found to swell, and this capacitor is UDMA circuit, so this method is not common, or fix the motherboard/replace the motherboard.
2. Hard disk failure:
Performance: normal use, suddenly this problem, and then continue to do so, and recall the case (hard disk) recently received a large impact.
Solution: Hard disk low grid.
3. Hard disk setup:
Performance: the new system appears, and is likely to be normally accessible from the slave disk on other machines.
Solution: Check the hard disk partition parameters, set the partition of the operating system installation as the primary partition, Active, non-hidden, start cylinder: 0, start head: 1, start sector: 1.

Detailed explanation of UART, SPI and IIC and their differences and relations

UART, SPI, IIC and their differences and connections
UART: full duplex asynchronous serial
I2C: half duplex synchronous serial
SPI: full duplex synchronous serial
Bus synchronous or asynchronous: See if there is a clock line
The bus is serial or parallel: bit by bit transmission on the communication line is serial, and multiple data bits are parallel
1) simplex data transmission only supports data transmission in one direction; Only one party can receive or send a message at the same time, such as television or radio.
2) half duplex data transmission allows data to be transmitted in two directions, but, at a certain time, only data is allowed to be transmitted in one direction. It is actually a simplex communication with direction switching; Only one party can receive or send messages at the same time. Two-way communication can be realized. Example: Walkie-talkie.
3) full-duplex data communication allows data to be transmitted in two directions at the same time. Therefore, full-duplex communication is the combination of two simplex communication modes. It requires sending equipment and receiving equipment to have independent receiving and sending capabilities. At the same time, information can be received and sent at the same time, realizing two-way communication, for example: telephone communication.