Tag Archives: cloud computing

[Solved] libvirtd Error: virNetServerAddClient:271 : Too many active clients

error: virNetServerAddClient:271 : Too many active clients (20), dropping connection from 127.0.0.1; 0

Reason: The number of libvirt client links exceeds the maximum number allowed by libvirtd, causing new client links to be discarded
Solution: Temporary workaround: modify max_clients in /etc/libvirt/libvirtd.conf to be larger, then restart libvirtd
Long-term solution: locate the cause of client link overflow on the server

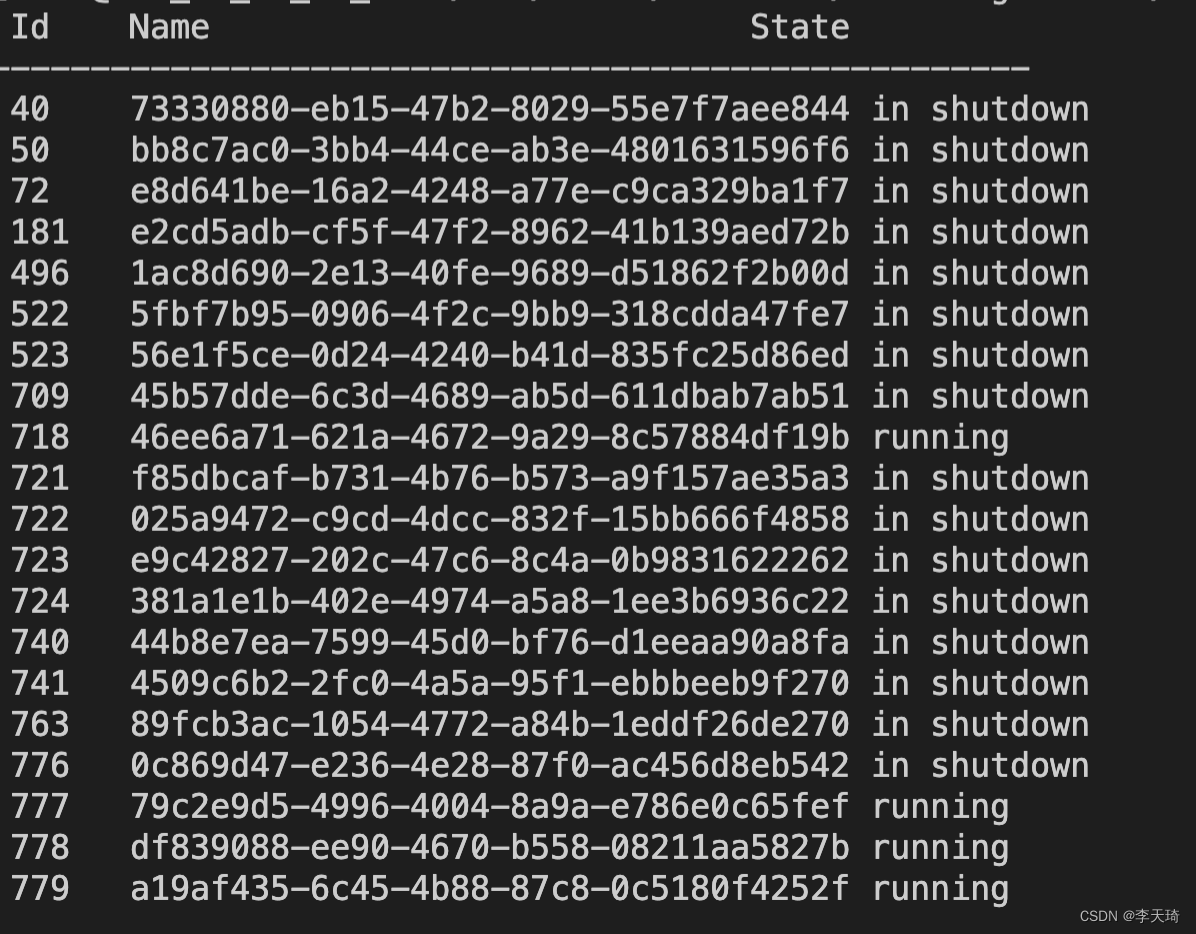
The following figure shows that the destruction of a large number of cvm sub machines on the server failed, resulting in client link overflow. The solution is to migrate the running cvm sub machines on the master machine, and then restart the master machine

Failed to remove multipath map 320b508ca45022b80 [How to Solve]

Failed to remove multipath map 320b508ca45022b80

1. Project scenario

Host os:kylin-server-10-sp1-release-build02-20210518-arm64
docker:docker-ce-18.09.7
cloud: openstack queens
storage: same acs5000
VM os: kylin-server-10-sp1-release-build02-20210518-arm64


2. Problem description and cause analysis

2.1 problem description

The volume-based virtual machine can be created normally, but the error after restarting the virtual machine, checking the logs of nova-compute, found that it reports ProcessExecutionError:unexpected error while running command. command: multipah -f 320b508ca45022b80 failed, map in use, failed to remove multipath map 320b508ca45022b80.
I manually executed multipah -f 320b508ca45022b80, and it did report the status of in use, so I suspect that there are processes using the volume, and I found that the same volume group name was activated through lvdisplay, vgdisplay and lsblk, so I suspect that the virtual machine and the physical machine used the same volume group name, and the volume group name was activated after the virtual machine started. The VM has been activated, and the process of reactivating all logical volumes in the volume group failed, resulting in multipath -f failure. Therefore, we need to configure lvm to activate only the logical volumes of the system, check the system volumes by lsblk, and then configure accordingly, edit /etc/lvm/lvm.conf and modify the following content

devices {
        filter = [ "a/sda/", "r/.*/" ]
}
allocation {
       volume_list = ["klas"]
       auto_activation_volume_list = ["klas"]
}

Restart service:

systemctl restart lvm2-lvmetad.service lvm2-lvmetad.socket

Re create the virtual machine and restart it. It is also recommended that the virtual machine adopt other volume group names

2.2 storage configuration

2.2.1 drive

Use the same driver version zeus-driver-3.1.2.000106, copy the driver to the cinder_volume container /usr/lib/python2.7/site-packages/cinder/volume/drivers/ directory and the cinder_backup container /usr/lib/python2.7/site-packages/cinder/backup/drivers/ directory, and restart the related services.

2.2.2 configure cinder volume

vim /etc/kolla/cinder-volume/cinder.conf

[DEFAULT]
enabled_backends=toyou_ssd
[toyou_ssd]
volume_driver = cinder.volume.drivers.zeus.Acs5000_iscsi.Acs5000ISCSIDriver
san_ip = x.x.x.x
use_mutipath_for_image_xfer = True
image_volume_cache_enabled = True
san_login = cliuser
san_password = ******
acs5000_volpool_name = toyou_ssd
acs5000_target = 0
volume_backend_name = toyou_ssd

Restart the cinder-volume service. For others, please refer to the “reference scheme”


3. Solutions

View the adopted system disk through lsblk, and then edit /etc/lvm/lvm.conf to modify the following contents

devices {
        filter = [ "a/sda/", "r/.*/" ]
}
allocation {
       volume_list = ["klas"]
       auto_activation_volume_list = ["klas"]
}

Restart service:

systemctl restart lvm2-lvmetad.service lvm2-lvmetad.socket

Note that it is mainly the filter. The drive letter in the filter is determined by the system disk recognized by lsblk, which may be SDB or nvme, etc

K8s ❉ Error: cannot be handled as a** [How to Solve]

Error Messages:

[root@master ~]# kubectl create -f pod-nginx.yaml 
namespace/dev created
Error from server (BadRequest): error when creating "pod-nginx.yaml": pod in version "v1" cannot be handled as a Pod: no kind "pod" is registered for version "v1" in scheme "k8s.io/kubernetes/pkg/api/legacyscheme/scheme.go:30"


Solution:

Check the yaml file for the reason as below

apiVersion: v1
kind: pod  # Here it should be Pod, P should be capitalized
metadata:
    name: nginxpod
    namespace: dev
spec:
    containers:
    - name: nginx-containers
      image: nginx:latest

ERROR: Rancher must be ran with the –privileged flag when running outside of Kubernetes

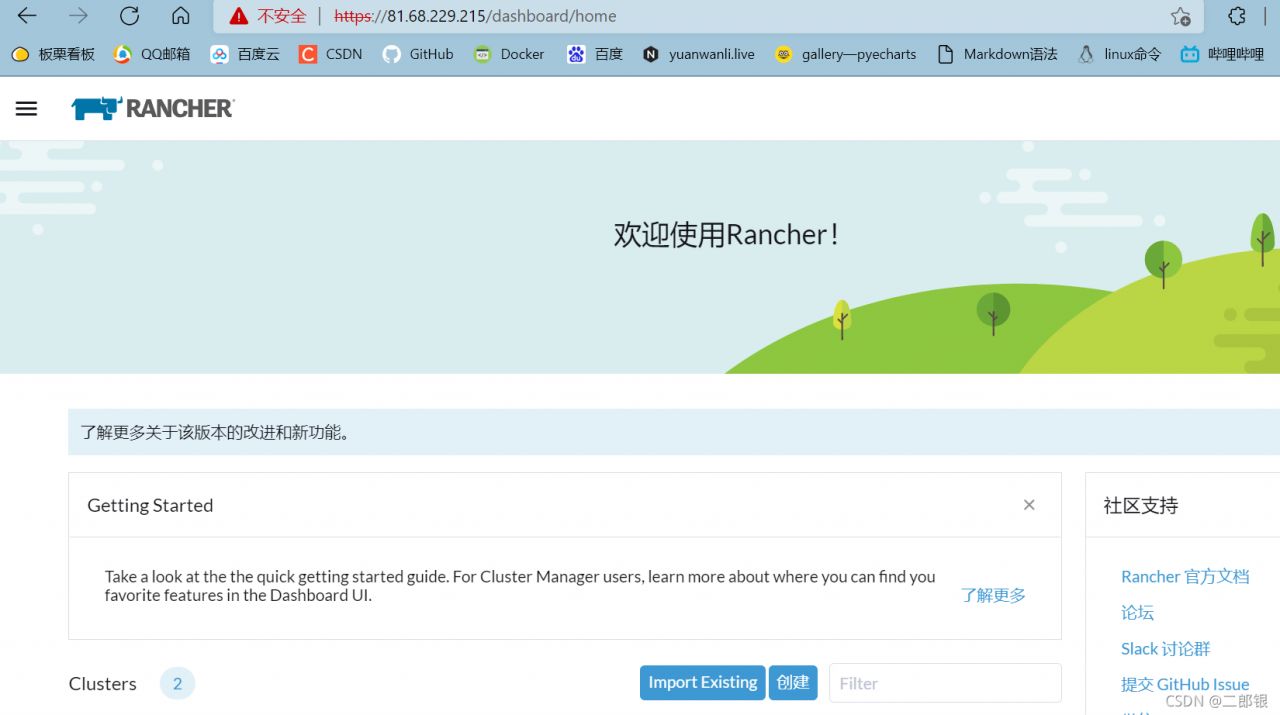
According to the document on the official website of rancher 2.4, only one Linux host is required. Remember that a single node rancher server can be quickly deployed. Of course, this can only be used for testing. Deployment is very convenient. Just start dcoker on the host, and then start a container:

sudo docker run -d --restart=unless-stopped -p 80:80 -p 443:443 rancher/rancher

After the test, it is found that the container is constantly restarted after startup, and there is no way to enter the UI, prompting a network error.

CONTAINER ID        IMAGE               COMMAND             CREATED             STATUS                         PORTS               NAMES
bfd5c52a1ce7        rancher/rancher     "entrypoint.sh"     12 hours ago        Restarting (1) 3 seconds ago                       elated_heisenberg

View log:

[root@k8s-node02 ~]# docker logs --tail 3 bfd5c52a1ce7
ERROR: Rancher must be ran with the --privileged flag when running outside of Kubernetes

If an error is found, it is said that — privileged is required to increase privileges
turn off the lifting appliance — privileged to try:

docker run -d --restart=unless-stopped --privileged  -p 80:80  -p 443:443 rancher/rancher

Found it

Amdcpu kvm & openstack virtualization nesting error [How to Solve]

Create instance error
Exceeded maximum number of retries. Exhausted all hosts available for retrying build failures for instance 82438533-1d24-417f-9e33-f98110e10160.].
nova.compute log:

ERROR nova.compute.manager [instance: 82438533-1d24-417f-9e33-f98110e10160] qemu-kvm: ../target/i386/kvm/kvm.c:2778: kvm_buf_set_msrs: Assertion `ret == cpu->kvm_msr_buf->nmsrs' failed.

Solution:

sudo tee /etc/modprobe.d/qemu-system-x86.conf << EOF
options kvm ignore_msrs=1
EOF

Reboot
the instance was created successfully

Parsing error name or service not known [How to Solve]

Problem phenomenon

On the node7 node of Alibaba OCP cluster, a domain name cannot be resolved when it is resolved. Error message: name or service not known

Troubleshooting

After testing, it is found that this problem does not only occur in node7 nodes. In all servers in Alibaba cloud East China 2 (Shanghai) zone F, the domain name cannot be resolved (other zones are normal).

Conclusion

After confirming with ALI engineers, the problem is caused by the fact that the self built DNS authoritative server that resolves the domain name does not support EDNS. The DNS community requires that the authoritative server must support EDNS, otherwise the localdns does not have a work around mechanism. However, due to different versions of alicloud’s localdns, it has not been completely upgraded. Therefore, some regions (availability zone f) comply with this Convention and cannot be parsed, while some regions are compatible with this workaround and can be parsed

Solution

(1) The other side creates its own authoritative DNS and turns on EDNS
(2) modify the resolver of ECs to 223.5.5.5 and 223.6.6. The two DNS have not removed the workaround of ends

[Solved] NIC cannot be generated vf, intel/mellanox, write error: Cannot allocate memory “not enough MMIO resources for SR-IOV”

Phenomenon: # echo 2 > /sys/class/infiniband/mlx5_0/device/mlx5_num_vfs
write error: Cannot allocate memory
#echo 8 > /sys/class/net/enp1s0f0/device/sriov_numvfs
write error: Cannot allocate memory
Verification.
You can see this error in dmesg “not enough MMIO resources for SR-IOV”
Analysis.
Due to BIOS limitations or errors, the PCI code cannot reallocate enough MMIO. RHEL’s SR-IOV support makes it necessary to have enough resources to map all possible VFs, otherwise all VF MMIO space allocation will fail.
Solution.
1. The BIOS does not provide enough MMIO space for the VFs. Contact your hardware vendor for a firmware or bios update.
2. As a workaround, you can pass “pci=realloc” to kernel 2.6.32-228.el6 during boot.
Implementation.
Add the following section in red to grub.cfg.
[root@localhost ~]# cat /etc/default/grub
GRUB_TIMEOUT=5
GRUB_DISTRIBUTOR=”$(sed ‘s, release .*$,,g’ /etc/system-release)”
GRUB_DEFAULT=saved
GRUB_DISABLE_SUBMENU=true
GRUB_TERMINAL_OUTPUT=”console”
GRUB_CMDLINE_LINUX=”crashkernel=auto resume=/dev/mapper/cl-swap rd.lvm.lv=cl/root rd.lvm.lv=cl/swap rhgb quiet iommu=pt intel_iommu=on pci=assign-busses pci=realloc”
GRUB_DISABLE_RECOVERY=”true”
GRUB_ENABLE_BLSCFG=true
[root@localhost ~]#
Verification:
[root@localhost ~]# cat /proc/cmdline
BOOT_IMAGE=(hd0,gpt9)/vmlinuz-4.18.0-240.22.1.el8_3.x86_64 root=/dev/mapper/cl-root ro crashkernel=auto resume=/dev/mapper/cl-swap rd.lvm.lv=cl/root rd.lvm.lv=cl/swap rhgb quiet iommu=pt intel_iommu=on pci=assign-busses pci=realloc
[root@localhost ~]#
[root@localhost ~]#
[root@localhost ~]# lspci
00:00.0 Host bridge: Intel Corporation Device 9b33 (rev 05)
00:01.0 PCI bridge: Intel Corporation 6th-9th Gen Core Processor PCIe Controller (x16) (rev 05)
00:02.0 VGA compatible controller: Intel Corporation Device 9bc5 (rev 05)
00:08.0 System peripheral: Intel Corporation Xeon E3-1200 v5/v6/E3-1500 v5/6th/7th/8th Gen Core Processor Gaussian Mixture Model
00:12.0 Signal processing controller: Intel Corporation Comet Lake PCH Thermal Controller
00:14.0 USB controller: Intel Corporation Comet Lake USB 3.1 xHCI Host Controller
00:14.2 RAM memory: Intel Corporation Comet Lake PCH Shared SRAM
00:15.0 Serial bus controller [0c80]: Intel Corporation Comet Lake PCH Serial IO I2C Controller #0
00:16.0 Communication controller: Intel Corporation Comet Lake HECI Controller
00:17.0 SATA controller: Intel Corporation Device 06d2
00:1b.0 PCI bridge: Intel Corporation Comet Lake PCI Express Root Port #21 (rev f0)
00:1c.0 PCI bridge: Intel Corporation Device 06bd (rev f0)
00:1c.6 PCI bridge: Intel Corporation Device 06be (rev f0)
00:1f.0 ISA bridge: Intel Corporation Device 0687
00:1f.3 Audio device: Intel Corporation Comet Lake PCH cAVS
00:1f.4 SMBus: Intel Corporation Comet Lake PCH SMBus Controller
00:1f.5 Serial bus controller [0c80]: Intel Corporation Comet Lake PCH SPI Controller
00:1f.6 Ethernet controller: Intel Corporation Ethernet Connection (11) I219-LM
01:00.0 Ethernet controller: Mellanox Technologies MT27800 Family [ConnectX-5]
01:00.1 Ethernet controller: Mellanox Technologies MT27800 Family [ConnectX-5]
01:00.2 Ethernet controller: Mellanox Technologies MT27800 Family [ConnectX-5 Virtual Function]
01:00.3 Ethernet controller: Mellanox Technologies MT27800 Family [ConnectX-5 Virtual Function]
01:00.4 Ethernet controller: Mellanox Technologies MT27800 Family [ConnectX-5 Virtual Function]
01:00.5 Ethernet controller: Mellanox Technologies MT27800 Family [ConnectX-5 Virtual Function]
02:00.0 Non-Volatile memory controller: Intel Corporation SSD 660P Series (rev 03)
03:00.0 PCI bridge: Texas Instruments XIO2001 PCI Express-to-PCI Bridge
05:00.0 Network controller: Qualcomm Atheros AR9287 Wireless Network Adapter (PCI-Express) (rev 01)
[root@localhost ~]#related commands:
#modprobe mlx5_core max_vfs=8
#mlxconfig -d /dev/mst/mt4119_pciconf0 q set SRIOV_EN=1 NUM_OF_VFS=8
#mst start    //mlx manager tools   mst status
modprobe:
options mlx4_core num_vfs=4 port_type_array=1,2 probe_vf=1echo 0 > /sys/class/net/enp1s0f0/device/sriov_numvfs
echo 8 > /sys/class/net/enp1s0f0/device/sriov_numvfs

Docker Startup Error: standard_init_linux.go:211: exec user process caused “no such file or directory”

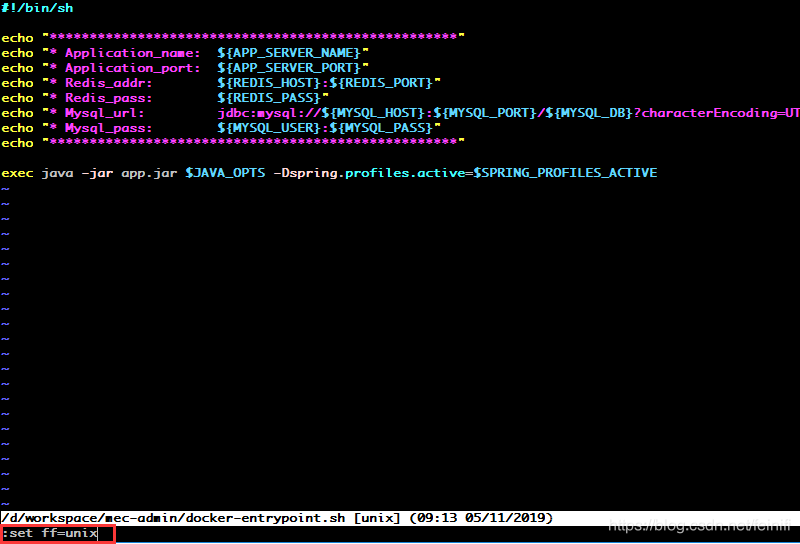
As shown in the question, start the Docker container according to the image built by yourself, exit directly, and check the error message in the container log without any other information. Internet search this problem, found that many people have encountered, the solution is also different, finally found an article. Inspired, my project is a Java project that builds a service running in the background with the ENTRYPOINT command starting the script docker-entrypoint.sh. My Docker-entrypoint. sh is edited under Windows, and the natural FileFormat is DOS. Here, it needs to be modified to Unix, and the modification method is also very simple. There is no need to operate under Linux.

After the modification is completed, the image can be built again. If the new image is started, no error will be reported, which is usually difficult to detect. I hereby record it, hoping to help someone who has encountered this mistake.

Building virtual machine environment based on kvm-qemu under ubuntu12.10 (12)

In addition to the initial mounting of the optical drive in the definition file of the virtual machine, Libvirt also has a dynamic platter mount method, which USES the Attach -device command in the virsh command. The format of this command is as follows:

dev@devhost:/opt/vm/xpvm1$sudo virsh attach-device < domain-name> filename

Where filename is a file defined in XML format (we’ll call it Disk.xml) :

< Disk type = “file” device = “cdrom” & gt; < The source file = “/ opt/vm/drivers. Iso/& gt;” < Target HDC dev = “”/& gt; < readonly/> < /disk>

The virtual machine was originally mounted ona CD-ROM called Windows_xp_professional_sp3_x89.ISO:

< domain type=’kvm’> & lt; name> XP_VM< /name> & lt; uuid> 91f15b08-e115-4016-a522-b550ff593af9< /uuid> & lt; memory> 1024000< /memory> & lt; currentMemory> 1024000< /currentMemory> & lt; vcpu> 1< /vcpu> & lt; os> & lt; Type the arch = ‘x86_64 machine =’ PC ‘& gt; hvm< /type> & lt; boot dev=’hd’/> & lt; boot dev=’cdrom’/> & lt; Bootmenu enable = ‘yes’/& gt; & lt; /os> & lt; features> & lt; acpi/> & lt; apic/> & lt; pae/> & lt; /features> & lt; cpu> & lt; The topology sockets = ‘1’ cores = ‘1’ threads = ‘1’/& gt; & lt; /cpu> & lt; = ‘localtime’ clock offset/& gt; & lt; on_poweroff> destroy< /on_poweroff> & lt; on_reboot> restart< /on_reboot> & lt; on_crash> restart< /on_crash> & lt; devices> & lt; emulator> /usr/bin/qemu-system-x86_64< /emulator> & lt; = ‘disk disk type =’ file ‘device’ & gt; & lt; Qemu driver name = ‘ ‘type =’ qcow2 ‘/ & gt; & lt; The source file = ‘/ opt/vm/xpvm1 xp_c. Img’ lock = ‘exclusive’/& gt; & lt; Target dev = ‘hda bus =’ ide ‘/ & gt; & lt; /disk> & lt; = ‘disk disk type =’ file ‘device’ & gt; & lt; Qemu driver name = ‘ ‘type =’ qcow2 ‘/ & gt; & lt; The source file = ‘/ opt/vm/xpvm1 xp_d. Img’ lock = ‘exclusive’/& gt; & lt; target dev=’hdb’ bus=’ide’/> & lt; /disk> & lt; = ‘cdrom disk type =’ file ‘device’ & gt; & lt; source file=’/opt/vm/windows_xp_professional_sp3_x86.iso’/> & lt; target dev=’hdc’/> & lt; readonly/> & lt; /disk> & lt; The channel type = ‘spicevmc & gt; & lt; Target type = ‘virtio’ name = ‘com. Redhat. Spice. 0’/& gt; & lt; Alias name = ‘virserial – channel1’/& gt; & lt; /channel> & lt; Interface type = ‘bridge’ & gt; & lt; MAC address = ’52:54:00:7 b: a8: d8’/& gt; & lt; The source bridge = ‘virbr0/& gt; & lt; = ‘vnet1’ target dev/& gt; & lt; The model type = ‘virtio/& gt; & lt; /interface> & lt; Input type = ‘tablet’ bus = ‘usb’/& gt; & lt; Graphics type=’spice’ port=’4000′ autoport=’no’ listen=’0.0.0.0′> & lt; Listen type = ‘address’ address = ‘0.0.0.0’/& gt; & lt; Agent_mouse mode = ‘off’/& gt; & lt; /graphics> & lt; Memballoon model = ‘virtio & gt; & lt; alias name=’balloon0’/> & lt; /memballoon> & lt; Sound model = ‘ac97 & gt; & lt; Address type=’ PCI ‘domain=’0x0000′ bus=’0x00′ slot=’0x04’ function=’0x0’/> & lt; /sound> & lt; video> & lt; The model type = ‘QXL vram =’ 65536 ‘heads =’ 1 ‘/ & gt; & lt; /video> & lt; /devices> & lt; qemu:commandline> & lt; Qemu: arg value = “-” CPU/& gt; & lt; Qemu: arg value = “kvm64″/& gt; & lt; /qemu:commandline> < /domain>

 
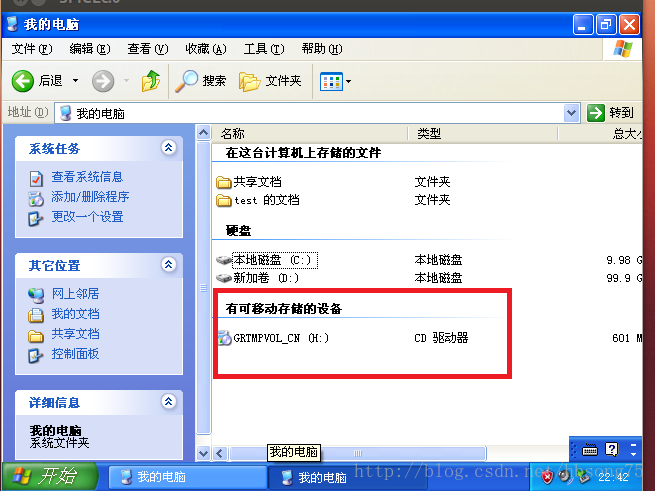
After installing the system, what you see in the virtual machine is:

 
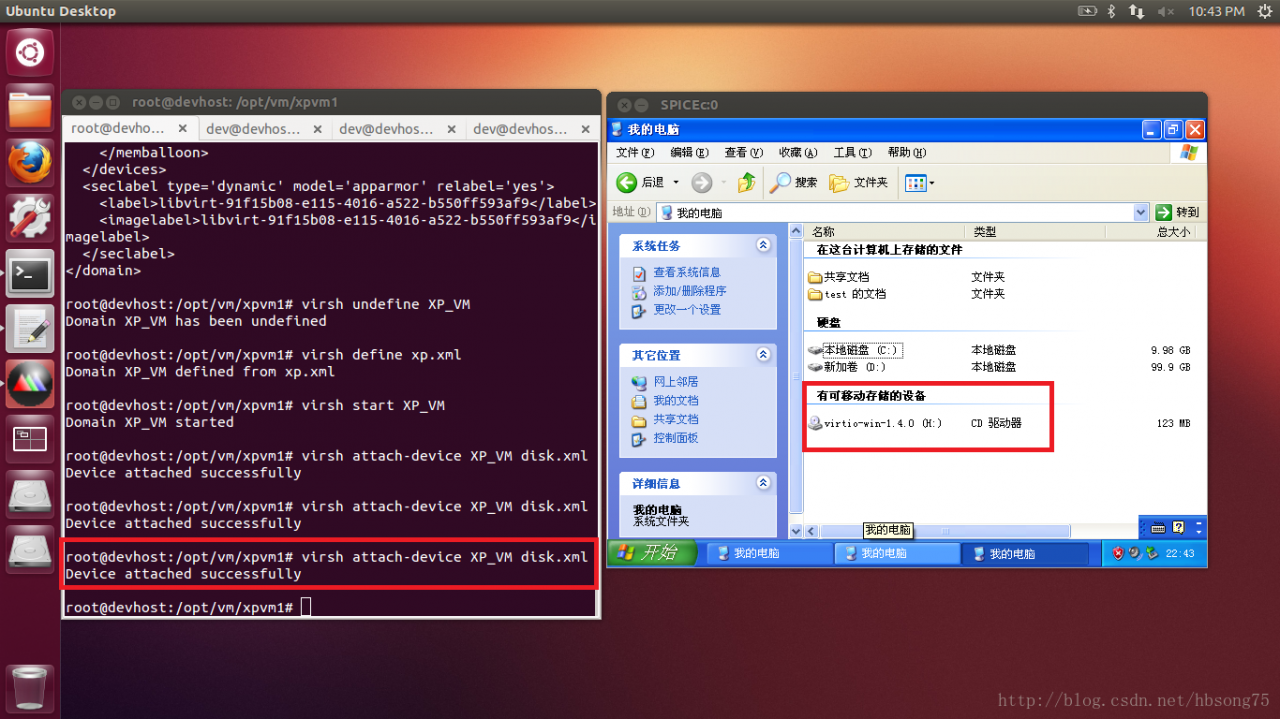
Instead of re-closing and defining a new disc file, we can change the disc using the Virsh Attach – Device command:
 

dev@devhost:/opt/vm/xpvm1$sudo virsh attaching -device XP_VM disk.xml


The advantage of doing this is that in some cases we can achieve the effect of a hot plug disc without having to restart the virtual machine.
Note: It should be noted that, after testing, there must first be an initial optical device in the defined XML, otherwise the execution of another optical device will fail: internal Error No device with bus ‘ide’ and target ‘HDC’ reported error.
That is, this is actually a swap, not a dynamic mount, and the cd-ROM device itself must be defined in XML before the virtual machine can be started.
 

Cloud computing learning route Courseware: XFS file system

= = = = = = = = = = = = = = = = = = = = = = = = = = = = = = = = = = = = = = = = = = = = = = = = = = = = = = = = = = = = = = = = = = = = = = = = = = = = = = = = = = = =
Centos7’s default file system, why abandon the EXT family?
EXT family has the most support:
But creating a file system (formatting) is slow!
But the repair is slow!
But file system storage capacity is limited!
XFS is also a journaling file system:
High capacity, support for large storage
High performance, fast file system creation/repair
Both inodes and blocks are generated dynamically when the system needs them
XFS file system
• Data section
The data area is the same as the ext family we learned about earlier, including information such as inode/data block/superblock.
• File system log section
• RealTime Section
Fix XFS file system XFS_repair
[root@tianyun ~]# xfs_repair /dev/vda1
xfs_repair: /dev/vda1 contains a mounted filesystem
xfs_repair: /dev/vda1 contains a mounted and writable filesystem
Fatal error – Couldn’t initialize XFS Library
[root@tianyun ~]# umount /dev/vda1
[root@tianyun ~]# xfs_repair /dev/vda1
Phase 1 – Find and Verify Superblock…
Phase 2 – using internal log
Zero the log… Scan filesystem freespace and inode maps… found root inode chunk

Linux Mint installs Hadoop environment

Using Hadoop-Language-2.8.4.jar, the command is as follows: ./share/hadoop/tools/lib/hadoop – streaming – 2.8.4. Jar – input/Mr – – the output/input/* Mr – output – the file/home/LZH/external/Mapper. Py – Mapper ‘Mapper. Py’ – the file/home/LZH/external/Reducer. Py – Reducer ‘Reducer.py’
Problem 1: bash:/share/hadoop/tools/lib/hadoop – streaming – 2.8.4. Jar: Permission denied
Solution: expand the file permissions, chmod -r 777/share/hadoop/tools/lib/hadoop – streaming – 2.8.4. Jar
Invalid File (bad Magic Number): Exec format Error
Solution: I was careless, and the command omitted the hadoop JAR in the front, and added it, namely: Hadoop jar./share/hadoop/tools/lib/hadoop – streaming – 2.8.4. Jar – input/Mr – – the output/input/* Mr – output – the file/home/LZH/external/Mapper. Py – Mapper ‘Mapper. Py’ – the file/home/LZH/external/Reducer. Py – Reducer ‘Reducer.py’
Problem 3 May be encountered: Mapper.py and reduc. py have to be turned to executable. Chmod +x filename modification permission is executable
When writing MapReduce in Python, it’s a good idea to start with: #! The /usr/bin/env python statement
And finally it works

Hadoop worked fine, but for other reasons, I pressed the power button to force a shutdown, huh?After starting start-up, start start-up all-sh, and then JPS check that there is a missing Datanode in Hadoop, FS-LS/Input, it is found that it cannot connect to 127.0.0.1. Restart hadoop again when starting Hadoop, it is found that it can also create folders by running the command Hadoop, FS-LS/Input, but there is a problem 3 when putting file: Put the File/input/inputFile. TXT. _COPYING_ could only be replicated to 0 home nodes minReplication (= 1). There are 0 datanode (s) running and no node (s) are excluded in this operation.
At this point, stop-all.sh discovers no Proxyserver to stop and no Datanode to stop. (pro test the first solution is successful)
Reason 1: Every time the Namenode Format creates a namenodeId again, while under Hadoop.tmp. dir contains the ID generated by the last format. The Namenode format cleans up the data under the Namenode, but does not clean up the data under the Datanode, which causes failure at startup.
Here are two solutions:

rm -rf /opt/hadoop/ DFS /name/*
rm -rf/rf /hadoop/ DFS /name/*
remove the contents of the “DFS. Datand. data.dir”
rm-rf /opt/hadoop/ DFS /data/*
2) delete files beginning with “hadoop” under “hadoop.tmp.dir”
rm-rf /apt/hadoop/ TMP /hadoop*
3) reformat hadoop
hadoop namenode-format
4) start hadoop
The disadvantage of the start-all-sh
scheme is that all the important data on the original cluster is gone. Therefore, the second scheme is recommended:
1) modify the namespaceID of each Slave so that it is consistent with the Master’s namespaceID.
or
2) modify the Master’s namespaceID to match the Slave’s namespaceID.
Master “namespaceID” located in the “/ opt/hadoop/DFS/name/current/VERSION” file, the Slave “namespaceID” is located in the “//opt/hadoop/DFS/data/current/VERSION” file.

reason 2: the problem is that hadoop USES the mapred and DFS process Numbers on the datanode when it stops. While the default process number is saved under/TMP, Linux defaults to delete files in this directory every once in a while (usually a month or 7 days). Therefore, after deleting the two files of Hadoop-Hadoop-Jobtracker. pid and Hadoop-Hadoop-Namenode. Pid, the Namenode will naturally not find the two processes on the Datanode.
configuring export HADOOP_PID_DIR in the configuration file hadoop_env.sh solves this problem.
In the configuration file, the default path for HADOOP_PID_DIR is “/var/hadoop/pids”, we will manually create a “Hadoop” folder in the “/var” directory, if it already exists, do not create it, remember to chown the permissions to hadoop users. Then kill the process of the Datanode and Tasktracker in Slave (kill -9 process number), restart -all.sh and stop-all.sh without a “No Datanode to stop”, indicating that the problem has been solved.

Run.sh: Bash:./run.sh: Permission denied
Solutions:
Use the command chmod to modify the directory. Sh permissions can be
Such as chmod u + x *. Sh
A Container killed on requisition.exit code is 143.
I just ran out of memory. There are two ways to solve it perfectly:
1. Several more Mapper and Reducer are specified during the runtime:
-d mapred.map.tasks=10 \ #command [genericOptions] [commandOptions]
-d mapred.reduce.tasks=10 \ # note that -d is genericOptions,
before the other parameters
– numReduceTasks 10
2. Modify yarn-site.xml to add the following attributes:

<property>
   <name>yarn.nodemanager.vmem-check-enabled</name>
   <value>false</value>
   <description>Whether virtual memory limits will be enforced for containers</description>
</property>

<property>
   <name>yarn.nodemanager.vmem-pmem-ratio</name>
   <value>4</value>
   <description>Ratio between virtual memory to physical memory when setting memory limits for containers</description>
</property> 

Reference:

[Python] Implement Hadoop MapReduce program in Python: calculate the mean and variance of a set of data
Error from server (alreadyexists) clusterrolebindings.rbac.authorization .k8s.io “kubelet

problem description

create bootstrap role to give permission to connect apiserver request signature error, modified as follows:

[root@localhost kubeconfig]# kubectl create clusterrolebinding kubelet-bootstrap –clusterrole=system:node-bootstrapper –user=kubelet-bootstrap
Error from server (AlreadyExists): Clusterrolebindings, rbac authorization. K8s. IO “kubelet – the bootstrap” already exists

problem analysis

this is because an incorrect signature has been created previously, the signature is occupied, and the occupied signature

needs to be deleted

problem solved

1. Delete signature

kubectl delete clusterrolebindings kubelet-bootstrap

2, recreate successfully

[root@localhost kubeconfig]# kubectl create clusterrolebinding kubelet-bootstrap –clusterrole=system:node-bootstrapper –user=kubelet-bootstrap
clusterrolebinding.rbac.authorization.k8s.io/kubelet-bootstrap created