Category Archives: How to Fix

How to use torch.sum()

torch. Sum () sums up one dimension of the input tensor data, which are divided into two forms:

1.torch.sum(input, dtype=None)
2.torch.sum(input, list: dim, bool: keepdim=False, dtype=None) → Tensor
 
input:输入一个tensor
dim:要求和的维度,可以是一个列表
keepdim:求和之后这个dim的元素个数为1,所以要被去掉,如果要保留这个维度,则应当keepdim=True
#If keepdim is True, the output tensor is of the same size as input except in the dimension(s) dim where it is of size 1. 

example:

a = torch.ones((2, 3))
print(a):
tensor([[1, 1, 1],
 		[1, 1, 1]])

a1 =  torch.sum(a)
a2 =  torch.sum(a, dim=0)
a3 =  torch.sum(a, dim=1)

print(a)
print(a1)
print(a2)

output:

tensor(6.)
tensor([2., 2., 2.])
tensor([3., 3.])

if you add keepdim=True, the dim dimension is kept from being squeezed

a1 =  torch.sum(a, dim=(0, 1), keepdim=True)
a2 =  torch.sum(a, dim=(0, ), keepdim=True)
a3 =  torch.sum(a, dim=(1, ), keepdim=True)

output:

tensor([[6.]])
tensor([[2., 2., 2.]])
tensor([[3., 3.]])

</ div>

torch.cuda.is_ Available() returns false

1, problem

after the torch gpu version is installed, torch.cuda.is_available() always returns False; But the execution of the torch. Backends. Cudnn. Enabled is TRUE.

execute nvidia-smi command without error, can display the driver information;

on the Internet, search the solution: execute the command:

sudo apt-get install nvidia-cuda-toolkit

still gives an error.

2, problem analysis

try various way, or still returns False, normal if installed correctly, return TRUE, the problem is that version of the problem, either a video card driver versions do not match, either install packages do not match.

3. Solution:

(1) method 1: update the video card driver. This method is risky and troublesome to operate, so it is not recommended.

(2) method two: find the corresponding version of cudatoolkit for installation: the specific version of each driver support, as follows:

https://docs.nvidia.com/deploy/cuda-compatibility/#binary-compatibility

installation method:

 conda install pytorch torchvision cudatoolkit=xxx(选择对应的版本) -c pytorch


Get picture captcha with Python + Chrome

.

we’ll start by importing some libraries that we’ll use in our code:

import re  # 正则
import time  # 代码停顿执行
from selenium import webdriver  # 打开访问的网站
from PIL import Image  # 图片 安装PIL --> Pillow
import pytesseract  # 图片转文字

(if the above some library file is not installed, can be used in the terminal PIP command to install, or for installation in pyCharm oh, you can refer to https://blog.csdn.net/YuanLiYin079/article/details/108726138, the installation method of selenium in the article to try)

to get the captcha, we need to go to the browser we are going to visit (in this case, using the Google browser)

# chromedriver.exe文件放置的路径(根据自己的路径做适当的修改)
chrome_driver = r"C:\Users\Admin\AppData\Local\Programs\Python\Python37\Lib\site-packages\selenium\webdriver\chrome\chromedriver.exe"
driver = webdriver.Chrome(executable_path=chrome_driver)
driver.maximize_window()
driver.implicitly_wait(3)  # 等待3秒
login_url = 'https://我们要访问的登录页面的地址写在这里哦.com'
# 进入访问地址的登录页面
driver.get(login_url)
time.sleep(3)

enter the page, start to get the captcha!

# 获取图片验证码
# 1、全屏截图,设置要将图片放置的路径
driver.save_screenshot('D:\Python_work\images\image.png')
# 2、获取图片验证码坐标和大小
code_image = driver.find_element_by_class_name('verifyCodeImg')
code_location = code_image.location
code_image_size = code_image.size
time.sleep(2)
print("验证码的坐标为:", code_location)  # 控制台查看{'x': 716, 'y': 475}
print("验证码的大小为:", code_image_size)  # 图片大小{'height': 48, 'width': 140}

# 3、图片4个点的坐标位置
left = code_image.location['x']  # x点的坐标
top = code_image.location['y']  # y点的坐标
right = left + code_image.size['width']  # 上面右边点的坐标
Rdown = top + code_image.size['height']   # 下面右边点的坐标
image = Image.open('D:\Python_work\images\image.png')

# 4、将图片验证码截取
code_image = image.crop((left, top, right, Rdown))
code_image.save('D:\Python_work\images\image1.png')  # 截取的验证码图片保存为新的文件
codeStr = pytesseract.image_to_string(code_image)  # 图片转文字
# 5、去除识别出来的特殊字符
codeStrS = re.sub(u"([^\u4e00-\u9fa5\u0030-\u0039\u0041-\u005a\u0061-\u007a])", "", codeStr)
result_four = codeStrS[0:4]  # 只获取前4个字符
print(codeStrS)  # 打印识别的验证码

now we can see the obtained captcha we printed out in the console, perform your input operation, and see what happens!


install pytesseract,
download the tesseract_ocr file from https://github.com/UB-Mannheim/tesseract/wiki, install:
remember the path to install because it will be used later.


then, open found an error, open the pytesseract. Py files, Find tesseract_cmd, comment out the original, and add a new one: tesseract_cMD = “path /tesseract.exe”. Then execute the code, and it will execute successfully.

No value has been specified for this provider

The project on github has encountered a problem for the first time:

No value has been specified for this provider

remove Settings. Include “xxxapp” in gradle and then File-> Sync project with gradles

Settings. Gradle include “xxxapp” and then File-> Sync project with gradles

https://www.jianshu.com/p/25c57ba7421a

met Unable to resolve the dependency for ‘: app @ the debug/compileClasspath: Could not resolve com. Google. Android. The GMS: play – services – basement: [15.0.0, 16.0.0)

Tensorflow 2.1.0 error resolution: failed call to cuinit: CUDA_ ERROR_ NO_ DEVICE: no CUDA-capable device is detected

today in the use of keras-gpu in jupyter notebook error, at first did not pay attention to the console output, only from jupyter see error messages. So, check the solution, roughly divided into two, one version back, two specified running equipment. Because I felt that it was not the version problem, I still used the latest version without going back, so I tried the second method to solve the problem, that is, the program was designed to run the device, and the program could run without error. I accidentally noticed the console output and found that the CPU was running?Then found that the name of the specified device error, resulting in the system can not find the device, so first query the name of the device and then specify the device, to solve the problem.


native environment:

  • cudatoolkit = 10.1.243
  • cudnn = 7.6.5
  • tensorflow – gpu = 2.1.0
  • keras – gpu = 2.3.1

Jupyter notebook print error:

...
UnknownError:  Failed to get convolution algorithm. This is probably because cuDNN failed to initialize, so try looking to see if a warning log message was printed above.
	 [[node time_distributed_1/convolution (defined at C:\anaconda3\envs\keras\lib\site-packages\keras\backend\tensorflow_backend.py:3009) ]] [Op:__inference_keras_scratch_graph_1967]

Function call stack:
keras_scratch_graph

Jupyter notebook console print error: failed call to cuInit: CUDA_ERROR_NO_DEVICE: no cuda-capable device is detected


solution:

  1. to view native GPU/CPU information
from tensorflow.python.client import device_lib
device_lib.list_local_devices()

output:

[name: "/device:CPU:0"
 device_type: "CPU"
 memory_limit: 268435456
 locality {
 }
 incarnation: 16677593686354176255,
 name: "/device:GPU:0"
 device_type: "GPU"
 memory_limit: 1440405913
 locality {
   bus_id: 1
   links {
   }
 }
  incarnation: 787265797177696422
 physical_device_desc: "device: 0, name: GeForce 940MX, pci bus id: 0000:01:00.0, compute capability: 5.0"]
  1. can see that the native device has GPU, so use the following statement to specify the name of the running device:
    The attention! = The following must be the device name, each person’s device name may be different, do not copy, must first use the command query, then specify!
import os
os.environ['CUDA_VISIBLE_DEVICES'] = '/device:GPU:0'
  1. to view the currently loaded device:
import tensorflow as tf
sess = tf.compat.v1.Session(config=tf.compat.v1.ConfigProto(log_device_placement=True))

output:

Device mapping:
/job:localhost/replica:0/task:0/device:GPU:0 -> device: 0, name: GeForce 940MX, pci bus id: 0000:01:00.0, compute capability: 5.0
  1. console output similar to the following information explains that the code has been run on the GPU:

Problem: attributeerror: ‘tensor’ object has no attribute ‘creator’

AttributeError: ‘Tensor’ object has no attribute ‘creator’

according to the official pytorch documentation, the variable has the above three properties, but the error of not having this property appears when the creator property of the y operation is obtained.

import torch
from torch.autograd import Variable
x = Variable(torch.ones(1,3), requires_grad=True)
y = x+2
print('x: ', x)
print('y: ', y)
print(y.creator)

after checking, it is found that the name of creator property has been changed to grad_fn, and many documents have not been modified

on making commits: https://github.com/pytorch/tutorials/pull/91/files

after modification, run again, you can get the property Variable

of the created Function property of y

import torch
from torch.autograd import Variable
x = Variable(torch.ones(1,3), requires_grad=True)
y = x+2
print('x: ', x)
print('y: ', y)
print(y.grad_fn)

How to delete Microsoft AutoUpdate from Mac

how to remove Microsoft AutoUpdate from Mac

how to remove Microsoft AutoUpdate from Mac

want to remove Microsoft AutoUpdate from Mac?Maybe you uninstalled Microsoft Office or some other Microsoft application from the Mac, so you no longer need Microsoft applications to automatically update themselves. In any case, you can remove the Microsoft AutoUpdate application from the Mac OS.

if Microsoft AutoUpdate is currently running, you need to exit the application first. You can also force an exit from the Microsoft AutoUpdate application from the activity monitor if desired.

From the MacOS Finder, pull down the “Go” menu and select “Go To Folder” (or press Command + Shift + G) and enter the following path:
/Library/Application Support/Microsoft/

find the folder named “MAU” or “MAU2.0”, then open that directory
find and drag “Microsoft autoupdate.app” to the wastepaper basket

After closing the MAU folder and continuing to use Mac as usual
to delete Microsoft AutoUpdate, Microsoft AutoUpdate will no longer run or automatically run on the Mac to update the software.

if you still want to own and use on the Mac Microsoft applications, deleting Microsoft AutoUpdate application may result in some unexpected consequences, in addition to get outdated software from Microsoft, so if you are a heavy Microsoft software users, it is best not to delete it, Microsoft Office, Word, Outlook, PowerPoint, Excel, Edge or any other things.

* if you want to leave other items in deleted messages for the time being, you can also specifically delete the file from deleted messages.

if you know of any other ways to manage, tame, or remove Microsoft AutoUpdate applications on a Mac, please share them in the comments below!

Datagrip import & export table structure and data

right click directly next to the database you want to export and select dump with ‘mysqldump’

mysqldump是mysql用于转存储数据库的实用程序。

add the -d argument to the automatically generated command to export only the table structure without the data! if you want to export a file containing data, plus the -d parameter can be broken…

if the local mysqldump version is higher, for example, my local version is 8.0 and the target data source version is lower, the export will fail :

mysqldump: Couldn't execute 'SELECT COLUMN......

solution: add –column-statistics=0 to solve the problem

if you want to export the entire database that contains the data; Alternatively, use the command

at terminal

mysqldump -u root -p source1 > source2.sql

where source1 is the name of the database to be exported and

is the data name of the exported source.sql

import the exported source2.sql into the database using the following command :

/source/XXX XXX source2. SQL

where source2.sql is the data to be imported

before import , first to enter mysql, then to build a database, such as database, then into the database, finally execute the above command can be

Solution to unbalanced load of multiple cards (GPU’s 0 card is too high) in Python model training (simple and effective)

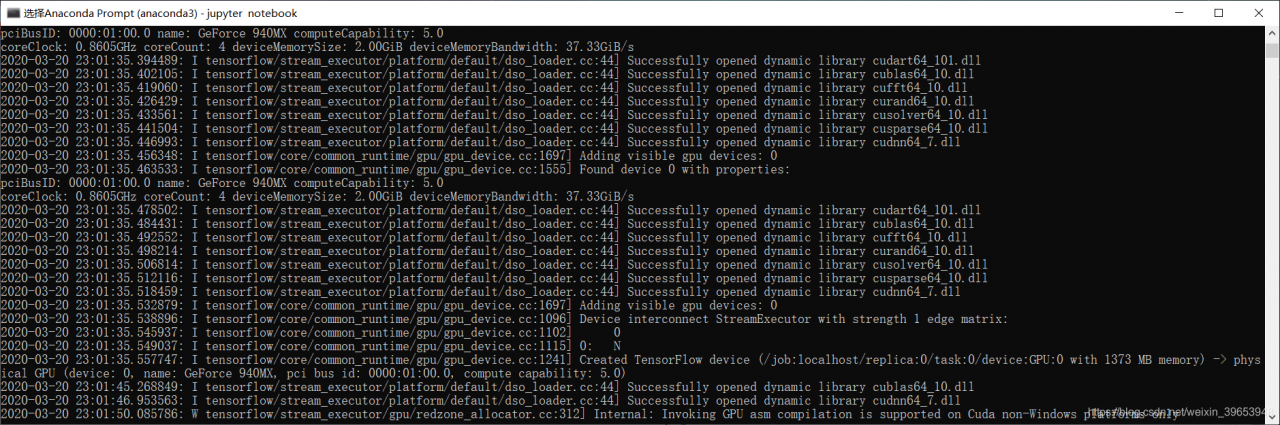
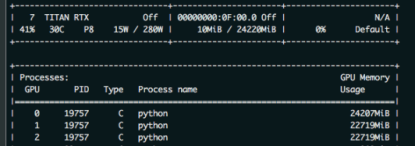
this paper mainly solves the problem that zero card of pytorch GPU occupies more video memory than other CARDS during model training. As shown in the figure below: the native GPU card is TITAN RTX, video memory is 24220M, batch_size = 9, and three CARDS are used. The 0th card video memory occupies 24207M. At this time, it just starts to run, and only a small amount of data is transferred to the video card. If the data is in multiple points, the video memory of the 0 card must burst. The reason why 0 card has higher video memory: During the back propagation of the network, the calculated gradient of loss is calculated on 0 card by default. So will be more than other graphics card some video memory, how much more specific, mainly to see the structure of the network.

as a result, in order to prevent training was interrupted due to out of memory. The foolhardy option is to set batch_size to 6, or 2 pieces of data per card.
batch_size = 6, the other the same, as shown in the figure below

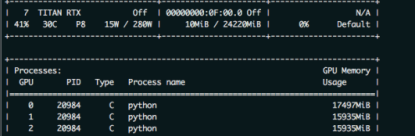
have found the problem?Video memory USES only 1,2 CARDS and less than 16 gigabytes of memory. The batch_size is sacrificed because the 0 card might exceed a little bit of video memory.
so there’s no more elegant way?The answer is yes. That is borrowed from the transformer – xl BalancedDataParallel used in the class. The code is as follows (source) :

import torch
from torch.nn.parallel.data_parallel import DataParallel
from torch.nn.parallel.parallel_apply import parallel_apply
from torch.nn.parallel._functions import Scatter


def scatter(inputs, target_gpus, chunk_sizes, dim=0):
    r"""
    Slices tensors into approximately equal chunks and
    distributes them across given GPUs. Duplicates
    references to objects that are not tensors.
    """

    def scatter_map(obj):
        if isinstance(obj, torch.Tensor):
            try:
                return Scatter.apply(target_gpus, chunk_sizes, dim, obj)
            except Exception:
                print('obj', obj.size())
                print('dim', dim)
                print('chunk_sizes', chunk_sizes)
                quit()
        if isinstance(obj, tuple) and len(obj) > 0:
            return list(zip(*map(scatter_map, obj)))
        if isinstance(obj, list) and len(obj) > 0:
            return list(map(list, zip(*map(scatter_map, obj))))
        if isinstance(obj, dict) and len(obj) > 0:
            return list(map(type(obj), zip(*map(scatter_map, obj.items()))))
        return [obj for targets in target_gpus]

    # After scatter_map is called, a scatter_map cell will exist. This cell
    # has a reference to the actual function scatter_map, which has references
    # to a closure that has a reference to the scatter_map cell (because the
    # fn is recursive). To avoid this reference cycle, we set the function to
    # None, clearing the cell
    try:
        return scatter_map(inputs)
    finally:
        scatter_map = None


def scatter_kwargs(inputs, kwargs, target_gpus, chunk_sizes, dim=0):
    """Scatter with support for kwargs dictionary"""
    inputs = scatter(inputs, target_gpus, chunk_sizes, dim) if inputs else []
    kwargs = scatter(kwargs, target_gpus, chunk_sizes, dim) if kwargs else []
    if len(inputs) < len(kwargs):
        inputs.extend([() for _ in range(len(kwargs) - len(inputs))])
    elif len(kwargs) < len(inputs):
        kwargs.extend([{} for _ in range(len(inputs) - len(kwargs))])
    inputs = tuple(inputs)
    kwargs = tuple(kwargs)
    return inputs, kwargs


class BalancedDataParallel(DataParallel):

    def __init__(self, gpu0_bsz, *args, **kwargs):
        self.gpu0_bsz = gpu0_bsz
        super().__init__(*args, **kwargs)

    def forward(self, *inputs, **kwargs):
        if not self.device_ids:
            return self.module(*inputs, **kwargs)
        if self.gpu0_bsz == 0:
            device_ids = self.device_ids[1:]
        else:
            device_ids = self.device_ids
        inputs, kwargs = self.scatter(inputs, kwargs, device_ids)
        if len(self.device_ids) == 1:
            return self.module(*inputs[0], **kwargs[0])
        replicas = self.replicate(self.module, self.device_ids)
        if self.gpu0_bsz == 0:
            replicas = replicas[1:]
        outputs = self.parallel_apply(replicas, device_ids, inputs, kwargs)
        return self.gather(outputs, self.output_device)

    def parallel_apply(self, replicas, device_ids, inputs, kwargs):
        return parallel_apply(replicas, inputs, kwargs, device_ids)

    def scatter(self, inputs, kwargs, device_ids):
        bsz = inputs[0].size(self.dim)
        num_dev = len(self.device_ids)
        gpu0_bsz = self.gpu0_bsz
        bsz_unit = (bsz - gpu0_bsz) // (num_dev - 1)
        if gpu0_bsz < bsz_unit:
            chunk_sizes = [gpu0_bsz] + [bsz_unit] * (num_dev - 1)
            delta = bsz - sum(chunk_sizes)
            for i in range(delta):
                chunk_sizes[i + 1] += 1
            if gpu0_bsz == 0:
                chunk_sizes = chunk_sizes[1:]
        else:
            return super().scatter(inputs, kwargs, device_ids)
        return scatter_kwargs(inputs, kwargs, device_ids, chunk_sizes, dim=self.dim)

you can see, in the code BalancedDataParallel inherited the torch. The nn. DataParallel, through the custom after 0, the size of the card batch_size gpu0_bsz, namely 0 card a bit less data. Balance the memory usage of 0 CARDS with other CARDS. The invocation code is as follows:

import BalancedDataParallel

 if n_gpu > 1:
    model = BalancedDataParallel(gpu0_bsz=2, model, dim=0).to(device)
    # model = torch.nn.DataParallel(model)

gpu0_bsz: 0 card batch_size of GPU;
model: model;
dim: batch dimension

as a result, we might as well just batch_size set to 8, namely gpu0_bsz = 2 try, the results are as follows:

the batch_size from 6 to 8 of success, because 0 put a batch less, therefore, will be smaller than the other CARDS. But sacrificing the video memory of one card to the video memory of others, eventually increasing the batch_size, is still available. The advantages of this method are even more obvious when the number of CARDS is large.

[How to Fix] NameError: name ‘requests‘ is not defined & NameError: name ‘request‘ is not defined

NameError: name ‘requests‘ is not defined is lack of package import requests;
NameError: name ‘request’ is not defined because of lack of package from flask import request.
these two look too much alike, but they don’t work the same way. “Requests” is for getting GET, POST requests, etc., such as

 r = requests.get('https://api.github.com/user', auth=('user', 'pass'))

“request” is used to get form data such as

request.form.get("value")

, or the front-end request method, etc. For more details, please refer to request

in flask

reference:
Requests: let HTTP service humans
NameError: name ‘request’ is not defined