Category Archives: How to Fix

Failure [INSTALL_PARSE_FAILED_NO_CERTIFICATES: … has no certificates at entry AndroidManifest.xml]


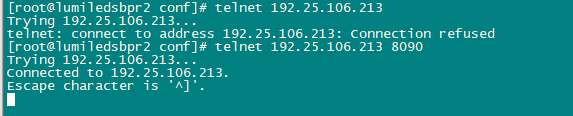
For a long time, We used packer-ng-plugin and didn’t notice the difference between using Android Studio for packaging. Today, I wrote a demo and found that only one installation was successful after I typed in my signature, and the following were all installation errors: Failure [INSTALL_PARSE_FAILED_NO_CERTIFICATES: Package /data/app/vmdl924957567.tmp/base.apk has no certificates at entry AndroidManifest.xml]
Analyze and find the cause of the problem:
Possible cause: A mobile version problem?Google later found that there are actually two versions of Signature. APK Signature Scheme v2 is introduced in Android7.0, and v1 is jar Signature from JDK. I was using Android Studio3.1, and it was only through a query that I knew there was a difference between the two versions. The old version probably didn’t and didn’t notice the change very much. After all, you don’t need signature packaging every day, and you don’t need to move it once it’s configured, so you don’t notice it.
V1: It should be verified by a ZIP entry so that APK can be signed for many changes – you can move or even recompress the file.
V2: Validates all bytes of the compressed file, not a single ZIP entry, so it cannot be changed after signing (including Zipalign). Because of this, we now merge compression, tuning, and signing in one step during compilation. The benefits are obvious, more secure, and the new signature speeds up the application installation by reducing the time it takes to validate on the device (without the time-consuming process of decompressing and validating).

v1 and v2 signatures are used
It doesn’t matter if you just check the V1 signature, but won’t you use more secure authentication on 7.0
If only check V2 signature 7.0, the installation will be finished and the installation will not be displayed. If 7.0 is above, V2 verification will be used
If I check V1 and V2, all the models are ok
But I did check both of them, and I tried different combinations of them, none of them (it will tell you to pick at least one), pick one, pick two, it’s the same error, it says base APK has no signature.
I found the Stack Overflow and someone had the same problem, but it was just a simple thing to check two and solve it. After a long time, a day, uncomfortable, congestion panic, do other things to…
And changed a cell phone or the same error. Changed a demo project, changed a keystore and still got the same error!!
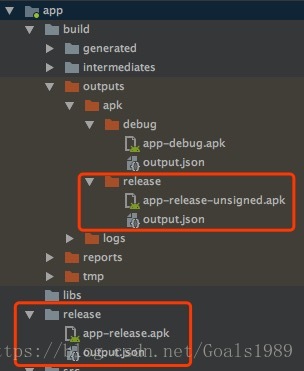
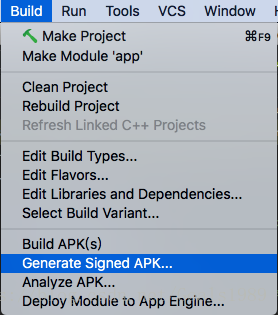
When I went back to the computer at night, I inadvertently found the difference in the screenshots in the new demo project. I used to find the signed package in the build-out-APk-Release folder, but this installation was not successful. And from the name you can see that it’s app-release-unsigned. Apk, but there is an additional release folder on the bottom, where the file is installed normally.
So I delete this file, and then just use 1, the command line package; Or 2, wrap it formally with Android Studio, and this folder does not appear. How strange!! I have entered various password aliases for secret keys before!! Why can’t you get a normal bag?Once before I packed a formal installation is normal ah!!
Inadvertently click on the steps to enter the signature information,!! Need you to enter the secret key information again!! After typing, use the Android Studio button again to package, or the command to package, the folder will come out. There’s a folder release in the main project, and the signature file that’s next to it is the normal app-release.apk. The installation is in order. Apk is app-release-unsigned. Apk. Unsigned, of course, will get an error.

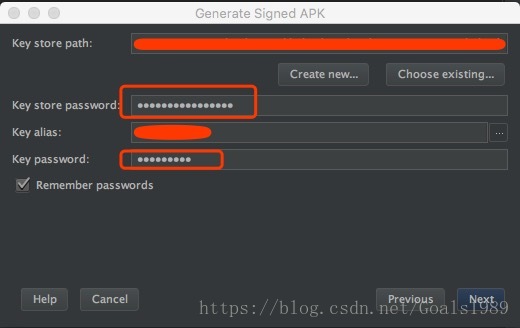
So to summarize, the solution is this: if you type in the signature key again, put it in the official package, it will generate a folder under the main project called Release, and the app-Release.apk in the side here will be signed normally. The build-out-apk-unsigned. Apk generated at the same time will not be installed successfully. The package is not fully signed. Why this should be is not clear. I hope it can help you solve the same problem you have.
 

PHP under linux uses pdo-dblib to connect to mssql to report an error solution. Error message: SQLSTATE[01002] Adaptive Server connection failed (severity 9)

I found a lot of answers on the Internet, but they are not the root cause of the problem.
Finally, it can be seen on the official website that the connection of PDO_dblib to MSSQL database is through FreeTDS.
PDO_DBLIB is a driver that implements the PHP Data Objects (PDO) interface to enable access from PHP to Microsoft SQL Server and Sybase databases through the FreeTDS libary.
Therefore, the problem was found. Freetds is a re-implementation of TDS protocol (Baidu’s). Different database versions use different VERSIONS of TDS protocol, so it is ok to modify the corresponding TDS version.
I am an Ubuntu system and the installation directory of Freetds is /usr/local/freetds
Modify the file to/usr/local/freetds/etc/freetds. Conf file.
Connect SQL Server2000, I change to TDS version=4.2 is ok, although Baidu is 8.0, I do not know this, but I know the key of the problem is ok, and so on in the future to understand the update.

Oracle Net Configuration Assistant failed abnormal solution

System use oracle12c centos7 oracle data version of
about the installation of oracle database reference: https://www.linuxidc.com/Linux/2017-08/146528.htm

process is detailed
about in the process of installation disk space is insufficient, swap the size is not enough, really depend on the package please make your own problems such as baidu.
I installed the database step by step according to this tutorial and solved all kinds of problems encountered in the process one by one. Finally, I got stuck in the
Oracle Net Configuration Assistant failed
which could not be solved by all kinds of baidu methods.
In fact, this error can be caused by many reasons, so it is difficult to find the correct solution.
My final solution was to set the NLS_LANG environment variable
This variable represents the encoding of the database
Set the location to ~/.bash_profile
The value should be the third last step in the database installation process, the page with the install button
Sliding down will show the database code
After the source ~/.bash_profile takes effect, click install.
(My database is already installed, so I don’t want to install it again, so I don’t have any screenshots. It’s so hard to speak.)
Reference for database unloading:
https://blog.csdn.net/kimsoft/article/details/8129292
The main thing is to delete the files

Nginx reports 502 error, log connect() failed (111: Connection refused) while connecting to upstream. A personal effective solution

Personal information is for reference only. If it is not applicable to your project, please do not speak ill of it.
The project adopts the mode of separation between front and rear ends, in which the routing relationship is Nginx A, which exposes the host address to the outside world, and all requests for App go directly to NginxB through the server.
The routing relationship is as follows: mobile App→ request (for example: www.test.cn: 8072/xp-web /index.html) →Nginx A→Nginx B
The server configuration of Nginx A routing to Nginx B is as follows:

  server {
        listen       8090;
   #     listen       192.25.106.214:8090;
        server_name  192.25.106.214;
	location /xy-app-web {
            proxy_pass http://192.25.106.214:8090/xy-app-web;
            proxy_set_header Host $host:8090;
            proxy_set_header X-Real-IP $remote_addr;
            proxy_set_header X-Forwarded-For $proxy_add_x_forwarded_for;
            proxy_set_header Via "nginx";
        }
        location/{
            root   html;
            index  index.html index.htm;
        }
    }

Suddenly I found that there was A problem with the project, and the access interface reported an error. After checking the logs of Nginx A, I found the following errors:

[Error] 20969#0: *1 Connect () failed (111: Connection union) while connecting to upstream, Client: 192.25.103.53, Server: 192.25.106.214, Request: “GET /xy-app-web/portfolio/piazza?rettype=appjson& E72 opstation = Y_IHADPLAZA_12222222222_e9dfdb288326f0371d091ea8bd64b2f55b7906ff77b68db98ae99bafe0cf9896_07AE3442-1-4346 – A58B – 6 ee511202f01_30901_3. 9.0.11 & amp; logintoken=b6459d2e-1e85-489a-94e9-57d2059cba69& userId=5d395883d13573b189da524ce1401834& timestamp=1548750589604& client=3& device=appweb& version=appweb& clientId=appweb& Sign = 8 e6cfc226dbcf7dbd01a68a987363427 HTTP/1.0 “, upstream: “http://192.25.106.214:8090/xy-app-web/portfolio/piazza?rettype=appjson& E72 opstation = Y_IHADPLAZA_12222222222_e9dfdb288326f0371d091ea8bd64b2f55b7906ff77b68db98ae99bafe0cf9896_07AE3442-1-4346 – A58B – 6 ee511202f01_30901_3. 9.0.11 & amp; logintoken=b6459d2e-1e85-489a-94e9-57d2059cba69& userId=5d395883d13573b189da524ce1401834& timestamp=1548750589604& client=3& device=appweb& version=appweb& clientId=appweb& sign=8E6CFC226DBCF7DBD01A68A987363427”, host: “www.xyzqts.cn:8072”, referrer: “http://www.test.cn:8072/app-web/index.html”

Internet search for half a day is what shit like plagiarized article, what PHP problems. Our project did not have PHP, and the reason why connect() failed (111:Connection refused) while connecting to upstream was that the establishment of network Connection failed, so we started to check the call link from the place where the error was reported. Here we found that port 8090 did not provide service from the network call link of Telent Nginx B, A server of Nginx A. The simple way to do this is telent.
The correct picture for Telnet should look like this:

The problem is obvious. Take a look at which service is providing port 8090, indicate that the service is abnormal, and see if the process is still there.

ps -ef|grep java

I found that at some point, xy-app-Web on port 8090 was gone.
We’re using SpringBoot here, so start it.

nohup  java -jar -Dlogging.path=./logs xy-app-web-0.0.2.jar --spring.profiles.active=test & 

Check the process again: ps-ef |grep Java finds xy-app-web for port 8090 already available. Call the phone App again and find the problem solved.


A call to an OS function failed

Recently encountered a problem in the project development, draw a Scrollbox with BCB6, and then use the program to build 10 scrollBox as the parent class panel, Panel in the child thread access. But whenever you access panel-> When the handle parameter is handled, the thread either gets stuck or reports an error “A call to an OS function failed”. I searched for a long time, but I couldn’t find the reason. Because the project code is relatively complex, then I want to build an empty project directly, click to add components, access can be normal. The appearance of the problem is vague. Later in the process of debugging found that when the panel was created, the first call panel-> Handle, then the subsequent access in the child thread will not make an error. Although the problem seems to be solved, we still don’t know why it happened. I will take this as a note for future reference.
PS: In access parameter panel-> In debugging Handle, an error will sometimes occur: “Class already exists. Code: 1410.”

Reproduced in: https://www.cnblogs.com/kamiya/p/11162723.html

Andorid: Installation failed due to invalid APK file due to version mismatch

I recently upgraded Gradle, created a new project, and ran it in the simulator, only to find an error that could not be installed.
Installation failed due to invalid APK file
Check the LogCat log and get the error message from the Couldn’t Load memtrack Module.
The simulator is 8.0-API-26 and the gradle configuration is

    compileSdkVersion 28
    buildToolsVersion "28.0.3"
    defaultConfig {
        applicationId "my.study"
        minSdkVersion 19
        targetSdkVersion 28
        versionCode 1
        versionName "1.0"
        testInstrumentationRunner "android.support.test.runner.AndroidJUnitRunner"
    }

By comparison, I found that api-28 corresponds to an android9 system, while my emulator is an android8 system. The mismatch here leads to the failure of installation.
Modify targetSdkVersion=26 in Gradle configuration

    compileSdkVersion 28
    buildToolsVersion "28.0.3"
    defaultConfig {
        applicationId "my.study"
        minSdkVersion 19
        targetSdkVersion 26
        versionCode 1
        versionName "1.0"
        testInstrumentationRunner "android.support.test.runner.AndroidJUnitRunner"
    }

Problem solving.

django.db.utils.IntegrityError: UNIQUE constraint failed: auth_user.username

Create user code has been completed, the user = user. The objects. The create_user (username = ‘356’ and password = ‘123456’), but an error in the back, then the created user has exists in the database , when you change an error that part of the code to execute, complains, remind you that this user has been created in the database, so you can’t use the data to create.
where does the code execute to form something in the database
username must be unique

“503 Service Unavailable” error when connecting to vCenter Server using vSphere Web Client (2121043)


Last Updated: 2020/3/22Categories: Troubleshooting 6 Subscribe
Symptoms

note: this article is a “503 service unavailable” error when connecting to the vCenter Server using the vSphere Web Client. While we will continue to strive to provide the best translations for this article, localized content may become obsolete. Please refer to the English version for the latest content.

Failed to connect to vCenter Server using the vSphere Web Client. You should see entries similar to the following:

503 Service Unavailable (Failed to connect to endpoint: [N7Vmacore4Http20NamedPipeServiceSpecE: 0 x7f009c095810] _serverNamespace =/_isRedirect = false _pipeName =/var/run/vmware/VPXD – webserver – pipe)

503 Service Unavailable (Failed to connect to endpoint: [class Vmacore::Http::LocalServiceSpec:00000000006F92F0] _serverNamespace = /vsphere-client

503 Service Unavailable (Failed to connect to endpoint: [N7Vmacore4Http20NamedPipeServiceSpecE:0x7f0c6005e4c0] _serverNamespace =/_isRedirect = false _pipeName =/var/run/vmware/vpxd-webserver-pipe)

503 service unavailble fail to connect to end point.

503 Service Unavailable (Failed to connect to endpoint: [N7Vmacore4Http16LocalServiceSpecE:0x7f65e7834610] _serverNamespace = /vsphere-client _isRedirect = false _port = 909

503 Service Unavailable (Failed to connect to endpoint: [N7Vmacore4Http16LocalServiceSpecE:0x00007f2470005950] _serverNamespace = /sdk action = Allow _port = 8085)
For more information about other potential causes and symptoms, see “503 Service unavailing “error on the vSphere Web Client when logging in or logging the vCenter Server.
The Purpose

when one or more services or endpoints are unavailable, an HTTP 503 error response code may be returned. For example, the vCenter Server service might not be running or Stopped while the vSphere Web Client service is running.
Resolution

to troubleshoot this problem:

    verify that the computer trying to access the vCenter Server using the vSphere Web Client with Telnet is connected by running the following command:
telnet vcenter_fqdn 9443

    runs the following command to check whether the partition on the VCSA has enough free space:
Df-h
* in version 6.7, the /storage/archive partition should be full, which is expected behavior. For details, see “File System /storage/ Archive is low on Storage Space “on the VCSA 6.7 VAMI Page

    use the following command to ensure that the vCenter Server service is running:

Service – control – the status – all
* If any of the services shut down unexpectedly, you can start all of them by running the following command:
Service – control – start – all
* If the PSC is external, you may also need to check the services on the PSC.
  
For more information on how to stop/start the service, see the following articles:
How to Stop, Start or Restart vCenter Server 6.x Services
Stopping, Starting or Restarting VMware vCenter Server Appliance 6.x services
    

    to ensure that VCSA has enough resources to handle requests, you may need to use the top command to check CPU/ memory usage on both the host and the VCSA. If all VC services are up and the Web Client is still not open, you can find more details on this issue in the virgo log at the following location:

Windows vCenterServer: C:\ProgamData\VMware\vCenterServer\logs\ VSphere – Client \logs\
VCenter Server Appliance: /var/log/vmware/ vsperr-client /logs/
Please also view the vpxd.log file:
Windows vCenterServer: C:\ProgramData\VMware\vCenterServer\logs\vmware-vpx
VCenter Server Appliance: /var/log/vmware/ VPXD
The Related Information
“503 service unavailable” error when connecting to the vCenter Server using the vSphere Web Client (2121043)vmware-vpxd service on VCSA fails with the error “contains unexpected zero page at block” on vpxd.log (50113962)Accessing the ESXi host through the Host Client UI fails with error: “503 Service Unavailable” (2144962)”invalid credentials LDAP Error 49″ error when starting Inventory Services in vCenter Server 6.x (2147280)How to reset the lost or forgotten root password in vCenter Server Appliance 6.5 (2147144).

FileZilla Server prompts 550 Could not open file for reading when downloading files (illustration)

This error prompts me to study for an hour, finally found that it was because the downloaded file was occupied by another program, so it could not be downloaded.
Solutions:
Open the FileZilla Server admin screen – Settings -Miscellaneous-Allow M.E. of files which are open for writing by another process.
The diagram below:

Uncaught TypeError: Failed to execute ‘appendChild’ on ‘Node’: parameter 1 is not of type ‘Node How to Fix

I want to dynamically insert a line of data into tBody, and I write the following code:

html:
        <table id="theList">
        <thead>
            <th>姓名</th>
            <th>年龄</th>
            <th>性别</th>
            <th>操作</th>
        </thead>
        <tbody id="myBody"></tbody>
    </table>


js:

let list = []
let temp = []

list.push({
    name: '张三',
    age: 20,
    sex: '男'
})
list.push({
    name: '赵四',
    age: 19,
    sex: '女'
})
function render(data) {
    var html=[]
    for (let i = 0; i < data.length; i++) {
        let template = '<tr><td>'+data[i].name+'</td><td>'+data[i].age+'</td><td>'+data[i].sex+'</td><td><a href="javascript:;">修改</a>&nbsp;&nbsp;<a href="javascript:;">删除</a></td></tr>'
        html.push(template)
                                    document.getElementById('myBody').appendChild(html.join(''))
    } 
}
render(list)

The browser throws an Uncaught TypeError when running the above code: Failed to execute ‘appendChild’ on ‘Node’ : parameter 1 is not of type ‘Node’. To find out the cause of the error by looking up data:
AppendChild () requires that a tr object be passed in, not a tr string
and html.join(“) above is a string

console.log(typeof html.join(''))  //stirng

Solution:
render function

function render(data) {
    for (let i = 0; i < data.length; i++) {
        let tr = document.createElement('tr')
        tr.innerHTML = '<td>'+data[i].name+'</td><td>'+data[i].age+'</td><td>'+data[i].sex+'</td><td><a href="javascript:;">修改</a>&nbsp;&nbsp;<a href="javascript:;">删除</a></td>'
        document.getElementById('myBody').appendChild(tr)
    } 
}

Tr is an object. Instead of writing like this, you might as well just write:

function render(data) {
    var html=[]
    for (let i = 0; i < data.length; i++) {
        let template = '<tr><td>'+data[i].name+'</td><td>'+data[i].age+'</td><td>'+data[i].sex+'</td><td><a href="javascript:;">修改</a>&nbsp;&nbsp;<a href="javascript:;">删除</a></td></tr>'
        html.push(template)
        document.getElementById('myBody').innerHTML = html.join('')
    } 
}

Operation effect:

Other features are still being implemented… .

An error is reported when starting the Android emulator: Emulator: audio: Failed to create voice `goldfish_audio_in’

After updating Android Studio to 3.5.2, the following error occurred when starting the emulator:
Emulator: audio: Failed to create voice `goldfish_audio_in’
In fact, this error does not affect our use in the future, but for me who is a little obsessive, mistakes are unforgivable and must be solved.
Solutions:
Right click on the sound icon and select Sound.

After opening the sound Settings panel, select the “Record” TAB, right-click the “Stereo Mix” and enable it, as shown in the figure below:

Open the Android emulator again, the error report disappears, and the problem is solved.