Category Archives: How to Fix

About the reason why the Raspberry Pi raspistill command cannot find the camera

You can find the camera driver on the raspberry PI, but input raspistil-o image.jpg on the raspberry PI terminal, and output the following error:

mmal: Cannot read camera info, keeping the defaults for OV5647
mmal: mmal_vc_component_create: failed to create component 'vc.ril.camera' (1:ENOMEM)
mmal: mmal_component_create_core: could not create component 'vc.ril.camera' (1)
mmal: Failed to create camera component
mmal: main: Failed to create camera component
mmal: Camera is not detected. Please check carefully the camera module is installed correctly

The reason for this is that the camera used is a USB camera, while the Raspistill command only works with the CSI camera. For the USB camera, you can access it by calling FSWEbCAM.
enter sudo apt-get install fswebcam to install fswebcam on raspberry PI terminal. Enter sudo fswebcam image.jpg for the photo test. You can use this method by entering fswebcam-h .

Failed to extend swap file from 0 kb to xxx kb.

Yesterday the esXI server of the company encountered such a problem;
Problem description:
Here’s how it works. The ESXI server has seven virtual machines, Windows and Centos. When I was setting up Jenkins’ build yesterday, when I was executing three build tasks at once (which I will limit to a single build later), the virtual machine died, “There is no more space for virtual disk Jenkins – 00002. The VMDK. You took a be able to continue this session by freeing dish space on the relevant volume, and clicking _Retry.” Then, when I started Jenkins server, I reported an exception “Failed to extend swap File from 0 KB to 5242880 KB.” Step 3: I adjusted the memory of Jenkins virtual machine, and then I could enter the virtual machine. After the above problems, I repeatedly reduced the configuration of other virtual machines, so the memory of the other six virtual machines was reduced to 1G. When Jenkins’ server went down, the only way to log in was to reduce the memory of the other virtual machines. It turned out that Jenkins’ machine couldn’t boot up even after all the machines were running with minimal memory. “Failed to extend swap File from 0 KB to XXXX KB.” In fact, What I can’t understand is, where is the memory I freed from other machines?I really can’t understand it. I didn’t think about it all night yesterday.

So spent the gloomy Saturday of helpless pain; Under the help of a friend from Shenzhen, Old K, I sorted out the train of thought and analyzed the problem.
As a part-time operation, I feel it is difficult to conquer this problem, which makes me not confident, especially when all the virtual machines on the server are very sensitive, which makes me hesitate. Nothing, yesterday also smoked two packs of cigarettes, this body. Ah!

To get down to business, solutions:
1. Refer to the official website of VMware; (Google input “Failed to extend swap File” from 0 KB to XXX KB), you will find the official website prompt;
I’m going to change the storage path of the SWAP file; Because of the risks, it was considered an alternative;

2. After analyzing for half a day, it was positioned as “esXI has insufficient disk space”. As a result, when the virtual machine started, it reported the above problem when writing swap file to the physical machine;

Solution: I delete a virtual machine on the machine and everything returns to normal. And ensure that the physical machine has enough memory, as esXI server maintenance essential knowledge;

Episode;
Yesterday I leadership said to me: you his mother even swap is what all don’t know?I can only say that I do Android development, I really don’t know, but it doesn’t matter, attitude allows you to keep solving problems). Also, I have to reflect on myself. Why don’t you even know swap?
Dedicated to 20160305, my day of anxiety.

chrome net_error_map

https://chromium.googlesource.com/chromium/src.git/+/refs/tags/74.0.3729.78/components/domain_reliability/util.cc

net_error_map[] = {
  { net::OK, "ok" },
  { net::ERR_ABORTED, "aborted" },
  { net::ERR_TIMED_OUT, "tcp.connection.timed_out" },
  { net::ERR_CONNECTION_CLOSED, "tcp.connection.closed" },
  { net::ERR_CONNECTION_RESET, "tcp.connection.reset" },
  { net::ERR_CONNECTION_REFUSED, "tcp.connection.refused" },
  { net::ERR_CONNECTION_ABORTED, "tcp.connection.aborted" },
  { net::ERR_CONNECTION_FAILED, "tcp.connection.failed" },
  { net::ERR_NAME_NOT_RESOLVED, "dns" },
  { net::ERR_SSL_PROTOCOL_ERROR, "ssl.protocol.error" },
  { net::ERR_ADDRESS_INVALID, "tcp.connection.address_invalid" },
  { net::ERR_ADDRESS_UNREACHABLE, "tcp.connection.address_unreachable" },
  { net::ERR_CONNECTION_TIMED_OUT, "tcp.connection.timed_out" },
  { net::ERR_NAME_RESOLUTION_FAILED, "dns" },
  { net::ERR_SSL_PINNED_KEY_NOT_IN_CERT_CHAIN,
        "ssl.cert.pinned_key_not_in_cert_chain" },
  { net::ERR_CERT_COMMON_NAME_INVALID, "ssl.cert.name_invalid" },
  { net::ERR_CERT_DATE_INVALID, "ssl.cert.date_invalid" },
  { net::ERR_CERT_AUTHORITY_INVALID, "ssl.cert.authority_invalid" },
  { net::ERR_CERT_REVOKED, "ssl.cert.revoked" },
  { net::ERR_CERT_INVALID, "ssl.cert.invalid" },
  { net::ERR_EMPTY_RESPONSE, "http.response.empty" },
  { net::ERR_SPDY_PING_FAILED, "spdy.ping_failed" },
  { net::ERR_SPDY_PROTOCOL_ERROR, "spdy.protocol" },
  { net::ERR_QUIC_PROTOCOL_ERROR, "quic.protocol" },
  { net::ERR_DNS_MALFORMED_RESPONSE, "dns.protocol" },
  { net::ERR_DNS_SERVER_FAILED, "dns.server" },
  { net::ERR_DNS_TIMED_OUT, "dns.timed_out" },
  { net::ERR_INSECURE_RESPONSE, "ssl" },
  { net::ERR_CONTENT_LENGTH_MISMATCH, "http.response.content_length_mismatch" },
  { net::ERR_INCOMPLETE_CHUNKED_ENCODING,
        "http.response.incomplete_chunked_encoding" },
  { net::ERR_SSL_VERSION_OR_CIPHER_MISMATCH,
        "ssl.version_or_cipher_mismatch" },
  { net::ERR_BAD_SSL_CLIENT_AUTH_CERT, "ssl.bad_client_auth_cert" },
  { net::ERR_INVALID_CHUNKED_ENCODING,
        "http.response.invalid_chunked_encoding" },
  { net::ERR_RESPONSE_HEADERS_TRUNCATED, "http.response.headers.truncated" },
  { net::ERR_REQUEST_RANGE_NOT_SATISFIABLE,
        "http.request.range_not_satisfiable" },
  { net::ERR_INVALID_RESPONSE, "http.response.invalid" },
  { net::ERR_RESPONSE_HEADERS_MULTIPLE_CONTENT_DISPOSITION,
        "http.response.headers.multiple_content_disposition" },
  { net::ERR_RESPONSE_HEADERS_MULTIPLE_CONTENT_LENGTH,
        "http.response.headers.multiple_content_length" },
  { net::ERR_SSL_UNRECOGNIZED_NAME_ALERT, "ssl.unrecognized_name_alert" }
};


When jar file is running: Failed to load Main-Class manifest attribute from ……Solution

The original address is:
Jar file runtime: Failed to load main-class manifest Attribute from… The solution

Failed to load main-class manifest Attribute from… , which is caused by the unset program entry program. Open the JAR file with WinRAR, expand the meta-INF folder, and check the MANIFEst.MF file. It can be found that main-class is not set, which is the reason of the exception.

reprint please indicate this article address:
Jar file runtime: Failed to load main-class manifest Attribute from… The solution

Failed to execute ‘postMessage’ on ‘DOMWindow’: The target origin provided (‘https://xxx.cn’) does n

Failed to execute ‘postMessage’ on ‘DOMWindow’: The Target Origin Provided (‘https://xxx.cn’) Does not match The Window’s Origin (‘null’).
Using the event. The source </ code> object as a letter
specific see: https://developer.mozilla.org...

// This function is called by addEventListenner when the A page postMessage is called.
function receiveMessage(event)
{
  // Can we trust the source of the information?
  if (event.origin ! == "http://example.com:8080")
    return;

  // event.source on the source page of the current popup page.
  // event.data is "hello there!"

  // Assuming you've already verified the origin of the received message (which you should do any time), a handy way to do this is to add the enent.source
  // as the object of the reply, and use event.origin as the targetOrigin.
  event.source.postMessage("hi there yourself! the secret response " +
                           "is: rheeeeet!",
                           event.origin);
}

window.addEventListener("message", receiveMessage, false);

The answer is helpful, it’s valuable 0 it’s not helpful, it’s the wrong answer, irrelevant answer
otherWindow.postMessage(message, targetOrigin, [transfer]);
otherWindow: a reference to another window, such as the contentWindow property of the iframe, the window object that executes window.open, or the named or numerically indexed window.frames.
otherWindow cannot be the current window oh
see MDN

DHCP principle and experimental verification

I. Function overview
The main function of DHCP (Dynamic Host Configuration Protocol) is to centrally manage and assign IP addresses, so that hosts in the network environment can dynamically obtain IP address, Gateway address, DNS server address and other information, and improve the utilization rate of addresses.
DHCP protocol adopts the client/server model: When the DHCP server receives the address application information from the network host, it will send the relevant address configuration information to the network host to realize the dynamic configuration of the network host address information.
Ii. Working principle
DHCP USES UDP as the transport protocol. The host sends the request message to port 67 of DHCP server, and the DHCP server responds the reply message to port 68 of the host. The detailed interaction is as follows.
(1) DHCP Client sends DHCP Discover message by broadcasting.

    (2) all DHCP servers can receive DHCP Discover message sent by the DHCP Client, and all DHCP servers will give a response and send a DHCP Offer message to the DHCP Client. (3) The “Your(Client) IP Address” field in the DHCP Offer packet is the IP Address that DHCP Server can provide to THE DHCP Client, and DHCP Server will put its IP Address in the “Option” field so that DHCP Client can distinguish different DHCP servers. The DHCP Server will have a record of the assigned IP address after sending this message. (4) DHCP Client can only handle one DHCP Offer packet among them, and the general principle is that DHCP Client can handle the DHCP Offer packet that it receives first. (5) The DHCP Client will send a broadcast DHCP Request message, and add the IP address and the required IP address of the selected DHCP Server into the option field. (6) After the DHCP Server receives the DHCP Request message, it shall determine whether the IP address in the option field is the same as its own address. If it is not the same, DHCP Server does not do anything but clear the corresponding IP address assignment record; If the same is true, the DHCP Server will respond to the DHCP Client with a DHCP ACK packet and add the usage lease information for the IP address in the options field. (7) After the DHCP Client receives the DHCP ACK packet, it shall check whether the IP address assigned by the DHCP Server can be used. If it can be used, then the DHCP Client successfully obtains the IP address and automatically starts the renewal process by using the lease term according to the IP address; If the DHCP Client finds that the assigned IP address has been used, the DHCP Client will send the DHCP Decline message to the DHCPServer, notify the DHCPServer to disable this IP address, and then the DHCP Client will start the new address application process. (8) After the DHCP Client successfully obtains the IP address, it can Release its IP address at any time by sending THE DHCP Release message. After the DHCP Server receives the DHCP Release message, it will recover the corresponding IP address and reassigned it. 3. Experimental verification: After DHCP services are configured on servers and network devices (routers and switches), DHCP can generally be used as DHCP servers. In this experiment, routers were used to simulate the network topology, as shown in the figure below: In the 
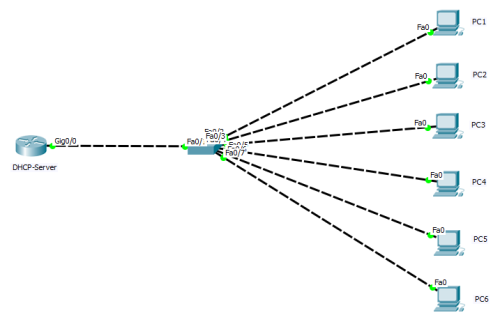
diagram, routers were dhCP-server and switches were two-layer devices (switch ports connected to PC1-6 hosts were all in the default VLAN 1).

1. Before the configuration of dhcp-server is completed, PC1 is configured to DHCP to get the IP address, which is shown as follows:

The result shows “DHCP failed. APIPA is being used”, indicating that the IP address was not successfully obtained (generally a “169.254.0.0/16” segment address is displayed, indicating that the IP address was not obtained from the DHCP server).
2. Configure DHCP related information on the router:
(1) configure port IP as shown in the figure below:

(2) configure DHCP service as shown in the figure below:

3. At this point, verify the IP address acquisition above PC1:

As can be seen from the figure above, PC1 successfully obtained the CONFIGURATION information of IP address, gateway, DNS-Server, etc.

Reproduced in: https://blog.51cto.com/13401027/1977218

(EE) Failed to load module “fbdev” (module does not exist, 0)

Enter the command startx in the virtual machine:
The following error occurs.
(EE) Failure to load module “Video Electronics Standards Association” (module does not exist, 0)
(EE) failed to load module “fbdev” (module does not exist, 0)
(EE) failed to load module “evdev” (module does not exist, 0)
(EE)No driver matching evdev input
(EE) failed to load module “evdev” (module does not exist, 0)
(EE)No driver matching evdev input
(EE) failed to load module “evdev” (module does not exist, 0)
(EE) No input driver matches “evdev”Solution.
yum install xorg-x11-drivers

Use yum to prompt Error: rpmdb open failed

On Centos systems, error when installing packages using the YUM command:

rpmdb: Thread/process 6539/140448388269824 failed: Thread died in Berkeley DB library
error: db3 error(-30974) from dbenv->failchk: DB_RUNRECOVERY: Fatal error, run database recovery
error: cannot open Packages index using db3 -  (-30974)
error: cannot open Packages database in /var/lib/rpm
CRITICAL:yum.main:

The reason is that the RPM database is corrupted
Restore the database to normal after rebuilding:

cd /var/lib/rpm/
for i in `ls | grep 'db.'`;do mv $i $i.bak;done
rpm --rebuilddb
yum clean all


Common mistakes in WCF distributed development (15): Communication with the underlying transaction manager has failed.

The error occurs today when debugging WCF transactions locally: Communication with the stable Transaction Manager has failed.

I did a lot of research to find out why. It’s because of MSDTC. This protocol USES a distributed transaction coordinator. Or the transaction protocol.

Solutions:

Modify the transaction communication protocol.

1. & lt; bindings>

& lt; netTcpBinding >

& lt; The binding name = “netTcpBindingTcp transactionFlow” = “true” & gt;

& lt; ! –transactionProtocol=”WSAtomicTransactionOctober2004″–> // Local debugging does not apply to this transaction protocol

& lt; ! –< reliableSession enabled=”true” ordered=”true”/>

& lt; security mode=”None”> < /security> –>

& lt; /binding>

& lt; /netTcpBinding>

& lt; /bindings>

2. Check MS DTC Settings. [Control Panel -& GT; Performance and Maintenance -& GT; Management Tools -& GT; Component Services -& GT; Computer -& GT; My Computer -& GT; Properties -& GT; MS-DTC TAB -& GT; Security Configuration.

See article links:

1. http://social.msdn.microsoft.com/forums/en-us/windowstransactionsprogramming/thread/71f7a219-c85d-4a04-973b-c73464f59606;

2.http://msforums.ph/forums/t/38399.aspx

3.http://www.cnblogs.com/ThinkCode/archive/2008/10/14/1311021.html

This article from frankxulei 51 cto blog, the original link: http://blog.51cto.com/frankxulei/320435, if you want to reprint, please contact our author

Connection for controluser as defined in your configuration failed.

Using the event scheduler (schedule tasks) in mysql,
The statement is written and runs fine, but it doesn’t have the desired result. The reasons for the failure of many planned tasks are summarized online. None of them fit me.
When you open the event table in phpmyAdmin, you see the following red prompt: Connection for Controluser as defined in your Configuration Failed.
“Due to the failure of the control user connection defined in the configuration.”
Without further ado, find phpyAdmin’s configuration file config.sample.inc. PHP, and see a paragraph like this:
/* PMA User advanced features */
$CFG [‘Servers’][$I][‘controluser’] = ‘PMA ‘;
$CFG [‘ the Servers’] [$I] [‘ controlpass] = $password;
It turns out that this user is the advanced user, when I installed the integration environment before, I didn’t let the user enter, I just needed to enter password,
As a result, I usually use a root account, but this account is not a power user, so I changed the pMA to root.
Back on the event table page, the red prompt disappears. My plan has started to work.
.
There are also people on the Internet who have summarized the reasons for the very common failure of event scheduling. Some important things to note are:
After the server is shut down and restarted, the planned task fails, which is not approved in the actual production.

Able to change mysql’s configuration file to resolve, add an event_scheduler=ON to my. Ini

Reproduced in: https://www.cnblogs.com/lcchuguo/p/5180282.html

Linux dynamically loads kernel modules

Linux is a single kernel. In order to make up for the poor scalability and maintenance of a single kernel, Linux introduces dynamic loadable kernel modules, which can be loaded into or unloaded from the kernel during the running of the system. A module is a stand-alone program that can be compiled but not run independently. It is linked to the kernel at runtime and runs in kernel space as part of the kernel. A module usually consists of a set of functions and data structures used to implement a file system, a driver, or other functions on top of the kernel.
Here’s a simple example: the
(1) module hello.c file

#include <linux/init.h>
//specify the initialization and cleanup functions
#include <linux/module.h>
// Contains definitions for a large number of functions and symbols needed to load the module.
#include <linux/kernel.h>

MODULE_LICENSE("GPL");
MODULE_AUTHOR("WFJ");
// Declare the module's license, for any version of the GNU General Public License
static int hello_init (void)
{
    printk(KERN_ALERT "Hello module init/n");
    return 0;
}
//The initialization function should be declared as static.
static void hello_exit (void)
{
    printk(KERN_ALERT "Hello module exit/n");
}
//Purge function, which logs out the interface and returns all resources to the system before the module is removed.
module_init(hello_init);
//This macro definition adds a special segment to the module object code, indicating where to find the module's initialization function.
//Without this definition, the initialization function will not be called.
module_exit(hello_exit);

A Linux kernel module must contain module initialization and module uninstall functions, which run at insmod and rmMOD, which must be defined before the macros module_init and module_exit are used, otherwise there will be a compilation error.
(2) Makefile file

CONFIG_MODULE_SIG=n

obj-m := hello.o

KERNELBUILD :=/usr/src/linux-source-3.13.0

default:

    make -C $(KERNELBUILD) M=$(shell pwd) modules

clean:

    rm -rf *.o  *.ko *.mod.c .*.cmd .tmp_versions *.order *.symvers

(3) the compilation Module
is compiled with make command. After the compilation, several new files will be produced: hello.ko, hello.mod. C, hello.mod. O, hello.o, modules. Order, module.symvers. Where Hello.ko is required.
(4) insert module

sudo insmod hello.ko

(5) View module

lsmod

Lsmod is short for list Modules. It lists all the modules.
does not print out the output of hello.c file on the port, but you can use the dmesg command to view it.

dmesg > hello.txt

Save the output of dMESg in the hello.txt file. If the CONFIG_MODULE_SIG=n statement is not included in the Makefile, then the hello.txt file will show: Hello: module verification failed: signature and/or required key missing-tainting kernel
: module verification failed. If this statement is present, the hello.txt file will show:

[ 9753.846136] Hello module init/n
[12601.703040] Hello module exit/n

That is: output the output content of the hello.c file.
(7) unload the module

sudo rmmod hello.ko

EXSI6.0 virtual machine swap error causes it to fail to start

scenario
Install EXSI6.0 on the server. Once the installation is complete, set up the two virtual machines via Vshpere. Start one normal. The error was “Failed to extend swap File from 0 KB to XXX KB”. The key point of this question is swap. There is a saying on the Internet is file, need to change the storage path of swap file, I tried it seems to have no effect.
The solution

    virtual machine attributes -> Options – & gt; File swap location, stored in the host’s swap file data store. (not sure if it works) Virtual machine attributes -& GT; Memory, set the memory size. In the resource option, set the reserved size of memory to the previous set size. Make sure there is a certain amount of memory available in the resource allocation column of the virtual machine.