Category Archives: How to Fix

JDBC connection to Oracle: listener used the connection with the following error: ora-12505

Exception in thread "main" java.sql.SQLException: Listener refused the connection with the following error:
ORA-12505, TNS:listener does not currently know of SID given in connect descriptor
 
	at oracle.jdbc.driver.T4CConnection.logon(T4CConnection.java:419)
	at oracle.jdbc.driver.PhysicalConnection.<init>(PhysicalConnection.java:536)
	at oracle.jdbc.driver.T4CConnection.<init>(T4CConnection.java:228)
	at oracle.jdbc.driver.T4CDriverExtension.getConnection(T4CDriverExtension.java:32)
	at oracle.jdbc.driver.OracleDriver.connect(OracleDriver.java:521)
	at java.sql.DriverManager.getConnection(DriverManager.java:571)
	at java.sql.DriverManager.getConnection(DriverManager.java:215)
	at com.test.OracleTest.main(OracleTest.java:13)
Caused by: oracle.net.ns.NetException: Listener refused the connection with the following error:
ORA-12505, TNS:listener does not currently know of SID given in connect descriptor
 
	at oracle.net.ns.NSProtocol.connect(NSProtocol.java:386)
	at oracle.jdbc.driver.T4CConnection.connect(T4CConnection.java:1054)
	at oracle.jdbc.driver.T4CConnection.logon(T4CConnection.java:308)
	... 7 more

//create a Connection object.
Connection conn = DriverManager getConnection (” JDBC: oracle: thin: @ localhost: 1521: former “, “admit”, “123”);
The problem is the database to monitor the sid in the configuration file is not correct, namely the “former” in the url, enter the database installation directory, find tnsnames. Ora file, for example, my path is/home/Oracle_11g/product/11.2.0/dbhome_1/network/admin/tnsnames. Ora
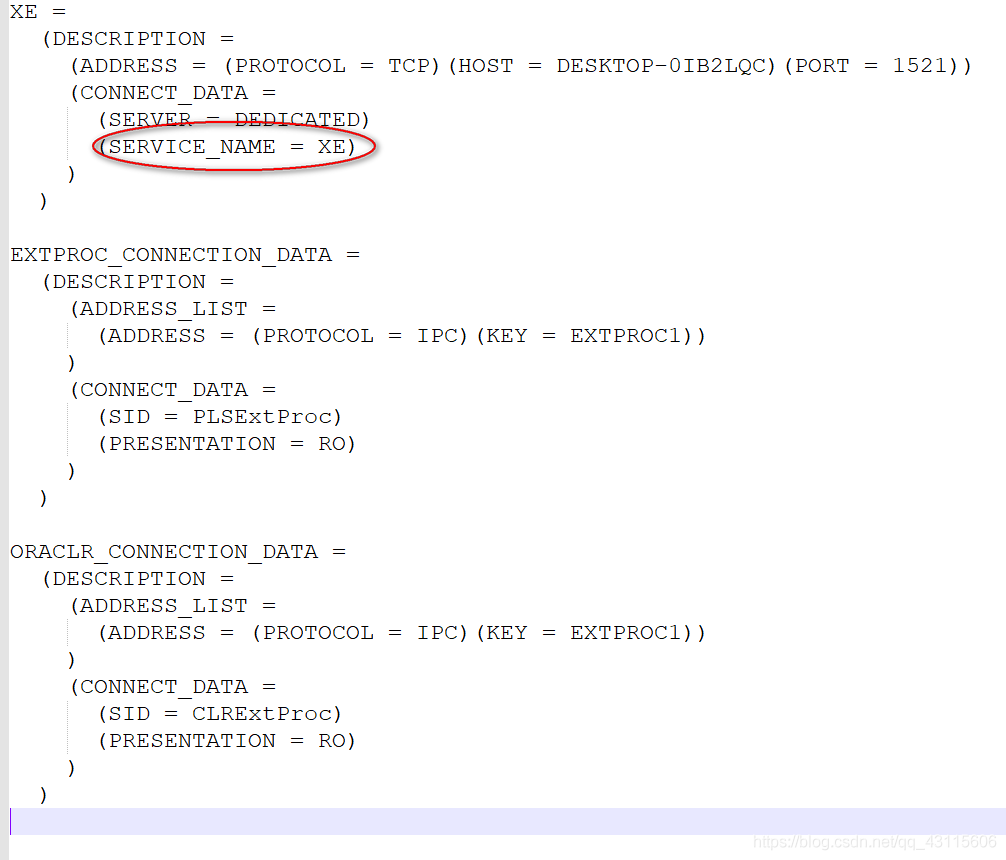
found SERVICE_NAME = XE, but not equal to the former, So you can change the url of the former to XE can
Connection conn = DriverManager. GetConnection (” JDBC: oracle: thin: @ localhost: 1521: former “, “admit”, “123”);

Windowserror: [error 183] error and in Python os.raname () detailed explanation

When I used Python to iterate over files in a folder and rename them, the correct code sometimes incorrectly reported WindowsError[183].
【 183 】 — & gt; Indicates that a file cannot be created while it exists.

Os.rename (oldFilepath,newfilepath), this error is most likely because your new path newfilepath has duplicated a file in the current folder [183].
Solution: Find duplicate files named other, or give a non-duplicate name first, then os.rename(oldFilepath, newFilepath)
Get the name you want.
For a variety of WindowsError error code, can refer to the article: https://blog.csdn.net/qq_35221523/article/details/79214356

HTTP Error 401.1 – Unauthorized:Access is denied due to invalid credentials

Phenomenon: The site is set as AD integrated authentication, but when accessing it, it is still prompted to enter the account password. An error occurred three times later.
Solution: in C: \ Inetpub \ Adminscripts run below: cscript adsutil. VBS set w3svc/NTAuthenticationProviders “NTLM” modify the authentication mechanism.
 
The text reads as follows:
http://support.microsoft.com/kb/871179
 
 
Ok when trying to Access a site that’s part of the IIS6.0 application pool, you get an Error message: “HTTP Error 401.1 – Access is denied due to Invalidcredentials” (HTTP Error 401.1 – Unauthorized:Access denied due to Invalidcredentials)
See the products this article applies to
Expand all | close all
symptoms
When you try to access a Microsoft Internet Information Service (IIS) 6.0 site configured to use only integrated Windows authentication, you are prompted for user credentials. .
When you try to access a Microsoft Internet Information Service (IIS) 6.0 site configured to use only integrated Windows authentication, you are prompted for user credentials. When you try to log in, you will receive another login prompt. After three login attempts, you receive the following error message:
HTTP error 401.1 – unauthorized: Access denied due to invalid credentials.
Back to the top
why
This problem can occur if an IIS 6.0 web site is part of an IIS application pool. The application pool runs under either a local account or a domain user account. The site is configured to use only integrated Win…
This problem can occur if:
· The IIS 6.0 site is part of the IIS application pool.
· Application pools run under local accounts or domain user accounts.
· The site is configured to use only integrated Windows authentication.
In this case, Kerberos authentication may not work when an integrated Windows authentication attempt is made to use Kerberos. To use Kerberos authentication, the service must register the service principal name (SPN) of the service under the account in the Active Directory Directory service (the account used to run the service). By default, Active Directory registers the computer name of the network’s basic input/output system (NetBIOS). Active Directory also allows the use of Kerberos for network services or local system accounts.
Back to the top
The solution
If this problem occurs while running the application pool under a local account, follow the steps in the Alternative Methods section. To resolve this problem when running the application pool under a domain user account, use the NetBIOS name and…
If this problem occurs while running the application pool under a local account, follow the steps in the Alternative Methods section. To resolve this problem when running the application pool under a domain user account, set the HTTP SPN using the NetBIOS name and the fully qualified domain name (FQDN) of the domain user account used to run the application pool. To do this, follow these steps on the domain controller:

important note: the service SPN can only be associated with one account. Therefore, if you use this suggested solution, any other application pool running under different domain user accounts cannot be used solely with integrated Windows authentication.
1. Install the setspn. exe tool. To obtain the Microsoft Windows 2000 version of this tool, visit the following Microsoft web site:
http://www.microsoft.com/downloads/details.aspx?FamilyID=5fd831fd-ab77-46a3-9cfe-ff01d29e5c46& displaylang=en (http://www.microsoft.com/downloads/details.aspx?FamilyID=5fd831fd-ab77-46a3-9cfe-ff01d29e5c46& displaylang=en)
Microsoft WindowsServer 2003 version of the setspn. exe command line tool is provided in WindowsServer 2003 SupportTools (WindowsServer 2003 SupportTools) included on WindowsServer 2003 CD. To install these Tools, double-click the Suptools.msi file in the Support/Tools folder.
2. Open a command prompt window and change to setspn.exe’s installation directory.
At the command prompt, type the following command. After typing each command, press Enter:
setspn.exe -a http/IIS_computer’s_NetBIOS_nameDomainName\UserName

setspn.exe -a http/IIS_computer’s_FQDN DomainName\UserName
Note: UserName is the user account used to run the application pool.
After setting the SPN of the HTTP service to the domain user account used to run the application pool, you can successfully connect to the web site without prompting you for user credentials.
Back to the top
Alternative methods
In cases where you have multiple pools of applications running under different domain user accounts, IIS must be forced to use NTLM as an authentication mechanism to resolve this issue (if you want to use only integrated Windows…
In cases where you have multiple pools of applications running under different domain user accounts, IIS must be forced to use NTLM as an authentication mechanism (if you want to use only integrated Windows authentication) to resolve this issue. To do this, follow these steps on the server where IIS is running:
1. Open a command prompt window.
2. Locate and change the directory containing adsutil.vbs file. By default, this directory is C:\Inetpub\Adminscripts.
3. Type the following command, then press Enter:
cscript adsutil.vbs set w3svc/NTAuthenticationProviders”NTLM”
4. To verify NtAuthenticationProviders metadata attribute is set to NTLM, please type the following command, and then press Enter:
cscript adsutil.vbs get w3svc/NTAuthenticationProviders
The following text should be returned:

NTAuthenticationProviders       : (STRING) "NTLM"

Back to the top
state
This behavior is caused by design.
Back to the top
For more information
If you set the SPN using only the FQDN of the server on which IIS is running, you will be prompted for user credentials after 30 minutes. Because Internet Explorer caches the domain name system…
If you set the SPN using only the FQDN of the server on which IIS is running, you will be prompted for user credentials after 30 minutes. There is a 30-minute timeout due to the way Internet Explorer caches domain name system (DNS) information. After 30 minutes, Internet Explorer will revert to the NetBIOS name. Therefore, you must also ensure that the SPN is registered using the NetBIOS name of the server on which IIS is running, so that you are not prompted for user credentials. For more information, click the article number below to view the corresponding article in the Microsoft Knowledge base:
Internet Explorer 263558 (http://support.microsoft.com/kb/263558/) how to use the cache of DNS host item
To verify the registered SPN for the user account used to run the application pool, open a command prompt window, type the following command from the setspn.exe installation directory, and then press Enter:
setspn.exe -l UserName
A list of registered SPNS for the user account is returned.

Copy Xcode project encountered MAC error code – 8058 (error code – 8058)

This morning, I opened the computer and routinely copied a copy of the program backup, but I encountered 8058 error. I tried to restart the computer, modify the folder permissions and change back, but all of them were invalid.
Thank you for the operation-can-t-be-completed-because-an-unexpected -error-error-COD problem. I was very upset when I saw that the number of answers was 0. I found that the problem was solved in the main building = W =.
Xcode is added to the project file, can add it to a folder itself, although this will prompt the item of the same name already exists in the engineering, operation fails, will not be shown in engineering, but in fact in the folder copy has been completed, and formed a recursive folder, can point to open. It’s fun, but you can’t replicate it… Go to this folder and delete it. 8058 error is resolved.

On the problem of from PIL import image

First, you need to find python27\Scripts with the CMD command, download and install PIP, and if you have, install pillow and image directly;
Next, we will find that the “from PIL import Image” in Pycharm still reports an error. Next, we will click file-& GT; settings-> Project Interpreter, double-click PIP, search Pillow, click Pillow, and there will be Install in the lower left corner, and the installation is successful.

As for pillow’s installation, please refer to the following one, but I personally think it can be installed directly in File -> settings-> Search the Pillow and Image installation in the Project Interpreter

PIL: Python Imaging Library is already the DE facto standard Library of image processing for the Python platform.
However, when we do image processing, we will report the exception of PIL in No Module Named. There is no library for image processing. Since Python2.7 doesn’t ship with the library, we’ll have to load and manipulate it ourselves. However, there is a lot of information on the Internet, no specific explanation. To save everyone time and not to be misled, I’ll write down the complete solution.
1. Install easy_install
Why install easy_install?
normally, to install a third-party extension for Python, you download the package, unzip it to a directory, open it at the command line or terminal, and then execute Python setup.py install to install it. It’s very tedious. It’s convenient to wrap Twisted if we run easy_install Twisted directly from the command line. So easy_install is meant to make it easier for us to install third-party extensions.
Easy_install download path: https://github.com/ActiveState/ez_setup
Unzip the package, open the command line, and execute Python ez_setup.py

2. Install the PIP
Installing the Python package is indeed the most convenient and quick way to install PIP, because it downloads files directly from PyPI, ensures security and reliability, and is rich in resources. PIP is a tool for installing and managing Python packages.
Download path: https://github.com/pypa/pip
Unzip the package, open the command line, and execute Python Setup.py install

Normally, it should be unzipped in your Python installation path, just for the sake of illustration. After PIP is installed, there is a scripts folder under our Python installation path, and we need to configure PIP’s environment variable, which is too easy to configure, So I won’t show you.
3. The next step is to install PIL
Download path: http://www.lfd.uci.edu/~gohlk/Python libs

Before installing PIL, we need to install the wheel package. Wheel is essentially a compressed format package. Installation of python modules.
Execute PIP Install wheel from the command line, because I’ve already installed it and it doesn’t show up very well.


Next, we can install our PIL. Execute PIP Install Lion-4.1.0-cp27-cp27m-win_amd64.WHl

Because I’ve already installed it, I can’t show it well. When we install PIL successfully, it will prompt Successfully.
Let me show you how to install the WHL file:
If you add the D:\Python27\Scripts directory to your path, you can just open a CMD window with the administrator in the directory where the WHL file is located and execute the following statement directly. WHL

PIP install clip-4.1.0-cp27-cp27m-win_amd64. WHL

otherwise, you will need to run the PIP command in the D:\ pyth27 \Scripts directory with the administrator open CMD, The file name should be written to the full path)

PIP install C:\Users\ XXX \Downloads\ cites-4.1.0-cp27-cp27m-win_amd64. WHL
4. Installation is complete
So far, our PIL module has been successfully installed. We will be able to use it in python2.7.
To introduce PIL, the code is from PIL import Image.
5. At the end
Although python2.7 and python3.0 are not very different from each other, compatibility issues are unavoidable. For example, there is built-in PIP above 3.0, and not at 2.7. So we’re going to do the operation. But since I’m used to using python2.7, I need to download files and operations. Hopefully this article will help you who are still using python2.7.

kCFErrorDomainCFNetwork error 306

kCFErrorDomainCFNetwork error 306 means that your web proxy isn’t working. Make sure that your HTTPS proxy setting is correct, and that the proxy server is up and running if you are using one.

kCFErrorDomainCFNetwork error 306 means that your web agent is not working. Make sure your HTTPS proxy Settings are correct and the proxy server is up and running if you are using one.

solve java.net.SocketException : Unrecognized Windows Sockets error: 0: JVM_ Bind

There was an error when starting Tomcat, and port 8080 was occupied. Three solutions
Error message: java.net.SocketException: Unrecognized Windows Sockets error: 0: JVM_Bind
. The solution
Method 1. Modify the configuration file Tomcat — conF –& GT; Server.xml modifies the port number
< The Connector port = “8080” protocol = “HTTP/1.1”
ConnectionTimeout = “20000”
The redirectPort = “8443”/& gt;
    
Method 2. Kill the process occupying the port

cmd–> Run the netstat -ano command to find the process occupying port 8080


Taskkill – pid/6038 f


Restart the tomcat

Method 3. Right-click on the taskbar and start task Manager — process — go to Javaw.exe — end the process — restart Tomcat

Alicloud CentOS 5 old version yum/ repomd.xml : [Errno 14] HTTP Error 404: Not Found

Too old version, many source 163 sohu ali cloud image has been deleted, so when using yum, it is not available, report 404 error. I found the following method.

使用centos-vault作为停止支持的CentOS的yum源


Just replace it with the source of Cenos-Vault.
Change all source host addresses in /etc/yum. Repos. D/cenos-base.repo file to http://vault.centos.org, and replace $releasever with the CentOS version used by the current system. 5.x final version 5.11 can be used. Note that all other alternate hosts need to be removed, as follows
[base]
name = CentOS – 5.11 – base
failovermethod = priority
baseurl=http://vault.centos.org/5.11/os/$basearch/
gpgcheck = 1
gpgkey=http://vault.centos.org/RPM-GPG-KEY-CentOS-5

# released updates

[updates] name = CentOS – 5.11 – updates
failovermethod = priority
baseurl=http://vault.centos.org/5.11/updates/$basearch/

gpgcheck = 1 gpgkey=http://vault.centos.org/RPM-GPG-KEY-CentOS-5

# additional packages that may be useful in
[extras]
name = CentOS – 5.11 – extras
failovermethod = priority

baseurl=http://vault.centos.org/5.11/extras/$basearch/ gpgcheck = 1 gpgkey=http://vault.centos.org/RPM-GPG-KEY-CentOS-5

# additional packages that extend functionality of existing Packages

[centosplus] name = CentOS – 5.11 – Plus
failovermethod = priority
baseurl=http://vault.centos.org/5.11/centosplus/$basearch/
gpgcheck = 1

enabled = 0 gpgkey=http://vault.centos.org/RPM-GPG-KEY-CentOS-5

# contrib – packages by Centos Users

[contrib] name = Centos – 5.11 – contrib
failovermethod = priority

baseurl=http://vault.centos.org/5.11/contrib/$basearch/ gpgcheck = 1 enabled = 0
gpgkey=http://vault.centos.org/RPM-GPG-KEY-CentOS-5

Then execute yum clean all & & Yum makecache will do.

About ora-00257: archiver error. Connect internal only, until free

Cause: OrA-00257 error (not enough space). By looking up the data, most of them say that it is caused by too many archived logs, which take up all the remaining space on the hard disk. This can be solved by simply deleting the logs or increasing the storage space.
Solutions:
1. SecureCRT log in to the server, switch user Oracle, and connect to Oracle
[root@userbeta~]# su – oracle
[oracle@userbeta~]$ sqlplus /nolog
SQL> connect /as sysdba
 
 
2. Check the use of Flash Recovery Area. It can be seen that ArchivelOG is already large, reaching 99.94
SQL> select * from V$FLASH_RECOVERY_AREA_USAGE;
 
 
3. Now clean up the archivelog archivelog and backup is recommended for production
Query the log directory location
show parameter recover;
 
4. Log out of SQLPLUS, log in with root, and delete the archive logs after backup
Enter a target address first; Create a new Oracle archive log backup directory
Mkdir Oracle archive log backup
 
 
Go to the archive log source directory (UPRR is the database instance name) :
cd /mnt/install/ora_11g/app/oracle/flash_recovery_area/UPRR/archivelog/
First go outside the Archivelog directory:
cd ..
Backup archivelog archive logs to the previously created oracle archivelog backup directory:
Cp-rf archivelog/MNT /oracle archivelog backup /
 
 
After waiting for the backup to complete, delete the archive logs that have been backed up
5. After the archive log is deleted, the control file must be maintained with RMAN, otherwise the space display will not be released
Log in to the server using Oracle user and enter RMAN maintenance:
rman target sys/pass
 
 
Check for some useless Archivelog
RMAN> crosscheck archivelog all;
Delete all Archivelog as of the previous day
RMAN> delete archivelog until time ‘sysdate-1’ ;
6. Query the use of Flash Recovery Area again:
Follow step 1 to enter the SQLPLUS environment, then use the following command to query the discovery, using only 0.66%, indicating that the archived logs have been cleared successfully!
SQL> select * from V$FLASH_RECOVERY_AREA_USAGE;

“Error: ` cout ‘was not declared in this scope”

code is:
#include <iostream>
int main(int argc, char *argv[])
{
    cout << “hello world” << endl;
}
when compile the erro info is below:
test@HuiT43 ~/sutdy $ g++ scat. cpp  -o scat
scat. cpp: In function `int main(int, char**)’:
scat. cpp:12: error: `cout’ was not declared in this scope
scat. cpp:12: error: `endl’ was not declared in this scope
the reason is :
This is becuase C++ 1998 requires cout and endl be called ‘std::cout’ and ‘std::endl’, or that a proper using directives such as ‘using namespace std;’ be used.
#include <iostream>
int main(int argc, char *argv[])
{
    std::cout << “hello world” << std::endl;
}
or
#include <iostream>
using namespace std;
int main(int argc, char *argv[])
{
     cout << “hello world” << endl;
}

VS2010 error: LINK : fatal error LNK1123: failure during conversion to COFF: file invalid or corrupt

After installing VS2012, an error occurred while using VS2010

LINK : fatal error LNK1123: failure during conversion to COFF: file invalid or corrupt

The solution is simple, as follows:

To summarize:
Either disable incremental linking, by going to

Project Properties 
   -> Configuration Properties 
       -> Linker (General) 
          -> Enable Incremental Linking -> "No (/INCREMENTAL:NO)"

or install VS2010 SP1.
VS2010 SP1 patch download address: http://www.microsoft.com/en-us/download/details.aspx?id=23691

Reference:
http://stackoverflow.com/questions/10888391/link-fatal-error-lnk1123-failure-during-conversion-to-coff-file-invalid-or-c

Error c2371: ‘xxx’: redefinition; different basic types solutions

http://blog.csdn.net/araecall/article/details/5583644
 
error C2371: ‘XXX’ : redefinition; Different basic types
define a structure, stored in a separate.h file, compile the error above, remove the #include “structure filename” from the.cpp file that instantiates the structure, and solve the problem.
later in a separate file and instantiate a such structure, the results and the above problems, structure of the object name is the same, in order to avoid the problems caused by this, and another. The CPP file renaming structure of the object, the problem was not solved, then the structure defined. H file, plus the “# pragma once”, compiled through.