Category Archives: How to Fix

Python error: command error out with exit status 1:

Update 2020.08.24: It seems that the reason for this is that Python 2 and Python 3 have different default encoding formats.
Python 2 is GBK and Python 3 is UTF-8. Some older packages can cause coding problems when installed.


Because PyCharm recently pops up RELP Communications all the time, it affects the efficiency of the code.
REPL (Read-Eval-Print Loop), which translates as “read-evaluation-output” Loop, is a simple, interactive programming environment.
Sounds useful, so I want to PIP the REPL directly in PyCharm.

Error result:
ERROR: Command errored out with exit status 1:

 
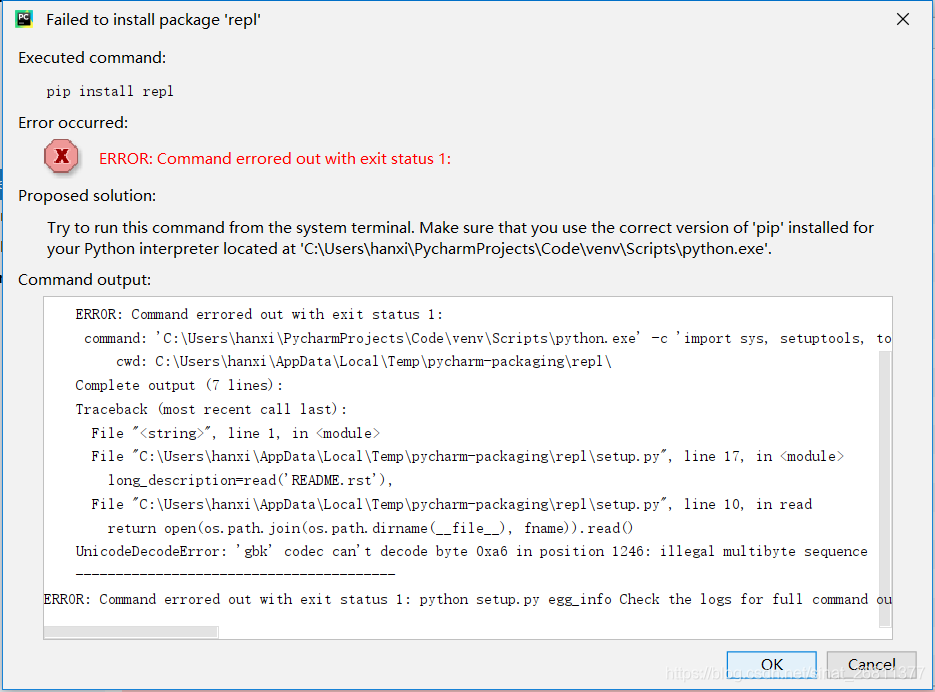
The main error is shown in the last few lines:
UnicodedecodeError: ‘GBK’ codec can’t decode byte 0xa6 in position 1246: illegal multibyte sequence
—————————————-
ror: Command errored out with exit status 1: python setup.py egg_info Check the logs for full command output.

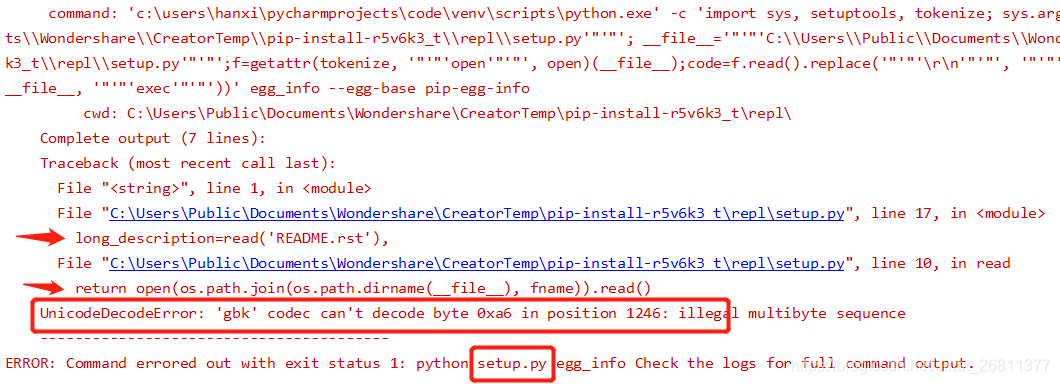
Positioning problems:
UnicodeDecodeError, indicating an encoding problem.
Specifically, on lines 10 and 17 of the setup.py file, the read file is encoded as GBK, not UTF-8, so the error prevents installation.


Update the successful solution:
Because you cannot use Project Interpreter in PyCharm.
Solution: download the source code package, make code changes and then install.
1. Locate the file of the original Package and find the line that reported the error.
REPL official address is: https://github.com/mbr/repl. View the source code of the setup file that reported the error.

Location problem: the source code does not specify the open encoding, so the default is GBK encoding.
Error source code:

def read(fname):
    return open(os.path.join(os.path.dirname(__file__), fname)).read()

 
2. After downloading the original package file, unpack it and find the setup.py file. Change this line in the file, add encoding=’utf-8′, save it and package it as a new installation package.
Modified code:

def read(fname):
    return open(os.path.join(os.path.dirname(__file__), fname),encoding='utf-8').read()

 
3. Enter PIP install repl-1.0.tar.gz and install with the new package. Success!


This problem bothered me for a week, but it turned out that the solution was very simple!
The most important thing to solve the problem is to locate the cause of the error, and then find a solution step by step according to the reason.

HTTP error 401 and 403 detailed explanation and solution

A, 401:
1. HTTP 401 Error – Unauthorized: (Unauthorized)
Your Web server believes that the HTTP data stream sent by the client is correct, but access to the URL resource requires user authentication, and the relevant information 1) has not been provided, or 2) has been provided but has not passed the authorization test. This is commonly known as “HTTP Basic Validation.” The authentication request that is required from the client is defined in the HTTP protocol as WWW — Authenticate Header Field

Desktop applications usually do not use cookies. Instead, they send the “user name + colon + password” as a base64-encoded string in the header Authorization of the HTTP request to the server. This method is called HTTP Basic Authentication.

2. The reason:
Since the request does not contain the Authorization header, the server will return a 401 Unauthozied to the client and add the information in the Response header “WWW -authentivate”. When the client encodes the user name and password with Base64 encryption and sends it to the server in the Authorization header, the authentication will be successful.

3. Scenarios and methods:
This is the interface of the user token. All the Body request parameters and Headers are the same, but the 401 error is reported. Haha, I forgot to add the request Header for Authorization. The solution is to add a keyvalue pair for basic authentication in HEADERS. The key-value pair is as follows:
Authorization:Basic YKKOw9MPlY3JldA== (Note: Base64-bit encoding here is written arbitrarily, please feel free to read) Authorization:Basic YKKOw9MPlY3JldA==
http://blog.csdn.net/u013136708/article/details/41210897

Second, 403:
1. HTTP 403forbidden – Access denied
403forbidden is a Status Code in the HTTP protocol. You do not have permission to access this site.

This state represents
The server understood the request but refused to execute the task. The request should not be re-sent to the server. In cases where the HTTP request method is not “HEAD” and the server wants the client to know why the permission is not available, the server should describe the reason for the refusal in the message returned. In cases where the server does Not want to provide any feedback, the server can use 404 Not Found instead of 403 Forbidden.

2. The reason:

You don’t have permission to access/on this server.
Additionally, a 500 Internal Server Error error was encountered while trying to use an ErrorDocument to handle the request.

3. Scenarios and methods:

I happened to see this error 403 a few days ago. Our link address was https://www.ceshi.com at that time. But it was configured as http://www.ceshi.com by someone else; This will result in a 403 error. The solution: just change HTTP to HTTPS.

On closer inspection: the error should be 403.4. 403.4 error is caused by requiring SSL, you must use “HTTPS” in the address of the page you want to view.

Hash conflict and four solutions

The cause of the hash conflict
Hashing is a solution to improve efficiency by recompressing data. However, because the hash value generated by the hash function is limited and the data may be more, there are still different data corresponding to the same value after processing by the hash function. This is where you have a hash conflict.
The influencing factors of hash conflict
Load factor (load factor = total number of data/hash table length), hash function, method of handling conflicts
Four ways to resolve hash conflicts
1. Open the address method
(1) Linear detection
When determining values sequentially, if a value for a piece of data already exists, one unit is added to the original value until no hash collisions occur.
(2) Ressquare detection
In order to determine the values, if the value of some data already exists, the original value is first added to the square of 1 units, if still exists, then subtracted 1 square units. It’s going to be 2 squared, 3 squared and so on. Until there is no hash conflict.
(3) Pseudo-random detection
When determining values in order, if some data already exists, a random number is generated by a random function, and the random number is added on the basis of the original value until there is no hash conflict.
2. Chain address method (HashMap hash resolution method)
For the same values, join using a linked list. Use an array to store each list.
Advantages:
(1) The zipper method is simple to deal with conflicts and has no accumulation phenomenon, that is, non-synonyms will never conflict, so the average search length is short;
(2) Because the node space of each linked list in the zipper method is dynamically applied, it is more suitable for the situation that the length of the table cannot be determined before making the table;
(3) In order to reduce conflicts, the open addressing method requires a small loading factor α, so a lot of space will be wasted when the node size is large. In the zipper method, α≥1 is desirable, and when the node is large, the added pointer domain in the zipper method can be ignored, so space is saved.
(4) In the hash table constructed by zipper method, the operation of deleting nodes is easy to realize. Simply delete the corresponding node on the linked list.
faults:
Pointers occupying a large space will cause a waste of space. If the space is used to increase the size of the hash table, the efficiency of the open address method will be improved.
3. Establish a public overflow area
Set up a common overflow area to store all hash conflicting data.
4. Re-hashing
The hash value of the conflict is hashed again until there is no hash conflict.

This configuration cannot edited error is reported in the project today, and the solution is given


Error cause:
Settings in plugins for many plugins missing error report, the simplest solution:

Find this file, delete, so idea again to get registration code aggravating the new configuration, the problem is solved perfectly
After searching the Internet, I found another simple way to solve the problem:

There is a red cancel check on the check, and then you will be prompted to restart the idea, perfect solution
 

Solutions to UCenter Info: MySQL query error app1

UCenter info: MySQL Query Error
l :SELECT * FROM [Table]notelist WHERE closed= ‘0’ AND app1< ‘1’ AND app1 & gt; ‘- 5’ LIMIT 1
Error: Unknown column ‘app1’ in ‘where clause’
Errno: 1054
find another method to solve the problem, as follows:
the first method:
in UCenter modify ID for the application of 1, testing process has the following Error message:
UCENTER INFO: MySQL Query Error
SQL:SELECT * FROM [Table]notelist WHERE closed= ‘0’ AND app1< ‘1’ AND app1 & gt;
Error:Unknown column ‘app1’ in ‘where clause’
rno :1054 LIMIT 1
Error:Unknown column ‘app1’ in ‘where clause
Mysql> select app1, app1, app1, app1, app1, app1, app1, app1, app1, app1
Using a database management software such as phpMyAdmin, look at the pre_notelist table of the UCenter database to see if the app1 field exists. If not, execute the following SQL statement:
ALTER TABLE pre_notelistd a> tinyint>) NOT NULL DEFAULT ‘0’;
> At this point, the problem is solved and the pro test is available.

The second method

https://www.discuz.net/thread-3167324-1-1.html due to their site before integrating several applications, and then make a mistake, just delete the appid in uc. The appid in the pre_ucenter_applications table is changed directly in the database. The appid in the pre_ucenter_applications table is changed directly in the database. And then it comes up, every time you update it, the cache comes up:
UCENTER INFO: MySQL Query Error
SQL:SELECT * FROM notelist WHERE closed= ‘0’ AND app1< ‘1’ AND app1 & gt;
Error:Unknown column ‘app1’ in ‘where clause’
rno :1054 LIMIT 1
Error:Unknown column ‘app1’ in ‘where clause
This kind of error, although does not affect the use, but looking uncomfortable! Here’s how to do it! (Note that there is only one DZ forum without integrating other applications.)
The idea is to restore the initial default Settings for the pre_ucenter_applications and pre_ucenter_notelist- tables. AppID starts at 1 again
First enter the phpmyadmin database — — — — — — — — — — – find pre_ucenter_notelist – back into the following interface:
the first step: 
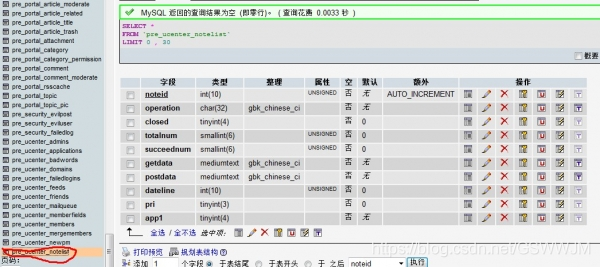
find position shown in the following screenshot:
click on the “browse” said if the data is empty, don’t tube it, if not delete all empty, pay attention to is to remove the data on the surface of the table data, not delete next step in the data table

click on the “structure” will appear the following interface:
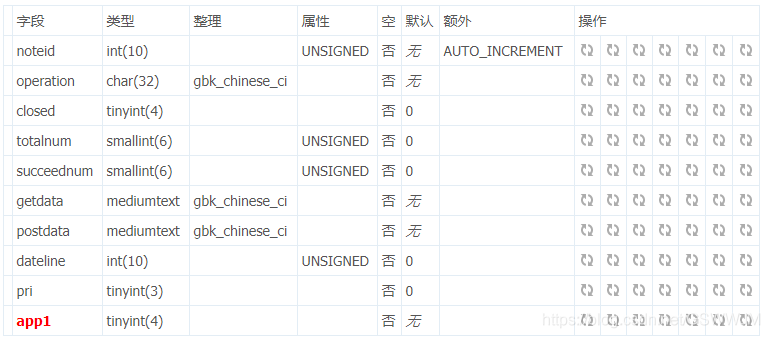
only need to keep APP1, if not APP1, but app6.app8.app10… (or other APP number), then delete directly, just keep the app1 line, as shown in the picture above! (Note that there is only one DZ forum without integrating other applications.)
Step 3:
modify pre_ucenter_applications table, put the appid modified into 1. Leave everything else alone.
after saving, exit the database!
Step 4:
Modify the config_ucenter. PHP directory in the forum root config to change the appID to 1
Step 5:
Change the app.php folder in the data cache under the UC_SERVER root of the forum. Change the appID to 1 as well
Step 6:
Log in to the UC_SERVER background. Refer to config_ucenter.php this data into the application list to fill in the corresponding parameters, save the update cache! (If the server didn’t cache the file when saving it, it will cause an error. Never mind the refresh, just go!)
Finally enter the DZ background [webmaster] – [UCENTER setting] refer to UC inside fill out, pay attention to the APPID, communication key to keep consistent! Ensure successful communication
= = = best update cache, clearing the browser traces, refresh, back into the background will not appear afore-mentioned problems, the principle is to restore pre_ucenter_applications and pre_ucenter_notelist – table of the initial default Settings. AppID again starting from 1 =
My personal solution
In addition to the above method,
the other Settings are not to make any changes
Just change the uCenter IP address: change it to the localhost IP address and the error will disappear

””Device not found” error causes and Solutions

This is a common error you may encounter when using SQLite in Android development.
See this in conjunction with my other article, “ADB is not an internal or external command, nor is it an executable application.”
Executing ADB shell under CMD. It is likely that your ADB version is low. (You can view your version of ADB with the adb version command.)
Here’s how to solve this problem.
Open the Android SDK Manager in Eclipse, upgrade the SDK Platform, and download the Google USB Driver. As shown in the figure below:


At this point, the problem is solved by executing adb.exe again.

Wireshark can’t find a solution to capture interface

After installing Wireshark, in the “Capture “-> “Options” does not have a single capture interface.
Question why
Win10 compatibility issues caused. is required to uninstall Winpcap and reinstall Win10pcap
The solution
(a) to download and install win10Pcap, download links: http://www.win10pcap.org/download/
note: prior to install Wireshark off, otherwise an error during the installation.


n>

>Link: fatal error lnk1561 and link: fatal error lnk1168: Solutions

In the VS 20XX custom project properties, select “General” on the left, “Use of MFC” on the right, and select “Use of MFC in Shared DLLs” next to it, as shown in Figure 1

Figure 1
LINK: fatal error LNK1561: cannot open E:\ test1.exe to write 1> in VS 20XX MFC; The operation to build project “test1.vcxproj” has completed – failed.
 
Solution: Change Settings: Linker ->; Advanced – & gt; Change the entry point to WinMainCRTStartup, as shown in Figure 2.

Figure 2
It’s done!! As shown in figure 3

Figure 3
Also, if a LINK: fatal error LNK1168 is reported, as shown in Figure 4

Figure 4.
This usually means that the program that was run last time did not shut down properly.
Indicate that the interface is not related, the program did not exit. Check if the task manager has a process called xx. exe, open the task manager, find the process called xx. exe, and close it. Then recompile the connection.