Category Archives: How to Fix

Error starting day: SELinux is not supported with the overlay 2

Environment: centos7

Command: systemctl start docker

          systemctl status docker -l

Error starting day: SELinux is not supported with the overlay 2 graph driver on this kernel. Either boot into a new kernel or disable SELinux in docker (- – SELinux enabled = false)

Solution:

It means: SELinux in this Linux kernel does not support overlay 2 graph driver. There are two solutions: either start a new kernel or disable SELinux in docker, – SELinux enabled = false

To edit the docker profile again:

vi /etc/sysconfig/docker

Change to:

Then systemctl start docker is ready

SBT command package error solution

Package

Clear

Stack overflow
error occurred: java.lang.StackOverflowError

For this overflow, you need to change the size of the stack. Find the following in SBT’s configuration file conf: sbtconfig.txt , add content:

-Xss2m

Memory overflow
error occurred: java.lang.OutOfMemoryError

Common memory overflow phenomenon, add configuration information:

-The size of xms64m
– xmx512m
can be changed by yourself.


Python: CUDA error: an illegal memory access was accounted for

Error in pytorch1.6 training:

RuntimeError: CUDA error: an illegal memory access was encountered

The reason for the error is the same as that of the lower version of python (such as version 1.1)

Runtimeerror: expected object of backend CUDA but get backend CPU for argument https://blog.csdn.net/weixin_ 44414948/article/details/109783988

Cause of error:

The essence of this kind of error reporting is model and input data_ image、input_ Label) is not all moved to GPU (CUDA).
* * tips: * * when debugging, you must carefully check whether every input variable and network model have been moved to the GPU. I usually report an error because I have missed one or two of them.

resolvent:

Model, input_ image、input_ The example code is as follows:

model = model.cuda()
input_image = input_iamge.cuda()
input_label = input_label.cuda()

or

device = torch.device("cuda" if torch.cuda.is_available() else "cpu")
model = model.to(device)
input_image = input_iamge.to(device)
input_label = input_label.to(device)

JavaScript summary: the difference between typeof and instanceof, and Object.prototype.toString() method

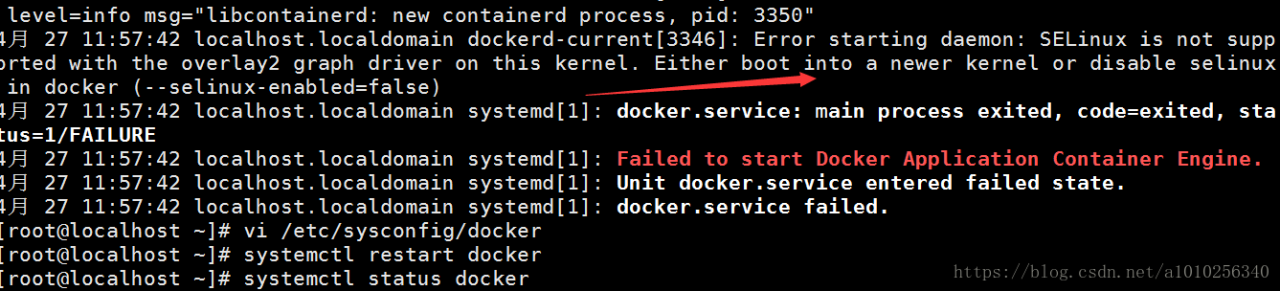
In my previous blog, I introduced basic data type and reference data type: basic type is a simple data segment stored in stack memory, that is, a single literal value; reference data type refers to an object composed of multiple values.

Typeof is an operator used to detect variable data types, mainly used to detect basic data types. It can determine whether a variable is a string, a numeric value, a Boolean value or undefined. However, if the detected variable is a reference data type, it can return object or function, but it can’t tell in detail whether it is array or regexp.

The main purpose of nstanceof is to detect reference types.


Let’s take a closer look

The difference between typeof and instanceof:

1.typeof:

Typeof is a unary operation, which can be of any type before an operand.

It is mainly used to determine whether the data is the basic data type:
string, number, object, null, undefined and Boolean, but it is unable to determine the function, array and regexp

the return value is a string indicating the type of the operand.

only a few results can be returned, such as number, undefined, and Boolean.

We can even use typeof to determine whether a variable exists,
such as if (typeof a = = undefined){ document.write (“OK”);}, and you don’t need to use if (a), because if a doesn’t exist (undeclared), there will be an error. For special objects such as array and null, typeof will always return objects, which is the limitation of typeof.

Take a look at the code example:

<!DOCTYPE html>
<html>
<head>
<meta http-equiv="Content-Type" content="text/html; charset=utf-8" />
<script language="javascript" type="text/javascript">
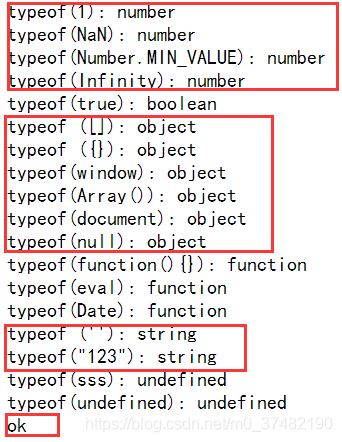
document.write ("typeof(1): "+typeof(1)+"<br>");
document.write ("typeof(NaN): "+typeof(NaN)+"<br>");
document.write ("typeof(Number.MIN_VALUE): "+typeof(Number.MIN_VALUE)+"<br>");
document.write ("typeof(Infinity): "+typeof(Infinity)+"<br>");
document.write ("typeof(true): "+typeof(true)+"<br>");
document.write ("typeof ([]): "+typeof([])+"<br>");
document.write ("typeof ({}): "+typeof({})+"<br>");
document.write ("typeof(window): "+typeof(window)+"<br>");
document.write ("typeof(Array()): "+typeof(new Array())+"<br>");
document.write ("typeof(document): "+typeof(document)+"<br>");
document.write ("typeof(null): "+typeof(null)+"<br>");
document.write ("typeof(function(){}): "+typeof(function(){})+"<br>");
document.write ("typeof(eval): "+typeof(eval)+"<br>");
document.write ("typeof(Date): "+typeof(Date)+"<br>");
document.write ("typeof (''): "+typeof('')+"<br>");
document.write ("typeof(\"123\"): "+typeof("123")+"<br>");
document.write ("typeof(sss): "+typeof(sss)+"<br>");
document.write ("typeof(undefined): "+typeof(undefined)+"<br>");
if(typeof a=="undefined"){document.write ("ok");}
</script>
<title>javascript</title>
</head>
<body>
</body>
</html>

Running results:


2.instanceof:

The main purpose of instanceof is to detect the reference type. The return value of is only true and false </ font>, which can be used to determine whether the prototype attribute of a constructor exists in the prototype chain of another object to be detected. Here we can ignore the prototype first

See the following code example:

<!DOCTYPE html>
<html>
<head>
<meta http-equiv="Content-Type" content="text/html; charset=utf-8" />
<script language="javascript" type="text/javascript">
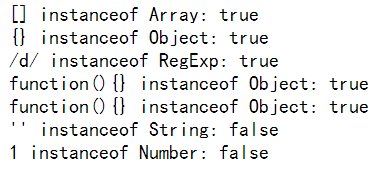
document.write ("[] instanceof Array: " + ([] instanceof Array )+ "<br>");
document.write ("{} instanceof Object: " + ({} instanceof Object )+ "<br>");
document.write ("/\d/ instanceof RegExp: " +( /\d/ instanceof RegExp) + "<br>");
document.write ("function(){} instanceof Object: " + (function(){} instanceof Object) +"<br>");
document.write ("function(){} instanceof Object: " + (function(){} instanceof Function) +"<br>");
document.write ("'' instanceof String: " + ('' instanceof String) +"<br>");
document.write ("1 instanceof Number: "+ (1 instanceof Number) +"<br>");
</script>
<title>javascript类型测试</title>
</head>
<body>
</body>
</html>

The running results are as follows:

For example, we need to determine whether a is an instance of B?You can use a instance of B?Alert (“true”): Alert (“false”); to judge

Instanceof is used to determine whether a variable is an instance of an object
for example, var a = new array(); alert (a instanceof array); will return true
and alert (a instanceof object) will return true;
this is because array is a subclass of object.

When it comes to instanceof, we need to insert one more problem, which is the arguments of function. We may all think that arguments is an array, but if we use instanceof to test, we will find that arguments is not an array object, although it looks very similar.

In addition:

Test var a = new array(); if (a instance of object) alert (‘y ‘); else alert (‘n’);
get ‘y’

But if (window instance of object) alert (‘y ‘); else alert (‘n’);
get ‘n’

Therefore, the object of instanceof test here refers to the object in JS syntax, not the DOM model object.

There are some differences when using typeof
alert (typeof (window)) will get object


three Object.prototype.toString

In many cases, we can use the instanceof operator or the constructor property of the object to detect whether the object is an array. For example, many JavaScript frameworks use these two methods to determine whether an object is an array type. But detecting arrays in cross frame pages fails. The reason is that arrays created in different iframes do not share their prototype properties with each other

    <script>
    window.onload=function(){
    var iframe_arr=new window.frames[0].Array;
    alert(iframe_arr instanceof Array); // false
    alert(iframe_arr.constructor == Array); // false
    }
    </script>

The tostring() method is called across the prototype chain Object.prototype.toString (), which can solve the above cross framework problem.
This is a primitive prototype extension function of an object, which is used to distinguish data types accurately
when Object.prototype.toString (o) After execution, the following steps are performed:

1) Get the class property of object o.
2) connection string “[object” + result (1) + “]
3) return result

Object.prototype.toString . call ([]);// returns “[object array]”
0 Object.prototype.toString . call (/ reg/Ig);// returns “[object regexp]”

And we will find that it is not accurate to judge the data type by typeof. For example, the return values of array, regular, date and object typeof are all objects, which will cause some errors.
Therefore, on the basis of type of judgment, we need to use Object.prototype.toString Method to further determine the data type.

Let’s look at the code:

<script language="javascript" type="text/javascript">
var type=Object.prototype.toString
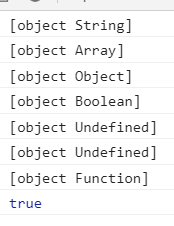
console.log(type.call(''));//object String
console.log(type.call([]));//object Array
console.log(type.call({}));//object Object
console.log(type.call(false));//object Boolean
console.log(type.call());//object Null
console.log(type.call(undefined));//object Undefined
console.log(type.call(function(){}));//object Function
console.log(type.call('')=="[object String]");//true
</script>

Running results:


To sum up:

Both typeof and instanceof are operators used to detect variable types. The difference between them is that

Typeof is used to judge the basic type of variable; instanceof is used to judge the type of object;

Call the tostring() method across the prototype chain: Object.prototype.toString (), which can solve the cross frame problem.
This is a primitive prototype extension function of the object, which can be used to accurately distinguish data types

Vscode code block / full text collapse / expand shortcut

Requirements & amp; operations

There are two types of scenes commonly used (pay attention to the scope of operation):

To operate all code blocks in the file where the cursor is located:

Collapse all Ctrl + K + 0 expand all Ctrl + K + J just operate the code in the code block where the cursor is located:

Collapse Ctrl + Shift + [ Expand Ctrl + Shift +]

More operations

If you have more needs, you can use Ctrl + Shift + P to search fold and unfold for more options.
The following commands can be used to find, do not have to remember (but the above two are still necessary to be familiar with).

Unfold - unfold

Fold - fold

Python switch / case statement implementation method

Different from Java, C/C + + and other languages, python does not provide switch/case statements, which makes me feel very strange. We can implement the switch/case statement in the following ways.

Use if elif… elif… Else to realize switch/case

You can use if elif… Elif.. else sequence to replace the switch/case statement, this is the easiest way to think of. However, with the increase of branches and frequent modification, this alternative method is not very good for debugging and maintenance.

Switch/case using dictionary

Switch/case can be realized by dictionary, which is easy to maintain and can reduce the amount of code. The following is the switch/case implementation using dictionary simulation:


def num_to_string(num):
    numbers = {
        0 : "zero",
        1 : "one",
        2 : "two",
        3 : "three"
    }

    return numbers.get(num, None)

if __name__ == "__main__":
    print num_to_string(2)
    print num_to_string(5)

The results are as follows:

two
None

Python dictionary can also include functions or lambda expressions. The code is as follows:

def success(msg):
    print msg

def debug(msg):
    print msg

def error(msg):
    print msg

def warning(msg):
    print msg

def other(msg):
    print msg

def notify_result(num, msg):
    numbers = {
        0 : success,
        1 : debug,
        2 : warning,
        3 : error
    }

    method = numbers.get(num, other)
    if method:
        method(msg)

if __name__ == "__main__":
    notify_result(0, "success")
    notify_result(1, "debug")
    notify_result(2, "warning")
    notify_result(3, "error")
    notify_result(4, "other")

The results are as follows:

success
debug
warning
error
other

Through the above example, it can be proved that the switch/case statement can be fully implemented through Python dictionary, and it is flexible enough. especially at runtime, it is convenient to add or delete a switch/case option in the dictionary.

Switch/case can be implemented by using scheduling method in class

If you are not sure which method to use in a class, you can use a scheduling method to determine it at run time. The code is as follows:

class switch_case(object):

    def case_to_function(self, case):
        fun_name = "case_fun_" + str(case)
        method = getattr(self, fun_name, self.case_fun_other)
        return method

    def case_fun_1(self, msg):
        print msg

    def case_fun_2(self, msg):
        print msg

    def case_fun_other(self, msg):
        print msg


if __name__ == "__main__":
    cls = switch_case()
    cls.case_to_function(1)("case_fun_1")
    cls.case_to_function(2)("case_fun_2")
    cls.case_to_function(3)("case_fun_other")

The results are as follows:

case_fun_1
case_fun_2
case_fun_other

summary

Personally, using dictionary to realize switch/case is the most flexible, but it is also difficult to understand.

The difference between LSTM and Gru

First, some conclusions are given

The performance of Gru and LSTM is equal in many tasks. With fewer Gru parameters, it is easier to converge, but LSTM performs better when the data set is large. Structurally, Gru has only two gates (update and reset), LSTM has three gates (forge, input and output). Gru directly transfers the hidden state to the next unit, while LSTM packages the hidden state with memory cell.


1. Basic structure

1.1 GRU

Gru is designed to better capture long-term dependencies. Let’s look at the input first

ht−1

and

x(t)

How can Gru calculate the output

h(t)

Reset gate

r(t)

Responsible for decision making

h(t−1)

For new memory

h^(t)

How important is it if

r(t)

If it’s about 0,

h(t−1)

It will not be passed to new memory

h^(t)

new memory

h^(t)

It’s a new input

x(t)

And the hidden state of the previous moment

h(t−1)

The summary of this paper. Calculate the new vector summed up

h^(t)

Contains the above information and new input

x(t)

. Update gate

z(t)

Responsible for deciding how much to pass

ht−1

to

ht

. If

z(t)

If it’s about one,

ht−1

Almost directly copied to

ht

On the contrary, if

z(t)

About 0, new memory

h^(t)

Pass directly to

ht

. Hidden state:

h(t)

from

h(t−1)

and

h^(t)

The weight of the two is determined by update gate

z(t)

Control. ​

1.2 LSTM

LSTM is also designed to better capture long-term dependencies, but the structure is different and more complex. Let’s take a look at the calculation process:

The new memory cell step is similar to the new memory in Gru. The output vector

c^(t)

It’s all about new input

x(t)

And the hidden state of the previous moment

h(t−1)

The summary of this paper. Input gate

i(t)

Responsible for determining input

x(t)

Whether the information is worth saving. Forget gate

f(t)

Responsible for determining past memory cell

c^(t−1)

yes

c(t)

It’s important. final memory cell

c(t)

from

c^(t−1)

and

c^(t)

The weight is determined by forge gate and input gate respectively. The output gate is not available in Gru. It’s responsible for making decisions

c(t)

Which parts of should be passed to hidden state

h(t)

2. Difference

1. Control of memory

LSTM: controlled by output gate and transmitted to the next unit

Gru: pass it directly to the next unit without any control

2. Input gate and reset gate have different action positions

LSTM: computing new memory

c^(t)

Instead of controlling the information of the previous moment, we use forge gate to achieve this independently

Gru: computing new memory

h^(t)

Reset gate is used to control the information of the previous time.

3. Similar

The biggest similarity is that addition is introduced in the update from t to T-1.

The advantage of this addition is that it can prevent gradient dispersion, so LSTM and Gru are better than RNN.

Reference:
1. https://cs224d.stanford.edu/lecture_ notes/LectureNotes4.pdf
2. Empirical Evaluation of Gated Recurrent Neural Networks on Sequence Modeling
3. https://feature.engineering/difference-between-lstm-and-gru-for-rnns/

Python generates (x, y, z) 3D coordinate sequence

For a (x, y, z) three-dimensional space, the dataframe sequence of [‘x ‘,’y’,’z ‘] is generated

import pandas as pd
import numpy as np

# x = 30 ,y = 20, z = 5
_x_size_temp = 30
_y_size_temp = 20
_z_size_temp = 5

_x_se = []
for _ in range(_x_size_temp):
    _x_se += [_] * (_y_size_temp * _z_size_temp)

_y_se = []
for _ in range(_y_size_temp):
    _y_se += [_] * (_z_size_temp)
_y_se *= _x_size_temp

_z_se = []
_z_se = np.arange(0, _z_size_temp).tolist() * (_x_size_temp * _y_size_temp)

cargo_state_3d = pd.DataFrame(data={
    'x': _x_se,
    'y': _y_se,
    'z': _z_se,
})

Several ways to view spark task log

The tasks run by spark are often viewed through the web. However, when the spark streaming task is running, the log is often very large, which makes it inconvenient to view the web. Therefore, it is necessary to locate it on the server. Here are two ways to view the driver side and the executor side logs.

1、 View the web log:

The following is the general web interface of four yarn scheduling spark tasks:

Click the first task: application_ 1509845442132_ 3866 enter the interface below. The log recorded in the lower right corner is actually the log of the driver side. The driver side is on the mosaic node.

In addition, we can view the log on the executor node. As shown in the figure above, open the applicationmaster and jump to the general task scheduling interface of spark

After clicking on the executor, you can see four executors and a driver. See the log on the right. Stdout is the output log of println, and stderr is the standard log of spark output.

2、 Server side log view

The task log of sparkstreaming is often very large, so it is not convenient to view it on the web. So we need to go to the server to view it. As you can see from the web, that node is the driver. The driver side log is usually in the following directory: Horn/container logs/

In case you don’t know which directory it is, you can find it directly: find/- name “application_ 1509845442132_ 3866”

The corresponding executor log is also found on the server in this way.

It’s time to upgrade your parquet: IOException: totalvaluecount = = 0

This article is from Huawei cloud community “your parquet should be upgraded: IOException: totalvaluecount = = 0 problem positioning Tour”, original author: wzhfy.

1. Problem description

When using spark SQL to perform ETL task, an error is reported when reading a table: “IOException: totalvaluecount = = 0”, but there is no exception when writing the table.

2. Preliminary analysis

The result of this table is generated after two tables join. After analysis, the result of join produces data skew, and the skew key is null. After join, each task writes a file, so the task whose partition key is null writes a large number of null values to a file, and the number of null values reaches 2.2 billion.

The figure of 2.2 billion is sensitive, just exceeding the maximum value of int 2147483647 (more than 2.1 billion). Therefore, it is suspected that parquet is writing more than int.max There’s a problem with a value.

[note] this paper only focuses on the problem that a large number of null values are written to the same file, resulting in an error when reading. As for whether it is reasonable to generate such a large number of nulls in this column, it is beyond the scope of this paper.

3. Deep dive into parquet (version 1.8.3, some contents may need to be understood in combination with parquet source code)

Entry: Spark (spark 2.3) – & gt; parquet

The parquet call entry is in spark, so the call stack is mined from spark.

InsertIntoHad oopFsRelationCommand.run ()/ SaveAsHiveFile.saveAsHiveFile () -> FileFormatWriter.write ()

There are several steps

    before starting a job, create an outputwriterfactory: ParquetFileFormat.prepareWrite ()。 A series of configuration information related to parquet writing files will be set here. The main one is to set the writesupport class ParquetOutputFormat.setWriteSupportClass (job, classof [parquetwritesupport]), parquetwritesupport is a class defined by spark itself. In executetask () – & gt; writeTask.execute In (), first create the outputwriter (parquetoutputwriter) through the outputwriterfactory: outputWriterFactory.newInstance ()。 For each row of records, use ParquetOutputWriter.write The (internalrow) method writes the parquet file in turn. Before the task ends, call ParquetOutputWriter.close () shut down resources.

3.1 write process

In parquetoutputwriter, through the ParquetOutputFormat.getRecordWriter Construct a recordwriter (parquet recordwriter), which includes:

Writesupport set when

    preparewrite(): responsible for converting spark record and writing to parquet structure parquetfilewriter: responsible for writing to file

    In parquetrecordwriter, the write operation is actually delegated to an internalwriter (internal parquetrecordwriter, constructed with writesupport and parquetfilewriter).

    Now let’s sort out the general process so far:

    single directory writetask/dynam icPartitionWriteTask.execute
    -> ParquetOutputWriter.write -> ParquetRecordWriter.write -> Interna lParquetRecordWriter.write

    Next, interna lParquetRecordWriter.write There are three things in it

    (1) writeSupport.write , i.e ParquetWriteSupport.write There are three steps

        MessageColumnIO.MessageColumnIORecordConsumer .startMessage; ParquetWriteSupport.writeFields : write the value of each column in a row, except null value; MessageColumnIO.MessageColumnIORecordConsumer . endmessage: write null value for missing fields in the second step.
        Columnwriterv1. Writenull – & gt; accountforvaluewritten:
        1) increase the counter valuecount (int type)
        2) to check whether the space is full, writepage – checkpoint 1 is required

        (2) Increase counter RecordCount (long type)

        (3) Check the block size to see if flushrowgrouptostore – checkpoint 2 is required

        Since all the written values are null and the memsize of 1 and 2 checkpoints is 0, page and row group will not be refreshed. As a result, null values are always added to the same page. The counter valuecount of columnwriterv1 is of type int, when it exceeds int.max The overflow becomes a negative number.

        Therefore, flushrowgrouptostore is executed only when the close() method is called (at the end of the task):
        the ParquetOutputWriter.close -> ParquetRecordWriter.close
        -> Interna lParquetRecordWriter.close -> flushRowGroupToStore
        -> ColumnWriteStoreV1.flush -> for each column ColumnWriterV1.flush

        Page will not be written here because valuecount overflow is negative.

        Because writepage has not been called, the totalvaluecount here is always 0.
        ColumnWriterV1.writePage -> C olumnChunkPageWriter.writePage -&Value total

        At the end of the write, interna lParquetRecordWriter.close -> flushRowGroupToStore -> Colum nChunkPageWriteStore.flushToFileWriter -> for each column C olumnChunkPageWriter.writeToFileWriter :

          ParquetFileWriter.startColumn : totalvaluecount is assigned to currentchunkvalueco untParquetFileWriter.writeDataPagesParquetFileWriter . endcolumn: currentchunk valuecount (0) and other metadata information construct a columnchunk metadata, and the relevant information will be written to the file eventually.

        3.2 read process

        Also, take spark as the entry to view.
        Initialization phase: ParquetFileFormat.BuildReaderWithPartitionValues -> Vectorize dParquetRecordReader.initialize -> ParquetFileReader.readFooter -> Parq uetMetadataConverter.readParquetMetadata -> fromParquetMetadata -> ColumnChunkMetaData.get , which contains valuecount (0).

        When reading: vectorize dParquetRecordReader.nextBatch -> checkEndOfRowGroup:
        1) ParquetFileReader.readNextRowGroup -> for each chunk, currentRowGroup.addColumn ( chunk.descriptor.col , chunk.readAllPages ())

        Since getvaluecount is 0, pagesinchunk is empty.

        2) Construct columnchunkpagereader:

        Because the page list is empty, the totalvaluecount is 0, resulting in an error in the construction of vectorizedcolumnreader.

        4. Solution: parquet upgrade (version 1.11.1)

        In the new version, ParquetWriteSupport.write ->
        MessageColumnIO.MessageColumnIORecordConsumer .endMessage ->
        ColumnWriteStoreV1(ColumnWriteStoreBase).endRecord:

        In endrecord, the attribute of maximum number of records per page (2W records by default) and the check logic are added. When the limit is exceeded, writepage will be generated, so that the valuecount of columnwriterv1 will not overflow (it will be cleared after each writepage).

        Compared with the old version 1.8.3, columnwritestorev1.endrecord is empty.

        Attachment: a small trick in parquet

        In parquet, in order to save space, when a long type value is within a certain range, int will be used to store it. The method is as follows:

        Determine whether it can be stored with int:

        If you can, use intcolumnchunkmetadata instead of longcolumnchunkmetadata to convert on construction time:

        When you use it, turn it back, in tColumnChunkMetaData.getValueCount -> intToPositiveLong():

        The common int range is – 2 ^ 31 ~ (2 ^ 31 – 1). Because metadata information (such as valuecount) is a non negative integer, it can only store numbers in the 0 ~ (2 ^ 31 – 1) range. In this way, the number in the range of 0 ~ (2 ^ 32 – 1) can be expressed, and the expression range is doubled.

        Attachment: test case code that can be used to reproduce (depending on some spark classes, it can be run in spark project)

        Test case code.txt 1.88kb


        Click follow to learn about Huawei’s new cloud technology for the first time~