Author Archives: Robins

【arm】arm-assembly-print-register-value-in-decimal

Date: 2018-7-15


1. Reference:
https://stackoverflow.com/questions/2370942/arm-assembly-print-register-value-in-decimal
2. Arm register printing
Since the ARM register print is always in hexadecimal, it seems to be a bit of a struggle. Therefore, we have been exploring the relatively convenient method of arm register printing recently, and now there are two methods for reference.
Method one:

print_decimal:
        stmfd   sp!, {
  r4,r5,lr}

        cmp     r0, #0
        moveq   r0, #'0'
        bleq    putchar
        beq     done

        mov     

The principle and return value of get() function in C language

The first thing to remember is Never use gets().

this is because the gets() function doesn’t check whether the target array holds input, and the first thing you need to do to read a string into your program is to reserve space for the string. The gets() function doesn’t check this aspect, so the result is that the program is vulnerable to bugs. The famous’ worm ‘virus works by overwriting data with too much data and causing it to crash. So for important programming, never use gets()!

1, gets() takes an address, which you need to specify to put the input from the keyboard into memory, and gets(array name) is typically used to pass the input string into a given array. Note: The size of the array must be defined in advance! If you don’t define the size of the array, you may not know into which memory the string was entered, which may result in overwriting the original code in that memory.

2, gets();
2, gets(); This way, because do not know when will to the end of the string, so whenever type ‘\ n’, gets () function will automatically read in front of the line breaks all the content and add ‘\ 0’ at the end, and directly put the string returned to the calling its program, and then gets () to read and be read to the ‘\ n’ discarded, so that the next read will begin in a new line.

case 1:

        #include <stdio.h>
        #include <stdlib.h>
        #define MAX 81
        int main(void)
        {
            char name[MAX];
            printf("Hi, what's your name?\n");
            gets(name);
            printf("Nice name, %s\n", name);
            return 0;
        }

        /*
            Hi, what's your name?
            Herry potter
            Nice name, Herry potter

        */

Char * gets(char * s)
3, gets()

{

return s;

}

so you can see that gets() returns a pointer to char type data with the same pointer passed to it. Therefore, there are the following procedures:

example 2:

        #include <stdio.h>
        #include <stdlib.h>
        #define MAX 81
        int main(void)
        {
            char name[MAX];
            char * ptr;

            printf("Hi,what's your name?\n");
            ptr = gets(name); // Here ptr is a pointer to a type char, in this case ptr points to the first address of name.
            printf("%s?Ah?%s!", name, ptr); // At this point, the values pointed to by name and ptr are output, and it can be seen that they both give the same output.
            return 0;
        }

        /*
            Hi,what's your name?
            Herry
            Herry?Ah?Herry!
        */

4. Actually gets() has two possible return value types:
1) when the program is normal input string: return to read the address of the string, also is the first of an array of strings stored address; 2) when the program errors or meet the end of file: return NULL pointer NULL, be careful not to confuse the NULL pointer and the NULL character (‘ \ 0 ‘);

so can easily detect errors in the following form:

the while (gets (name)! = NULL)

note: you basically don’t use gets(), which is arguably a defunct function, and you can now replace it with scanf(), getchar(), fgets().

[Python] How to Sort a Group of Tuples Using the Sorted() Function

[question]
Suppose we use a set of tuples to represent students’ names and grades:

L = [('Bob', 75), ('Adam', 92), ('Bart', 66), ('Lisa', 88)]

With sorted() sorted the above lists by name:

# Sort by name

L = [('Bob', 75), ('Adam', 92), ('Bart', 66), ('Lisa', 88)] 

def by_name(t):
    return t[0].lower()

L2 = sorted(L, key=by_name)
print(L2)

Operation results:

[('Adam', 92), ('Bart', 66), ('Bob', 75), ('Lisa', 88)]

【 description 】
About indexes:
L = [(‘ Bob ‘, 75), (‘ Adam ‘, 92), (‘ Bart, 66), (88) ‘Lisa’]
L [0] is (75), ‘Bob’
L[0][0] is “Bob”
and so on
Here, we need to understand:
The key to sorting () is implementing a mapping function. The function specified by the key will act on each element of the list and sort by the result returned by the key function. The final result: Returns the corresponding elements of the original list in the order of the key function
So the actual argument to the by_name function is each element in L, the tuple primitive in the list.

so, sort the contents of the list by name:
The by_name function does all the lowercase handling of the first element of the tuple, the name string t[0], with the lower() function, and returns the result. The by_name function ACTS one by one on each primitive in L, and sorts the original elements in L according to the order of function results.
In the same way, it can be realized and ranked from high to low in terms of performance:

# In descending order of performance

L = [('Bob', 75), ('Adam', 92), ('Bart', 66), ('Lisa', 88)] 

def by_score(t):
    return t[1]

L2 = sorted(L, key=by_score,reverse=True)
print(L2)

Operation results:

[('Adam', 92), ('Lisa', 88), ('Bob', 75), ('Bart', 66)]

Explain stdin, stdout, stderr in C language

When we write C programs, we often come across printf (), fprintf (), perror (), what exactly do these things do?I have to say stdin, stdout, stderr. Think about what we do when we write a File in C: File * FP =fopen(), which is what we request from the system, which is the equivalent of a channel to the File.
 
Actually, stdin,stdout,stderr is this FP, but it is turned on by default when the computer system is turned on, where 0 is stdin, which means input stream, which means input from the keyboard, 1 is STdout,2 is Stderr, and 1,2 is the monitor by default. While printf () prints out to stdout, which is equivalent to Fprintf (stdout, “***”), perror() prints out to Stderr, which is equivalent to Fprintf (stderr, “***”), what’s the difference between stdout and Stderr?
 
The reason we use printf () when we write a program is that we can monitor the health of our program, or debug, if our program is running all the time without stopping, we can’t keep staring at the screen to see the output of the program, then we can use file redirection. Will output to a file that we can look at later. For example, test.c
(CPP) view plain copy
1. & lt; The pre class = “CPP” name = “code” & gt; #include< stdio.h>   
2.
3. Int main ()
4. {
5. The printf (” stdout Helo World!!!!! \n”);    
6.
7. Return 0;   
8.}
After compiling, we./test > Test.txt (redirects the contents of stdout to a file by default) outputs the contents of the test program to a file called test.txt. There is a more explicit way of writing it. Test.txt, where the 1 stands for stdout. Speaking of which, you should know what Stderr should do. Test.c: That’s right.
(CPP) view plain copy
1. # include< stdio.h>   
2.
3. Int main ()
4. {
5. The printf (” Stdout Helo World!!!!! \n”);   
6. Fprintf (stdout, stdout “Hello World!! \n”);   
7. Perror (Stderr “Hello World!!!!! \n”);   
8. Fprintf (stderr, “stderr Hello World!! \n”);   
9.
10. Return 0;   
11.}
After compilation,./test, four outputs on the screen, if./test > Test.ext, the result is two Stderr Hello World output from the screen!! , Stdout Helo World!!!!! In the file test.txt, based on the above, it is easy to understand the current result, so we can do whatever we want with the output, such as:
 
./test 1> testout.txt 2> Testerr.txt, we’ll output stdout to testout.txt, stderr to testerr.txt;
./test 1> Testout.txt, output stdout to file testout.txt, output stderr to screen;
./test 2> Testerr.txt, output stderr to file testerr.txt, output stdout to the screen;
./test > test.txt 2> & 1, this is to redirect stdout and Stderr to the same file, test.txt.
 
If we don’t want to see the output, either on the screen or redirected to a file, don’t worry, Linux has a solution for everything,./test >/dev/zero 2 & gt; & 1, so you don’t see any output.
 
Note: An important difference between Stderr and Stdout is that Stderr is non-buffered and outputs immediately, whereas Stdout defaults to row buffering, which means it outputs when it hits’ \n ‘. If you want stdout to output in real time as well, add Fflush (stdout) to the end of the output statement to do so in real time.

Reprinted in WeChat embedded ARM public number

How to Revert Your File & Folder by “FOUND.000”

How do you feel when you copy files between partitions, when you download software when you write in Word when you suddenly have a power failure, Windows fails to respond, or the system automatically reboots? How do you feel when the screen goes black? We can only hope that important text will not be lost after the reboot. However, many times things don’t go according to plan. After rebooting, your original files have been “lost” except one by one in the folder “FOUND.000” similar to “file0001.chk”. Don’t worry, there’s a good chance that these files will contain the important data you’re looking for, just restore them to their original state (restore CHK files to different types of files that you can recognize).

Tools/Materials

Windows 2000/XP

Microsoft.net Framework V2.0 and above

CHKResume software

Methods/Steps

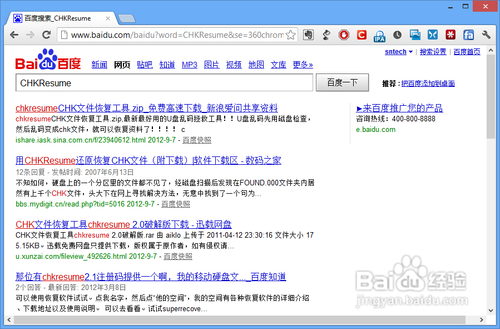
Search Baidu for a software download called “CHKResume.” CHKResume does not need to be installed, just run it.

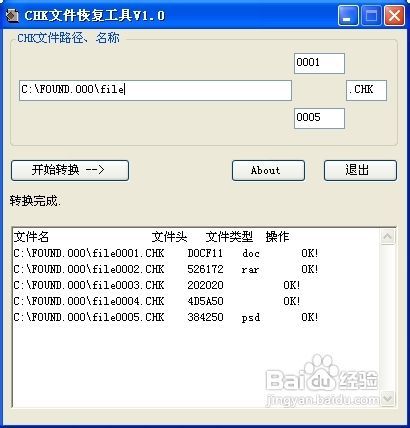
By default, CHKResume can restore MP3, JPG, BMP, MPG, DOC, and GIF file types, but since the author has taken the software into account, you can manually add your own file types that can be restored. Next, we add support for RAR compression files for CHKResume and use it to restore CHK files.
Use Notepad to open the file.type file in CHKResume directory, and add the file type according to the rule of “the first six bytes of file header + space + file extension”. For example, add RAR file to support “526172 RAR”, and save the modified file.type file.

Run CHKResume, select the directory where you want to save the CHK files, enter the file naming rules (automatically generated CHK files are usually named after the “File + four-digit. CHK” rule), fill in the start and end Numbers of the file in the two numeric input boxes next to it, and click the “Start Conversion” button to restore the file.

END

Matters needing attention

Installation of Microsoft.net Framework V2.0 or above is required.

Windows 7 is already integrated with Microsoft.NET Framework V2.0.

Conclusion:

The method of operation is as follows.
  1. First of all, click Tools - Folder Options and go to Folder Options Settings.
  In Folder Options, select the View tab to find the option to show system files and the option to show hidden files to show all files.
  3. Then find the folder found.000 on the USB flash drive. Of course, this one is numbered and may appear as found.
  XXX. 4, you can see the size of the files inside. If you want to recover the files inside, you need to know the approximate file information, such as file format. For example, here are some photo files, if they are JPG then modify their file extension to jpg.
  5, copy all the files to the hard drive, then right-click and select Rename File. Change the suffix from chk to the file format to be recovered (you can use the bulk renaming tool, there will be a lot of modified useless things do not care, find the desired file can be). 6.
  6, and then keep the recovered file to the specified location on the hard disk can be. This method can save some data. Of course, if the data is precious, you can go for professional data recovery personnel.

If you are willing to pay a few yuan to buy me a cup of tea, you can use your mobile phone to scan the QR code below and donate through Alipay. I will try to write better articles.
(donation does not display the personal information of the donor. If necessary, please indicate your contact information)
Thank you for your kindly donation!!


Mac upgrade pip

I haven’t upgraded PIP for a long time. Today I will upgrade once:

$ pip install --upgrade pip
Collecting pip
  Using cached https://files.pythonhosted.org/packages/d8/f3/413bab4ff08e1fc4828dfc59996d721917df8e8583ea85385d51125dceff/pip-19.0.3-py2.py3-none-any.whl
Installing collected packages: pip
  Found existing installation: pip 9.0.1
    Uninstalling pip-9.0.1:
Exception:
Traceback (most recent call last):
  File "/Library/Python/2.7/site-packages/pip-9.0.1-py2.7.egg/pip/basecommand.py", line 215, in main
    status = self.run(options, args)
  File "/Library/Python/2.7/site-packages/pip-9.0.1-py2.7.egg/pip/commands/install.py", line 342, in run
    prefix=options.prefix_path,
  File "/Library/Python/2.7/site-packages/pip-9.0.1-py2.7.egg/pip/req/req_set.py", line 778, in install
    requirement.uninstall(auto_confirm=True)
  File "/Library/Python/2.7/site-packages/pip-9.0.1-py2.7.egg/pip/req/req_install.py", line 754, in uninstall
    paths_to_remove.remove(auto_confirm)
  File "/Library/Python/2.7/site-packages/pip-9.0.1-py2.7.egg/pip/req/req_uninstall.py", line 115, in remove
    renames(path, new_path)
  File "/Library/Python/2.7/site-packages/pip-9.0.1-py2.7.egg/pip/utils/__init__.py", line 267, in renames
    shutil.move(old, new)
  File "/System/Library/Frameworks/Python.framework/Versions/2.7/lib/python2.7/shutil.py", line 300, in move
    rmtree(src)
  File "/System/Library/Frameworks/Python.framework/Versions/2.7/lib/python2.7/shutil.py", line 247, in rmtree
    rmtree(fullname, ignore_errors, onerror)
  File "/System/Library/Frameworks/Python.framework/Versions/2.7/lib/python2.7/shutil.py", line 252, in rmtree
    onerror(os.remove, fullname, sys.exc_info())
  File "/System/Library/Frameworks/Python.framework/Versions/2.7/lib/python2.7/shutil.py", line 250, in rmtree
    os.remove(fullname)
OSError: [Errno 13] Permission denied: '/Library/Python/2.7/site-packages/pip-9.0.1-py2.7.egg/EGG-INFO/PKG-INFO'
You are using pip version 9.0.1, however version 19.0.3 is available.
You should consider upgrading via the 'pip install --upgrade pip' command.

Prompt permission is not enough, assign permission to the current user:

mac-temp:~ zyh$ sudo chown -R $USER /Library/Python/2.7

Upgrade again:

mac-temp:~ zyh$ pip install --upgrade pip
Cache entry deserialization failed, entry ignored
Collecting pip
  Using cached https://files.pythonhosted.org/packages/d8/f3/413bab4ff08e1fc4828dfc59996d721917df8e8583ea85385d51125dceff/pip-19.0.3-py2.py3-none-any.whl
Installing collected packages: pip
  Found existing installation: pip 9.0.1
    Uninstalling pip-9.0.1:
      Successfully uninstalled pip-9.0.1
Successfully installed pip-19.0.3

$ pip --version
pip 19.0.3 from /Users/zyh/Library/Python/2.7/lib/python/site-packages/pip (python 2.7)


【Hackerrank】Reverse a doubly linked list

You’re given the pointer to the head node of a doubly linked list. Reverse the order of the nodes in the list. The head node might be NULL to indicate that the list is empty.
Input Format
You have to complete the Node* Reverse(Node* head) method which takes one argument – the head of the doubly linked list. You should NOT read any input from stdin/console.
Output Format
Change the next and prev pointers of all the nodes so that the direction of the list is reversed. Then return the head node of the reversed list. Do NOT print anything to stdout/console.
Sample Input
NULL
NULL <– 2 <–> 4 <–> 6 –> NULL
Sample Output

NULL
NULL <-- 6 <--> 4 <--> 2 --> NULL

Explanation
1. Empty list, so nothing to do.
2. 2,4,6 become 6,4,2 o reversing in the given doubly linked list.

#include<iostream>
#include<cstdio>
#include<cstdlib>
#include<cmath>
using namespace std;
struct Node
{
	int data;
	Node* next;
	Node* prev;
};/*
   Reverse a doubly linked list, input list may also be empty
   Node is defined as
   struct Node
   {
     int data;
     Node *next;
     Node *prev
   }
*/
Node* Reverse(Node* head)
{
    // Complete this function
    // Do not write the main method. 
    if(head == NULL || head->next == NULL)
        return head;
    Node *p = head;
    Node *q = head->next;
    if(q->next == NULL)
    {
        q->next = p;
        q->prev = NULL;
        p->next = NULL;
        p->prev = q;
        return q;
    }
    while(q->next != NULL)
    {
        if(p == head)
            p->next = NULL;
        Node *_next = q->next;
        q->next = p;
        p->prev = q;
        p = q;
        q = _next;
    }
    q->next = p;
    p->prev = q;
    q->prev = NULL;
    return q;
}Node* Insert(Node *head, int data)
{
	Node *temp = new Node();
	temp->data = data; temp->prev = NULL; temp->next = NULL;
	if(head == NULL) return temp;
	head->prev = temp;
	temp->next = head;
	return temp;
}
void Print(Node *head) {
	if(head == NULL) return;
	while(head->next != NULL){ cout<<head->data<<" "; head = head->next;}
	cout<<head->data<<" ";
	while(head->prev != NULL) { cout<<head->data<<" "; head = head->prev; }
	cout<<head->data<<"\n";
}
int main()
{
	int t; cin>>t;
	Node *head = NULL;
	while(t--) {
	   int n; cin>>n;
           head = NULL;
	   for(int i = 0;i<n;i++) {
		   int x; cin>>x;
		   head = Insert(head,x);
	   }
	   head = Reverse(head);
	   Print(head);
	}
}

source, ~/.bashrc, ~/.bash_ Profile details

The source command is used to execute a script, so:

For example, in a script you export $KKK=111, if you use./ a.shh to execute the script, after execution, you run echo $KKK and find no value. If you use source to execute, and then echo, you will find KKK=111. Because calling./ a.shh to execute the shell is run in a subshell, so after execution, the structure does not reflect in the parent shell, but the source is different, it is executed in this shell, so you can see the result

when you first login to Linux, first start /etc/profile, then start one of the ~/.bash_profile, ~/.bash_login, or ~/.profile files in the user directory.
The order of execution is: ~/.bash_profile, ~/.bash_login, ~/.profile.
If the ~/.bash_profile exists, the ~/.bashrc file is also typically executed.

if [-f ~/.bashrc];
if [-f ~/.bashrc]; Then
.. /bashrc
fi

~/.bashrc, generally there will be the following code:
if [-f /etc/bashrc]; Then
. /etc/bashrc
fi

so ~/.bashrc will call /etc/bashrc file. Finally, the ~/.bash_logout file is also executed when the shell exits.

execution order: /etc/profile-& gt; (~/.bash_profile | ~/.bash_login | ~/.profile) -> ~/.bashrc -> /etc/bashrc ->

(1) /etc/profile: this file sets the environment information for each user of the system and executes when the user logs in for the first time. And collect shell Settings from the configuration file in the /etc/profit.d directory.

(2) /etc/bashrc: execute this file for every bash shell user. When the bash shell is opened, the file is read (that is, bashrc is executed every time a new terminal is opened).

(3) ~/.bash_profile: each user can use this file to enter shell information dedicated to their own use. When the user logs in, this file is only executed once. By default, some environment variables are set to execute the user’s.bashrC file.

(4) ~/.bashrc: this file contains bash information dedicated to your bash shell, which is read when you log in and every time you open a new shell.

(5) ~/.bash_logout: this file is executed every time the system exits (bash shell). In addition, variables set in /etc/profile (global) can be applied to any user, while variables set in ~/.bashrc (local) can only inherit from variables in /etc/profile, they are “father and son” relationship.

(6) ~/.bash_profile: interactive, login into bash running ~/.bashrc: interactive, non-login into bash running usually the Settings are about the same, so usually the former calls the latter.

The use of various environment variables such as /etc/profile and /etc/environment Settings files
1) First add export LANG=zh_CN to /etc/profile, log out of the system and log in again. The login prompt shows English.
2) First delete export LANG=zh_CN in /etc/profile, add LNAG=zh_CN to /etc/environment, log out of the system and log in again. The login prompt shows Chinese.

user environment is always created by executing /etc/profile before reading /etc/environment. Why is this different?Instead of executing /etc/environment first and /etc/profile later?
this is because: /etc/environment is the environment for setting the whole system, while /etc/profile is the environment for setting all users, the former is irrelevant to the logon user, while the latter is relevant to the logon user.

system application execution environment with users can be independent, but related to the system environment is, so when you log in, you can see, such as date, time, information display format and LANG is related to the system environment, the default LANG = en_US, LANG = zh_CN if the system environment, the message is in Chinese, or in English.

for the user’s shell initialization is to execute /etc/profile first, then read the file /etc/environment; For the whole system, /etc/environment is executed first. Is that correct?
logon order should be
/etc/enviroment –> /etc/profile –> $HOME/.profile –> $HOME/. Env (if present)
/etc/profile is the environment variable for all users
/etc/enviroment is the environment variable for the system

login system the order that the shell reads should be
/etc/profile-& gt; /etc/enviroment –> $HOME/.profile –> $HOME/.env
the reason should be the difference between the user environment and the system environment. If the same variable has different values in the user environment (/etc/profile) and the system environment (/etc/environment), then the user environment should be used as the criterion.

The use of MAC Desktop tiktok Goose pet goose

GooseDesktop is a fun desktop pet app that allows users to see a goose running around the screen.
douyin table pet goose Mac version how to use
Double click the application
to open it again to display the Settings window
. In the Settings window, you can either:
to change Settings
to exit the Desktop Goose (type killall “Desktop Goose” and press enter) or click the Settings “Quit Desktop Goose”
to open the Memes and Notes folder

Douyin Table pet goose Mac version technical description

module stored in ~/Library/Containers/net. Namedfork. Desktop chicago-brewed Goose/Data/Library/Application Support/Desktop chicago-brewed Goose/Memes.
is filled with built-in modules on the first run, but you can put more memes (GIF, PNG, JPG, and so on) in it.

note the Notes stored in ~/Library/Containers/net. Namedfork. Desktop chicago-brewed Goose/Data/Library/Application Support/Desktop chicago-brewed Goose/Notes /.
is populated with built-in comments the first time it runs, but you can put more comments here (as a TXT file).
Settings
to open the Settings window, double-click the icon again after the application runs.
can also change the Settings of the terminal using the default command. Here are the Settings and their default values:
CanAttackAtRandom: NOMinWanderingTimeSeconds: 20 maxwanderingtimeseconds: 40 firstwandertimeseconds: 20 framerate: 60 soundvolume: 1 – (use values between 0 and 1) UseCustomColors: NOGooseWhite: #ffffffGooseOrange: #ffa500GooseOutline: #d3d3d3GooseEye: #000000GooseMud: #8b4513
For example, to frame rate down to 30:
defaults write net. Namedfork. DesktopGoose FrameRate 30
let goose red:
defaults write.net. Namedfork. DesktopGoose GooseWhite “# ff0000”
defaults write net. Namedfork. DesktopGoose UseCustomColors – bool YES
quieted goose:
defaults write.net. Namedfork. DesktopGoose SoundVolume 0
changes will take effect immediately, without having to restart the Desktop chicago-brewed Goose.
application scripting
desktop goose for Mac can script with AppleScript. Drag the application to the script editor to see what is supported.
some examples you can do:
tell app “Desktop Goose” to collect meme “Meme4.png”
tell app “Desktop Goose” to collect meme “https://i.redd.it/4bamd6lnso241.jpg”
tell app “Desktop Goose” to wander
tell app “Desktop Goose” to nab mouse
tell app “Desktop Goose” to collect note “Honk from AppleScript” title “HoNK”

Django WSGI protocol application, based on wsgiref module DIY a web framework

1. Web framework
Web framework (Web framework) is a development framework used to support the development of dynamic Web sites, Web applications and Web services. Most of these Web frameworks provide a set of ways to develop and deploy web sites, as well as a common set of methods for Web behavior. The Web framework has already implemented many functions, and developers can quickly develop Web applications by using the methods provided by the framework and completing their own business logic. The browser and server communicate based on the HTTP protocol. It can also be said that the Web framework is in the above dozens of lines of code base extension, there are a lot of simple and convenient use of methods, greatly improve the efficiency of development.
2. Web application background
By understanding the HTTP protocol and HTML documents, we understand the essence of a Web application: </font b>
The browser sends an HTTP request; server receives a request to generate an HTML document; The server sends the HTML document to the browser as the Body of the HTTP response; browser receives the HTTP response, pulls out the HTML document from the HTTP Body and displays it.
3. WSGI Protocol
the simplest Web application is to save the HTML with a file, use an off-the-shelf HTTP server software, receive user requests, read HTML from the file, return. Common static servers such as Apache, Nginx, Lighttpd, and others do just that.
if you want to generate HTML dynamically, you need to do the above steps yourself. However, accepting HTTP requests, parsing HTTP requests, and sending HTTP responses are all hard work, and if we write the underlying code ourselves and haven’t started writing dynamic HTML yet, we’ll have to spend months reading the HTTP specification.
The correct approach is that the underlying code is implemented by specialized server software, and we focus on generating HTML documents in Python. Because we don’t want to touch the TCP connection, HTTP raw request and response formats, we need a unified interface, and let’s focus on writing Web business in Python.
This Interface is the WSGI: Web Server Gateway Interface.

WSGI, (Web Server Gateway Interface), is a Web Server Gateway Interface standard/protocol that implements Python parsing. It is a simple and common Interface between a Web Server and a Web application or framework.

4. Wsgiref module
The wsgiref module is a service module developed by python based on wsgi protocol. It is a reference implementation of wsgi server written in pure python. A “reference implementation” means that the implementation is fully compliant with the WSGI standards, but does not consider any operational efficiency, and is used only for development and testing purposes.

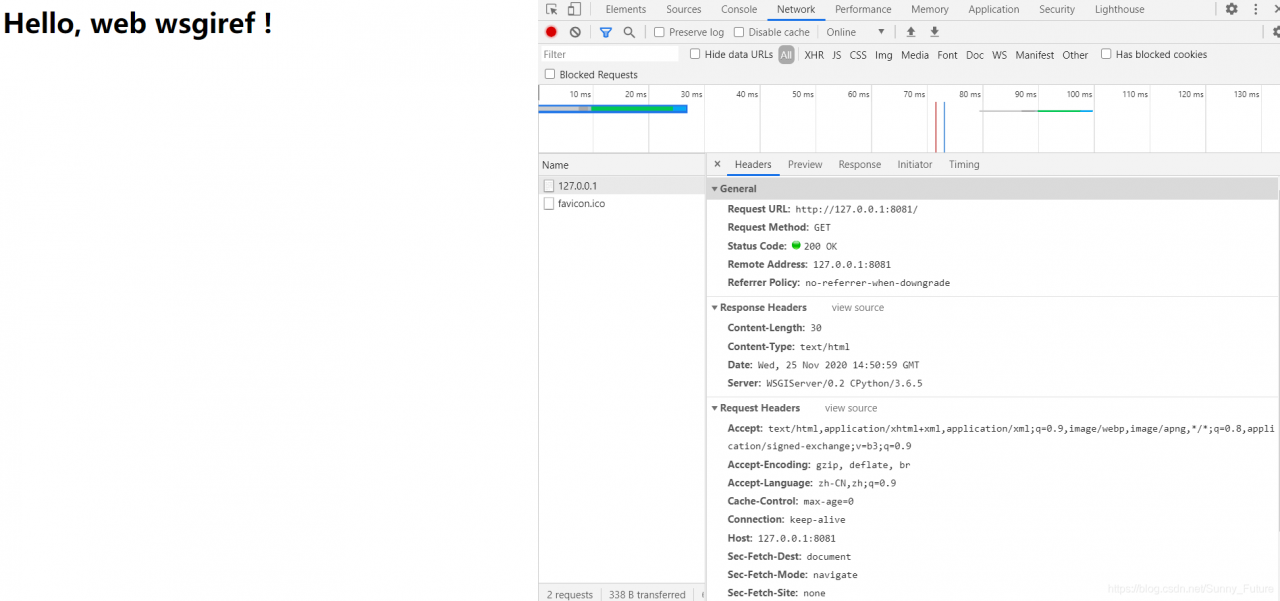
from wsgiref.simple_server import make_server


def application(environ, start_response):
    start_response('200 OK', [('Content-Type', 'text/html')])
    return [b'<h1>Hello, web  wsgiref !</h1>']


httpd = make_server('', 8081, application)

print('Serving HTTP on port 8081...')
# Start listening to HTTP requests:
httpd.serve_forever()

5. DIY a Web framework
in order to make a dynamic website, we need to extend the functions, such as the user accesses the url through a login page when the path is login, and responds to a front page when the path is index.
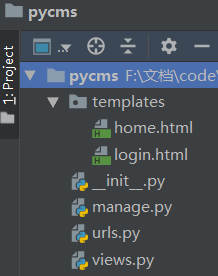
5.1 Startup file: manager.py

from wsgiref.simple_server import make_server
from views import *
from urls import urlpatterns


def application(environ, start_response):
    # print("environ",environ)
    start_response('200 OK', [('Content-Type', 'text/html')])
    # Get the current request path
    print("PATH_INFO",environ.get("PATH_INFO"))
    path=environ.get("PATH_INFO")
    # Branches
    func = None
    for item in urlpatterns:
        if path == item[0]:
            func = item[1]
            break
    if not func:
        ret = notFound(environ)
    else:
        ret = func(environ)
    return [ret]


httpd = make_server('', 8080, application)
# Start listening to HTTP requests:
httpd.serve_forever()

5.2 URL control file: URls.py

from views import *

urlpatterns = [
    ("/login", login),
    ("/home", home),
]

5.3 View file :views. Py

# View Functions
def home(environ):
    with open("templates/home.html", "rb") as f:
        data = f.read()
    return data


def login(environ):
    with open("templates/login.html", "rb") as f:
        data = f.read()
    return data


def notFound(environ):
    return b"<h1>404...</h1>"

5.4 Templates file Templates
login.html:

<!DOCTYPE html>
<html lang="en">
<head>
    <meta charset="UTF-8">
    <title>Title</title>
</head>
<body>
<form action="http://127.0.0.1:8080/home" method="post">
    Username <input type="text" name="user" placeholder="user">
    Password <input type="password" name="pwd"  placeholder="pwd">
    <input type="submit">
</form>
</body>
</html>

home:

<!DOCTYPE html>
<html lang="en">
<head>
    <meta charset="UTF-8">
    <title>Title</title>
</head>
<body>
<h3> GOOD JOB!! This is home!</h3>
</body>
</html>

5.5 Start the Web framework and request access
Start the manage. Py files, listen on port 8080
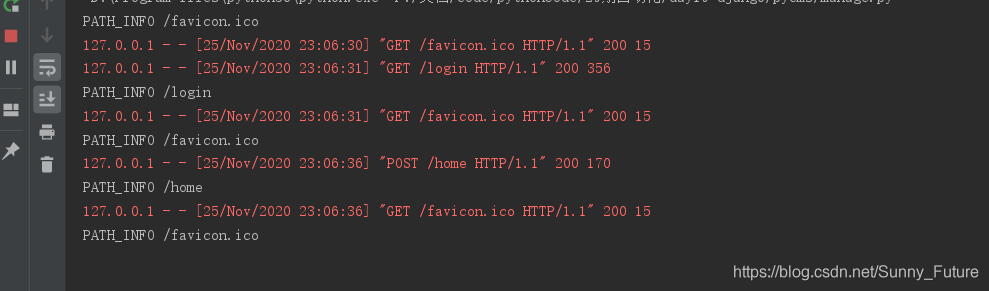
visit http://127.0.0.1:8080/login
will redirect after login the home page, http://127.0.0.1:8080/home

5.6 Framework application
At this point, the PyCMS package is a Web framework, and once this framework is built, it is easy to add business functions. For example, if we add a time view page, we only need to complete two parts:
(1) Add:

("/timer", timer),

(2) Add in views. Py:

def timer(request):
    import datetime
    now=datetime.datetime.now().strftime("%Y-%m-%d %X")
    return now.encode()

Isn’t that easy! With the web framework, no longer has to start line after line of code from creating a socket!
At this point, exclamation, Django framework really sweet!!

How to Find the Standard Deviation in Minitab

Standard deviation, represented by the Greek Letter sigma σ, is a measure of dispersement in statistics. It shows you how spread out your data set it. In a normal distribution, the bulk (64.2%) of a data set is within one standard deviation from the mean and almost all the data will fall within three standard deviations of the mean.  Calculating a standard deviation by hand involves the use of an ugly-looking formula, but you can calculate a standard deviation in Minitab in a couple of mouse clicks.
Sample question: Find the standard deviation in Minitab for the following data: 102, 104, 105, 110, 112, 116, 124, 124, 125, 240, 245, 254, 258, 259, 265, 265, 278, 289, 298, 311, 321, 321, 324, 354
Step 1: Type your data into a single column in a Minitab worksheet.
Step 2: Click “Stat”, then click “Basic Statistics,” then click “Descriptive Statistics.”

Step 3: Click the variables you want to find the standard deviation for and then click “Select” to move the variable names to the right window.
Step 4: Click the “Statistics” button.
Step 5: Check the “Standard deviation” box and then click “OK” twice. The standard deviation will be displayed in a new window.