Lack of files in composer installation
File php.ini (text editor open)
extension_dir = "D:\web\PHP7.3\ext" //File directory problem (change to under current folder)
Lack of files in composer installation
File php.ini (text editor open)
extension_dir = "D:\web\PHP7.3\ext" //File directory problem (change to under current folder)
After reading some articles, all kinds of requests for version control and switching master are bullshit. just run composer install -- ignore platform reqs or composer update -- ignore platform reqs directly
Phenomenon: using os.system() to call external exe program in Python process, which results in the main process blocking
resolvent:
subprocess.Popen("***.exe")Use the subprocess. Popen method to open a separate process for the external exe program
Decompress multiple compressed files method: first merge, and then decompress
Windows:
Win + R, enter CMD, then enter the CMD terminal, CD to the compressed file directory, and then merge with the following command.
copy /B xxx.zip.001 + xxx.zip.002 + xxx.zip.003 1.zip
Decompress the generated 1. Zip
Note: the space and + sign in the middle
Linux:cat xxx.tar.gz* >& gt; xxx.tar.gz
Decompress the generated xxx.tar.gz:
tar -zxvpf xxx.tar.gz
Note: the compressed name corresponding to the transposition of XXX
 File "/home/jsj201-6/anaconda3/lib/python3.6/site-packages/allennlp/data/data_loaders/multiprocess_data_loader.py", line 16, in <module>
    from allennlp.data.data_loaders.data_collator import DataCollator, DefaultDataCollator
  File "/home/jsj201-6/anaconda3/lib/python3.6/site-packages/allennlp/data/data_loaders/data_collator.py", line 3, in <module>
    from transformers.data.data_collator import DataCollatorForLanguageModeling
  File "/home/jsj201-6/anaconda3/lib/python3.6/site-packages/transformers/data/__init__.py", line 19, in <module>
    from .metrics import glue_compute_metrics, xnli_compute_metrics
  File "/home/jsj201-6/anaconda3/lib/python3.6/site-packages/transformers/data/metrics/__init__.py", line 23, in <module>
    from sklearn.metrics import f1_score, matthews_corrcoef
  File "/home/jsj201-6/anaconda3/lib/python3.6/site-packages/sklearn/metrics/__init__.py", line 7, in <module>
    from .ranking import auc
  File "/home/jsj201-6/anaconda3/lib/python3.6/site-packages/sklearn/metrics/ranking.py", line 25, in <module>
    from scipy.stats import rankdata
  File "/home/jsj201-6/anaconda3/lib/python3.6/site-packages/scipy/stats/__init__.py", line 348, in <module>
    from .stats import *
  File "/home/jsj201-6/anaconda3/lib/python3.6/site-packages/scipy/stats/stats.py", line 177, in <module>
    from . import distributions
  File "/home/jsj201-6/anaconda3/lib/python3.6/site-packages/scipy/stats/distributions.py", line 13, in <module>
    from . import _continuous_distns
  File "/home/jsj201-6/anaconda3/lib/python3.6/site-packages/scipy/stats/_continuous_distns.py", line 15, in <module>
    from scipy._lib._numpy_compat import broadcast_to
  File "/home/jsj201-6/anaconda3/lib/python3.6/site-packages/scipy/_lib/_numpy_compat.py", line 10, in <module>
    from numpy.testing.nosetester import import_nose
ModuleNotFoundError: No module named 'numpy.testing.nosetester'
terms of settlement:
Update the version of SciPy:
pip install numpy==1.18
pip install scipy==1.1.0
pip install scikit-learn==0.21.3
The problem is solved.
Yesterday, when I was developing an OO ALV, I found the customer’s system. After creating the screen, I click layout to edit the screen.
SAP dumps directly, as shown in the figure
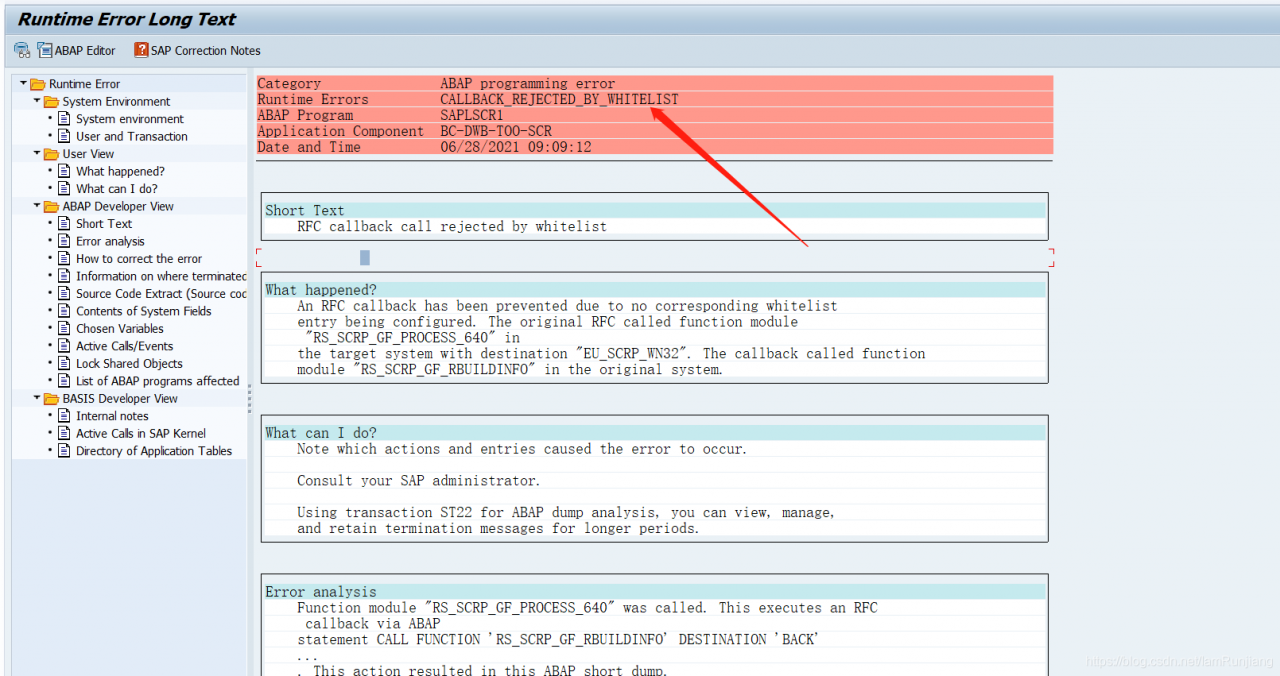
After consulting the data, the solutions are as follows:
SM59–> TCP/IP CONNECTIONS–> EU_ SCRP_ WN32
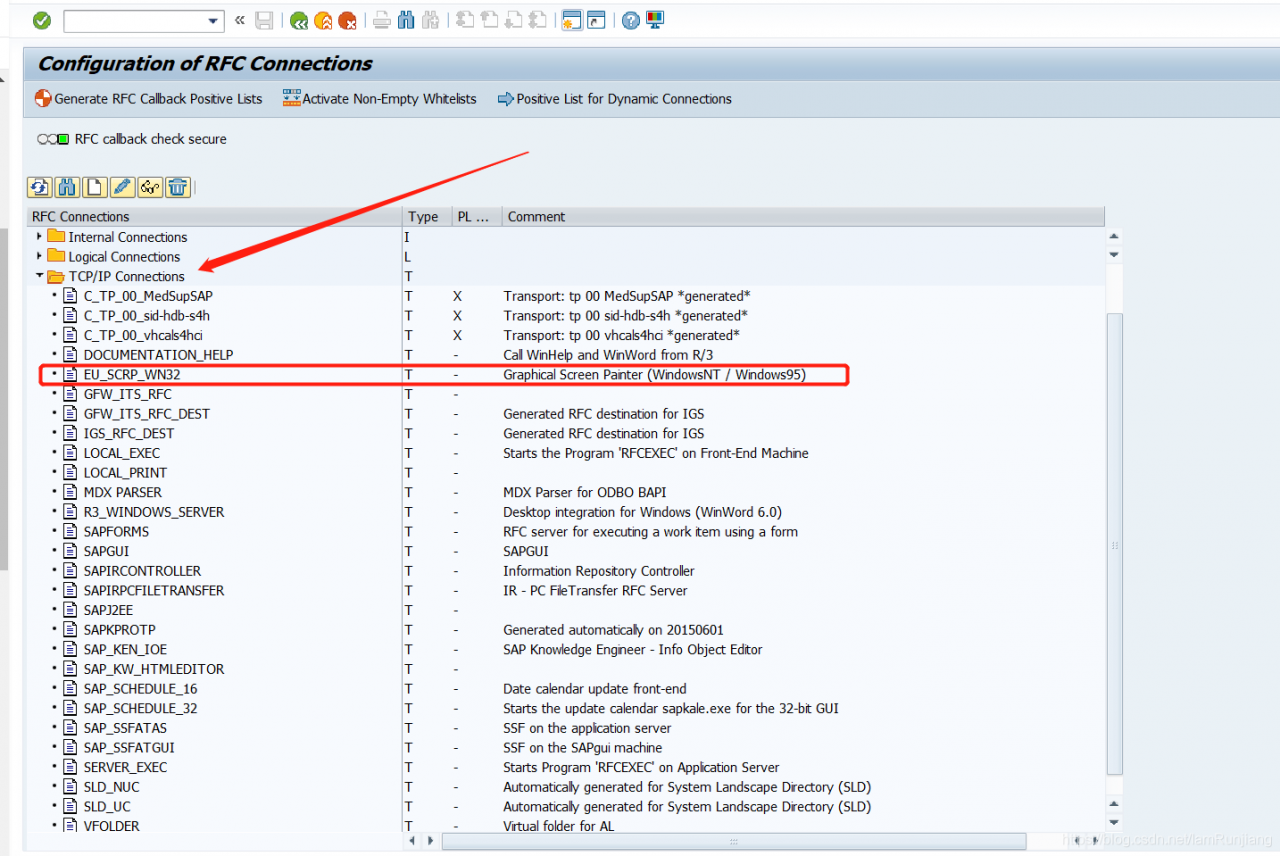
After entering, click Edit — “logo & amp; security–> Add call function
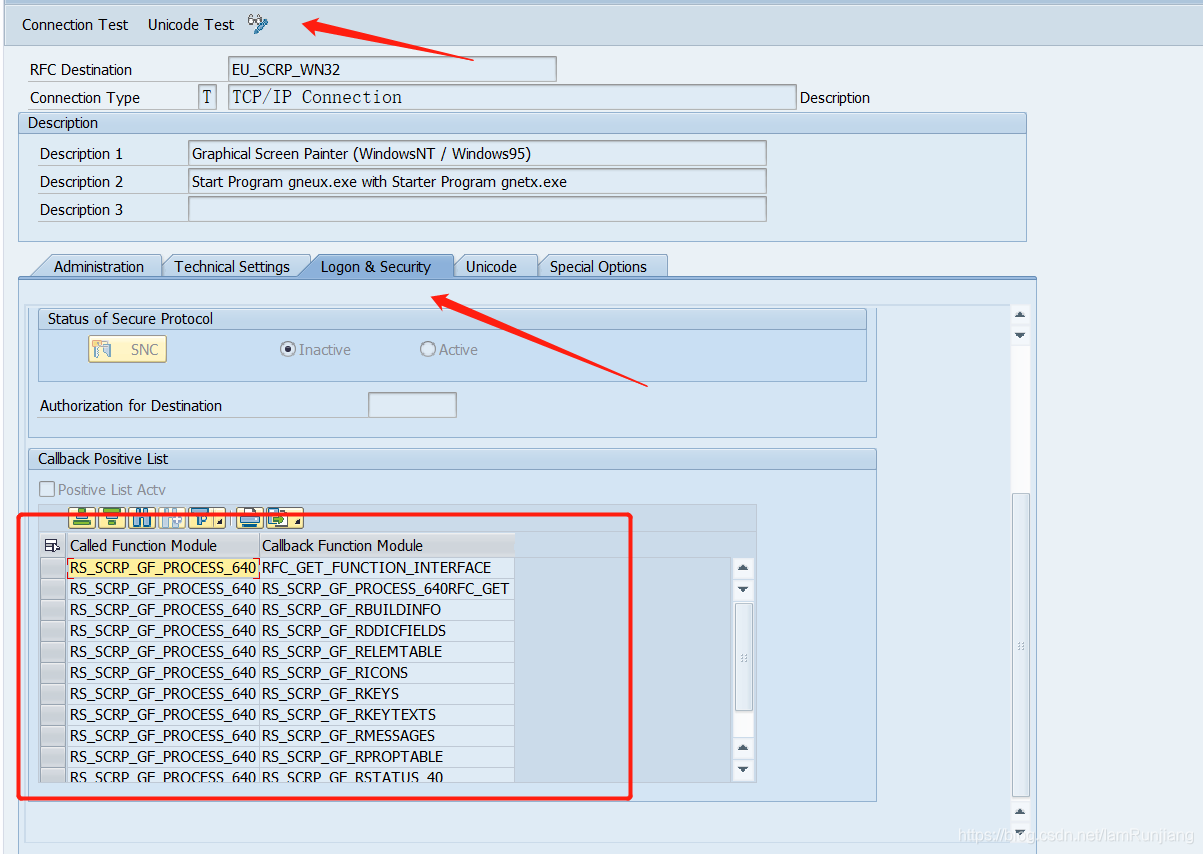
The code is as follows
RS_SCRP_GF_PROCESS_640	RFC_GET_FUNCTION_INTERFACE
RS_SCRP_GF_PROCESS_640	RS_SCRP_GF_PROCESS_640RFC_GET
RS_SCRP_GF_PROCESS_640	RS_SCRP_GF_RBUILDINFO
RS_SCRP_GF_PROCESS_640	RS_SCRP_GF_RDDICFIELDS
RS_SCRP_GF_PROCESS_640	RS_SCRP_GF_RELEMTABLE
RS_SCRP_GF_PROCESS_640	RS_SCRP_GF_RICONS
RS_SCRP_GF_PROCESS_640	RS_SCRP_GF_RKEYS
RS_SCRP_GF_PROCESS_640	RS_SCRP_GF_RKEYTEXTS
RS_SCRP_GF_PROCESS_640	RS_SCRP_GF_RMESSAGES
RS_SCRP_GF_PROCESS_640	RS_SCRP_GF_RPROPTABLE
RS_SCRP_GF_PROCESS_640	RS_SCRP_GF_RSTATUS_40
RS_SCRP_GF_PROCESS_640 RS_SCRP_GF_RTEXTS
Just save it
Tensorflow2.0 prompt error:
module 'tensorflow' has no attribute 'placeholder'
Solution:
do not use:
import tensorflow as tf
Replace with:
import tensorflow.compat.v1 as tf
tf.disable_v2_behavior()
The new changes of tensorflow, follow-up to find specific documents, and then add.
Just add this module, because it is not recognized.

[rpauser@node-zwf ~]$ openssl version
OpenSSL 1.0.2k-fips  26 Jan 2017
[rpauser@node-zwf ~]$
[rpauser@node-zwf ~]$
[rpauser@node-zwf ~]$ pwd
/home/rpauser
[rpauser@node-zwf ~]$
[rpauser@node-zwf ~]$
[rpauser@node-zwf ~]$ ll
total 1352
drwxr-xr-x.  2 rpauser rpauser       6 Jun 27 04:08 Desktop
drwxr-xr-x.  2 rpauser rpauser       6 Jun 27 04:08 Documents
drwxr-xr-x.  2 rpauser rpauser       6 Jun 27 04:08 Downloads
drwxr-xr-x.  2 rpauser rpauser       6 Jun 27 04:08 Music
drwxrwxr-x. 11 rpauser rpauser    4096 Jun 27 06:30 nginx
drwxr-xr-x.  9 rpauser rpauser    4096 Jun 27 05:57 nginx-1.18.0
-rwxrw-rw-.  1 rpauser rpauser 1039530 Jun 25 05:10 nginx-1.18.0.tar.gz
drwxrwxr-x.  5 rpauser rpauser    4096 Dec 22  2020 ngx_http_proxy_connect_module
-rwxrw-rw-.  1 rpauser rpauser   48986 Jun 25 02:14 ngx_http_proxy_connect_module-master.zip
drwxr-xr-x.  2 rpauser rpauser       6 Jun 27 04:08 Pictures
drwxr-xr-x.  2 rpauser rpauser       6 Jun 27 04:08 Public
-rwxrw-rw-.  1 rpauser rpauser    1638 Jun 27 04:02 readme.txt
drwxr-xr-x.  2 rpauser rpauser       6 Jun 27 04:08 Templates
drwxrwxr-x.  3 rpauser rpauser      18 Jun 27 06:00 usr
drwxr-xr-x.  2 rpauser rpauser       6 Jun 27 04:08 Videos
-rwxrw-rw-.  1 rpauser rpauser  276792 Jun 27 03:49 zip-3.0-23.el8.x86_64.rpm
[rpauser@node-zwf ~]$
[rpauser@node-zwf ~]$
[rpauser@node-zwf ~]$
[rpauser@node-zwf ~]$ ps -ef|grep nginx
rpauser    9285   9161  0 09:26 pts/0    00:00:00 grep --color=auto nginx
[rpauser@node-zwf ~]$
[rpauser@node-zwf ~]$
[rpauser@node-zwf ~]$ cd /nginx/sbin
bash: cd: /nginx/sbin: No such file or directory
[rpauser@node-zwf ~]$ cd nginx
[rpauser@node-zwf nginx]$
[rpauser@node-zwf nginx]$ cd sbin
[rpauser@node-zwf sbin]$ ll
total 3764
-rwxrwxr-x. 1 rpauser rpauser 3851672 Jun 27 06:08 nginx
[rpauser@node-zwf sbin]$
[rpauser@node-zwf sbin]$
[rpauser@node-zwf sbin]$ ./nginx -p /home/rpauser/nginx
[rpauser@node-zwf sbin]$
[rpauser@node-zwf sbin]$
[rpauser@node-zwf sbin]$ ps -ef|grep nginx
rpauser    9357      1  0 09:27 ?       00:00:00 nginx: master process ./nginx -p /home/rpauser/nginx
rpauser    9361   9357  0 09:27 ?       00:00:00 nginx: worker process
rpauser    9378   9161  0 09:27 pts/0    00:00:00 grep --color=auto nginx
[rpauser@node-zwf sbin]$
[rpauser@node-zwf sbin]$
[rpauser@node-zwf sbin]$
Problem description
In tensorflow GPU 1.14.0 environment, using multiple GPU training will report error 
change to tensorflow GPU 1.13.1 to solve this problem
SSH Remote ulimit does not work
Problem description
The contents of the operating system/etc/security/limits.conf file are as follows:
* soft memlock unlimited

* hard memlock unlimited
Use the remote connection tool MoBa to connect to the server, and use ulimit - a to view ulimit value, which is consistent with /etc/security/limits. Conf file configuration.
When using SSH command line remote connection, use ulimit - a to view ulimit value, which is the default value, which is inconsistent with /etc/security/limits. Conf file configuration.
When the operation and maintenance program starts the system remotely, it uses the SSH connection to execute in the past, and the ulimit value in the SSH connection does not take effect. As a result, the system cannot use RDMA because the default configuration of memlock is too small.
Investigation
After a series of investigation, we found that the SSH version of the customer environment (openssh)_ 4p1) and the default SSH version of the operating system (openssh)_ 7.4p1). It is suspected that the client’s recompiled version will cause the limit value of remote SSH login not to take effect
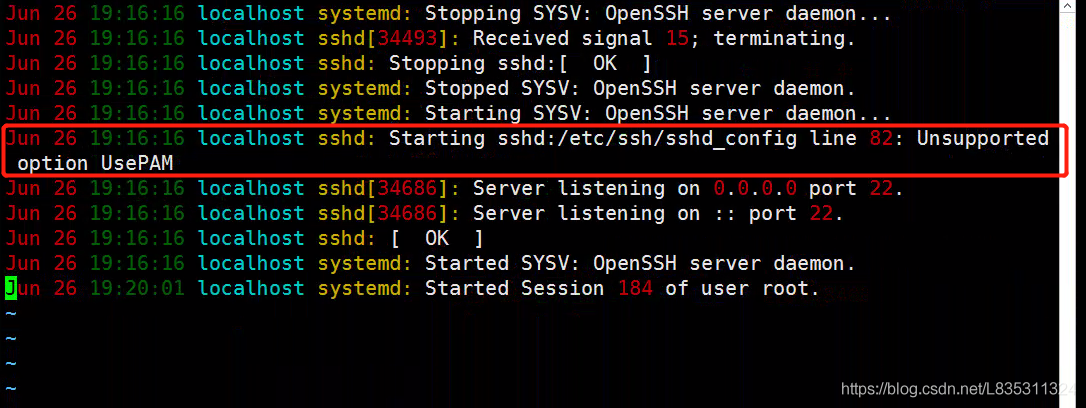
at the same time/etc/SSH/sshd_ The usepam value of the config file is No. when this item is configured to yes, restart the sshd server and view the system log. The error is as follows:
It is suspected that upgrading and compiling SSH to add – with PAM (this module is not compiled by default) will cause this problem.
solve
It is recommended that customers recompile the openssh version with the – with PAM parameter. Problem solving after customer operation.
Suggestions
The – with PAM parameter is required for the subsequent upgrade and compilation of openssh.
Expansion
Introduction of PAM module
Linux PAM (i.e. Linux pluggable authentication module) is a set of shared libraries, which enables local system administrators to choose the authentication mode of programs at will. In other words, you can change the authentication mechanism without recompiling an application with PAM function. In this way, even if you upgrade the local authentication mechanism, you don’t need to modify the program.
PAM uses the configuration file under/etc/pam.d/ to manage the authentication mode of the program. The application program calls the corresponding configuration file to call the local authentication module. The module is placed under/lib/security to load the dynamic library. For example, when we use the Su command, the system will prompt you to enter the password of the root user. This is what the Su command realizes by calling the PAM module.
SSH login will also refer to the modification module, and the configuration file is/etc/pam.d/sshd
#%PAM-1.0
auth       required     pam_sepermit.so
auth       substack     password-auth
auth       include      postlogin
# Used with polkit to reauthorize users in remote sessions
-auth      optional     pam_reauthorize.so prepare
account    required     pam_nologin.so
account    include      password-auth
password   include      password-auth
# pam_selinux.so close should be the first session rule
session    required     pam_selinux.so close
session    required     pam_loginuid.so
# pam_selinux.so open should only be followed by sessions to be executed in the user context
session    required     pam_selinux.so open env_params
session    required     pam_namespace.so
session    optional     pam_keyinit.so force revoke
session    include      password-auth
session    include      postlogin
# Used with polkit to reauthorize users in remote sessions
-session   optional     pam_reauthorize.so prepare
The session section will include the password auth configuration, and the/etc/pam.d/password-auth-ac file is as follows:
#%PAM-1.0
# This file is auto-generated.
# User changes will be destroyed the next time authconfig is run.
auth        required      pam_env.so
auth        required      pam_faildelay.so delay=2000000
auth        sufficient    pam_unix.so nullok try_first_pass
auth        requisite     pam_succeed_if.so uid >= 1000 quiet_success
auth        required      pam_deny.so
account     required      pam_unix.so
account     sufficient    pam_localuser.so
account     sufficient    pam_succeed_if.so uid < 1000 quiet
account     required      pam_permit.so
password    requisite     pam_pwquality.so try_first_pass local_users_only retry=3 authtok_type=
password    sufficient    pam_unix.so sha512 shadow nullok try_first_pass use_authtok
password    required      pam_deny.so
session     optional      pam_keyinit.so revoke
session     required      pam_limits.so
-session     optional      pam_systemd.so
session     [success=1 default=ignore] pam_succeed_if.so service in crond quiet use_uid
session     required      pam_unix.so
PAM_ Limits.so is the so module that will be called when creating an SSH connection, that is, the core so that the/etc/security/limits.conf file takes effect.
Reference documents
https://www.cnblogs.com/kevingrace/p/8671964.html
int type maximum ten digits 2147483647
int m=1;
int n=1345;
for(m=1;m<=1000000000;m*=10)
{ int d=n/m%10; printf(“%d\n “,d); } will report an error overflow, because the maximum m is, and then execute 1000000000*10 to overflow
Improve
int m=1;
int n=1345;
for(m=1000000000;m>
=1;m/=10)
{ int d=n/m%10; printf(“%d\n”,d); } this Hour output from high output 1 3 4 5
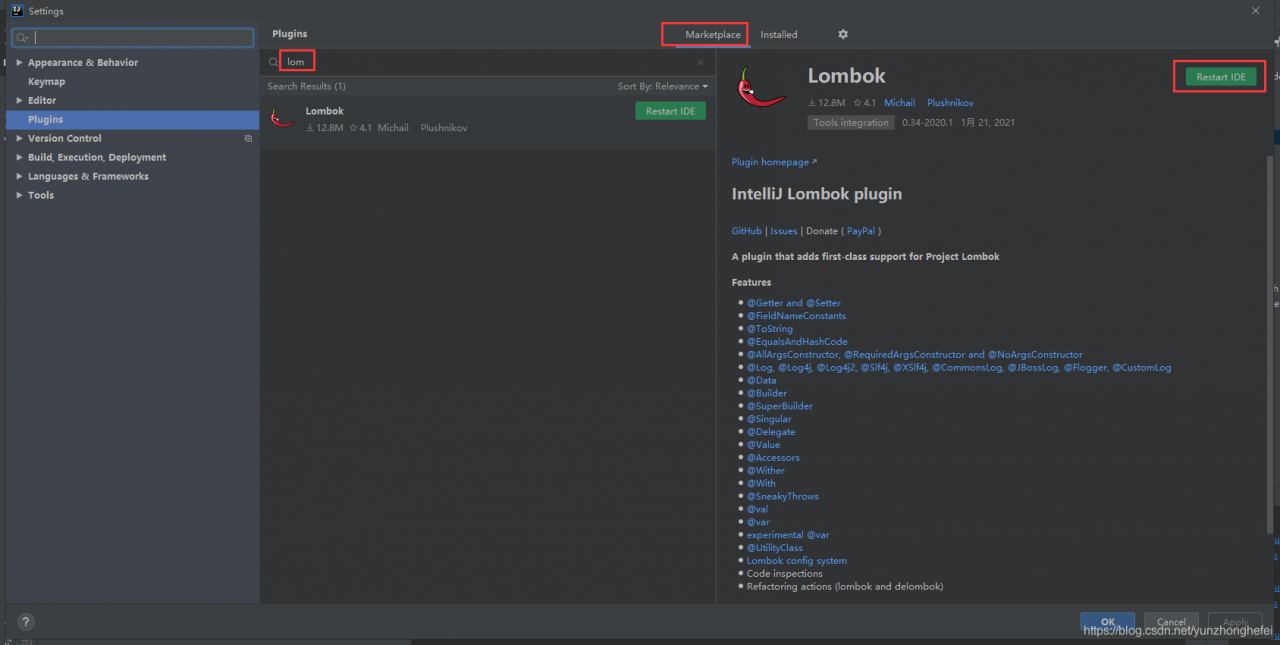
In the code, there is @data annotation in the bean class. Normally, a series of template methods such as getter/setter/tostring() will be automatically added to the compiled class. However, in practice, after the subclass inherits the bean class, the getter/setter method cannot be used by default.
Why? This is because plug-in support needs to be added to IDEA.
Settings—> Plugins, click marketplace, input Lombok, install and restart idea.
</ div>