Author Archives: Robins

Kotlin develop Error: java.lang.VerifyError [How to Solve]

When using kotlin+ coroutine, compiling APK will throw Java lang.VerifyError: Verifier rejected class …

Cause: a supend method marked by a coroutine uses @JvmStatic annotation, resulting in a verify error when compiling and parsing code.

Solution: remove the annotation of the supend method.

Reference: https://stackoverflow.com/questions/59113152/java-lang-verifyerror-verifier-rejected-class-code-working-fine-in-debug-mode

ERROR conda.core.link:_execute(699): An error occurred while installing package ‘‘Rolling back trans

Problem description

CONDA install the package error: ERROR conda.core.link:_execute(699): An error occurred while installing package ‘conda-forge::cudatoolkit-11.1.1-h6406543_8’. Rolling back transaction: done [Errno 12] Cannot allocate memory ()
similar errors will also be encountered during PIP installation: SystemError: deallocated bytearray object has exported buffers


Solution:

Clean up CONDA cache

conda clean -a

Websocket Front-end Call Example

<!DOCTYPE html>
<html lang="en">
<head>
<meta charset="UTF-8">
<meta name="viewport" content="width=device-width, initial-scale=1.0">
<meta http-equiv="X-UA-Compatible" content="ie=edge">
<title>Document</title>
</head>
<body>
Welcome<br/><input id="text" type="text"/>
<button onclick="send()">Send message</button>
<hr/>
<button onclick="closeWebSocket()">Close WebSocket connection</button>
<hr/>
<div id="message"></div>
</body>
<script>
var websocket = null;
// determine if the current browser supports WebSocket
if ('WebSocket' in window) {
	websocket = new WebSocket("ws://localhost:8080/wsServer");
}
else {
	alert('The current browser does not support websocket')
}

// Callback method for connection error
websocket.onerror = function () {
	setMessageInnerHTML("An error occurred with the WebSocket connection");
};

// Callback method for successful connection establishment
websocket.onopen = function () {
	setMessageInnerHTML("WebSocket connection successful");
}

// Callback method for received message
websocket.onmessage = function (event) {
	setMessageInnerHTML(event.data);
}

// Callback method for closing the connection
websocket.onclose = function () {
	setMessageInnerHTML("WebSocket connection closed");
}

// Listen to the window close event and actively close the websocket connection when the window is closed to prevent the window from being closed before the connection is broken, which will throw an exception on the server side.
window.onbeforeunload = function () {
	closeWebSocket();
}
 
// Display the message on the web page
function setMessageInnerHTML(innerHTML) {
	document.getElementById('message').innerHTML += innerHTML + '<br/>';
}
 
//Close the WebSocket connection
function closeWebSocket() {
	websocket.close();
}
 
//Send a message

function send() {
var message = document.getElementById('text').value;
	websocket.send(message);
}
</script>

</html>

Hutool Excel Import & Export Example

Download and generate excel template

Example code:

① Entity class of template:

@Getter
@Setter
@ToString
@SuperBuilder
@NoArgsConstructor
public class WsWorkerTemplate{
    @ApiModelProperty(value = "NAME")
    private String workerName;

    @ApiModelProperty(value = "Phone Number")
    private String workerPhone;
    
    @ApiModelProperty(value = "ID number")
    private String workerIdcard;
}

② Class to generate template:

    @ApiOperation("Download generated excel template")
    @GetMapping("/downloadExcel")
    public void downloadExcel(HttpServletResponse response) throws IOException {

        WsWorkerTemplate wsWorker = new WsWorkerTemplate();
//        wsWorker.setWorkerName("张三");
//        wsWorker.setWorkerPhone("15992714704");
//        wsWorker.setWorkerIdcard("130501197512158843");
        List<WsWorkerTemplate> rows = CollUtil.newArrayList(wsWorker);

        // Create writer by tool class, default create xls format
        ExcelWriter writer = ExcelUtil.getWriter();
        // custom header alias
        writer.addHeaderAlias("workerName", "Name");
        writer.addHeaderAlias("workerPhone", "mobile number");
        writer.addHeaderAlias("workerIdcard", "ID number");
        // merge the header row after the cell, using the default header style
        String content = "Instructions for filling out the form: \n\t" +
                "1, name: 2 to 15 Chinese characters; \n\t" +
                "2, cell phone number: 11-digit cell phone number format; \n\t" +
                "3, ID number: 18-bit second-generation ID number; \n\t";
        writer.merge(2,content,false);
        //set the column width
        writer.setColumnWidth(-1,30);

        writer.setRowHeight(0,80);
        // write the content at once, use the default style, and force the output headers
        writer.write(rows, true);
        //out is the OutputStream, the target stream to write out to
        // response is the HttpServletResponse object
        response.setContentType("application/vnd.ms-excel;charset=utf-8");
        //test.xls is the name of the file that pops up the download dialog box, it can't be Chinese, please encode it yourself
        //response.setHeader("Content-Disposition", "attachment;filename=test-file.xls");
        String excelName="worker.xls";
        // When setting response.setHeader, if it contains Chinese characters, it must be converted to ISO8859-1 format, otherwise the set Chinese will be incorrect.
        response.setHeader("content-disposition", "attachment;filename="+new String(excelName.getBytes("gb2312"), "ISO8859-1"));
        ServletOutputStream out = response.getOutputStream();
        writer.flush(out, true);
        // Close the writer and free memory
        writer.close();
        // Remember to close the output servlet stream here
        IoUtil.close(out);
    }

excel import

 /**
     * Batch Import
     *
     * @param file
     * @return
     */
    public ResultObj<Object> importWorker(@RequestParam("file") MultipartFile file, String worksiteId) {
        ResultObj<Object> resultObj = new ResultObj<Object>();
        String message1 = "";
        List<String> strList = new LinkedList<>();
        List<WsWorker> list = new LinkedList<>();
        try {
            InputStream inputStream = file.getInputStream();
            list = getWsWorkerExcel(inputStream);
            if (list != null && list.size() > 0) {
                    for (WsWorker w : list) {
                        w.setWorksiteId(worksiteId);
                        w.setCheckResult(0);
                        wsWorkerMapper.insertSelective(w);
                    }
                    resultObj.setStatus(200);
                    resultObj.setMsg("import successfully");
              }
        } catch (IOException e) {
            e.printStackTrace();
        }
        return resultObj;
    }

Get Excel data:

  public List<WsWorker> getWsWorkerExcel(InputStream inputStream) {

        ExcelReader reader = ExcelUtil.getReader(inputStream);
        reader.addHeaderAlias("Name", "workerName");
        reader.addHeaderAlias("Phone Number", "workerPhone");
        reader.addHeaderAlias("ID Number", "workerIdcard");

        List<WsWorker> workers = reader.read(1, 2, WsWorker.class);
        return workers;
    }

torch.max Example (How to Use)

torch.max(input, dim)

pred = torch.max(input, dim)

Returns the maximum value per row (dim = 1) or column (dim = 0).

_, pred = torch.max(input, dim)

Only the position of the maximum value in each row (dim = 1) or column (dim = 0) is returned.

Example:

import torch

# Construct a 5x3 randomly initialized matrix
x = torch.rand(5, 3)
print('input: ', x)
print('-'*10)
y1 = torch.max(x, 1)
print('max by row: ', y1)
print('-'*10)
y2 = torch.max(x, 0)
print('max by col: ', y2)
print('-'*10)
_, y3 = torch.max(x, 1)
print('max index by row: ', y3)
print('-'*10)
_, y4 = torch.max(x, 0)
print('max index by col: ', y4)

Output result:

input:  tensor([[0.5504, 0.3160, 0.2448],
        [0.8694, 0.3295, 0.2085],
        [0.5530, 0.9984, 0.3531],
        [0.2874, 0.1025, 0.9419],
        [0.0867, 0.4234, 0.8334]])
----------
max by row:  torch.return_types.max(
values=tensor([0.5504, 0.8694, 0.9984, 0.9419, 0.8334]),
indices=tensor([0, 0, 1, 2, 2]))
----------
max by col:  torch.return_types.max(
values=tensor([0.8694, 0.9984, 0.9419]),
indices=tensor([1, 2, 3]))
----------
max index by row:  tensor([0, 0, 1, 2, 2])
----------
max index by col:  tensor([1, 2, 3])

MultipartFile Upload an Image Example

 /**
     * Adding data to the general meal master table
     */
    @ApiOperation(value = "Add General Meal Master Table")
    @ApiResponses(value = {
            @ApiResponse(code = 200, message = "The operation was successful, returning the new general meal master table, which is saved in the data collection element"),
            @ApiResponse(code = 500, message = "Internal error, message returned by msg field")
    })
    @RequestMapping(value = "saveDishesTable",method=RequestMethod.POST)
    @ResponseBody
    public R<DishesTable> saveDishesTable (DishesTable dishesTable, MultipartFile file, HttpServletRequest request){
        try {
            //The full path to this file is divided into two parts: the path to the home folder + the file name

            //Manually create the home folder under 1001-services/src/mian/resources
            //get the path to the downloaded file on the server-> that is, the path to the newly created home folder
            String path = request.getSession().getServletContext().getRealPath("home");
            if(file!=null){
                //Get the name of the file saved to the server
                String fileName = file.getOriginalFilename();
                //splice the path â€" path of home folder + file name
                File dir= new File(path,fileName);
                //write the uploaded file to the specified file on the server
                file.transferTo(dir);
                //returns a canonical pathname string representing the file or directory with the same abstract pathname - "that is, the path is converted to a string form
                String directory = dir.getCanonicalPath();
                //cut the string, starting from the back of the home folder - "get the string corresponding to the filename
                //directory.indexOf("home") means find the subscript of the letter h of home
                //directory.substring(directory.indexOf("home"),directory.length()) means cut from the subscript of h to the last one
                // The result of the final cut is in this form: home/3c2c1cc2-49f1-44c4-b98d-34be8fe09b35.jpg
                String str = directory.substring(directory.indexOf("home"),directory.length());
                dishesTable.setDishesPictures(str);
            }

            DishesTable savedishesTable = dishesTableService.saveDishesTable(dishesTable);
            return R.ok(savedishesTable);
        }catch(Exception e){
            logger.error("Failed to add common meals master table interface error : {}", e);
            e.printStackTrace();
            return R.error("Failed to add common meal master table----->"+e.getMessage());
        }
    }

Base64 Image Compression Example

Compress picture size

@Log4j2
public class Base64Util {

    /**
     * Compressed images within 100k
     *
     * @param base64Img
     * @return
     */
    public static String resizeImageTo100K(String base64Img) {
        try {
            BufferedImage src = base64String2BufferedImage(base64Img);
            BufferedImage output = Thumbnails.of(src).size(src.getWidth()/3, src.getHeight()/3).asBufferedImage();
            String base64 = imageToBase64(output);
            if (base64.length() - base64.length()/8 * 2 > 40000) {
                output = Thumbnails.of(output).scale(1/(base64.length()/40000)).asBufferedImage();
                base64 = imageToBase64(output);
            }
            return base64;
        } catch (Exception e) {
            return base64Img;
        }
    }


    /**
     * base64 convert to BufferedImage
     *
     * @param base64string
     * @return
     */
    public static BufferedImage base64String2BufferedImage(String base64string) {
        BufferedImage image = null;
        try {
            InputStream stream = BaseToInputStream(base64string);
            image = ImageIO.read(stream);
        } catch (IOException e) {
            log.info("");
        }
        return image;
    }

    /**
     * Base64 convert to InputStream
     *
     * @param base64string
     * @return
     */
    private static InputStream BaseToInputStream(String base64string) {
        ByteArrayInputStream stream = null;
        try {
            BASE64Decoder decoder = new BASE64Decoder();
            byte[] bytes1 = decoder.decodeBuffer(base64string);
            stream = new ByteArrayInputStream(bytes1);
        } catch (Exception e) {
            // TODO: handle exception
        }
        return stream;
    }

    /**
     * BufferedImage switch to base64
     *
     * @param bufferedImage
     * @return
     */
    public static String imageToBase64(BufferedImage bufferedImage) {
        Base64 encoder = new Base64();
        ByteArrayOutputStream baos = new ByteArrayOutputStream();
        try {
            ImageIO.write(bufferedImage, "jpg", baos);
        } catch (IOException e) {
            log.info("");
        }
        return new String(encoder.encode((baos.toByteArray())));
    }

}

Opentelemetry + Jaeger Python Version Cross Service Call Example

Opentelemetry Python version cross service invocation example

When calling opentelemetry across services, you need to import opentelemetry-instrumentation-requests, and then use request to cross service requests. (note that aiohttp-client should be used if it is asynchronous)
I use Jaeger on the server, which is deployed directly through the docker of all-in-one. The code is as follows:

docker run -d --name jaeger \
  -e COLLECTOR_ZIPKIN_HOST_PORT=:9411 \
  -p 5775:5775/udp \
  -p 6831:6831/udp \
  -p 6832:6832/udp \
  -p 5778:5778 \
  -p 16686:16686 \
  -p 14250:14250 \
  -p 14268:14268 \
  -p 14269:14269 \
  -p 9411:9411 \
  jaegertracing/all-in-one:1.32

After starting Jaeger, visit the following page: http://localhost:16686

Python needs to start two services to demonstrate cross service invocation. The framework I use is fastapi, so I need to install opentelemetry-instrumentation-fastapi
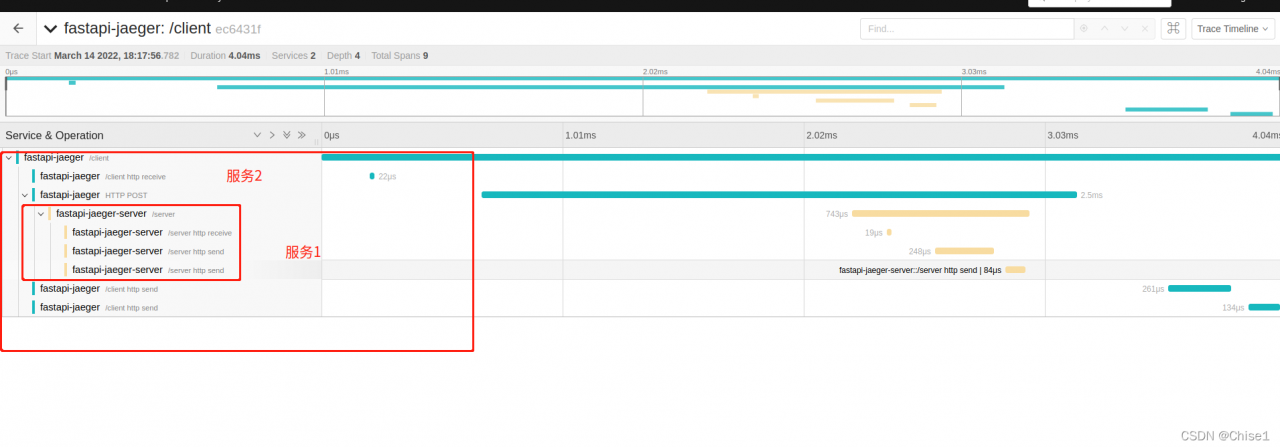
call service 1 by service 2
Service 1:

import fastapi
from opentelemetry import trace
from opentelemetry.instrumentation.fastapi import FastAPIInstrumentor
from fastapi import Body
from pybase.lib.tracer.jaeger_ import register_to_jaeger
from pydantic import BaseModel

app = fastapi.FastAPI()


class UserInfo(BaseModel):
    name: str


tracer = trace.get_tracer(__name__)


@app.post("/server")
async def server(userinfo: str = Body(...), name: str = Body(..., )):
    return {"message": f"hello {userinfo},{name}"}


FastAPIInstrumentor.instrument_app(app)
if __name__ == '__main__':
    register_to_jaeger("fastapi-jaeger-server", "localhost")
    import uvicorn

    uvicorn.run(app,port=8001)

Service 2

import fastapi
import requests
from opentelemetry import trace
from opentelemetry.instrumentation.fastapi import FastAPIInstrumentor
from fastapi import Body
from opentelemetry.instrumentation.requests import RequestsInstrumentor
RequestsInstrumentor().instrument()
from pybase.lib.tracer.jaeger_ import register_to_jaeger
from pydantic import BaseModel

app = fastapi.FastAPI()


class UserInfo(BaseModel):
    name: str


tracer = trace.get_tracer(__name__)


@app.post("/foobar")
async def foobar(userinfo: str = Body(...), name: str = Body(..., )):
    with tracer.start_as_current_span("foo"):
        with tracer.start_as_current_span("bar"):
            with tracer.start_as_current_span("baz"):
                print("Hello world from OpenTelemetry Python!")
    return {"message": f"hello {userinfo},{name}"}
@app.post("/foobar2")
async def foobar2(userinfo: str = Body(...), name: str = Body(..., )):
    return {"message": f"hello {userinfo},{name}"}

@app.post("/client")
def client(userinfo: str = Body(...), name: str = Body(..., )):

    res=requests.post("http://127.0.0.1:8001/server",json={
        "userinfo":userinfo,"name":name
    })
    return res.json()


FastAPIInstrumentor.instrument_app(app)
if __name__ == '__main__':
    register_to_jaeger("fastapi-jaeger", "localhost")
    import uvicorn

    uvicorn.run(app)

A function that depends on register_ to_ jaeger:

from opentelemetry import trace
from opentelemetry.exporter.jaeger.thrift import JaegerExporter
from opentelemetry.sdk.resources import SERVICE_NAME, Resource
from opentelemetry.sdk.trace import TracerProvider
from opentelemetry.sdk.trace.export import BatchSpanProcessor


def register_to_jaeger(service_name: str, jaeger_host: str, jaeger_port: int = 6831):
    """
    Register the service to jaeger so that tracer-related information can be sent to the jaeger server
    Args:
        service_name: the registered service name
        jaeger_host: jaeger address
        jaeger_port:

    Returns: TracerProvider

    """
    provider = TracerProvider(
        resource=Resource.create({SERVICE_NAME: service_name})
    )
    trace.set_tracer_provider(
        provider
    )

    # create a JaegerExporter
    jaeger_exporter = JaegerExporter(
        agent_host_name=jaeger_host,
        agent_port=jaeger_port,
    )

    # Create a BatchSpanProcessor and add the exporter to it
    span_processor = BatchSpanProcessor(jaeger_exporter)

    # add to the tracer
    trace.get_tracer_provider().add_span_processor(span_processor)

Then execute:

curl -X 'POST' \
  'http://127.0.0.1:8000/client' \
  -H 'accept: application/json' \
  -H 'Content-Type: application/json' \
  -d '{
  "userinfo": "string",
  "name": "string"
}'

You can get the following results:
if you have any questions, please correct them.

Matplotlib Draw 3D scatter Diagram Example

In the following code, it is shown that two different color scatter plots are drawn at the same time in the same coordinate system

import numpy as np
import matplotlib.pyplot as plt
from mpl_toolkits.mplot3d import Axes3D

#Generate random data
data1 = np.random.randint(30, 70, size=(30, 3)) #30*3 dimensional random integers of [30,70]
data2 = np.random.randint(10, 30, size=(40, 3)) #40*3 dimensions of [10, 30] random integers

x1 = data1[:, 0]
y1 = data1[:, 1]
z1 = data1[:, 2]

x2 = data2[:, 0]
y2 = data2[:, 1]
z2 = data2[:, 2]


# Plot a scatter plot
fig = plt.figure()
ax = Axes3D(fig)

'''
marker: shape, default round ball ('^' inverted triangle shape.)
c:color, default cyan

'''
ax.scatter(x1, y1, z1, c='r', marker = "^", label='red points')
ax.scatter(x2, y2, z2, c='g', label='green points')

# Plot the legend
ax.legend(loc='best')

# Add axes
ax.set_zlabel('Z Label', fontdict={'size': 15, 'color': 'red'}) 
ax.set_ylabel('Y Label', fontdict={'size': 15, 'color': 'red'})
ax.set_xlabel('X Label', fontdict={'size': 15, 'color': 'red'})
plt.show()

The results show that:

Jquery use queue to implement Ajax request queue Simple Example

Packaging method

var axmq = {
    //Queues
    queues: [],
    //network request
    request: null,
    //Execution queue
    render: function() {
        $(document).queue(axmq.queues);
    },
    //append queue
    append: function(func) {
        axmq.queues.push(func);
    },
    //clear queue
    clear: function() {
        $(document).dequeue();
        if (0 === $(document).queue().length) {
            axmq.queues = [];
            $(document).clearQueue();
        }
    },
    //POST request
    post: function(args) {
        var params = {
            url: 'https://www.sample.com/api',
            headers: {},
            data: {},
            buffer: function() {},
            callback: function() {}
        };
        $.extend(params, args);
        var headers = {
            Accept: 'application/json;charset=utf-8'
        };
        if (Object.keys(params.headers).length > 0) {
            $.extend(headers, params.headers);
        }
        if (axmq.request == null) {
            axmq.request = $.ajax({
                async: true,
                type: 'POST',
                url: params.url,
                headers: headers,
                data: params.data,
                dataType: 'JSON',
                beforeSend: function() {
                    params.buffer();
                },
                success: function(res) {
                    console.log(res);
                    axmq.request = null;
                    axmq.clear();
                    params.callback(res);
                },
                error: function(err) {
                    console.log(err);
                    axmq.request = null;
                    axmq.clear();
                    params.callback({
                        errcode: 5001,
                        errmsg: 'System busy'
                    });
                }
            });
        }
    },
    //example
    sample: function() {
        axmq.append(function() {
            axmq.post({
                url: 'https://www.sample.com/api/a'
            });
        });
        axmq.append(function() {
            axmq.post({
                url: 'https://www.sample.com/api/b'
            });
        });
        axmq.append(function() {
            axmq.post({
                url: 'https://www.sample.com/api/c'
            });
        });
        axmq.render();
    }
};

Call example

axmq.sample();

MySQL Batch Add Data and Store Example

DELIMITER $$
-- If the procedure already exists, delete it
DROP PROCEDURE IF EXISTS SAVERANDDATA;
-- Create procedure name
CREATE PROCEDURE SAVERANDDATA()
BEGIN
	DECLARE i INT;
	SET i = 0;
	-- Defining the MYSQL REPEAT Statement
	REPEAT
		-- SQL content
		INSERT INTO `lzhstore`.`almart_all` (
			`date_key`,
			`hour_key`,
			`client_key`,
			`item_key`,
			`account`,
			`expense`
		)
		VALUES
		(
			"2016-05-01",
			FLOOR(RAND() * 24),
			FLOOR(RAND() * 1000000) + 1,
			FLOOR(RAND() * 100000) + 1,
			FLOOR(RAND() * 20) + 1,
			FLOOR(RAND() * 10000) + 1
		);	
	SET i = i + 1;
  -- Ends the loop if executed one million times
  UNTIL i = 1000000 END REPEAT;
	END $$
	CALL SAVERANDDATA();

Asynchronous Future Parallel processing request code example

The thread pool is implemented in cooperation with future, but the main request thread is blocked. High concurrency will still cause too many threads. CPU context switching. Through future, n requests can be sent concurrently, and then wait for the slowest return. The total response time is the time returned by the slowest request

public class Test{
  
  final static ExecutorService executor = Executors.newFixedThreadPool(2);

  public static void main(String[] args){
    RpcService rpcService = new RpcService();
    HttpService httpService = new HttpService();
    Future<Map<String,String>> future1 = null;
    Future<Integer> future2 = null;
    try{
      future1 = executor.submit(()->rpcService.getRpcResult());
      future2 = executor.submit(()->httpService.getHttpResult());
    }catch(Exception e){
       if(future1 != null){
         future1.cancel(true);
       }
       if(future2 != null){
         future2.cancel(true);
       }
       throw new RuntimeEException(e);
    }
  }
  
  static class RpcService{
    Map<String,String> gerRpcResult() throws Exception{
      //Calling remote methods, taking 10ms
    }
  }

  static class HttpService{
    Integer getHttpResult() throws Exception{
      //Calling remote methods, taking 30ms
    }
  }
}