Tag Archives: ubuntu

Change the path in the user directory in Chinese Ubuntu to English

In order to make it easy for users to use, it is installed in the “home”, “music”, “pictures” and “natural” It’s all in Chinese.

Most of the time, I like to put some files to be operated on the desktop. There are many command-line operations in Linux, so it’s hard to avoid using the command line to operate things on the desktop. Then I need to “CD desktop”. When I hit “desktop”, I need to switch the input method. It’s troublesome So I tried to find a way to change the path under the user directory to English, while the other Chinese remained unchanged. The method is as follows:

Open the terminal and enter the command in the terminal

        export LANG=en_US

        xdg-user-dirs-gtk-update

Jump out of the dialog box and ask if you want to convert the directory to an English path, agree and close it.
enter the command in the terminal:

        export LANG=zh_CN

Close the terminal and restart. Next time you enter the system, the system will prompt you whether to change the converted directory back to Chinese. Select no more prompt and cancel the modification. The Chinese to English conversion of the main directory is completed~

Reprinted from: http://my.oschina.net/myriads/blog/2867
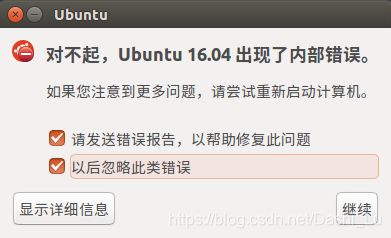
Solution: ubantu has an internal error

This often happens when Ubuntu is turned on.


Why

Ubuntu desktop version is pre installed with app, which is an error collection system. It collects software crashes, unhandled exceptions and other information, including program bugs, and generates crash reports for debugging purposes. When an application crashes or a bug occurs, the app will alert the user through a pop-up window and ask the user whether to submit a crash report

“Sorry, the application XXX has closed unexpectedly.”
“sorry, the application XXX has closed unexpectedly.”  
“Sorry, Ubuntu XX.XX Has experienced an internal error.
“sorry, Ubuntu XX.XX An internal error has occurred. ”
“system program problem detected.”

The actual situation is not that Ubuntu is prone to internal errors, but that once the program crashes once, a. Crash file will be generated to record the crash information, which is stored in the directory:

/var/crash/ 

As long as you don’t deal with it, every time you turn on it, you will be prompted with an error. That is to say: the error report is not necessarily something wrong, but there have been errors, and you did not deal with them. Usually, go to the/var/crash/directory to view the crash file. If it’s not a big problem (usually no big problem), delete the crash file in the directory, and then no more errors will be reported.

Solution:

Error report for permanently closing the app
to permanently close the app, edit/etc/default/APP and modify the following parameters

enabled=0 

Restart your Ubuntu system, and the app will shut down automatically
if you never use it again, there is a simple way to remove it completely

$ sudo apt-get purge apport

Even if I removed the app directly, there was no problem.

The Ubuntu status bar shows the network speed, memory and CPU utilization ratio

Install indicator sysmonitor

1. Add source

sudo add-apt-repository ppa:fossfreedom/indicator-sysmonitor

2. Update source

sudo apt update

3. Installation

sudo apt install indicator-sysmonitor

Start monitor-4

nohup indicator-sysmonitor &

Note: when starting with nohup, the indicator sysmonitor will not exit when closing the terminal.

Delete files with specified suffix in specified folder under Linux

This method can be used to delete a file with a suffix in a folder. Of course, the format of the file name can be defined by yourself, not necessarily by specifying a suffix, but by specifying a prefix, etc.
From: drizzle and glimmer

Method 1

Find Directory – name “*. ABC” | xargs RM
command is a bit dangerous, you can first execute the first half to see if it is the file you want to delete, and then execute the whole

method 2:
find. – name ‘*. Exe’ – type F – print – exec RM – RF {} \;
(1) “.” means to search recursively from the current directory
(2) “- name ‘*. Exe'” to search by name, all the folders or files ending with. Exe should be found
(3) “- type F” the type of search is file
(4) “- print” the directory name of the output search file
(5) The most important thing is – exec. The – exec option is followed by a command to be executed, which means that the command will be executed for the found file or directory.
The exec option is followed by the command or script to be executed, followed by a pair of {}, a space and a \, and finally a semicolon

Exec format error: Java

welcome to my blog

Problem Description: decompress the jdk8 installation package, configure the environment variables, execute the Java command, and report an error: exec format error: Java

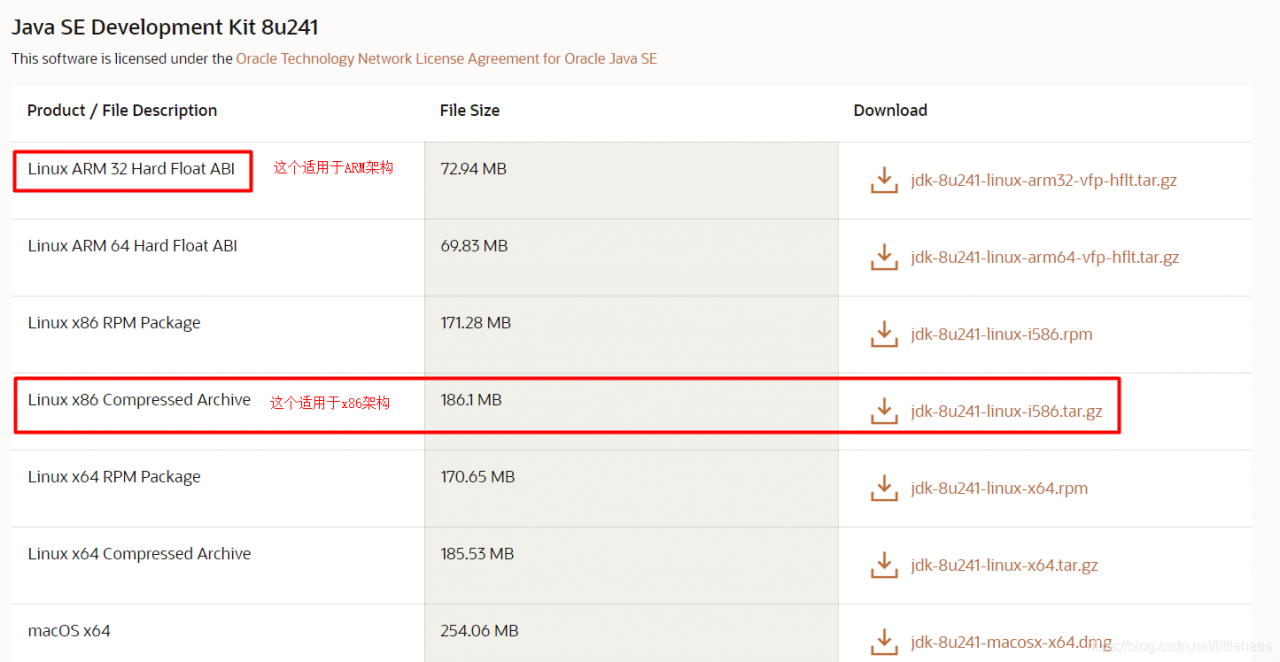
Reason: I didn’t look carefully when downloading the compressed package. As a result, the download is wrong. The download is ARM architecture, and the Ubuntu/Linux I use is x64 architecture

Download the correct compressed package and re operate

Ubuntu 20.04 installing gfortran-6/ libgfortran.so .3

When I try to run the do command under GAMIT on Ubuntu 20.04, it shows:

root@DESKTOP-LF0EAC9:/etc/apt# doy
doy: error while loading shared libraries: libgfortran.so.3: cannot open shared object file: No such file or directory

among libgfortran.so . 3 depending on gfortran-6, try to install gfortran-6:

root@DESKTOP:/etc/apt# apt install gfortran-6
Reading package lists... Done
Building dependency tree
Reading state information... Done
E: Unable to locate package gfortran-6

The problem here is that Ubuntu 20.04 does not support G + ± 6. Add the following source to/etc/apt/ sources.list For the method of adding source, see the link

deb http://gb.archive.ubuntu.com/ubuntu/ bionic main universe

function

sudo apt-get update

Install GCC + + – 6

apt-get install g++-6

Setting the default version of GCC

sudo update-alternatives --install /usr/bin/gcc gcc /usr/bin/gcc-6 6

Install gfortran-6

 apt install gfortran-6

Install successfully, run doy

root@DESKTOP-LF0EAC9:/etc/apt# doy 2020 001
Date 2020/01/01  0:00 hrs, DOY   1 JD  2458849.5000 MJD  58849.0000
GPS Week  2086 Day of week  3, GPS Seconds 259200 Day of Week Wed
Decimal Year 2020.000000000 GRACE Seconds 631108800.0

Run successfully

Start rqt_ Graph, prompt / opt / ROS / melody / share / PR2_ motor_ diagnostic_ Under tool plugin.xml There is something wrong with the file

Question: as the title, open it plugin.xml It was found to be blank.

Solution: find the GitHub of PR2, download and copy it to/opt/ROS/melody/share/PR2_ moto_ diagnostic_ Tool/or create your own plugin.xml File, which will be installed on GitHub plugin.xml Copy in the code in.

[new problem] prompts that we do not have permission to create a file in this path, so we need to increase the permission to obtain the super user permission: $sudo Chmod 777/opt/ROS/melody/share/PR2_ motor_ diagnostic_ tool/。 Then create a new one plugin.xml File, copy the code in and save it.

Visual slam Lesson 6: curve fitting with g2o, error: cmake error at CMakeList.txt (find_ package) By not providing“FindG2O.cmake“

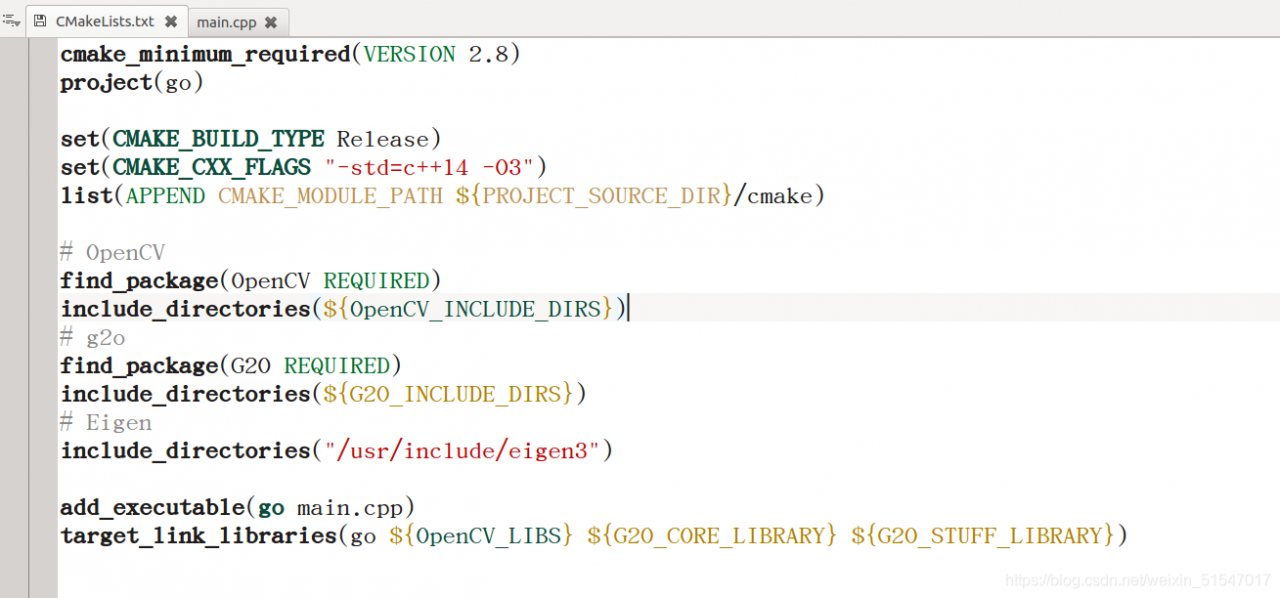
When compiling with KDevelop, my CMakeList.txt There’s an error in the file. It’s mine CMakeList.txt The code in the file is as follows:

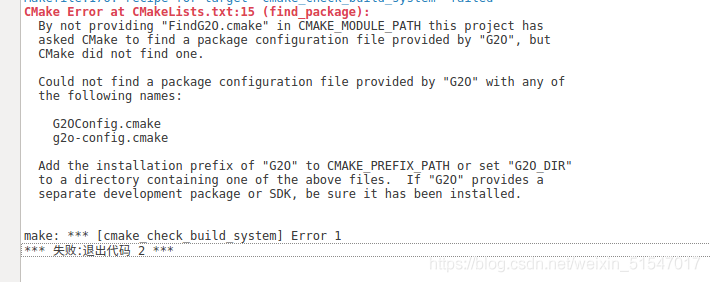
the errors are as follows:

The solution is as follows:
you need to CMakeList.txt Modify the following code in the file:
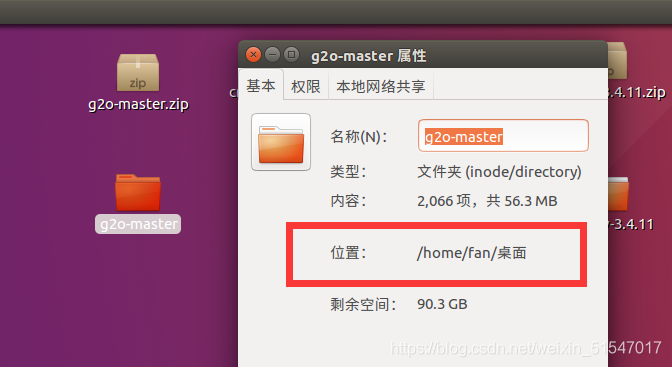
1. First of all, you need to find the location of your g2o installation: find the g2o folder – right click the properties to see

Add


list (APPEND CMAKE_ MODULE_ PATH ${PROJECT_ SOURCE_ DIR}/cmake)


Amend to read

list(APPEND CMAKE_ MODULE_ Path/home/fan/desktop/g2o master/cmake_ modules)

Among them,

/Home/fan/desktop/g2o master/cmake_ Modules// where to install your own g2o files

2. Add an extra set

set(G2O_ ROOT /usr/local/include/g2o)

After completing the above steps, there will be no problem with the build and it can be executed smoothly.
The code is as follows

cmake_ minimum_ required(VERSION 2.8)
project(go)
set(CMAKE_ BUILD_ TYPE Release)
set(CMAKE_ CXX_ FLAGS “-std=c++14 -O3”)
list(APPEND CMAKE_ MODULE_ Path/home/fan/desktop/g2o master/cmake_ modules)
set(G2O_ ROOT /usr/local/include/g2o)

find_ package(OpenCV REQUIRED)
include_ directories(${OpenCV_ INCLUDE_ DIRS})

find_ package(G2O REQUIRED)
include_ directories(${G2O_ INCLUDE_ DIRS})

include_ directories(“/usr/include/eigen3”)

add_ executable(go main.cpp )
target_ link_ libraries(go ${OpenCV_ LIBS} ${G2O_ CORE_ LIBRARY} ${G2O_ STUFF_ LIBRARY})

Configuring NFS server in Linux

1、 Install services for NFS

sudo apt-get install nfs-kernel-server rpcbind

(by the way, you can start the SSH service sudo apt get install openssh server)

2、 NFS profile

Open profile

sudo vim /etc/exports

Add server folder path

/home/zwz/linux/nfs *(rw,sync,no_root_squash)

As above, my path is/home/ZWZ/Linux/NFS

3、 Restart NFS service

sudo /etc/init.d/nfs-kernel-server restart

4、 Experimental test

1. Copy files to the NFS folder (such as zimage)
2. The client can use the corresponding NFS command to try.

CONDA error notwritableerror: the current user does not have write permissions

Just after installing anaconda and preparing CONDA create environment, we encountered the following error

NotWritableError: The current user does not have write permissions to a required path.
  path: /home/NAME/.conda/envs/.conda_envs_dir_test
  uid: 1000
  gid: 1000

If you feel that permissions on this path are set incorrectly, you can manually
change them by executing

  $ sudo chown 1000:1000 /home/NAME/.conda/envs/.conda_envs_dir_test

In general, it's not advisable to use 'sudo conda'.

According to the prompt he gave, the operation failed, so use the following command to change the permissions of CONDA related folder, – R recursively applied to subfolders

sudo chmod 777 -R ~/anaconda3/
sudo chmod 777 -R ~/.conda/

If the problem is solved for the time being, we will not report the above mistakes

Maybe it’s the redundant problem caused by using sudo sh ana… When installing anaconda.