Tag Archives: ubuntu

Error handling of apt instruction e: unmet dependencies. Try ‘apt — fix broken install’ with no packages in Ubuntu 20.04

Record the error handling of * * e: unmet dependencies. Try ‘apt — fix broken install’ with no packages and errors were accounted while processing and E: sub process/usr/bin/dpkg returned an error code (1) * *
only my process and solutions are recorded here.

Process

This error was reported when using apt and apt get packages today.

$ sudo apt install git
[sudo] password for wh: 
Reading package lists... Done
Building dependency tree       
Reading state information... Done
You might want to run 'apt --fix-broken install' to correct these.
The following packages have unmet dependencies:
 cypher-shell : Breaks: neo4j (< 3.1.4) but 2.1.5 is to be installed
 git : Depends: liberror-perl but it is not going to be installed
       Depends: git-man (> 1:2.17.1) but it is not going to be installed
       Depends: git-man (< 1:2.17.1-.) but it is not going to be installed
E: Unmet dependencies. Try 'apt --fix-broken install' with no packages (or specify a solution).

Follow the prompts to run sudo apt -- fix broken install , and report an error. The echo is as follows:

YPreconfiguring packages ...
(Reading database ... 209743 files and directories currently installed.)
Preparing to unpack .../neo4j_1%3a3.5.14_all.deb ...
-----------------------------------------------------------------------------
It looks like you are upgrading from Neo4j 2.x. Many configuration
changes and improvements have been made in 3.0, including the location of
the databases. These changes cannot be handled automatically by this package
installation.

You will need to upgrade from Neo4j 2.x to Neo4j 3.2 and THEN to this release.
The upgrade guide for Neo4j 3.2 can be found at 
https://neo4j.com/docs/operations-manual/3.2/upgrade/
-----------------------------------------------------------------------------

dpkg: error processing archive /var/cache/apt/archives/neo4j_1%3a3.5.14_all.deb 
(--unpack):
 new neo4j package pre-installation script subprocess returned error exit status
 1
Errors were encountered while processing:
 /var/cache/apt/archives/neo4j_1%3a3.5.14_all.deb
E: Sub-process /usr/bin/dpkg returned an error code (1)

Here I want to install neo4j_ 1%3a3.5.14_ All.deb, but I already have neo4j 2. X. I need to upgrade from neo4j 2. X to neo4j 3.2, and then to this version
the following error report also means to analyze neo4j_ 1%3a3.5.14_ Error in all.deb
(but I didn’t look at the above information carefully, so I only know that the following error report says my neo4j_ 1%3a3.5.14_ All.deb parsing error)

I’ve checked a lot of blogs here, but it doesn’t work for a long time
I followed the method in reference 1. Method 1 and method 2 are useless. I have achieved method 3
the process of trying method 3 is as follows:

$ sudo rm /var/cache/apt/archives/neo4j_1%3a3.5.14_all.deb 
$ sudo apt-get clean
$ sudo apt-get autoremove
Reading package lists... Done
Building dependency tree       
Reading state information... Done
You might want to run 'apt --fix-broken install' to correct these.
The following packages have unmet dependencies:
 cypher-shell : Breaks: neo4j (< 3.1.4) but 2.1.5 is installed
E: Unmet dependencies. Try 'apt --fix-broken install' with no packages (or specify a solution).

When you run sudo apt get autoremove , you will be prompted

The following packages have unmet dependencies:
 cypher-shell : Breaks: neo4j (< 3.1.4) but 2.1.5 is installed

At this time, I realized that there is a 2.1.5 version of neo4j in my system
if this step is not successful, the following instructions will not be executed successfully.

Here, I query the directory of neo4j version 2.1.5 through the where is command, and modify the corresponding directory name. It is reasonable to say that after the modification, the system cannot find neo4j2.1.5, sudo apt get autoremove should be able to execute successfully. But it didn’t.

In fact, it’s very simple here. We just need to uninstall neo4j in version 2.1.5. As follows:
perform sudo apt get remove neo4j uninstall
then follow method 3 in reference blog 1 to execute it again. The above error will not be reported in the process.

Then apt and apt get can be used normally.

reference resources

    Fix “Sub-process /usr/bin/dpkg returned an error code (1)” In Ubuntu

Dpkg: error processing package XXX (- – configure) solution (red warning in the upper right corner of Ubuntu)

When executing sudo apt get upgrade in Ubuntu, the following error is reported:

Setting up bluez (4.101-0ubuntu13.1) ...
reload: Job is not running: dbus
invoke-rc.d: initscript dbus, action "force-reload" failed.
start: Job failed to start
invoke-rc.d: initscript bluetooth, action "start" failed.
dpkg: error processing package bluez (--configure):
 subprocess installed post-installation script returned error exit status 1
dpkg: dependency problems prevent configuration of bluez-alsa:i386:
 bluez-alsa:i386 depends on bluez; however:
  Package bluez is not configured yet.
 
dpkg: error processing package bluez-alsa:i386 (--configure):
 dependency problems - leaving unconfigured
No apport report written because the error message indicates its a followup error from a previous failure.
                          Errors were encountered while processing:
 bluez
 bluez-alsa:i386
E: Sub-process /usr/bin/dpkg returned an error code (1)

You can solve this problem by executing the following command:

$ sudo mv /var/lib/dpkg/info/ /var/lib/dpkg/info_old/
$ sudo mkdir /var/lib/dpkg/info/
$ sudo apt-get update
...
$ sudo apt-get -f install
    Reading package lists... Done
    Building dependency tree
    Reading state information... Done
    0 upgraded, 0 newly installed, 0 to remove and 0 not upgraded.
    7 not fully installed or removed.
    After this operation, 0 B of additional disk space will be used.
    Setting up bluez (4.101-0ubuntu13.1) ...
    Setting up blueman (1.23-git201403102151-1ubuntu1) ...
    Setting up bluetooth (4.101-0ubuntu13.1) ...
    Setting up bluez-alsa:amd64 (4.101-0ubuntu13.1) ...
    Setting up bluez-alsa:i386 (4.101-0ubuntu13.1) ...
    Setting up bluez-gstreamer (4.101-0ubuntu13.1) ...
    Setting up bluez-utils (4.101-0ubuntu13.1) ...
$ sudo mv /var/lib/dpkg/info/* /var/lib/dpkg/info_old/
$ sudo rm -rf /var/lib/dpkg/info
$ sudo mv /var/lib/dpkg/info_old/ /var/lib/dpkg/info/

After entering the above command, there is no problem in executing sudo apt get update and sudo apt get upgrade.

[Linux] failed to install libudev dev in Ubuntu 18.04

Recently, when compiling BlueZ source code bluez-5.58, you need to install the dependency library libudev dev.
the log is as follows:

checking for UDEV... no
configure: error: libudev >= 172 is required

The solutions are as follows:

 sudo apt-get install libudev-dev

However, due to the slow download speed of Ubuntu’s default software source, the software source was modified to install libudev dev for Tsinghua’s 20.04 source

The installation process is as follows:

➜  ~ sudo apt-get autoremove libudev-dev
Reading package lists... Done
Building dependency tree       
Reading state information... Done
The following packages will be REMOVED:
  libudev-dev linux-hwe-5.4-headers-5.4.0-42 linux-hwe-5.4-headers-5.4.0-72
0 upgraded, 0 newly installed, 3 to remove and 1693 not upgraded.
1 not fully installed or removed.
After this operation, 142 MB disk space will be freed.
Do you want to continue?[Y/n] Y
(Reading database ... 234541 files and directories currently installed.)
Removing libudev-dev:amd64 (245.4-4ubuntu3.7) ...
Removing linux-hwe-5.4-headers-5.4.0-42 (5.4.0-42.46~18.04.1) ...
Removing linux-hwe-5.4-headers-5.4.0-72 (5.4.0-72.80~18.04.1) ...
Setting up udev (245.4-4ubuntu3.7) ...
Failed to restart udev.service: Unit systemd-udevd.service is not loaded properly: Exec format error.
See system logs and 'systemctl status udev.service' for details.
invoke-rc.d: initscript udev, action "restart" failed.
● systemd-udevd.service - udev Kernel Device Manager
   Loaded: error (Reason: Exec format error)
   Active: active (running) since Fri 2021-06-25 17:03:02 CST; 18h ago
     Docs: man:systemd-udevd.service(8)
           man:udev(7)
 Main PID: 611 (systemd-udevd)
   Status: "Processing with 24 children at max"
    Tasks: 1 (limit: 15842)
   CGroup: /system.slice/systemd-udevd.service
           └─611 /lib/systemd/systemd-udevd

Jun 26 11:05:01 t systemd[1]: systemd-udevd.service: Cannot add dependency job, ignoring: Unit systemd-udevd.service is not loaded properly: Exec format error.
Jun 26 11:06:26 t systemd[1]: systemd-udevd.service: Got notification message from PID 611, but reception is disabled.
Jun 26 11:06:57 t systemd[1]: /lib/systemd/system/systemd-udevd.service:26: Executable path is not absolute: udevadm control --reload --timeout 0
Jun 26 11:06:57 t systemd[1]: systemd-udevd.service: Cannot add dependency job, ignoring: Unit systemd-udevd.service is not loaded properly: Exec format error.
dpkg: error processing package udev (--configure):
 installed udev package post-installation script subprocess returned error exit status 1
Processing triggers for man-db (2.8.3-2ubuntu0.1) ...
Errors were encountered while processing:
 udev
E: Sub-process /usr/bin/dpkg returned an error code (1)

As can be seen from the above logs, there was a problem with the installation of libudev dev. then I thought it was nothing and ignored it. As a result, the system could not start normally after restart.
later, through log analysis:

Failed to restart udev.service: Unit systemd-udevd.service is not loaded properly: Exec format error.

Guess whether the version of libudev dev does not correspond to the problem, and then remember that the software source was set before for 20.04, so switch to the official default software source and re install it

The installation log is as follows:

➜  ~ sudo apt-get install libudev-dev
Reading package lists... Done
Building dependency tree       
Reading state information... Done
The following packages were automatically installed and are no longer required:
  linux-hwe-5.4-headers-5.4.0-42 linux-hwe-5.4-headers-5.4.0-72
Use 'sudo apt autoremove' to remove them.
The following additional packages will be installed:
  libudev1 udev
The following NEW packages will be installed:
  libudev-dev
The following packages will be upgraded:
  libudev1 udev
2 upgraded, 1 newly installed, 0 to remove and 126 not upgraded.
Need to get 1,180 kB of archives.
After this operation, 206 kB of additional disk space will be used.
Do you want to continue?[Y/n] y
Get:1 http://cn.archive.ubuntu.com/ubuntu bionic-updates/main amd64 udev amd64 237-3ubuntu10.48 [1,103 kB]
Get:2 http://cn.archive.ubuntu.com/ubuntu bionic-updates/main amd64 libudev1 amd64 237-3ubuntu10.48 [58.0 kB]
Get:3 http://cn.archive.ubuntu.com/ubuntu bionic-updates/main amd64 libudev-dev amd64 237-3ubuntu10.48 [19.1 kB]
Fetched 1,180 kB in 6s (214 kB/s)     
(Reading database ... 234373 files and directories currently installed.)
Preparing to unpack .../udev_237-3ubuntu10.48_amd64.deb ...
Unpacking udev (237-3ubuntu10.48) over (237-3ubuntu10.46) ...
Preparing to unpack .../libudev1_237-3ubuntu10.48_amd64.deb ...
Unpacking libudev1:amd64 (237-3ubuntu10.48) over (237-3ubuntu10.46) ...
Setting up libudev1:amd64 (237-3ubuntu10.48) ...
Selecting previously unselected package libudev-dev:amd64.
(Reading database ... 234373 files and directories currently installed.)
Preparing to unpack .../libudev-dev_237-3ubuntu10.48_amd64.deb ...
Unpacking libudev-dev:amd64 (237-3ubuntu10.48) ...
Setting up udev (237-3ubuntu10.48) ...
update-initramfs: deferring update (trigger activated)
Setting up libudev-dev:amd64 (237-3ubuntu10.48) ...
Processing triggers for libc-bin (2.27-3ubuntu1.2) ...
Processing triggers for systemd (237-3ubuntu10.42) ...
Processing triggers for man-db (2.8.3-2ubuntu0.1) ...
Processing triggers for ureadahead (0.100.0-21) ...
Processing triggers for initramfs-tools (0.130ubuntu3.9) ...
update-initramfs: Generating /boot/initrd.img-5.4.0-74-generic

Done! Problem fix!!

Summary

In Ubuntu, it is convenient to switch the source. At the same time, we must pay attention to the problems in the process of installing the software. Here we encounter the problem of system crash caused by the failure of installing libudev dev

Error in installing Google Chrome in Ubuntu

Problem description

Prepare to install Google browser in Ubuntu, open the installation after downloading and find that it cannot be installed normally, and prompt “this software is from a third party and may contain non free components”, as follows:

Solution

Install third party software solutions:

    gdebi installation

    sudo apt install gdebi-core 
    
      if it can’t be installed, try to change the source and execute first

      sudo apt-get update
      
        find the location of the downloaded Google browser installation package, and then execute:

        sudo gdebi xxx.deb
        

        Xxx.deb is the package name

Windows subsystem Ubuntu 18.04 solves SSH problem

Download 18.04 of Ubuntu in the Microsoft Store of windows, but there are some problems in SSH localhost. Refer to some information on the Internet and make the following summary

    first, you need to install sshd sudo apt get install openssh server and then modify/etc/SSH/sshd_ Two items under config file

      permitrootlogin yes permitrootlogin changed to yes passwordauthentication yes passwordauthentication changed to yes Restart SSH service /etc/init.d/ssh restart execute SSH localhost again input password should be able to SSH successfully

gazebo7 CMake Error:Could not find a package configuration file provided by “gazebo_plugins“

Running catkin on Ubuntu 16.04 gazebo7_ Cmake error

Error details:

CMake Error at /opt/ros/kinetic/share/catkin/cmake/catkinConfig.cmake:83 (find_package):
  Could not find a package configuration file provided by "gazebo_plugins"
  with any of the following names:

    gazebo_pluginsConfig.cmake
    gazebo_plugins-config.cmake

terms of settlement:

sudo apt-get install ros-kinetic-gazebo-ros-pkgs ros-kinetic-gazebo-ros-control

Catkin make

[Solved] Login with Ubuntu graphical interface, error sorry, that didn’t work.please try again

Sorry, that didn’t work.please try again

Today, I just finished installing Ubuntu 20.04. After setting the root password, I found that the root login would report such an error:
sorry, that didn’t work.please try again

In fact, there is no problem with the command line login, which indicates that it is not the password, but the desktop environment.

vi /etc/pam.d/gdm-autologin
#Note "auth requied pam_succeed_if.so user != root quiet success"

vi /etc/pam.d/gdm-password
#Note "auth requied pam_succeed_if.so user != root quiet success"

Unbuntu 18.04 unable to install mkcramfs

Problem description

In the morning, I received user feedback and applied to add mkcramfs and libxml dev to the offline source
which was strange. After asking the user, the user gave a screenshot of the question:

Problem analysis

Firstly, the first step is to get the user node information and login mode, and the path of the command in the screenshot
after logging in, the user problem is reproduced, and the error is indeed reported; Try the following:

1、apt-get install mkcramfs

Report an error, indicating that there is no such package

2、apt-get install libxml2-dev

I still report an error. I feel strange. I suspect that there is something wrong with the source.
3. Check the source configuration of the user’s machine and find that there is no/etc/apt/source.list file, only/etc/apt/source.text; The reason is that the MV of the last step is not executed when the user installs the offline source document.
4. Modify the source information and update it

mv /etc/apt/source.text /etc/apt/source.list
apt-get update

5. After trying to install the previous two packages, it is found that libxml2 dev is installed normally, and mkcramfs cannot be installed

Problem solving

For all the relevant information on the Internet, it is found that some Ubuntu can’t install mkcramfs in APT get mode, so they need to download the package to the local and then install it.
1. Find the corresponding package in the offline source, and then download it:

2. Install it in dpkg-i mode
3. Verify it by performing the user’s previous operation; Problem solving:

Summary

Some Ubuntu can’t install mkcramfs in APT get mode, so you need to download the package to the local and then install it
extension: there may be other packages with this situation, which can be used as a reference for subsequent analysis

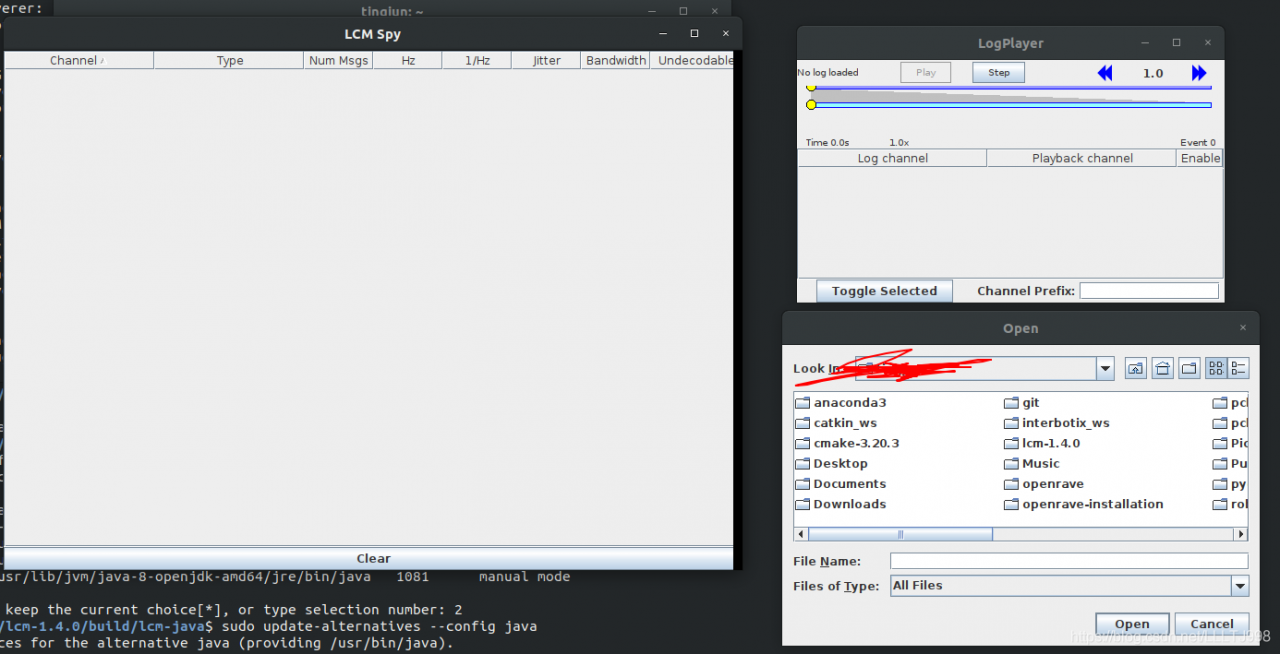
About LCM spy running error in LCM v1.4.0

I am a little white, but recently in the Linux system running LCM spy encountered a variety of error messages. Finally, after collecting all kinds of information on the Internet and a little bit of my imagination, I successfully solved the problem, so I want to share it with you and leave a file for myself, so as not to be at a loss when I encounter the same problem in the future.

First, follow the official LCM guidelines   Before installing LCM, be sure to download its recommended default JDK. This automatic download is the latest version of Java (I don’t know much about Java, but it also seems to download javac). Bloggers download Java 11 by default. Note: Java 8 can’t run make successfully, at least the blogger failed.

Default JDK installation steps:

$ sudo apt update
$ sudo apt install default-jdk

Then follow the steps to install according to the official website (cmake may say that some files in other languages cannot be found, but you can try to run make first)

$ mkdir build
$ cd build
$ cmake ..
$ make
$ sudo make install

If there is no error in make and make install, please check whether there is an LCM Java folder and whether there is lcm.jar in the folder under build. This is very important, because it determines whether you can run LCM spy

Next, you need to download Java 8 and change the default version of Java to Java 8. The method is as follows (the first and second behaviors download Java 8, and the third behavior change the version)

$ sudo apt-get update
$ sudo apt-get install openjdk-8-jdk
$ sudo update-alternatives --config java

Then select the number corresponding to Java 8 in the pop-up window and press enter:

Next, you need to move the lcm.jar to the Java folder. Note: the specific address varies from person to person. Please check the address of the Java folder in usr. Bloggers provide their own examples:

$ sudo cp ~/lcm-1.4.0/build/lcm-java/lcm.jar /usr/share/java/

In this way, you can find the LCM. Jar file in the Java folder. If there is no accident, you can run LCM spy and LCM logplayer GUI in any path.

——————————————————————————————————————————

PS:

1. Two versions of Java are needed because during the installation of LCM v1.4.0, Java related files only support Java 11 (maybe Java 10), but not Java 8. However, the operation of LCM spy does not support Java 11, because Java 11 has deleted an option named “xincgc” in Java 8, so it needs to change the Java version to Java 8 to run successfully;

2. A Java application notes in the official website   Bloggers did not run successfully, so they have to manually copy LCM. Jar to the Java folder. If you are interested, you can also try whether the official website tutorial is useful.

linux Ubuntu Error: No command ‘setenv‘ found


Linux Ubuntu error: no command ‘setenv’ found


Foreword solution


preface

   sometimes the installed software commands are written based on CSH. If you use bash to use the software, you will report an error, such as “no command ‘setenv’ found”. At this time, you need to change the default bash of Ubuntu to CSH

resolvent

   Linux Ubuntu changes the default bash to CSH by default

How to Solve Error: “Hdaudio hdaudioc0d2: unable to bind codec”

recently, after installing nidia drivers on the platform of Ubuntu 18.04, restart the computer, report the error “hdaudio hdaudioc0d2: unable to bind codec” on the command line, and the startup interface stays in the shell interface</ font>

note: there are many solutions to this problem on the Internet, but they don’t talk about the permission problem. The pro test can only save the modified grub file under the permission of root

resolvent

1. Enter super user root:

sudo -i

2. Enter grub file:

vim /etc/default/grub

3. Modify the following contents: before modification: </ font> </ font> 1

GRUB_CMDLINE_LINUX_DEFAULT="quiet splash nomodeset"

Modify:

GRUB_CMDLINE_LINUX_DEFAULT=""

4. Save the file: </ font> </ font>

ESC +:x