Tag Archives: The document

Several common methods of inserting pictures into latex documents

zz from: http://hepg.sdu.edu.cn/Service/tips/latex/latexfig.html#top & http://liqunsun.spaces.live.com/Blog/cns!285A08B51269F219!109.entry

Generally, latex only supports inserting EPS (encapsulated postscript) format graphics files directly, so we should try to get EPS format files before inserting pictures into latex documents.

all kinds of application software under UNIX can output the results in PS format, Most software can also output EPS format. If the software can only output PS format but not EPS format results, it can be converted to EPS format by ps2epsi command. Please refer to man ps2epsi’s instructions. If the image file format is bitmap graphics file, it can be converted to PS or EPS format file by display and convert tools of image magic package. See man page and man page for details

instructions

the output of windows software becomes PS / EPS file: please refer to the

“How to convert the output of software in Windows system into PS and EPS files”

Description in the column


Inserting pictures into latex documents is realized by using some latex graphics processing macro commands. Many macro commands support inserting EPS format graphics files into latex documents

(1) Using the macro command of includegraphics (graphicx package)

First of all, you need to add the following in the file description of latex document:

/usepackage{graphicx}

Then, it is quoted in the place where the image needs to be inserted:
/ includegraphics [height = height] {image file name} or / includegraphics [width = width] {image file name}
where “height” and “width” refer to the height and width of the image to be printed, and the unit must be given, which can be centimeter (CM) or inch (in), The image file name in the above command refers to the file name of the image file to be inserted. The image must be in EPS format

When inserting a picture with the macro command includegraphics of the graphicx package, you can also rotate the picture by:
/ includegraphics [height = height] [angle = rotation angle] {picture file name}

The inserted graphics are usually in EPS, PDF, JPG, PNG and other formats. Suppose the name is fig, and put it in the same directory of your tex document.
1. First add a sentence / usepackage {graphicx}
in the introduction area. 2. If you want to insert an inline graphic, you can directly use
/ includegraphics [width = 5in] {fig},
without adding a suffix.
This width is my most commonly used option, which can also be changed to other options.
3. If you want to insert floating graphics, use
/ begin {figure} [htbp]
/ centering / includgraphics [width = 3.5in] {fig}
/ caption {something} / label{ fig:1 }
/ end {figure}
4. For EPS graphics, the compilation process is latex, dvips, ps2pdf.
for PDF JPG PNG graphics, the compilation process is pdflatex

Use the include graphics macro command (graphics package) to:

It is troublesome to insert pictures with graphics package

(2) Using psfig macro command

First of all, you need to add the following in the file description of latex document:

/usepackage{psfig}

Then, it is quoted in the place where the picture needs to be inserted:
/ psfig {figure = picture file name, height = height} or / psfig {figure = picture file name, width = width}
where “height” and “width” refer to the height and width of the picture you want to print, and the unit bit must be given, which can be centimeter (CM) or inch (in), The image file name in the above command refers to the file name of the image file to be inserted. The image must be in EPS format

(3) use the epsfig macro command

The usage of epsfig macro command is exactly the same as that of psfig. The specific method is as follows:
first, add the following in the file description of latex document:

/usepackage{epsfig}

Then reference where you want to insert the image:

/ epsfig {figure = picture file name, height = height} or / epsfig {figure = picture file name, width = width}

The “height” and “width” refer to the height and width of the picture you want to print. The unit must be given, which can be centimeter (CM) or inch (in). The height and width can also be in the above format

The image file name in the above command refers to the file name of the image file to be inserted, and the image must be in EPS format


(4) Using EpsF macro command

The usage of EpsF macro command is as follows: first, add the following in the file description of latex document:

/usepackage{epsf}

Then, you can refer to:
/ epsfxsize = width / epsffile {image file name} or / epsfysize = height / epsffile {image file name} where you want to insert the image

The “height” and “width” refer to the height and width of the image to be printed. The unit must be given, which can be centimeter (CM) or inch (in). The height and width can also be given in the above format, so that the length width ratio of the original image can be changed. The image file name in the above command refers to the file name of the image file to be inserted, and the image must be in EPS format


(5) Latex? Picture control command, position control

Latex controls the position of the image by adding an exclamation point to ignore the “aesthetic” standard.
/ begin {figure} [! HTB]
/ usepackage {float}
/ begin {figure} [H]
insert it into the corresponding position of your code.

1, insert the side-by-side subgraph
/ usepackage {subfigure}

/ begin {figure} [H]
/ centering
/ subfigure [subfigurecaption] {
/ label{ Fig.sub .1}
/includegraphics[width=0.4/textwidth]{ figurename.eps }}
/subfigure[SubfigureCaption]{
/label{ Fig.sub .2}
/includegraphics[width=0.4/textwidth]{ figurename.eps }}
/caption{MainfigureCaption}
/label{ Fig.lable }
/ end {figure}

2, control the image position
if you don’t like latex to automatically arrange the image position, you can use the float package, and then
use / begin {figure} [H].
/ usepackage {float}
1, insert JPG image
in the command line environment, use the command:
ebb figure.jpg
Generating bounding box file figure.bb .
Use the following command:
/ includegraphics [width = 0.8/textwidth]{ figure.jpg }
PDF texify can be directly compiled into PDF file.
2, insert BMP image
there is no way to insert BMP image directly. The current method is to use
gimp to convert BMP into JPG, and then insert it according to the above method. When converting, do not use windows built-in painter, as the image quality is lost too much. With gimp or
fastone image viewer, the JPG quality is the highest, and the image quality is better.
3, insert JPG and EPS images at the same time
the insert command remains unchanged. When compiling, it uses latex and dvi2pdf, and the
images in both formats can be displayed.
Insert EPS picture
use / includegraphics [options] {file} command to insert EPS picture. The following is the simplest example:
/ documentclass {article}
/ usepackage {graphicx}% using the graphicx package
/ begin {document}
/ includegraphics{ file.eps }% insert the picture, insert it according to the original size of the picture
/ end {document}
note:
(1) EPS file and Tex file are placed in the same folder, which can be called only by the file name, without writing the path.
(2) Pdflatex cannot be used at compile time, an error will occur. Even if there are no mistakes, you can’t see the diagram. We should use latex compilation to generate DVI, and then dvi2ps, ps2pdf can see the figure.
Use [options] to specify the image size:
/ includegraphics [width = 3in]{ file.eps }
set the image width to 3 inches, and the image height will be automatically scaled.
/includegraphics[width=/testwidth]{ file.eps }
set the image width to the text width.
/includegraphics[width=0.8/textwidth]{ file.eps }
set the image width to 0.8 times the text width
/ includegraphics [width = / testwidth-2.0in]{ file.eps }
set the image width to be 2 inches less than the text width.
Use [options] to specify the image rotation angle:
/ includegraphics [angle = 270]{ file.eps }
rotate the image 270 degrees.
The two options are used at the same time, separated by commas:
/ includegraphics [width = / testwidth, angle = 270]{ file.eps }


A few useful articles on graph problems in latex

Graphics and Colour with LaTeX 

Online guide to illustration and color use in latex

Figure’ing and picture’ing latex (PS format)

The method of inserting PS graph and xfig graph into latex

Using imported graphics in latex 2e (PS format)

The illustration in latex is discussed in detail, including basic concepts, file formats and their mutual conversion, related software, etc. in addition, how to replace the characters in PS format pictures with latex format characters is also discussed, so as to solve the problem that some application software can not use special characters such as Greek alphabet and complex mathematical formula expressions

Latex maths and graphics (PS format)

It is mainly about the method of inserting pictures and formulas into latex.

this paper introduces the method of inserting pictures and formulas into latex

About Visio to EPS

Many people are used to drawing with Visio (including me), but Visio can’t export EPS format, so they have to rely on third-party software. Save it as *. EMF format through Visio, and then open it with OpenOffice draw to export it to EPS format. When exporting, you need to select the open image, so that after exporting EPS, only the content of *. EMF image will be included, and there will be no large blank. But the EPS image exported by this method will be out of shape, for example, the straight line will often be intermittent, and the “computer” shape I added in Visio will also have inexplicable shadows. Or maybe I didn’t set it up.

There is another better solution, the EPS file exported is perfect. In other words, the Visio graphics are printed into PDF by acrobat printer, and then cut by gsview (gsview4.8). The specific process is as follows:

1 edit the image file and save it as PDF file

Install acrobat, print the edited picture as PDF file under Visio and word


2 to EPS file

Open PDF file in acobat and select Save as EPS file


3. Reduce EPS files

Open EPS file with gsview, select File — & gt; PS to EPS, select auto cut, and save it as another *. EPS file
VS2010 debugging window flash solution

These days the development integration environment has been changed to VS2010, just started to use, some places are not very understand, by consulting the relevant documents, is now solved.
Take the VS2010 debugging window flash through the solution is as follows:
#include < iostream>
using namespace std;
void main()
int add(int,int,int);
float business (int);
int x, y, z, sum;
cout< < “Input x, y, z:”;
cin> > x> > y> > z;
the sum = add (x, y, z);
cout< <” sum=”< < sum< < endl;
cout< <” average=”< < average(sum)< < endl;
// system (” pause “);
}
}
Int add (int a, int b, int c)
{return (a+b+c); }
float business (int s)
{return (s/3.0); }
This is the test code.
The solution is as follows:
If you are compiling (F5), you can run the program (Ctrl+F5). If it is still flashing, use the following method to solve it.
method one:
1. If the c + + files, in the final to write a program before (return) add: system (” pause “);
= #include”stdlib.h”;
= #include”stdlib.h”; Then add: system(“pause”) at the end of the program (before the return).
Method 2:
. Right click on the current project – Properties
2> 3. Change the SUBSYSTEM configuration in System Options, select the first ‘/ CONSOLE’ in the drop-down menu and then select ‘Start Executing (Don’t Debug)’, that is Ctrl +F5;
This solves the flash window problem once and for all.
 

C / C + + error handling (document): unhandled exception: 0xc0000005: access violation while reading location 0x00000000

Environment: VS2005
Code:
#include “stdafx.h”// Add include {
cout< <” argc=”< < argc< < endl;
for(int i=0; i< argc; I++)
{
wcout< <” argv[0]=”< < argv[0]< < endl;
}
cin.get();
return 0;
}
br> <>>
>
Unhandled exception: 0xC0000005: Access conflict occurred while reading position 0x00000000

Modifying the default style of scrollbar in Android

Well, I met the requirement again, and needed to modify the style of ScrollBar, so I looked up a lot of documents, I think the summary of this great cow is good, by the way, I took a look at his home page, wow, great ~!! Attach great god article links: http://likfe.com/archives/

knowledge points in the ListView/ScrollView/RecyclerView add attributes:
android: vertical scrollbars = “”
android: scrollbarTrackVertical =” @ drawable/xxx_vertical_track “
android: scrollbarThumbVertical =” @ drawable/xxx_vertical_thumb “
B: Horizontal scroll bar
android: horizontal scrollbars = “”
android: scrollbarTrackHorizontal =” @ drawable/xxx_horizontal_track “
android: scrollbarThumbHorizontal =” @ drawable/xxx_horizontal_thum “
other common attributes
defines the style and position of the scrollbar
android:scrollbarStyle= “outsideInset”
2. Define the size of the scroll bar, refers to the width, when the vertical level refers to the height of the
android: dp scrollbarSilbarSize = “4”

0

2

4

5

6

8

attributes effects
1 scrollbarThumbVertical[Horizontal] 3 short bars
7 scrollbarTrackVertical[Horizontal] 9 long bars, The background
Note that
where scrollbaTrackxxx, scrollbarThumbxxx can use:
◦ custom Shape

◦. ◦ can be registered for use.9. PNG
@color/ XXX to use color values
You cannot use the # XXXXXX color value directly
Android :scrollbarStyle can define the style and position of the scrollbar with four optional values including insideOverlay, insideInset, outsideOverlay and outsideInset.
Where inside and outside respectively mean whether the overlay is inside the padding of the view, overlay and inset mean whether the overlay is on the view or inserted behind the view, so the four values respectively represent:

0

3

4

6

attribute value effect of the

insideOverlay

default values, Inside the padding and overlaid on the view
means inside the padding and inserted behind the view
outsideInset 1 means outside the padding and inserted behind the view
5 outsideOverlay 7 inside the padding Outside and overlying the view

Demo
note:
scrollbarTrackVertical can be set to transparent or not directly set android: scrollbarTrackVertical = “@ color/transparent”
again: scrollbarThumbVertical, scrollbarTrackVertical can not directly set to color values, but you can use @ color
Layout:

android:scrollbarStyle="outsideOverlay"
android:scrollbarThumbVertical="@drawable/scrollbar_vertical_thumb"
android:scrollbarSize="3dp"
android:scrollbars="vertical"

Demo 2
layout:

android:scrollbarStyle="outsideOverlay"
android:scrollbarThumbVertical="@color/red_square"
android:scrollbarSize="3dp"
android:scrollbars="vertical”

default:

Demo2 effect:

Demo1 effect:

Solution to PCL XL error of HP p2055d laser printer

Recently, HP P2055d laser printer (produced in November 2009) has been installed at the customer’s office. The hardware environment is as follows: PC: Dell OptiPlex 360, and another Fujitsu DPK 8600E ticket printer. P2055d is connected to PC via USB data cable. Software environment: The operating system, Windows XP SP2, USES the driver disk attached. After the installation of the operating system and the driver, the HP P2055d printer will be installed. After the installation of the driver, the test page will be printed, OK; Then, the Fujitsu DPK8600E was installed. After the installation was completed, everything worked fine. As a result, the P2055d hung up.
— — — — — — — — — — — — — — — — — — — — — — — — — — — error message started the author add (visit) — — — — — — — — — — — — — — — — — — — — — — — — — — — —
PCL XL error
Subsystem: KERNEL
Error: IllegalOperatorSequence
Operator: EndSession
Position: 7
— — — — — — — — — — — — — — — — — — — — — — — — — — — — — — — — — — — — — — — — — — — — — — — — — — — — — — –// error message end I (visit)
Using the built-in test function of the machine, the printer can work normally, but it cannot communicate with the PC normally. Uninstall and reinstall the driver and all associated software, and the problem remains. Helpless, call HP customer service, customer service staff told the problem cannot be determined, can only use the following methods to try. Because the telephone is far from the machine, it is not convenient to operate. After two calls to customer service, the P2055d can finally be printed. The operation method is listed here for later use.
1. Change the advanced options for the first time
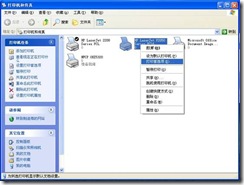
1) Right-click the printer and select “Print Preference…” in the window that pops up. , as shown in Figure 1.

Figure 1
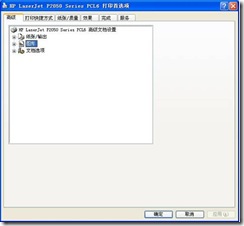
2) Open the print preferences window as shown in Figure 2

Figure 2
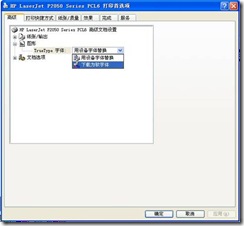
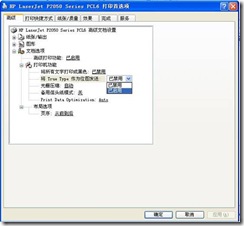
3) Expand “Graph” and select “Download as Soft Font” from the drop-down list of “True Type Font” below (Figure 3)

Figure 3
4) Expand Document Options a Printer Functions and change the drop-down list of Send True Type as bitmap to Enabled (Figure 4).

Figure 4.
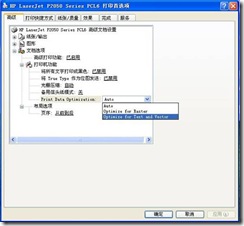
5) Then, change the “Print Data Optimization” drop-down list to “Optimize for Text and Vector,” apply “–” Optimize “(Figure 5).

Figure 5
To be on the safe side, I restarted the machine and printer (actually shutting down the computer and then shutting down the printer).
2. Try again and change the driver
As the problem was not solved, the author turned to HP customer service again (every time I played HP customer service, I had to wait, I didn’t know whether HP service was too good or HP product quality was wrong). The author was told to replace it with a 2200 driver, so I tried again.
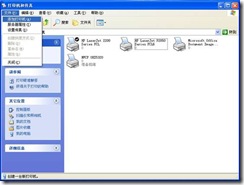
1) Open the “Printer and Fax” window (start A to set A printer and fax), and click “File” A to “Add Printer” in turn, as shown in Figure 6.

Figure 6.
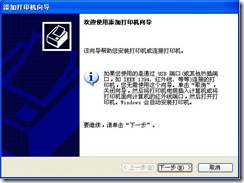
2) Open the “Add Printer Wizard” window as shown in Figure 7, and click “Next”.

Figure 7.
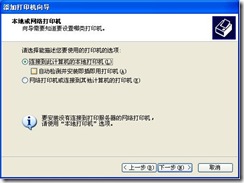
3) Remove the selection of “Automatic Detection and Installation of plug and play Printer” in the window shown in Figure 8, and click “Next”.

Figure 8.
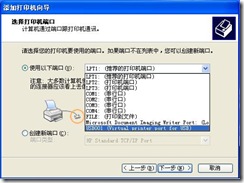
4) In the “Select Printer Ports” window, select “USB001” (Figure 9) from the following port drop-down list and click “Next”.

Figure 9.
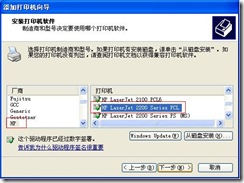
5) In the “Install Printer Software” window, select “HP” from the list of manufacturers, and the printer select “HP LaserJet 2200 Series PCL”, and click “Next” to add the printer.

Figure 10.
After adding this printer, print the document and test page OK. The original 2055D printer system will be installed automatically. It is recommended to set this 2200 printer as the default printer. At this point, the “PCL XL error” problem is resolved.
When the operating system was reinstalled, the printer was installed directly in accordance with Plan 2, and everything was fine.

Error: current transaction is aborted, commands ignored until end of transaction blockp

In normal database programming, we encountered errors from time to time: Current Transaction is aborted, commands ignored until the end of transaction BlockP. How to solve it?We usually look it up on the Internet. If you’re a little bit better at English you can tell from the error message that there’s probably something wrong there. But if the experience is not very rich, or the Internet to find more convenient. The most basic error message can see from the official documentation (http://www.postgresql.org/docs/8.4/interactive/errcodes-appendix.html).
The error above is the cause of improper transaction control, which can be written as follows.
Improper writing 1:
Connection OPEN.
Try {
Try {
Database operation A.
} Catch (Exception e) {
The log. The error (” do something “);
}
 
Database operation B. // The above error may occur during this data operation.
The transaction commits commit.
} Catch (Exception ex) {
Transaction rollback rollback.
} the finally {
Close the connection.
}
 
Improper writing method 2:
Connection OPEN.
Try {
Database operation A.
Database operation B.
The transaction commits commit.
} Catch (Exception ex) {
Database operation C. // The above error may occur during this data operation.
The transaction commits commit.
} the finally {
Close the connection.
}
 
In a Postgres database, if there is an error in a database operation in the same transaction, all subsequent databases in that transaction will fail.
If there is an error in database operation A, the same database operation B will report an error when it is executed. If there is an error in database operation A or database operation B, the same database operation C will report an error.
To avoid errors, someone is using the re-open method, which in effect throws away all previous operations (not in the case of auto-commit) and adds overhead by re-opening, which is not recommended.
Depending on the cause of the error, we can treat the processing before the possible error as a transaction. The processing after the error is then treated as a transaction, depending on the specific logic. That way you can avoid making mistakes.
In this way, we can change the improper 1 to
Try {
Database operation A.
} Catch (Exception e) {
Transaction rollback or commit;
The log. The error (” do something “);
}
Database operation B.  
 
In this way we can change the improper notation 2 to
} Catch (Exception ex) {
Transaction rollback or commit;
Database operation C.   
The transaction commits commit.
} the finally {
Close the connection.
}