Tag Archives: tensorflow

tf.gradients is not supported when eager execution is enabled. Use tf.GradientTape instead.

After learning Chapter 5 of deep learning with Python, deeply learn the thermodynamic diagram for computer vision
5.4.3 visualization class activation
when running the code in tensorflow 2.0 environment

grads = K.gradients(african_elephant_output, last_conv_layer.output)[0]

replace with

grads = tf.keras.backend.gradients(african_elephant_output, last_conv_layer.output)[0]

The following errors still occur

tf.gradients is not supported when eager execution is enabled. Use tf.GradientTape instead.

Solution

with tf.GradientTape() as gtape:
    grads = gtape.gradient(african_elephant_output, last_conv_layer.output)

Full code reference

reference resources:

https://stackoverflow.com/questions/58322147/how-to-generate-cnn-heatmaps-using-built-in-keras-in-tf2-0-tf-keras

In tensorflow tf.reduce_ Mean function


tf.reduce_ The mean function is used to calculate the mean value of tensor along a specified number axis (a dimension of tensor), mainly for dimension reduction or calculating the mean value of tensor (image).


reduce_mean(input_tensor,
                axis=None,
                keep_dims=False,
                name=None,
                reduction_indices=None)


The first parameter is input_ Tensor: the input tensor to be reduced; the second parameter axis: the specified axis; if not specified, the mean value of all elements will be calculated; the third parameter keep_ Dims: reduce dimension, set to true, the output result keeps the shape of input tensor, set to false, the output result will reduce dimension; the fourth parameter name: name of operation; the fifth parameter reduction_ Indicators: used to specify axes in previous versions, but has been discarded;


Take a tensor with dimension 2 and shape [2,3] as an example

import tensorflow as tf

x = [[1,2,3],
      [1,2,3]]

xx = tf.cast(x,tf.float32)

mean_all = tf.reduce_mean(xx, keep_dims=False)
mean_0 = tf.reduce_mean(xx, axis=0, keep_dims=False)
mean_1 = tf.reduce_mean(xx, axis=1, keep_dims=False)


with tf.Session() as sess:
    m_a,m_0,m_1 = sess.run([mean_all, mean_0, mean_1])

print m_a    # output: 2.0
print m_0    # output: [ 1.  2.  3.]
print m_1    #output:  [ 2.  2.]

If you set the dimension to keep the original tensor, keep_ Dims = true, results:

print m_a    # output: [[ 2.]]
print m_0    # output: [[ 1.  2.  3.]]
print m_1    #output:  [[ 2.], [ 2.]]


Similar functions include:

tf.reduce_ Sum: calculate the sum of all elements in the axis direction specified by the tensor; tf.reduce_ Max: calculate the maximum value of each element in the axis direction specified by the tensor; tf.reduce_ All: calculate the logical sum (and operation) of each element in the axis direction specified by the tensor; tf.reduce_ Any: calculates the logical or (or operation) of each element in the axis direction specified by the tensor;
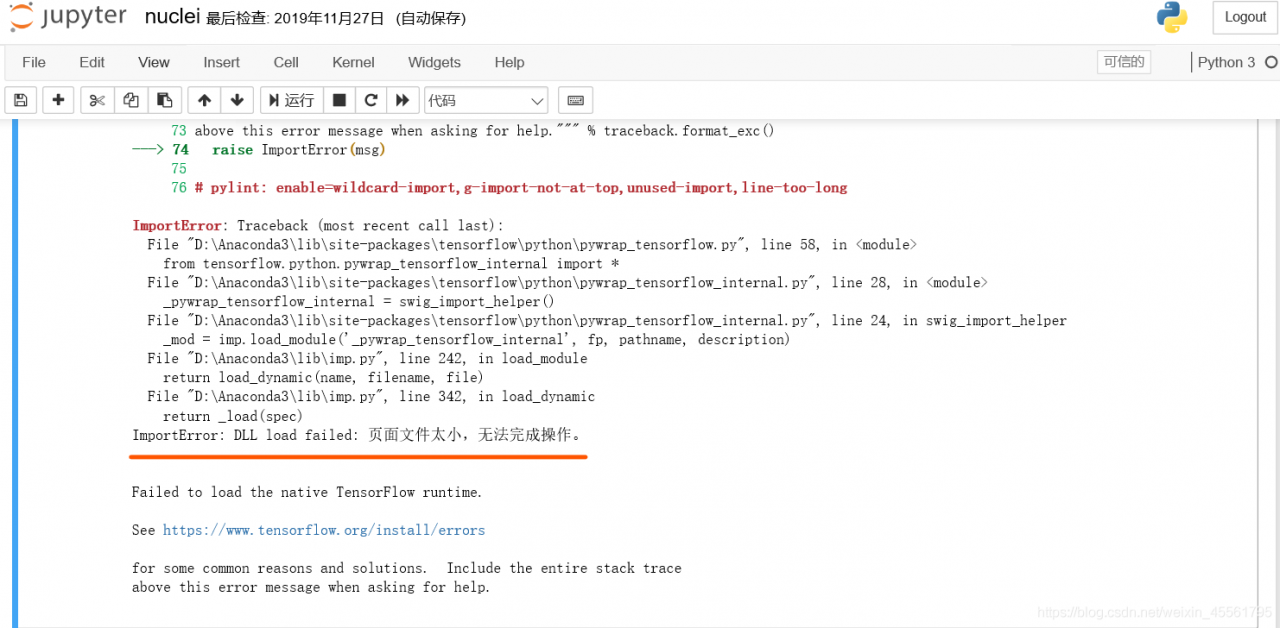
Using pip to install tensorflow: tensorflow — is not a supported wheel on this platform

Install TensorFlow using VirtualEnv:
From https://pypi.python.org/pypi/tensorflow to download the corresponding version of the tensorflow: tensorflow 1.3.0 – cp27 – cp27mu – manylinux1_x86_64. WHL;
PIP install –upgrade tensorflow-1.3.0-cp27-cp27mu-manylinux1_x86_64.whl;

Tensorflow-1.3.0-CP27-CP27mu-manylinux1_x86_64. WHL is not a supported wheel on this platform.


The reference blog: http://blog.csdn.net/qing101hua/article/details/52504403
After changing the file name to tensorflow-1.3.0-cp27-none-linux_x86_64.whl, execute the command:
PIP install --upgrade
to continue...


Error: importerror: DLL load failed: the page file is too small to complete the operation.

ImporError: DLL Load Failed: The page file is too small to complete operation.

Cause analysis,

2
2
2
2
2
2
2
2
2> Other programs are running, solution: wait for the other programs to finish running or close the other programs. Turn off all useless programs on your computer. Also, Python.ext should not be used by two programs at the same time. For example, if you are using PyDev + Anaconda, turn one off. *

Two deformation methods of tensorflow image

There is also the padding, which can prevent the image from deforming, but the result is not good, because there are too many irrelevant factors on the pad, so we don’t use this.
1. For labels, fill with the nearest neighbor’s value:

tf.image.resize_nearest_neighbor(
        tf.expand_dims(label, 0),
        new_dim,
        align_corners=True)

2. Apply to images, using bilinear interpolation

tf.image.resize_bilinear(
      tf.expand_dims(image, 0),
      new_dim,
      align_corners=True)

Because both of the above methods require four dimensions, expand_dim
Capital water. But I’m actually writing code for myself for easy review, funny.

Tensorflow image random_ There seems to be something wrong with the shift function

Environment: Python 3.6, TensorFlow 1.15
Hope for augmentation, using tf keras. Preprocessing. Image. Random_shift function
Unsupported operand type(s) for *: ‘Dimension’ and ‘float’
Line 446 in tensor_shape.py is return self * other
Return self * other –> return self * other –> return self * int(other)
The random_shift function does not work, and the image does not have any shift effects
As a last resort, change the design function to achieve random_shift function function
According to my requirements, first of all, two random numbers are generated by TF.Random. Uniform, which are used as the translation pixels of the width and height dimensions of the image. Then use tf.roll to translate the image in two dimensions of height and width. The code is as follows:

shift_num = tf.random.uniform(shape=[2], minval=-img_height/2, maxval=img_height/2, dtype=tf.dtype.int32)

img_out = tf.roll(img_in, shift=shift_num, axis=[1,2])

This code does what I need the random_shift function to do, but it’s slow
over

To solve the problem of importerror when installing tensorflow: libcublas.so . 10.0, failed to load the native tensorflow runtime error

Recently installing TensorFlow-GPU on a service has been experiencing the following error:
ImporError: libcublas.so.10.0: Cannot open shared object file: No such file or directory
iled to load the native TensorFlow Runtime.
I>Error: libcublas.so. Different TensorFlow-GPU versions correspond to different CUDA and CUDNN versions. How do I view CUDA and CUDNN versions?

DA 8.0→ CUDNN V6.0/CUDA 8.0→ CUDNN V6.0/CUDA 9.0→ CUDNN V7.0.5
T>rFlow 1.6/1.5 CUDA 9.0 and 1.3/1.3 CUDA 8.0.
TensorFlow 1.6/1.5 CUDA 9.0
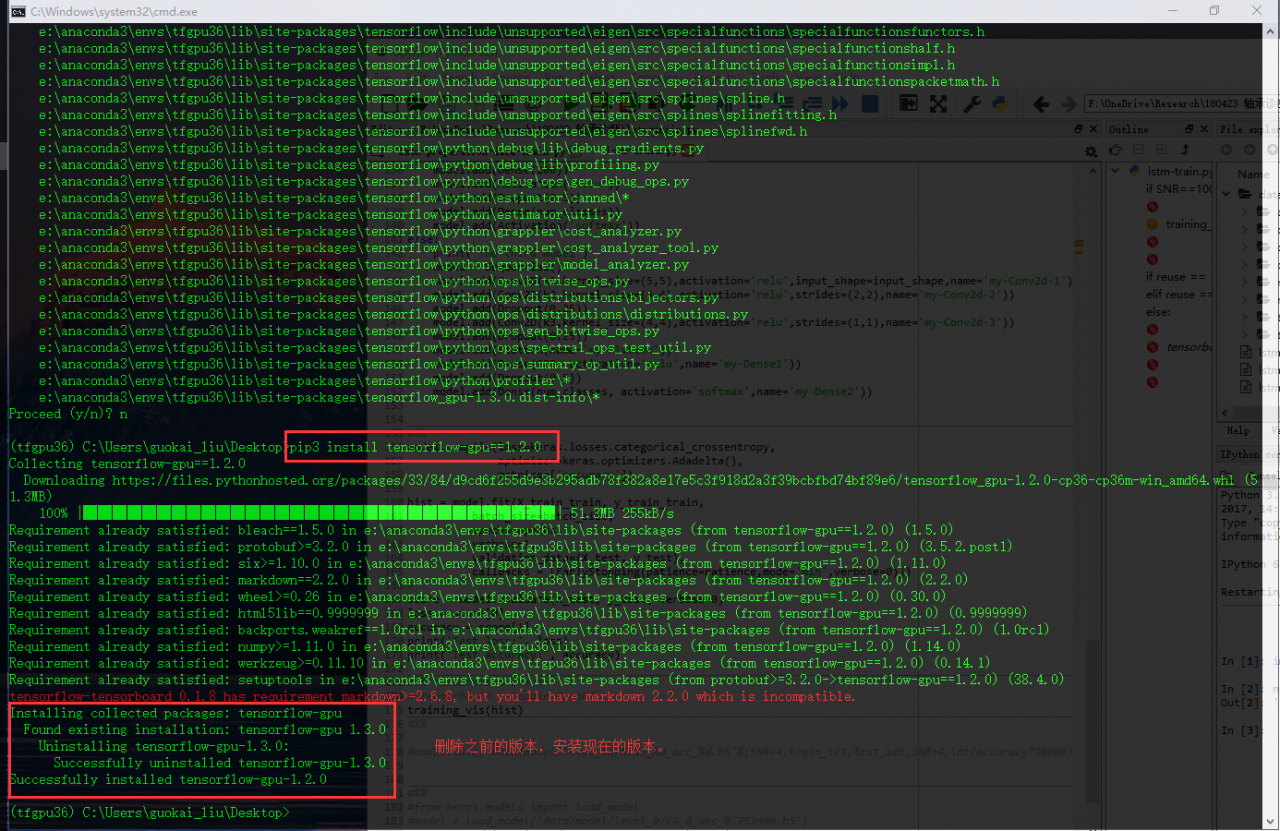
As a result, specify TensorFlow – GPU version to reinstall (Note: you don’t need to install TF before uninstalling it, you can PIP directly because it will automatically detect the installed TF and uninstall it).

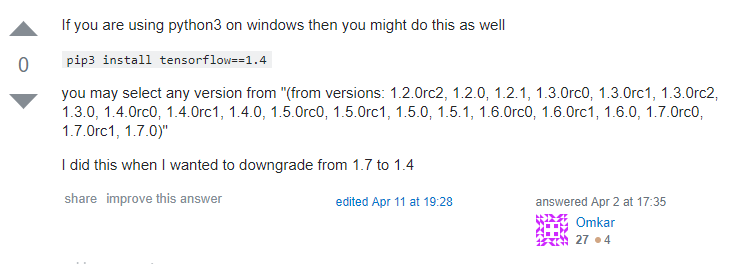
pip install  tensorflow-gpu==1.5

Note: it is best to use mirror image such as Tsinghua mirror, the speed difference is not a little bit.

pip install -i https://pypi.tuna.tsinghua.edu.cn/simple some-package

You can test it once it’s installed

import tensorflow as tf
sess = tf.Session(config=tf.ConfigProto(log_device_placement=True))

Displaying large section of relevant information indicates successful installation!

Problem solving: importerror: libcublas.so .9.0: cannot open shared object file: No such file

ImporError: LibCublas.so.9.0: Cannot open shared object file: No such file: ImporError: LibCublas.so.9.0: Cannot open shared object file: No such file: ImporError: LibCublas.so.
This means the CUDA version is not compatible with TF.
I’m running in a virtual environment created by Conda. Python =3.6. CUDA version = 9.2 in basic environment.
When TensorFlow was configured, it was TF1.8 installed as CUDA 9.2. How could it not be compatible?So I’m n V c minus V.

So I was curious to create a new virtual environment and install TensorFlow =1.8.

conda install tensorflow-gpu==1.8


See the error and think TF1.8 is really not compatible with CUDA10 + lol, I need to confirm the CUDA driver version.

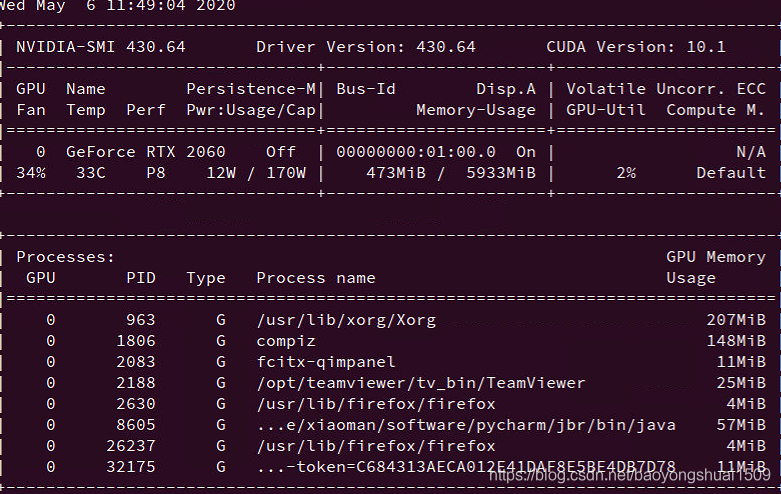
nvidia-smi


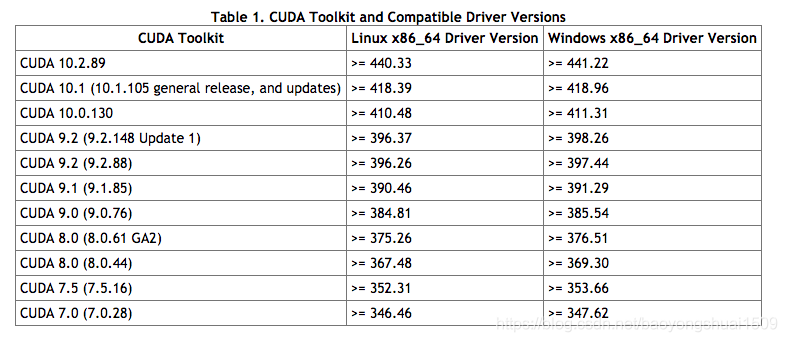
The original CUDA driver is 10.1, the CUDA version and the driver version are not consistent, embarrassing. It turned out that the graphics driver on the new computer was too new. Please refer to the corresponding relationship on Nvidia’s website:

The CUDA driver is 430.64, but the CUDA version=9.2 is configured. Well, upgrade the CUDA version and the problem is solved. Of course TF will be upgraded to 2.0+.

CONDA 3090 install tenslow GPU report error importerror: libcublas.so .9.0: cannot open shared object file

ImporError: libcublas.so.9.0: Cannot open shared object file: No such file or directory
The complete installation of TensofLow2.x creates the environment to go into the environment and install the TensorFlow test environment

background
Graphics card 3090 GeForce RTX driver version 455.23.04 CUDA version 11.1
why
cudatoolkit/ code>> is not installed in the Conda environment, use the install command

conda install cudatoolkit

A complete installation of tensoflow2.x
Create an environment

conda create -n tensorflow-gpu python=3.8 cudatoolkit

Into the environment

conda activate tensorflow-gpu

Install tensorflow

pip install tensorflow -i https://pypi.tuna.tsinghua.edu.cn/simple

The test environment

import tensorflow as tf
tf.test.is_gpu_available()

Solve the problem of red wavy line in pychar when importing module written by oneself

Solve the problem of red wavy line in the module imported from Pycharm
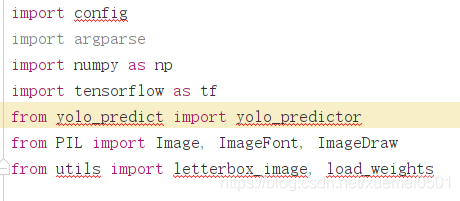
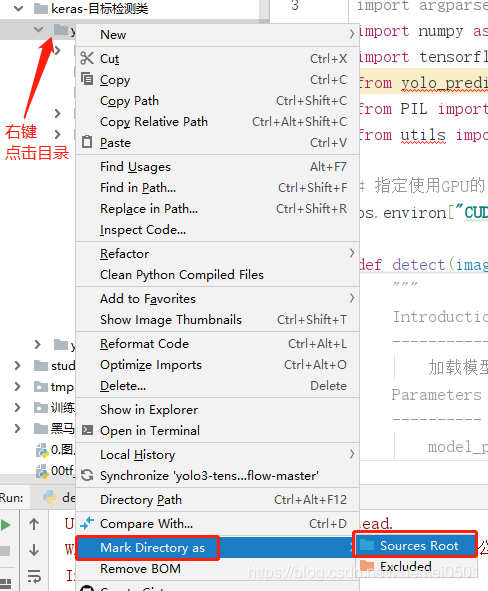
A red wavy line appears in the module imported by myself in Pycharm, as shown in the figure below. However, it can operate normally. The main problem is the file directory, and the module simply imported by import cannot find the path.

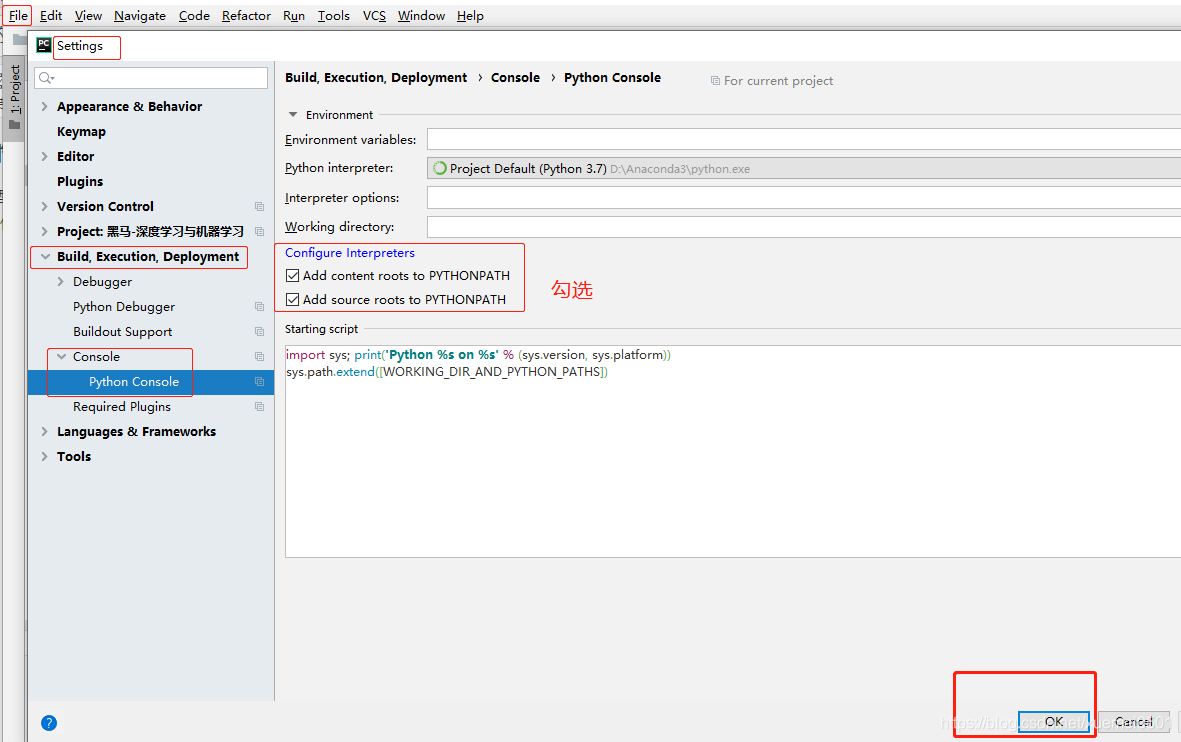
if you don’t feel comfortable with the red wavy line, you can also choose to solve this problem. The next two steps will be completed.
step 1:
enter Settings, go to the Python Console under the Console, check the option “Add source roots to PYTHONPAT”, and then click OK
. Step 2:
right click on the Directory and select Mark Directory as in the popup menu bar, then continue to select Sources Root, and you will immediately see the red wavy line in the code has been automatically removed.

tf.one_ How to use hot ()

Tensorflow study notes
tf.one_hot
This paper only serves as a personal learning record, please refer to tensorFlow Chinese official website TF Chinese official website
Call format
tf.one_hot(indices, depth, on_value=None, off_value=None, axis=None, dtype=None, name=None)
Parameters that
Indices: Tensors of an index.
· depth: a scalar quantity defined in one_hot dimension
· on_value: a set of indices[j] = I (default: 1)
· off_value: a set of indices[j]! = I (default: 0)
· axis: axis to be filled (default: -1, a new innermost axis)
· dtype: the data type of the output tensor.
· name: the name of the operation (optional).
The output
A one_hot tensor
A possible mistake

    TypeError
    whether on_value or off_value does not match dtype. TypeError
    whether on_value and off_value do not match each other

prompt

    indices location value is on_value, while the other location is off_value. The on_value and OFF_value data types must match. If dType has a value, they must take the same value as the type displayed by DTYPE.
    if on_value has no value, the default value is 1, and the output is dtype.
    if off_value has no value, the default value is 0, and the output is dtype.
    if the indices have N dimensions, the output is N+1. If the indices are scalars, the output is a vector with a length of depth. If the indices are tensor with features, the output will be:
    . If the indices are indices with batch size [batch, features], the output will be:
    . If the indices are RaggedTensor, the axis must be positive and form an axis which is hard to form. The output is equivalent to the output of one_hot applied with a value of an irregular shape, and a new irregular shape is generated from the result.
    if dtype has no value, it will try to assume that the data type is on_value or off_value if one or both pass. If on_value, off_value, dtype have no value, dtpye will default to be tf.float32.
    ** note: if output of non-numeric types (such as tf.string, tf.bool, etc), on_value, off_value all need to have a value.

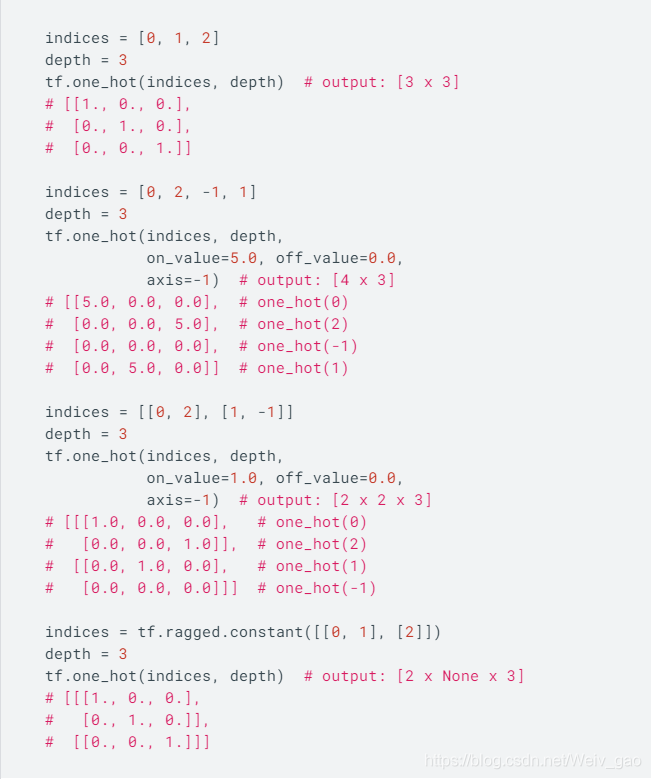
example