Python installed plugin appear error: Microsoft Visual c + + 14.0 is required. The Get it with the “Microsoft Visual c + + Build Tools” : https://visualstudio.microsoft.com/downloads/
Solution:
according to the given url https://visualstudio.microsoft.com/downloads/, download and install the software.
or follow the software I downloaded visualcppbuildtools_full.rar, and install it. Once installed, you don’t have to restart it.
Tag Archives: python
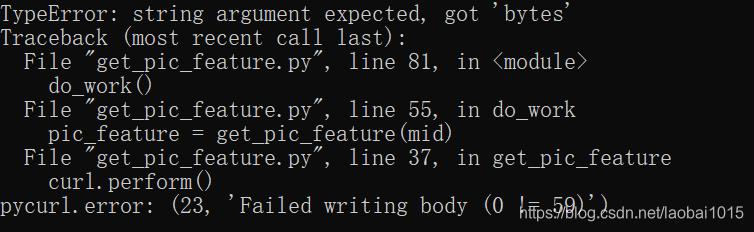
curl.perform() pycurl.error: (23, ‘Failed writing body (0 != 59)’)
The introduction of the pycurl and StringIO modules when using python3.7 is prone to the above errors
The solution for importing the StringIO module:
StringIO module can only be imported in python2, directly
But python3, STringIO, and cStringIO modules are gone, and to use them you have to import the IO modules:
The solution for importing the StringIO module:
StringIO module can only be imported in python2, directly
from StringIO import StringIO But python3, STringIO, and cStringIO modules are gone, and to use them you have to import the IO modules:
from io import StringIO
dot_data = StringIO()
StringIO can also be used by importing the Six module:
from six import StringIOor
from sklearn.externals.six import StringIO Provide a method that is both Python2 and Python3 compatible:
try:
    from StringIO import StringIO
except ImportError:
    from io import StringIO
This solves the problem of importing the StringIO module in different Python versions.
But Pycurl is also influenced by the Python version when it encodes strings, as follows:
Write instead
Under python 2, you can use StringIO object:
import pycurl
from StringIO import StringIO
c = pycurl.Curl()
c.setopt(c.URL,'http://pycurl.io')
buffer = StringIO()
c.setopt(c.WRITEDATA, buffer)
# Same result if using WRITEFUNCTION instead:
#c.setopt(c.WRITEFUNCTION, buffer.write)
c.perform()
# ok
Under python 3, when pycurl USES the bytes parameter, the response must be written to the BytesIO object:
import pycurl
from io import BytesIO
c = pycurl.Curl()
c.setopt(c.URL,'http://pycurl.io')
buffer = BytesIO()
c.setopt(c.WRITEDATA, buffer)
# Same result if using WRITEFUNCTION instead:
#c.setopt(c.WRITEFUNCTION, buffer.write)
c.perform()
# ok
Trying to use the StringIO object will produce an error: :
import pycurl
from io import StringIO
c = pycurl.Curl()
c.setopt(c.URL,'http://pycurl.io')
buffer = StringIO()
c.setopt(c.WRITEDATA, buffer)
c.perform()
The error message is as follows:
The following idiom is available for code that requires compatibility with Python2 and Python3:
import pycurl
try:
    # Python 3
    from io import BytesIO
except ImportError:
    # Python 2
    from StringIO import StringIO as BytesIO
c = pycurl.Curl()
c.setopt(c.URL,'http://pycurl.io')
buffer = BytesIO()
c.setopt(c.WRITEDATA, buffer)
c.perform()
# ok
# Decode the response body:
string_body = buffer.getvalue().decode('utf-8')
matplotlib error – no module named tkinter
The article directories
1 Error report 2 solution
1 error
Try using the Matplotlib package on Linux via Pycharm IDE. When I run this code:
from matplotlib import pyplot
Result error:
ImportError: No module named 'tkinter'
2 Solutions
Ubuntu’s system:
sudo apt-get install python3-tk
Or, if you are a centos server:
sudo yum install python36u-tkinter.x86_64
Unloading and installation of node and NPM of Vue Foundation
Problem background: Node and NPM have been installed on the original MAC computer, but in the process of a misoperation, it was found that the nPM-V command could not be typed out, prompting the Command not Found. Tamping many times, finally decisive after all kinds of search uninstall clean and then reinstall all.
Problems:
1 node-v can have a version prompt, npm-v does not have a version prompt, and the output NPM command not found
2 brew install node can have a version prompt, brew install NPM prompt error.
Solutions:
(1) Delete old files: delete them according to the prompts, or delete them directly (operation can be carried out in access)
sudo npm uninstall npm -g
sudo rm -rf /usr/local/lib/node /usr/local/lib/node_modules /var/db/receipts/org.nodejs.*
sudo rm -rf /usr/local/include/node /Users/$USER/.npm
sudo rm /usr/local/bin/node
sudo rm /usr/local/share/man/man1/node.1
sudo rm /usr/local/lib/dtrace/node.d
Confirm whether to uninstall:
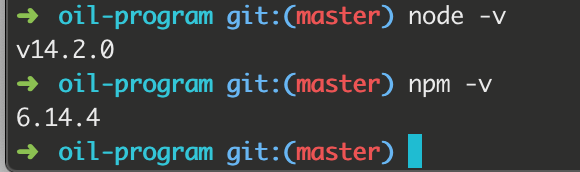
node -v
npm -v
(2) Reinstall Node
brew install node
(3) Associate node with the soft link
brew link node
At this time, we may have the following results:
Linking /usr/local/Cellar/node/11.2.0...
Error: Could not symlink include/node/common.gypi
Target /usr/local/include/node/common.gypi
already exists. You may want to remove it:
  rm '/usr/local/include/node/common.gypi'

To force the link and overwrite all conflicting files:
  brew link --overwrite node

To list all files that would be deleted:
  brew link --overwrite --dry-run node
localhost:wkdir meng$ brew link --overwrite node
Linking /usr/local/Cellar/node/11.2.0...
Error: Could not symlink include/node/common.gypi
/usr/local/include/node is not writable.
(4) Then we will enforce it according to the prompts:
brew link --overwrite --dry-run node
Enforcement may require us to delete some of the previous files related to Node, as shown below
Would remove:
/usr/local/include/node/common.gypi
/usr/local/include/node/config.gypi
/usr/local/include/node/libplatform/libplatform-export.h
/usr/local/include/node/libplatform/libplatform.h
/usr/local/include/node/libplatform/v8-tracing.h
(5) Continue to delete the above file and run it again
brew link --overwrite node
Install the NPM
sudo npm install --registry=https://registry.npm.taobao.org
Check node and NPM again
node -v
npm -v
Results:
Note: There may be a variety of problems. When there is a problem, try baidu, and then go on to solve the next problem.
For more personal tutorials, please visit the personal homepage:
Github builds personal blog (2019 update, pro test)
.https://blog.csdn.net/xudailong_blog/article/details/78762262
The public no. :

solve events.js:174 Throw er; / / error reported by unhandled ‘error’ event
This problem is very simple ~, the port is occupied, the printer must output this error message, you are currently running to kill the port to try again.
I wish you a happy writing bug!
Raspberry pie 4B uses adafruit_ Pca9685 report error ioerror: [errno 121] remote I / O error solution
First, make sure that python2 or python3’s Adafruit_PCA9685 library has been downloaded. Then understand that the reason for this error is that Adafruit_PCA9685 could not find the external hardware, so think that you did not open I2C permissions (of course, make sure to open I2C permissions first), and then the error is usually in the following format
File "simpletest.py", line 17, in <module>
    pwm = Adafruit_PCA9685.PCA9685()
  File "/usr/local/lib/python3.7/dist-packages/Adafruit_PCA9685/PCA9685.py", line 81, in __init__
    self._device.write8(MODE1, mode1)
  File "/usr/local/lib/python3.7/dist-packages/Adafruit_GPIO/I2C.py", line 114, in write8
    self._bus.write_byte_data(self._address, register, value)
  File "/usr/local/lib/python3.7/dist-packages/Adafruit_PureIO/smbus.py", line 256, in write_byte_data
    self._device.write(data)
IOError: [Errno 121] Remote I/O error
At this time we only need to click on the File "/ usr/local/lib/python3.7/dist - packages/Adafruit_PCA9685/PCA9685 py", line 81, in __init__ self. _device. Write8 (MODE1, MODE1) to enter to PCA9685. Py files, the need to look at the red circle place address, use the command line. 
Open the command line for raspberry PI Type B input
sudo i2cdetect -y 1
Type A is A change to 0
appears 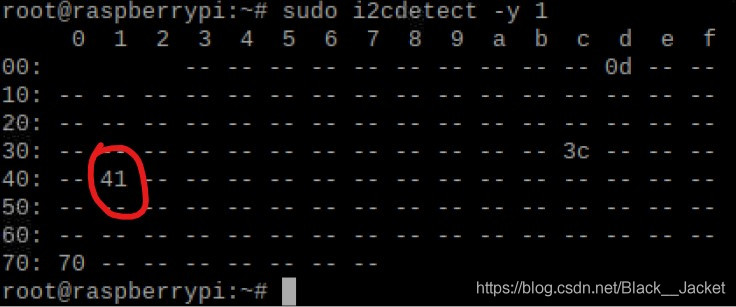
the 70 is gm's address, 41 is our module address some people is 20, or 40, and 0 d, and 3 c is my another equipment (raspberries pie intelligent housekeeper), if only to connect A device is good, look good, let's modify. Just open the PCA9685 py files address 0 x41 or 0 x40, etc., as the case may be, and then save the changes, then you will find 
no permissions, so you can open A command line input
su
Enter the password, go to root, copy the address of pCA9685.py just now (mine is 0x41), type CD and address, paste it to the command line, press enter, and go to that directory.
if you are a python3.7 user you can use this one directly
cd /usr/local/lib/python3.7/dist-packages/Adafruit_PCA9685/
Py sudo chmod 777 pca9685.py
modify permission
then edit the pca9685.py file just now, modify the PCA9685_ADDRESS in it to the address you found by using sudo i2cdetect -y 1.
then run it and try it!
Syntax error: unexpected character after line continuation character
print(‘ b ‘\xe5\x9c\ x93\xe7\x8e\ xe6\x97\xb6’. Decode ‘GBK’)
SyntaxError:
SyntaxError: unexpected character after line character
Modify it:
Print (b ‘\xe5\x9c\xa3\ x98\x93\xe7\x8e\ xe6\x97\xb6’. Decode ‘GBK’)
passed.
turned out to be the result of the addition of an extra pair of ‘s to b’ \xe5\x9c\ xe6\ x93\xe7\x8e\ xe6\x97\xb6 ‘.
Python: What’s Virtualenv
The Python virtualenv
Install VirtualEnv2.1 Install Virtualenv2.2 Create virtual Environment 2.3 Activate/exit virtual Environment
3. TIps
1. What is VirtualEnv
Virtualenv is short for Virtual Environment, meaning a virtual environment.
so what’s good about python using it?Some!
suppose I did A project A before, using Django2.2. Now that there is a new version of Django3.1, I want to use the latest version of Django. The problem is that I installed the new version of Django, and project A using the old version may not run smoothly.
this is where virtualenv comes in. It can create multiple virtual environments simultaneously, allowing multiple versions of Django to exist on a single computer.
2. Install VirtualEnv
2.1 install virtualenv
pip install virtualenv
2.2 Create a virtual environment
Create a virtual environment.
command format:
virtualenv+ environment name
virtualenv test_env1
virtualenv test_env2
2.3 Activate/exit the virtual environment
Enter the virtual environment, and then you can install the package in the virtual environment.
Win:
	Run\Scripts\activate access a virtual environment
	Run\Scripts\deactivate exit a virtual environment
3. TIps
There is no package installed in the virtual environment and a re-pip is required. The Python interpreter is in the /Scripts/ Python.exe directory.
The lenet model trained by Python failed to predict its own handwritten pictures
LeNet is trained with MNIST’s training set, and the code is not shown here.
directly loads the saved model
lenet = torch.load('resourses/trained_model/LeNet_trained.pkl')
Attached to the test code
print("Testing")
# Define conversion operations
# Read in the test image and transfer it to the model.
test_images = Image.open('resourses/LeNet_test/0.png')
img_to_tensor = transforms.Compose([
    transforms.Resize(32),
    transforms.Grayscale(num_output_channels=1),
    transforms.ToTensor(),
    transforms.Normalize([0.5], [0.5])])
input_images = img_to_tensor(test_images).unsqueeze(0)
# Move models and data to cuda for computation if cuda is available
USE_CUDA = torch.cuda.is_available()
if USE_CUDA:
    input_images = input_images.cuda()
    lenet = lenet.cuda()
output_data = lenet(input_images)
# Print test information
test_labels = torch.max(output_data, 1)[1].data.cpu().numpy().squeeze(0)
print(output_data)
print(test_labels)
At present, there is no correct rate according to my own picture, and I can’t find any reason. At present, the frequency of output 8 is very high.
later looked up relevant information, for the following reasons: </mark b>
-
- parsed MNIST data set, you will find that the pictures in the data set are white words on a black background, such as:

-
- , but our custom test pictures are generally black words on a white background, such as:
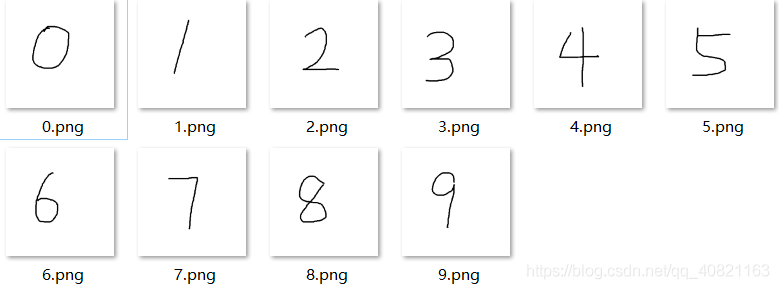
-
- , so I took the custom test pictures by pixel and then re-tested
- pixel reverse code is as follows:
from PIL import Image, ImageOps
image = Image.open('resourses/LeNet_test/0.png')
image_invert = ImageOps.invert(image)
image_invert.show()
After pixel reversal, the accuracy rate of the test reaches 50-60 percent, but the accuracy rate is still not ideal. Please refer to the following reasons
- MNIST data set contains the handwriting of foreigners. The handwriting style and habits of foreigners are slightly different from those of Chinese people, which is also a major factor affecting the accuracy of the test. But the owner of the building has not tested the correct rate of the image test after modifying the font.
[Error resolution] paramiko.ssh_exception.SSHException: Error reading SSH protocol banner setting
Error message
In the morning, my colleague in the data group told me that there were several programs reporting errors. After checking the log, the error message was found:
paramiko.ssh_exception.SSHException: Error reading SSH protocol bannerAfter a search, it was revealed that the error was caused by the banner_TIMEOUT default setting being too short, only 15s.
Error analysis
See the transport code under Paramiko library. Py:
class Transport(threading.Thread, ClosingContextManager):
        self.banner_timeout = 15
        # how long (seconds) to wait for the handshake to finish after SSH
Reset the banner_TIMEOUT property value
Most of the methods on the Internet is to modify the source code, reinstall, feel a little trouble. I’m going to reset the properties in the code.
transport = paramiko.Transport((self.host, self.port))
print(transport.banner_timeout)
transport.banner_timeout = 30
print(transport.banner_timeout)
After testing, the two printed property values are different, indicating that the property is set successfully and the problem is solved.
Reproduced in: https://www.cnblogs.com/everfight/p/paramiko_ssh_exception.html
cannot import name ‘multiarray’
cannot import name ‘multiarray’
My solution: Uninstall Numpy and reinstall it
pip uninstall numpy
conda uninstall numpy
pip install numpy
My solution: Uninstall Numpy and reinstall it
pip uninstall numpy
conda uninstall numpy
pip install numpy
Solution to Error 400. The request has an invalid header name
I encountered this problem today, and then Searched baidu, Bing and Google. I saw many blogs that wrote about this problem. To be honest, it was not helpful at all, so I spent 2 hours to find the reason by myself. The reason for this error is very simple. The reason for this error is that the header part is wrong. 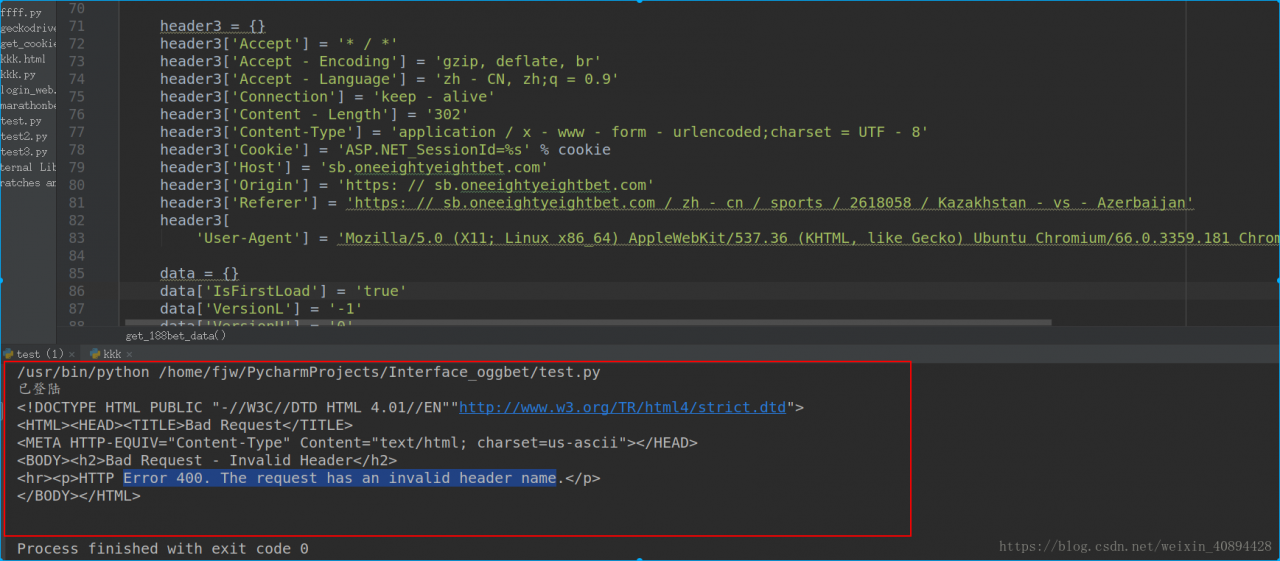 may be the direct cause of the error, as some browsers have different formats, which may lead to extra white space in the header information when you paste it into the code
I’m copying and pasting this piece of code when I add header information, is that okay?But if you look closely at the content-type part, isn’t there a lot of space?Just delete the Spaces and you’re done.
I modified
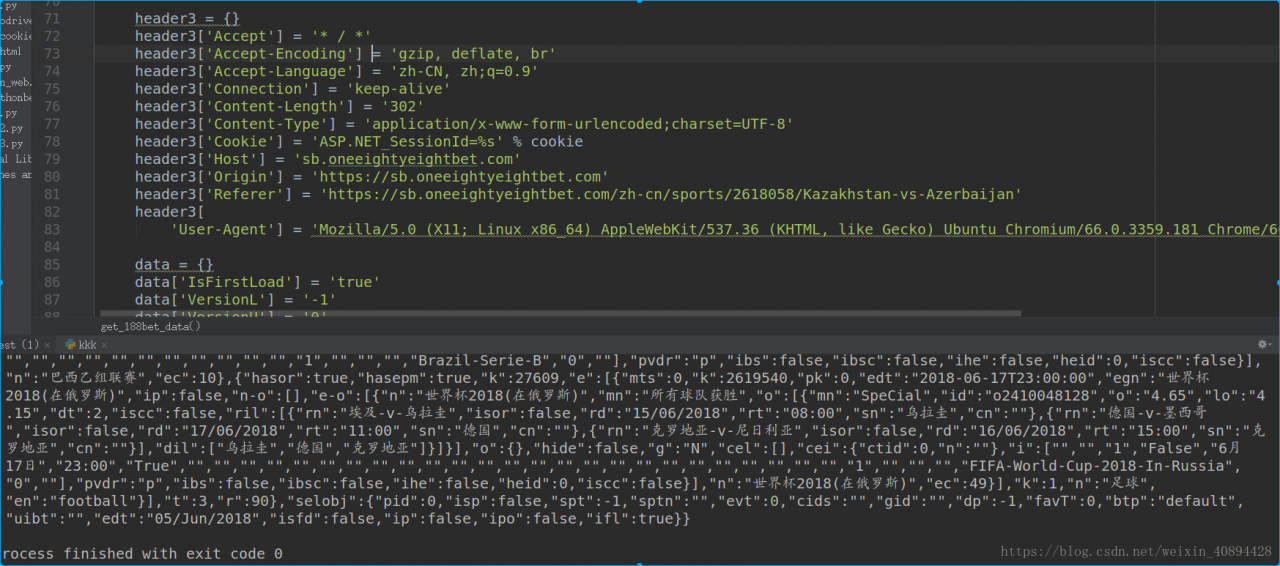
Crawl out of the data perfectly.
The first blog in my life, I hope you will pay more attention to me, I will continue to publish the blog about crawler in the future!!
may be the direct cause of the error, as some browsers have different formats, which may lead to extra white space in the header information when you paste it into the codeI’m copying and pasting this piece of code when I add header information, is that okay?But if you look closely at the content-type part, isn’t there a lot of space?Just delete the Spaces and you’re done.
I modified
Crawl out of the data perfectly.
The first blog in my life, I hope you will pay more attention to me, I will continue to publish the blog about crawler in the future!!