Tag Archives: linux system

[Solved] ansible Command Error: Error -5 while decompressing data: incomplete or truncated stream

1. Error message:

An error occurs when executing the ansible command

ERROR! Unexpected Exception, this is probably a bug: Error -5 while decompressing data: incomplete or truncated stream

The detailed error reports are as follows

[root@localhost tmp]# ansible -h
ERROR! Unexpected Exception, this is probably a bug: Error -5 while decompressing data: incomplete or truncated stream
the full traceback was:

Traceback (most recent call last):
  File "/usr/bin/ansible", line 97, in <module>
    mycli = getattr(__import__("ansible.cli.%s" % sub, fromlist=[myclass]), myclass)
  File "/usr/lib/python2.7/site-packages/ansible/cli/__init__.py", line 38, in <module>
    from ansible.inventory.manager import InventoryManager
  File "/usr/lib/python2.7/site-packages/ansible/inventory/manager.py", line 36, in <module>
    from ansible.plugins.loader import inventory_loader
  File "/usr/lib/python2.7/site-packages/ansible/plugins/loader.py", line 22, in <module>
    from ansible.parsing.utils.yaml import from_yaml
  File "/usr/lib/python2.7/site-packages/ansible/parsing/utils/yaml.py", line 17, in <module>
    from ansible.parsing.yaml.loader import AnsibleLoader
  File "/usr/lib/python2.7/site-packages/ansible/parsing/yaml/loader.py", line 30, in <module>
    from ansible.parsing.yaml.constructor import AnsibleConstructor
  File "/usr/lib/python2.7/site-packages/ansible/parsing/yaml/constructor.py", line 29, in <module>
    from ansible.parsing.vault import VaultLib
  File "/usr/lib/python2.7/site-packages/ansible/parsing/vault/__init__.py", line 42, in <module>
    from cryptography.hazmat.backends import default_backend
  File "/usr/lib64/python2.7/site-packages/cryptography/hazmat/backends/__init__.py", line 7, in <module>
    import pkg_resources
  File "build/bdist.linux-x86_64/egg/pkg_resources/__init__.py", line 70, in <module>
  File "build/bdist.linux-x86_64/egg/pkg_resources/extern/__init__.py", line 43, in load_module
    __import__(extant)
error: Error -5 while decompressing data: incomplete or truncated stream

2. Background of error reporting

When installing setuptools inansible-playbook, it terminated unexpectedly, and then execute ansible command to report this error,


3. Solution:

Reset setuptools-33.1.1.zip package decompression and installation:

cd setuptools-33.1.1  

python setup.py install

It is normal to try the ansible command after execution. Some friends may not be setuptools, or they may not execute after installing into a package. Please try it yourself.

[solved] runtimeerror: module compiled against API version 0xc but this version of numpy is 0xb

This article records the solutions for bloggers to report errors in Import torch in Python. Updated on March 20, 2019.

This error is due to the current version of numpy does not meet the requirements.

First, run on the terminal:

python
import numpy
numpy.version

View the current version of numpy. Run after

pip3 install –upgrade numpy

Just update the numpy version. If it’s python2, use PIP .

More, welcome to the planet discussion.

Building virtual machine environment based on kvm-qemu under ubuntu12.10 (12)

In addition to the initial mounting of the optical drive in the definition file of the virtual machine, Libvirt also has a dynamic platter mount method, which USES the Attach -device command in the virsh command. The format of this command is as follows:

dev@devhost:/opt/vm/xpvm1$sudo virsh attach-device < domain-name> filename

Where filename is a file defined in XML format (we’ll call it Disk.xml) :

< Disk type = “file” device = “cdrom” & gt; < The source file = “/ opt/vm/drivers. Iso/& gt;” < Target HDC dev = “”/& gt; < readonly/> < /disk>

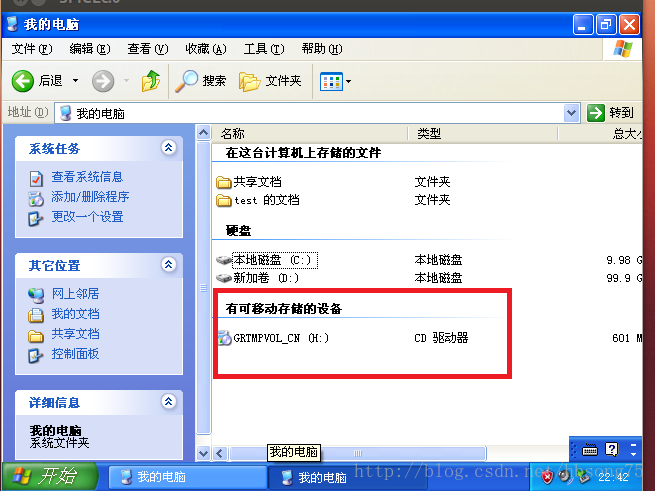
The virtual machine was originally mounted ona CD-ROM called Windows_xp_professional_sp3_x89.ISO:

< domain type=’kvm’> & lt; name> XP_VM< /name> & lt; uuid> 91f15b08-e115-4016-a522-b550ff593af9< /uuid> & lt; memory> 1024000< /memory> & lt; currentMemory> 1024000< /currentMemory> & lt; vcpu> 1< /vcpu> & lt; os> & lt; Type the arch = ‘x86_64 machine =’ PC ‘& gt; hvm< /type> & lt; boot dev=’hd’/> & lt; boot dev=’cdrom’/> & lt; Bootmenu enable = ‘yes’/& gt; & lt; /os> & lt; features> & lt; acpi/> & lt; apic/> & lt; pae/> & lt; /features> & lt; cpu> & lt; The topology sockets = ‘1’ cores = ‘1’ threads = ‘1’/& gt; & lt; /cpu> & lt; = ‘localtime’ clock offset/& gt; & lt; on_poweroff> destroy< /on_poweroff> & lt; on_reboot> restart< /on_reboot> & lt; on_crash> restart< /on_crash> & lt; devices> & lt; emulator> /usr/bin/qemu-system-x86_64< /emulator> & lt; = ‘disk disk type =’ file ‘device’ & gt; & lt; Qemu driver name = ‘ ‘type =’ qcow2 ‘/ & gt; & lt; The source file = ‘/ opt/vm/xpvm1 xp_c. Img’ lock = ‘exclusive’/& gt; & lt; Target dev = ‘hda bus =’ ide ‘/ & gt; & lt; /disk> & lt; = ‘disk disk type =’ file ‘device’ & gt; & lt; Qemu driver name = ‘ ‘type =’ qcow2 ‘/ & gt; & lt; The source file = ‘/ opt/vm/xpvm1 xp_d. Img’ lock = ‘exclusive’/& gt; & lt; target dev=’hdb’ bus=’ide’/> & lt; /disk> & lt; = ‘cdrom disk type =’ file ‘device’ & gt; & lt; source file=’/opt/vm/windows_xp_professional_sp3_x86.iso’/> & lt; target dev=’hdc’/> & lt; readonly/> & lt; /disk> & lt; The channel type = ‘spicevmc & gt; & lt; Target type = ‘virtio’ name = ‘com. Redhat. Spice. 0’/& gt; & lt; Alias name = ‘virserial – channel1’/& gt; & lt; /channel> & lt; Interface type = ‘bridge’ & gt; & lt; MAC address = ’52:54:00:7 b: a8: d8’/& gt; & lt; The source bridge = ‘virbr0/& gt; & lt; = ‘vnet1’ target dev/& gt; & lt; The model type = ‘virtio/& gt; & lt; /interface> & lt; Input type = ‘tablet’ bus = ‘usb’/& gt; & lt; Graphics type=’spice’ port=’4000′ autoport=’no’ listen=’0.0.0.0′> & lt; Listen type = ‘address’ address = ‘0.0.0.0’/& gt; & lt; Agent_mouse mode = ‘off’/& gt; & lt; /graphics> & lt; Memballoon model = ‘virtio & gt; & lt; alias name=’balloon0’/> & lt; /memballoon> & lt; Sound model = ‘ac97 & gt; & lt; Address type=’ PCI ‘domain=’0x0000′ bus=’0x00′ slot=’0x04’ function=’0x0’/> & lt; /sound> & lt; video> & lt; The model type = ‘QXL vram =’ 65536 ‘heads =’ 1 ‘/ & gt; & lt; /video> & lt; /devices> & lt; qemu:commandline> & lt; Qemu: arg value = “-” CPU/& gt; & lt; Qemu: arg value = “kvm64″/& gt; & lt; /qemu:commandline> < /domain>

 
After installing the system, what you see in the virtual machine is:

 
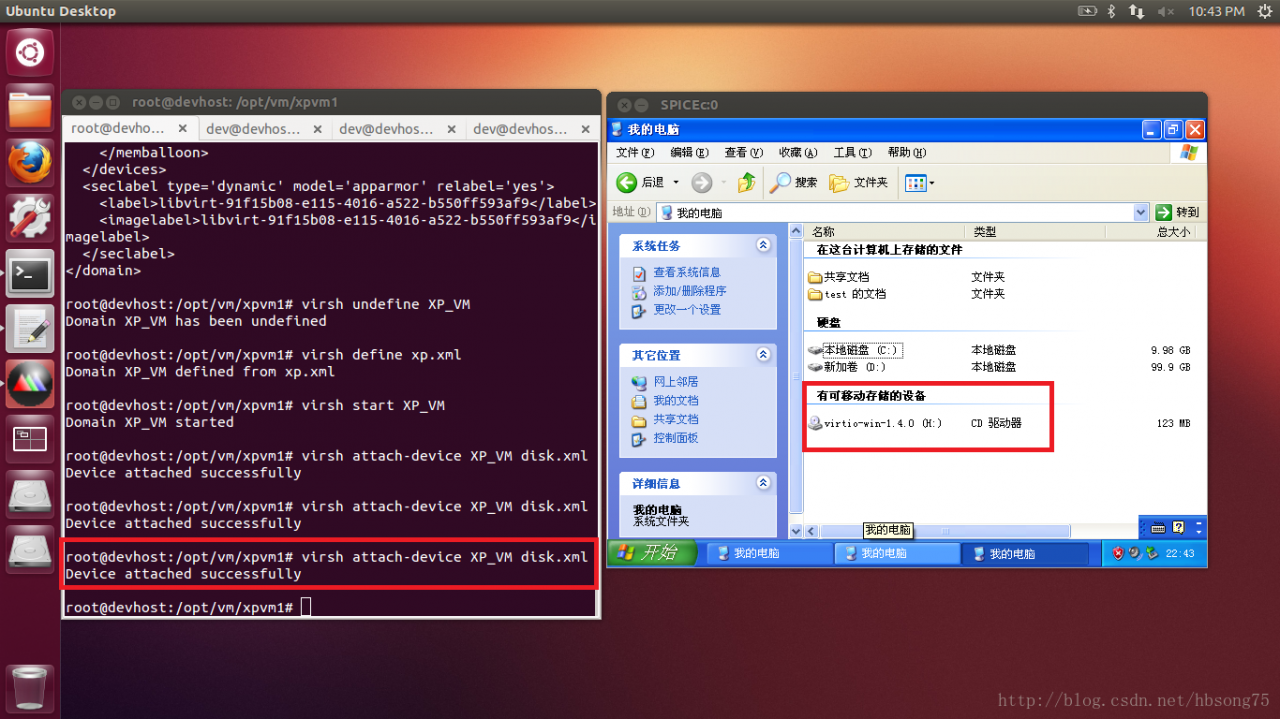
Instead of re-closing and defining a new disc file, we can change the disc using the Virsh Attach – Device command:
 

dev@devhost:/opt/vm/xpvm1$sudo virsh attaching -device XP_VM disk.xml


The advantage of doing this is that in some cases we can achieve the effect of a hot plug disc without having to restart the virtual machine.
Note: It should be noted that, after testing, there must first be an initial optical device in the defined XML, otherwise the execution of another optical device will fail: internal Error No device with bus ‘ide’ and target ‘HDC’ reported error.
That is, this is actually a swap, not a dynamic mount, and the cd-ROM device itself must be defined in XML before the virtual machine can be started.
 

Mount error (22): invalid argument refer to the mount.cifs (8) manual page (

View samba version is 4:
[root@redhat_192.168.0.12 16:08:07 ~]# rpm-qa samba
samb-4.9.1-6. El7.x86_64
For a long time, baidu has been mount command plus various parameters, confirmed that the user and password are no problem, directory permission is also given, finally is to use the following method to solve.
Add the parameter SEC = NTLMSSP to the mount configuration of /etc/fstab as follows:
//hahaha.com/devops/MNT /dev/cifs username=kenji,password=123456, SEC = NTLMSSP,rw,_netdev 0 0
Then save the configuration and rerun mount -a, and the mount succeeds

Stop: job failed while stopping

system: ubuntu14.04


computer in the program, after dinner came back to find that the computer crashed, stay in the login interface, basically unable to move the mouse.
do not want to restart, otherwise to reprocess the program, too much trouble, baidu do not restart under the way into the system.

also press CTRL + Alt +F1 to enter the tty interface, enter the top command, view those processes with large memory footprint, and find those unimportant processes that can be closed. The first column is the process number PID. After determining the process to be killed, type sudo kill pid to close the process. After reducing the memory footprint, you can basically enter the system without accident.

after entering the system, I found the network icon in the upper right corner of my system, but it was an empty fan. This was the first time I encountered such a situation, that is, I plugged in the network cable, but the computer neither showed wired nor wireless, so there should be something wrong with the network module. Want to restart the computer should be able to solve, but still do not want to restart based on that reason just now, do not have, that continues to do, hence again Baidu. Baidu to several methods, this time for my situation is useless, first record here, other encountered this problem may be useful. Of course, my problem was solved in the end.

The first method that

looks up. Sudo /etc/init.d/networking restart

prompt

start: Job is already running: networking

indicate that the network service is running, but can’t normally closed
then baidu, instructed to check the error log information
sudo tail -f/var/log/upstart/networking. The log

Stopping or restarting the networking job is not supported.
Use ifdown & ifup to reconfigure desired interface.
Stopping or restarting the networking job is not supported.
Use ifdown & ifup to reconfigure desired interface.
Stopping or restarting the networking job is not supported.
Use ifdown & ifup to reconfigure desired interface.
Stopping or restarting the networking job is not supported.
Use ifdown & ifup to reconfigure desired interface.

according to the log, continue:
sudo ifdown eth0 & & ifup eth0

fails again:

ifdown: interface eth0 not configured
Ignoring unknown interface eth0=eth0.

then tried the first command with a lucky heart, but again it failed:
sudo /etc/init.d/networking restart

Various commands tried during

:

ifconfig eth0 down
ifconfig eth0 up

finally come to think of it, finishing before an ubuntu system under some of the problems of notes, found after watching, try the following command:

sudo NetworkManager restart

doesn’t solve the problem, but the hint is useful to me:

NetworkManager is running (pid 1082)

since there is a problem shutting down the network service normally, why don’t I just kill the process and start the network service?So, keep trying:

sudo kill 1082
sudo NetworkManager restart

now prompt:

NetworkManager is running (pid 30417)

can see that the process number has changed, indicating that the network service restart was successful.
then found that the network fault has been lifted, you can access the Internet normally ~~~
hope to solve your problems.


above, welcome to exchange.

Python — a solution to [error 24: too many open files] under Ubuntu


in my last blog, I mentioned that when I used multithreading + coroutine crawler to grab data, when my coroutine number × thread number was very large, it would prompt [Error 24: too many open files] and a series of other errors. This blog is a solution to this problem.


Why does

report this error?You only have a few files open?
this should be the first reaction of most people. When I met this error was also very meng, then wanted to think, it should be me every collaborators process to obtain access to the file handle, so even though you only took up to save data to a file, but when the program runs, there may be many threads or processes have the file handle, the program looks like opened a lot of files.
so the only way to deal with this situation is to change the system default maximum number of files.


Under

ubuntu, you can enter ulimit-n in the terminal to see the current system default maximum number of files, which is usually 1024 by default. Obviously, this value is small for the crawler.
there are two ways to change this default value. Both methods have worked on different machines. The first is simple, but it doesn’t guarantee success. If the first fails, try the second, and you’ll basically solve the problem.


the first method:
directly in the terminal input: ulimit -n 10000
I tried this on my own computer without success, only on the server.


the second method:
input in terminal sudo vim/etc/security/limits the conf to open the file, to the end of the file, the keyboard I insert content:

* soft nofile 10000
* hard nofile 10000

after the above two lines have been written, press Esc to exit edit mode, then press shift and at the same time; Key, type wq! save the file and exit. Then log out and log in again. If you put ulimit -n in the terminal you will get the value you just set.
Windows has not tried, recently rarely logged in Windows, Windows do not know whether there will be such a problem, if encountered, the principle should be the same, according to this idea to find the answer should be able to solve.


above. Welcome to exchange.