Tag Archives: ffmpeg

Ffmpeg: How to Solve error initializing filter ‘gltransition’

1: After installing ffmpeg, check whether to install ffmpeg

Implementation: ffmpeg

Here’s the explanation. No problem

root@hroot-virtual-machine:~/ffmpeg-4.2.2# ffmpeg
ffmpeg version 4.2.2 Copyright (c) 2000-2019 the FFmpeg developers
  built with gcc 9 (Ubuntu 9.3.0-17ubuntu1~20.04)
  configuration: --enable-libx264 --enable-libx265 --enable-libvpx --enable-libfdk-aac --enable-libmp3lame --enable-libopus --enable-nonfree --enable-gpl --enable-opengl --enable-filter=gltransition --extra-libs='-lGLEW -lglfw -ldl'
  libavutil      56. 31.100/56. 31.100
  libavcodec     58. 54.100/58. 54.100
  libavformat    58. 29.100/58. 29.100
  libavdevice    58.  8.100/58.  8.100
  libavfilter     7. 57.100/ 7. 57.100
  libswscale      5.  5.100/ 5.  5.100
  libswresample   3.  5.100/ 3.  5.100
  libpostproc    55.  5.100/55.  5.100
Hyper fast Audio and Video encoder
usage: ffmpeg [options] [[infile options] -i infile]... {[outfile options] outfile}...

Use -h to get full help or, even better, run 'man ffmpeg'

Check whether the configuration gltransition is installed

root@hroot-virtual-machine:~/ffmpeg-4.2.2# ffmpeg -v 0 -filters | grep gltransition
 T.. gltransition      VV->V      OpenGL blend transitions

Test whether gltransition runs successfully

//Create a file to store the material
?CD/
?MKDIR img
?CD img

root@hroot-virtual-machine:/img# ll
total 1248
drwxr-xr-x  2 root root   4096 Jul   2 11:38 ./
drwxr-xr-x 21 root root   4096 Jul   2 10:05 ../
-rw-r--r--  1 root root 185169 Jul   2 10:05 1.jpg
-rw-r--r--  1 root root  67524 Jul   2 10:05 2.jpg
-rw-r--r--  1 root root 149603 Jul   2 10:05 3.jpg
-rw-r--r--  1 root root 188339 Jul   2 10:05 4.jpg
-rw-r--r--  1 root root 176810 Jul   2 10:05 5.jpg
-rw-r--r--  1 root root 487613 Jul   2 10:53 bgm.m4a

Check out the special effects files we downloaded

root@hroot-virtual-machine:~/ffmpeg-gl-transition/gl-transitions/transitions# ll
total 320
drwxr-xr-x 2 root root 4096 7月   1 18:22 ./
drwxr-xr-x 6 root root 4096 7月   1 18:22 ../
-rw-r--r-- 1 root root  462 7月   1 18:22 angular.glsl
-rw-r--r-- 1 root root  752 7月   1 18:22 Bounce.glsl
-rw-r--r-- 1 root root 2593 7月   1 18:22 BowTieHorizontal.glsl
-rw-r--r-- 1 root root 2541 7月   1 18:22 BowTieVertical.glsl
-rw-r--r-- 1 root root 1908 7月   1 18:22 BowTieWithParameter.glsl
-rw-r--r-- 1 root root  245 7月   1 18:22 burn.glsl
-rw-r--r-- 1 root root  981 7月   1 18:22 ButterflyWaveScrawler.glsl
-rw-r--r-- 1 root root  485 7月   1 18:22 cannabisleaf.glsl
-rw-r--r-- 1 root root  550 7月   1 18:22 CircleCrop.glsl
-rw-r--r-- 1 root root  422 7月   1 18:22 circle.glsl
-rw-r--r-- 1 root root  408 7月   1 18:22 circleopen.glsl
-rw-r--r-- 1 root root  392 7月   1 18:22 colorphase.glsl
-rw-r--r-- 1 root root  364 7月   1 18:22 ColourDistance.glsl
-rw-r--r-- 1 root root  627 7月   1 18:22 CrazyParametricFun.glsl
-rw-r--r-- 1 root root  623 7月   1 18:22 crosshatch.glsl
-rw-r--r-- 1 root root  228 7月   1 18:22 crosswarp.glsl
-rw-r--r-- 1 root root 2396 7月   1 18:22 CrossZoom.glsl
-rw-r--r-- 1 root root 1738 7月   1 18:22 cube.glsl
-rw-r--r-- 1 root root  361 7月   1 18:22 directional-easing.glsl
-rw-r--r-- 1 root root  315 7月   1 18:22 Directional.glsl
-rw-r--r-- 1 root root  498 7月   1 18:22 directionalwarp.glsl
-rw-r--r-- 1 root root  577 7月   1 18:22 directionalwipe.glsl
-rw-r--r-- 1 root root  533 7月   1 18:22 displacement.glsl
-rw-r--r-- 1 root root 1627 7月   1 18:22 DoomScreenTransition.glsl
-rw-r--r-- 1 root root 1221 7月   1 18:22 doorway.glsl
-rw-r--r-- 1 root root  378 7月   1 18:22 Dreamy.glsl
-rw-r--r-- 1 root root 1163 7月   1 18:22 DreamyZoom.glsl
-rw-r--r-- 1 root root  413 7月   1 18:22 fadecolor.glsl
-rw-r--r-- 1 root root  136 7月   1 18:22 fade.glsl
-rw-r--r-- 1 root root  558 7月   1 18:22 fadegrayscale.glsl
-rw-r--r-- 1 root root 2231 7月   1 18:22 FilmBurn.glsl
-rw-r--r-- 1 root root  522 7月   1 18:22 flyeye.glsl
-rw-r--r-- 1 root root 2242 7月   1 18:22 GlitchDisplace.glsl
-rw-r--r-- 1 root root  607 7月   1 18:22 GlitchMemories.glsl
-rw-r--r-- 1 root root 2300 7月   1 18:22 GridFlip.glsl
-rw-r--r-- 1 root root  356 7月   1 18:22 heart.glsl
-rw-r--r-- 1 root root 1644 7月   1 18:22 hexagonalize.glsl
-rw-r--r-- 1 root root 7518 7月   1 18:22 InvertedPageCurl.glsl
-rw-r--r-- 1 root root  585 7月   1 18:22 kaleidoscope.glsl
-rw-r--r-- 1 root root  647 7月   1 18:22 LeftRight.glsl
-rw-r--r-- 1 root root  682 7月   1 18:22 LinearBlur.glsl
-rw-r--r-- 1 root root  189 7月   1 18:22 luma.glsl
-rw-r--r-- 1 root root 3812 7月   1 18:22 luminance_melt.glsl
-rw-r--r-- 1 root root  390 7月   1 18:22 morph.glsl
-rw-r--r-- 1 root root 1127 7月   1 18:22 Mosaic.glsl
-rw-r--r-- 1 root root  339 7月   1 18:22 multiply_blend.glsl
-rw-r--r-- 1 root root 1444 7月   1 18:22 perlin.glsl
-rw-r--r-- 1 root root  361 7月   1 18:22 pinwheel.glsl
-rw-r--r-- 1 root root  584 7月   1 18:22 pixelize.glsl
-rw-r--r-- 1 root root  464 7月   1 18:22 polar_function.glsl
-rw-r--r-- 1 root root  326 7月   1 18:22 PolkaDotsCurtain.glsl
-rw-r--r-- 1 root root  364 7月   1 18:22 Radial.glsl
-rw-r--r-- 1 root root  444 7月   1 18:22 randomNoisex.glsl
-rw-r--r-- 1 root root  399 7月   1 18:22 randomsquares.glsl
-rw-r--r-- 1 root root  378 7月   1 18:22 ripple.glsl
-rw-r--r-- 1 root root  878 7月   1 18:22 rotate_scale_fade.glsl
-rw-r--r-- 1 root root  348 7月   1 18:22 rotateTransition.glsl
-rw-r--r-- 1 root root  376 7月   1 18:22 SimpleZoom.glsl
-rw-r--r-- 1 root root  771 7月   1 18:22 squareswire.glsl
-rw-r--r-- 1 root root  455 7月   1 18:22 squeeze.glsl
-rw-r--r-- 1 root root 8015 7月   1 18:22 StereoViewer.glsl
-rw-r--r-- 1 root root 1539 7月   1 18:22 swap.glsl
-rw-r--r-- 1 root root  715 7月   1 18:22 Swirl.glsl
-rw-r--r-- 1 root root 4051 7月   1 18:22 tangentMotionBlur.glsl
-rw-r--r-- 1 root root  650 7月   1 18:22 TopBottom.glsl
-rw-r--r-- 1 root root  651 7月   1 18:22 TVStatic.glsl
-rw-r--r-- 1 root root 1399 7月   1 18:22 undulatingBurnOut.glsl
-rw-r--r-- 1 root root  429 7月   1 18:22 WaterDrop.glsl
-rw-r--r-- 1 root root  397 7月   1 18:22 wind.glsl
-rw-r--r-- 1 root root  274 7月   1 18:22 windowblinds.glsl
-rw-r--r-- 1 root root  299 7月   1 18:22 windowslice.glsl
-rw-r--r-- 1 root root  192 7月   1 18:22 wipeDown.glsl
-rw-r--r-- 1 root root  192 7月   1 18:22 wipeLeft.glsl
-rw-r--r-- 1 root root  192 7月   1 18:22 wipeRight.glsl
-rw-r--r-- 1 root root  192 7月   1 18:22 wipeUp.glsl
-rw-r--r-- 1 root root 1073 7月   1 18:22 ZoomInCircles.glsl

Get absolute path

root@hroot-virtual-machine:~/ffmpeg-gl-transition/gl-transitions/transitions# pwd
/root/ffmpeg-gl-transition/gl-transitions/transitions

--------Then go back to the material folder where
cd /img

Start the test

ffmpeg \
-t 1 -loop 1 -i 1.jpg \
-t 1 -loop 1 -i 2.jpg \
-filter_complex \
"gltransition=offset=0.5:duration=0.5:source=/root/ffmpeg-gl-transition/gl-transitions/transitions/crosswarp.glsl" \
-y out.mp4

Source: followed by the absolute path of the special effects file

The results showed that: 1

root@hroot-virtual-machine:/img# ffmpeg \
> -t 1 -loop 1 -i 1.jpg \
> -t 1 -loop 1 -i 2.jpg \
> -filter_complex \
> "gltransition=offset=0.5:duration=0.5:source=/root/ffmpeg-gl-transition/gl-transitions/transitions/crosswarp.glsl" \
> -y out.mp4
ffmpeg version 4.2.2 Copyright (c) 2000-2019 the FFmpeg developers
  built with gcc 9 (Ubuntu 9.3.0-17ubuntu1~20.04)
  configuration: --enable-libx264 --enable-libx265 --enable-libvpx --enable-libfdk-aac --enable-libmp3lame --enable-libopus --enable-nonfree --enable-gpl --enable-opengl --enable-filter=gltransition --extra-libs='-lGLEW -lglfw -ldl'
  libavutil      56. 31.100/56. 31.100
  libavcodec     58. 54.100/58. 54.100
  libavformat    58. 29.100/58. 29.100
  libavdevice    58.  8.100/58.  8.100
  libavfilter     7. 57.100/ 7. 57.100
  libswscale      5.  5.100/ 5.  5.100
  libswresample   3.  5.100/ 3.  5.100
  libpostproc    55.  5.100/55.  5.100
Input #0, image2, from '1.jpg':
  Duration: 00:00:00.04, start: 0.000000, bitrate: 37033 kb/s
    Stream #0:0: Video: mjpeg (Baseline), yuvj444p(pc, bt470bg/unknown/unknown), 400x400 [SAR 1:1 DAR 1:1], 25 fps, 25 tbr, 25 tbn, 25 tbc
Input #1, image2, from '2.jpg':
  Duration: 00:00:00.04, start: 0.000000, bitrate: 13504 kb/s
    Stream #1:0: Video: mjpeg (Baseline), yuvj444p(pc, bt470bg/unknown/unknown), 400x400 [SAR 1:1 DAR 1:1], 25 fps, 25 tbr, 25 tbn, 25 tbc
[AVFilterGraph @ 0x565112acce40] Error initializing filter 'gltransition' with args 'offset=0.5:duration=0.5:source=/root/ffmpeg-gl-transition/gl-transitions/transitions/crosswarp.glsl'
Error initializing complex filters.
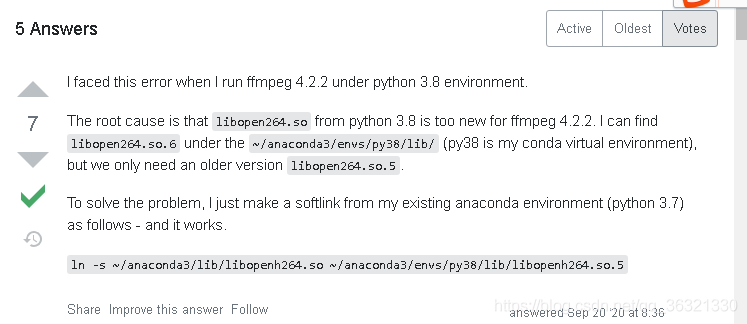
Operation not permitted

Error initializing filter ‘gltransition’ is a problem

The solution is as follows:

Install xvfb (skip if installed)

sudo apt-get -y install xvfb

Then start xvfb (thread blocking)

Xvfb :1 -screen 0 1280x1024x16

Then call xvfb to execute the special effect

env DISPLAY=:1  ffmpeg 命令

For example, the sentence that just reported an error:

env DISPLAY=:1 ffmpeg \
	-t 1 -loop 1 -i 1.jpg \
	-t 1 -loop 1 -i 2.jpg \
	-filter_complex \
	"gltransition=offset=0.5:duration=0.5:source=/root/ffmpeg-gl-transition/gl-transitions/transitions/crosswarp.glsl" \
	-y out1.mp4

If the instructions are not saved after execution, let’s check:

root@hroot-virtual-machine:/img# ll
	total 1336
	drwxr-xr-x  2 root root   4096 7月   2 11:49 ./
	drwxr-xr-x 21 root root   4096 7月   2 10:05 ../
	-rw-r--r--  1 root root 185169 7月   2 10:05 1.jpg
	-rw-r--r--  1 root root  67524 7月   2 10:05 2.jpg
	-rw-r--r--  1 root root 149603 7月   2 10:05 3.jpg
	-rw-r--r--  1 root root 188339 7月   2 10:05 4.jpg
	-rw-r--r--  1 root root 176810 7月   2 10:05 5.jpg
	-rw-r--r--  1 root root 487613 7月   2 10:53 bgm.m4a
	-rw-r--r--  1 root root  89138 7月   2 11:49 out1.mp4	(Our picture plus special effects composite video)

Video add special effects, no EGL must install xvfb, with xvfb to add special effects

Env display =: 1 this must be added before executing the command

[Solved] Minidlna Error: checking for avformat_open_input in -lavformat -lavcodec -lavutil -lz… no

I have installed FFmpeg, but when I configured minidlna1.3.0, I found an error when I executed. /configure and found an error
checking for avformat_open_input in -lavformat -lavcodec -lavutil -lz… no
configure: error: Could not find libavformat – part of ffmpeg
Opening the configuration results file config.log reveals various errors.
For example.
libavformat/rtmpproto.c:1077: undefined reference to ‘inflateInit_’
libavcodec/vaapi_encode_h264.c:871: Undefined reference to ‘vaQueryVendorString’.

So the configure file needs to be modified

as_ac_Lib=`$as_echo "ac_cv_lib_avformat -lavcodec -lavutil -lz''_av_open_input_file" | $as_tr_sh`
modify to
as_ac_Lib=`$as_echo "ac_cv_lib_avformat -lavcodec -lavutil -lz -lm -lbz2 -lswresample -llzma -lX11 -lva -lva-x11 -lva-drm''_avformat_open_input" | $as_tr_sh`

LIBS="-lavformat -lavcodec -lavutil -lz  $LIBS"
modify to
LIBS=" -lpthread -lavformat -lavcodec -lavutil -lz  -lm -lbz2 -lswresample -llzma -lX11 -lva -lva-x11 -lva-drm $LIBS"

if test x"$ac_cv_lib_avformat__lavcodec__lavutil__lz___av_open_input_file" != x"yes" &&
test x"$ac_cv_lib_avformat__lavcodec__lavutil__lz___avformat_open_input" != x"yes"; then

modify to
if eval test \"x\$"$as_ac_Lib"\" != x"yes"; then

ffmpeg:error while loading shared libraries: libopenh264.so.5

Problem Description:
in the Ubuntu 10.04 system, we want to use ffmpeg for face cutting, but there is a title error. I can’t generate the corresponding version number by inputting ffmpeg – version. After Google[ https://stackoverflow.com/questions/62213783/ffmpeg-error-while-loading-shared-libraries-libopenh264-so-5 ]It turned out to be too new

I use the name of CONDA virtual environment, which is houyw. If houyw appears below, it is my virtual name.

(1) I’ll take a chance according to the instructions given by the boss

sudo ln -s ~/anaconda3/lib/libopenh264.so  ~/anaconda3/envs/houyw/lib/libopen264.so.5

As a result, there is no libopenh264. So in my ~/anaconda3/lib directory. So there is an error that the file does not exist

(2) At this time, I found that although there is no ~/anaconda3/lib directory, there is ~/anaconda3/envs/houyw/lib directory.. So I had a whim and tried to use libopenh264. So under ~/anaconda3/envs/houyw/lib (delete libopenh264. So. 5 first).

cd ~/anaconda3/envs/houyw/lib
rm -rf libopenh264.so.5
sudo ln -s libopenh264.so libopenh264.so.5

(3) Finished, input ffmpeg – version to display the version number correctly
(4) Summary: if libopenh264.so exists in ~/anaconda3/lib, use method 1, if not, use method 2. Finally, I hope everyone can solve this problem perfectly!!!

Opencv2.4.9 + ffmpeg1.2.12 installation configuration and problem solution under Ubuntu 14.04

In the process of video processing, two feature extraction methods, space-time interest points (stip) and improved dense trajectories (IDT), are used. We can find the open algorithm source code on the author’s home page. They need opencv and ffmpeg to run smoothly under Linux. We have used these two tools before, but now we want to use them again after changing the working environment, but there are still many problems in the process of configuration and installation. Therefore, I feel it is necessary to record the specific process, problems and solutions for future use, and hope to bring a little help to others.


Opencv2.4.9 and ffmpeg 1.2.12 source package download

These two software in the official website can be directly found in various versions of the source code package, download, compile and install. If you don’t particularly need the latest version of the software, I suggest that you use the earlier version that has been used by most people, and you can easily find the corresponding solution when there is a problem. I chose opencv2.4.9 and ffmpeg 1.2.12.

Opencv2.4.9 download
the official website provides download links from the earlier version 1.0.0 to 3.1 and 2.4.13, which means that different operating systems have different software packages
http://opencv.org/downloads.html
The download address of version 2.4.9 that I used is as follows:
0 https://sourceforge.net/projects/opencvlibrary/files/opencv-unix/2.4.9/opencv-2.4.9.zip/downloadFFmpeg1.2.12 The latest version of ffmpeg is 3.1.4, and the update speed is relatively fast. Personal choice of the early version 1.2.12 has been able to meet the actual needs, and the download address is as follows:
0 https://ffmpeg.org/olddownload.html

Ffmpeg compilation configuration

Ffmpeg is a leading multimedia framework, which can be used to record, convert digital audio and video, and convert them into open source programs. It includes the leading audio/video coding libraries libavcodec, libavutil, libavformat, etc.

1. Uninstall the previously installed ffmpeg and x264 software
in order to prevent version problems, it is recommended to uninstall the previously (possibly) installed version first. The order is as follows:

sudo apt-get -qq remove ffmpeg x264 libx264-dev

2. Install dependencies and related software

sudo apt-get install yasm
sudo aptitude install libx264-dev libfaac-dev libmp3lame-dev libtheora-dev libvorbis-dev libxvidcore-dev  libxext-dev libxfixes-dev

3. Compile and install
decompress the ffmpeg package and enter the decompressed directory

cd ffmpeg-1.2.12

Environment configuration [4]

./configure --prefix=/usr/local/ffmpeg --enable-gpl --enable-version3 --enable-nonfree --enable-postproc --enable-pthreads --enable-libfaac --enable-libmp3lame --enable-libtheora --enable-libx264 --enable-libxvid --enable-x11grab --enable-libvorbis --enable-nonfree --enable-pic --enable-shared

Note that there may be carriage return or character problems in the process of copying. If there is a problem with the prompt command, you need to carefully check the space and carriage return. If you use prefix to specify the installation path of the software, you need to modify the corresponding path in the configuration file so that the system can find the installation path of ffmpeg

vi /etc/profile

Press insert and add the following two lines at the end of the file:

export FFMPEG_HOME=/usr/local/ffmpeg 
export PATH=$FFMPEG_HOME/bin:$PATH

Press ESC and enter “: WQ” to exit and save, and then make the above changes take effect. The command is as follows:

source profile

After all configuration is completed, prepare to install. The command is as follows:

make
make install

After installation, you will see three directories in/usr/local/ffmpeg: Bin executable file directory, lib static and dynamic link library directory, and header files used in include programming.

4. Check whether the installation configuration is correct
it is said on the Internet that you can test whether the installation is successful by executing ffplay to play the video file in the bin directory. However, I did not generate ffplay after compiling and installing. There are only ffmpeg and ffserver in the bin directory. Therefore, we directly check whether the version is correct, and there is no problem when we use it later. The order is as follows:

ffmpeg -version

The correct version and configuration information appears, indicating that the installation is successful.

Opencv compilation and installation

The full name of OpenCV is: open source computer vision library. Opencv is a cross platform computer vision library based on BSD license (open source), which can run on Linux, windows and Mac OS operating systems. It is lightweight and efficient, which is composed of a series of C functions and a small number of C + + classes. It also provides the interfaces of python, ruby, MATLAB and other languages, and realizes many general algorithms in image processing and computer vision [5].

1. Install dependencies

sudo apt-get -qq install libopencv-dev build-essential checkinstall cmake pkg-config libjpeg-dev libjasper-dev libavcodec-dev libavformat-dev libswscale-dev libdc1394-22-dev libxine-dev libgstreamer0.10-dev libgstreamer-plugins-base0.10-dev libv4l-dev python-dev python-numpy libtbb-dev libqt4-dev libgtk2.0-dev libopencore-amrnb-dev libopencore-amrwb-dev x264 v4l-utils 

2. Compile and install
to unzip the downloaded opencv package and enter the unzipped directory

cd opencv-2.4.9

Create compile directory, compile and install

mkdir release
cd release
cmake -D CMAKE_BUILD_TYPE=RELEASE -D CMAKE_INSTALL_PREFIX=/usr/local ..
make
sudo make install

It takes a long time to compile here. After completion, the following prompt information will be printed on the last line:

-- Configuring done
-- Generating done
-- Build files have been written to: /opt/opencv-2.4.9

During the compilation process, you may stay in the line “configuring done” for a long time. Don’t stop the compilation in a hurry. You need to wait patiently for the compilation to complete. During the installation process, there will be a progress prompt in the form of “[10%]” percentage, and the process will be very slow. Please wait patiently.

Tip: after cmake is completed, relevant information will appear, in which you can check whether ffmpeg has been supported. If yes is supported, ffmpeg will appear after it. There are also some encoding and formats with yes.

3. Environment configuration
all library files are installed under/usr/local/lib by default, and all header files are installed under/usr/local/include/opcv * /. Modify the environment configuration [6], and the command is as follows:

vim /etc/ld.so.conf

Press the insert key to add in the last line of the file

/usr/local/lib

Press ESC key to enter “: WQ” to exit and save, and then execute the following command:

ldconfig

At this point, opencv installation is complete.

Libcxcore. So. 2 cannot find a solution to the problem

After opencv is installed, the IDT algorithm can run normally, but the following errors appear when executing stip program:

./bin/stipdet: error while loading shared libraries: libcxcore.so.2: cannot open shared object file: No such file or directory

Look at the problem, it means that the shared library file libcxcore. So. 2 can’t be found during the execution of the program. This file or path doesn’t exist. From the online search results, most of the problems are prepared to use stip to obtain video features, but dense track programs do not have this problem. This problem and several solutions are available on the stackoverflow website for reference [7].

I didn’t succeed in creating soft links. Maybe I didn’t set it correctly at that time, and then I didn’t have root permission. Finally, I adopted a temporary method. To set the search directory of shared library, the command is as follows:

export LD_LIBRARY_PATH=[enter your path]/opencv-2.4.9/release/lib

When executing some external programs under Linux, you may be prompted that the shared library cannot be found, which is quite common. The reason for this problem is that although the shared library has been installed, the program cannot find the file when it is ready to call.

My problem is that the shared library file is installed in other “non/lib or/usr/lib” directory, but after the installation, the non root user does not have the permission to add a path in the “/ etc/LD. So. Conf”. So export is a global variable LD_ LIBRARY_ Path, and then run the program will go to this directory to find the shared library [8].

Execute stip program

If you directly execute “.”/bin/stippet – help “in this directory, you will not be able to execute. You must turn stippet and stipshow into executable files. For convenience, I directly changed it to fully open executable permissions [9]. The order is as follows:

chmod 777 bin/stipdet
chmod 777 bin/stipshow

For programs with dense trajectories, the same method can be used to execute normally. In addition, the global variable of export will no longer take effect every time the command window is closed. Therefore, before executing the stip program, we must first set the search directory of the shared library according to the above method, and there will be no problem that libcxcore. So. 2 cannot be found.

Opencv version view

During use, you may need to check the installed version of OpenCV. You can use the following command [10]:

pkg-config --modversion opencv

PKG config is a very useful tool for compiling applications and library files. One of its functions is to check the version number of the library.

Python calls opencv module

If you need to use Python to call opencv module, you can install Python first and then load CV [4]. The order is as follows:

sudo apt-get install python-opencv
sudo apt-get install python-numpy
python
import cv


References: <
> 1] https://www.di.ens.fr/~laptev/interestpoints.html
[2] https://lear.inrialpes.fr/people/wang/improved_trajectories
[3] https://ffmpeg.org/about.html
[4] http://blog.csdn.net/u010106759/article/details/51931815
[5] http://opencv.org/
[6] http://blog.csdn.net/firefoxbug/article/details/7554409
[7] http://stackoverflow.com/questions/5212728/libcxcore-so-2-missing-in-opencv
[8] http://blog.csdn.net/sahusoft/article/details/7388617
[9] http://blog.chinaunix.net/uid-21880738-id-1813031.html
[10] http://blog.csdn.net/ppp2006/article/details/47445903

Conversion of audio file format with ffmpeg command

order of the day

1. Convert MP3 to WAV

ffmpeg -i input.mp3 -acodec pcm_ s16le -ac 1 -ar 8000 output.wav

2. Convert m4a to wav

ffmpeg -i input.m4a -acodec pcm_ s16le -ac 1 -ar 8000 output.wav

3. Conversion between wav and PCM

ffmpeg – iinput.wav -f s16le -ar 8000 -acodec pcm_ s16le output.raw

4. PCM to WAV

ffmpeg -f s16le -ar 8000-ac 1 -acodec pcm_ s16le -i input.raw output.wav

Note:
– acodec PCM_ s16le pcm_ S16le 16bits encoder
– F s16le is saved in 16bits PCM format
– AC 1 mono
– AR 8000 sampling rate

Ffmpeg installation configuration see blog:

https://blog.csdn.net/qq_ 39516859/article/details/81843419

Ffmpeg (libx264) compiling for IOS

Refer to the article: https://blog.csdn.net/cairo123/article/details/78808763
MacOS: 10.13.5 f77 (17)
FFmpeg: 2.7.7
1. The x264 compilation

The source code download: https://github.com/mstorsjo/fdk-aac
Compile script: https://github.com/kewlbear/x264-ios
Brew install NASM
$ nasm -v
NasM version 2.13.03 Compiled on Feb 8 2018

Compile scripts in X264 source code equivalent directory. Execute the compile script.

To fit the project requirements, modify the compiled script as follows:

CONFIGURE_FLAGS=”–enable-static –enable-pic”

ARCHS=”arm64 armv7 armv7s”

I’m just going to leave the ARM64, the ARMv7, the ARMv7s and I’m going to get rid of the i386 x86_64 of the simulator and the idea here is to reduce the size of the library.
Flags are as simple as possible to avoid the hassle of having fewer compilations, so just keep –enable-static –enable-pic
The modified compiled script: https://download.csdn.net/download/wangyubin2010n/10486377

2. Compile FFmpeg
To download the script: https://github.com/kewlbear/FFmpeg-iOS-build-script
Modify the script:
A. Remove i386, x86_64 architecture support,
B. Modify FFMPEG version to 2.7.7;
C. Streamline FFMPEG to remove unnecessary compilation such as binary compilation and DOCS, save time, and simplify the size of the library.
Because the script downloads the FFMPEG source code automatically, the script is executed directly after the modification is completed.     
The modified script: https://download.csdn.net/download/wangyubin2010n/10486405

3. Complete

X264 -iOS: Static library containing x264
FFMPEG-IOS: Holds FFMPEG libraries.
Library download address: https://download.csdn.net/download/wangyubin2010n/10486418

Methods of compiling and installing ffmpeg and libx264 in Linux

Recently in the study of TS stream video preparation FFMPEG video format encoding and conversion
Compiling FFMPEG was smooth but integrating with Libx264 was tedious
It took me a long time to find it online
It is hereby sorted here

Operating system: CentOS 6.4 64-bit kernel 2.6.32
Compiling environment: GCC 4.4.7
FFMPEG version: 2.4
X264 version: X264 0.142.2479 DD79A61
YASM version: 1.3

Prepare documents:
Ffmpeg source
https://www.ffmpeg.org/releases/ffmpeg-snapshot.tar.bz2
x264
Git clone git://git.videolan.org/x264.git
yasm
http://www.tortall.net/projects/yasm/releases/yasm-1.3.0.tar.gz

Compile and install procedure:
1. Install YASM

tar zxvf yasm-1.3.0.tar.gz 
cd yasm-1.3.0
 ./configure 
 make
 make install
 yasm --version

2. Compile and install X264

cd x264 
./configure --enable-shared --enable-pthread --enable-pic
make
make install

3. Compile FFMPEG

cd ffmpeg
./configure --enable-libx264 --enable-gpl --enable-shared  --extra-cflags=-I/usr/local/include --extra-ldflags=-L/usr/local/lib --enable-pic
make
make install

Install well at FFMPEG runtime if prompted

ffmpeg: error while loading shared libraries: libavdevice.so.52: cannot open shared object file: No such file or directory

You will need to modify the file: /etc/ld.so.conf

Add a line at the end of the file:
/usr/local/lib
Then execute the command:
ldconfig

Rerun the ffmpeg – encoders | grep x264 will find successful installation

Vs2013 compiling ffmpeg

Because VS2013 support C99, so, you can directly use VS2013 for FFMPEG compilation and debugging, and no longer use Eclipse toss. Referring to others, the record is as follows:

Specific steps:
1. Download FFMPEG source code, download address: http://ffmpeg.zeranoe.com/builds/ or http://ffmpeg.org/download.html

2. Download the MinGW installer, download address: http://www.mingw.org/ or http://sourceforge.net/projects/mingw/files/latest/download?Source =files install after download, click run after install, mark the following items:

Then, under the Installation menu, click Apply Changes (mingw32-gcc-g++ is not selected);

Download msys2 http://sourceforge.net/projects/msys2/ download after installation to the mingw/msys2/directory

Download YASM at http://yasm.tortall.net/; Please do not download the VS version, but download the 64-bit version. After downloading, rename it to yasm.exe and copy it to the usr/bin directory of msys2.

4. Configuration C:/MinGW msys/1.0/msys. Bat, in the front of this file (@ echo off after) add a line the following contents:
(The same is true for MSYS2)
Call “D:\Microsoft Visual Studio 12.0\VC\bin\vcvars32.bat”; call “D:\Microsoft Visual Studio 12.0\VC\bin\vcvars32.bat”

5. Rename the C:/MinGW msys/1.0/bin/link. Exe for link_renamed. Exe (in accordance with the actual installation path) choice, this step is to prevent the link. Exe and vc link. Exe conflict, after the completion of the compilation can modify the back; Vc /bin link. Exe lib. Exe.

6. Configure compilation, double click msys.bat, go to the FFMPEG source code root directory, can run./configure –help to view the compilation configuration options, I used the option:
Static library:./configure –enable-static –prefix=./vs2013_build –enable-debug –toolchain= MSVC
Dynamic library:./configure –enable-shared –prefix=./vs2013_build –enable-debug –toolchain= MSVC

— — — — — — — — — — — — — — — — — — note:
The default is enable-yasm, and you can –disable-asm disable all assembly optimizations if you don’t want them
For libraries that generate release mode, you can –disable-debug to remove the debug message
Static library:./configure –enable-static –prefix=./vs2013_build_release –disable-debug –toolchain= MSVC — enable-memalligate-hack
For libraries that generate Debug mode, it seems that the top approach is fine, but to be safe in order to step into any function, set it as follows:
./configure –enable-static –prefix=./vs2013_build_noyasm –enable-debug –toolchain= MSVC –disable-yasm — disable-memalloce-hack
—————–

Wait for the configuration to return;

7. Type make all to compile;
8. Type make install.

If you have any problems, make for msys2 can enter the msys environment, run the pacman -s make may refer to http://m.oschina.net/blog/363658

The generated header files and libraries are in the vs2013_build directory under the FFMPEG source code.

Create a project FFMEPG_TEST (static)
Find a file in share/example, such as avio_reading.c, and place it in your project
Add the include directory and lib directory: C++->; Conventional – & gt; ADD INCLUDE DIRECTORY ADD INCLUDE LINKER ADD LIB
Add to lib:
advapi32.lib; Secur32.lib; ws2_32.lib; libavcodec.a; libavdevice.a; libavfilter.a; libavformat.a; libavutil.a; libswresample.a; libswscale.a;

———————————————–
Inline error is encountered during compilation because VS2013 uses its own _inline
#define inline _inline in a file

Then, the default library “MSVCRTD” conflicts with other libraries
Solution:
Properties – C++->; Code Generation -> runtime changed to multithreading /MT
/NODEFAULTLIB:libcmt.lib: /NODEFAULTLIB:libcmt.lib: /NODEFAULTLIB:libcmt.lib: /NODEFAULTLIB:libcmt.lib

The avcodec_alloc_frame() function received an error

Replace avcodec_alloc_frame() with av_frame_alloc().

Compile successfully

The scheme used for compiling 64-bit is MSYS2 + MINGW64
After installing MSYS2, in the directory
Pacman-S make GCC diffutils mingw64-x86_64-toolchain
Rename /usr/bin/link.exe to /usr/bin/link.bak to avoid conflicts with MSVC’s link.exe.

04 configuration msys2
04.01 edit the C:/msys64/msys2_shell. CMD,
Rem set MSYS2_PATH_TYPE=inherit: set MSYS2_PATH_TYPE=inherit
Open the MSYS2 window associated with VS2015
In the Command Prompt window, type:
# Switch to C: /msys64 directory CD C: /msys64 # Switch to VS2016 64-bit environment C:\
PR
Ogram Files (x86)\Microsoft Visual Studio 14.0\VC\bin\amd64\vcvars64.bat # Open mingw64 window msys2_shel.cmd-mingw64 of msys2
04.03 Check tool components
/ C/ Program Files (x86)/Microsoft Visual Studio 14.0/VC/BIN/amd64/cl /c/Program Files (x86)/Microsoft Visual Studio 14.0/VC/BIN/amd64/link /usr/ BIN/ yasm /usr/ BIN/ CPP

Modify the MSYS2 window code page to GBK to avoid displaying garbled code at compile time.
Right-click on the window, select the [Options] menu, select [Text], locale select: zh_CN, Character set select GBK. –arch=x86_64 make

After configuring the config, it may still be x86, open the config file, and change the corresponding value to 0

RTMP_Connect0, failed to connect socket. 110 (Connection timed out)

perform ffmpeg – re – I/var/WWW/HTML/input. Mp4 – vprofile baseline – acodec aac – ar 44100 – strict – 2-1 – f ac FLV -s 1280 x720 – q 10 RTMP:// XXX. XXX. XXX. XXX: 1935/HLS RTMP_Connect0
appeared, Failed to connect socket. 110 (Connection Timed out) error.

processing:
ali cloud machine port 1935 is not open.