After the VS2008 project is upgraded to VS2010, it compiles and reports an error link: fatal error LNK1104: the file “mfc90ud. Lib” cannot be opened
Reason: vc90.pdb of old 2008 is used
Solution: rebuild the solution.
After the VS2008 project is upgraded to VS2010, it compiles and reports an error link: fatal error LNK1104: the file “mfc90ud. Lib” cannot be opened
Reason: vc90.pdb of old 2008 is used
Solution: rebuild the solution.
When compiling gem5, the following error was reported:

the most likely reason is that your version of GCC is not right. It is recommended to upgrade a higher version of GCC. The pro test shows that 10.2.0 is effective, and no version below 8 seems to work
Error: undefined reference to ` xxx ‘in C + + means that an undefined method is referenced. There are many reasons for this problem. Here are two problems I encountered.
1. The corresponding header file is not referenced or the versions of library functions referenced in the header file are inconsistent. In different versions of libraries, the names of the same implementation method may be inconsistent, which causes this problem.
2. The method of using extern keyword is wrong. There are many uses of extern. The function of extern here is to refer to functions of other files.
a.h:
//a.h

#ifndef AH
#define AH

extern int test();//Here the return type and parameters must be the same as the implementation method

#endif
aaa.cpp
//aaa.cpp

#include <stdio.h>
#include <iostream>
#include "a.h"  //Both need to refer to the corresponding header file, otherwise an error will be reported

using namespace std;

int test()
{
cout << "abc" <<endl;
}
bbb.cpp
//bbb.cpp

#include <stdio.h>
#include <iostream>
#include "a.h" //Both need to refer to the corresponding header file, otherwise an error will be reported


int main()
{
    test();
}
Results of operation:

If any cpp file does not refer to the corresponding header file, an error will be reported.
Recently, we encountered a problem, that is, the printf display of floating-point calls in uCOSII is abnormal, but the support for floating-point calls on bare metal machines is normal. Here are the details.
When calling printf to debug floating-point numbers in UCOS, it is correct in memory, but print data is 0, and other shaping data are normal.
The running result on bare metal is completely normal, that is to say, the problem lies in UCOS.
According to the information, this is because the user task stack is not aligned with octets. When running bare metal programs, the system’s default stack octets are aligned, but UCOS’s user task stack is not.
Align the user stack octets.
Solution:
1. Solutions under IAR: (untested)
Through # pragma data_ Alignment specifies the number of bytes to align
For example:
#pragma data_alignment=8

OS_STK Task1_LED1_Stk[Task1_LED1_Stk_Size];

#pragma data_alignment=8

OS_STK T
2. Solutions under keil MDK: (available for personal testing)
Add the force octet alignment command before the task stack declaration, as follows:
__align(8) static OS_STK  TaskEquipmentStk[TASK_EQUIPMENT_STK_SIZE];
__align(8) static OS_STK  TaskUartRcvStk[TASK_UARTRCV_STK_SIZE];
__align(8) static OS_STK  TaskFileRcvStk[TASK_FILERCV_STK_SIZE];
__align(8) static OS_STK  TaskFtpStk[ TASK_FTP_STK_SIZE ];
__align(8) static OS_STK  TaskErrorRateRS485Stk[ TASK_ERROR_RATE_RS485_STK_SIZE ];
Detailed explanation of the reasons
The history of this is that arm itself does not support non aligned data access; Therefore, with a 64bit data operation instruction, the instruction requires 8-byte alignment.
Furthermore, after a certain version of the compiler (rvct3?) AAPCs requires stack 8-byte alignment.
AAPCs with 8-byte alignment first, then cm3. Pay attention to the sequence. Before cm3 r2p0, automatic stack pressing does not require 8 alignment, and r2p0 seems to be forced alignment.
Printf’s 8-alignment is required by the C runtime and has nothing to do with hardware. The C RTL manual is written and can be read. Its root lies in the requirements of AAPCs; AAPCs is rooted in instructions like LDRD.
In other words, in the future, if 128bit data operation is available and arm does not support non alignment, AAPCs may be upgraded to 16 byte alignment.
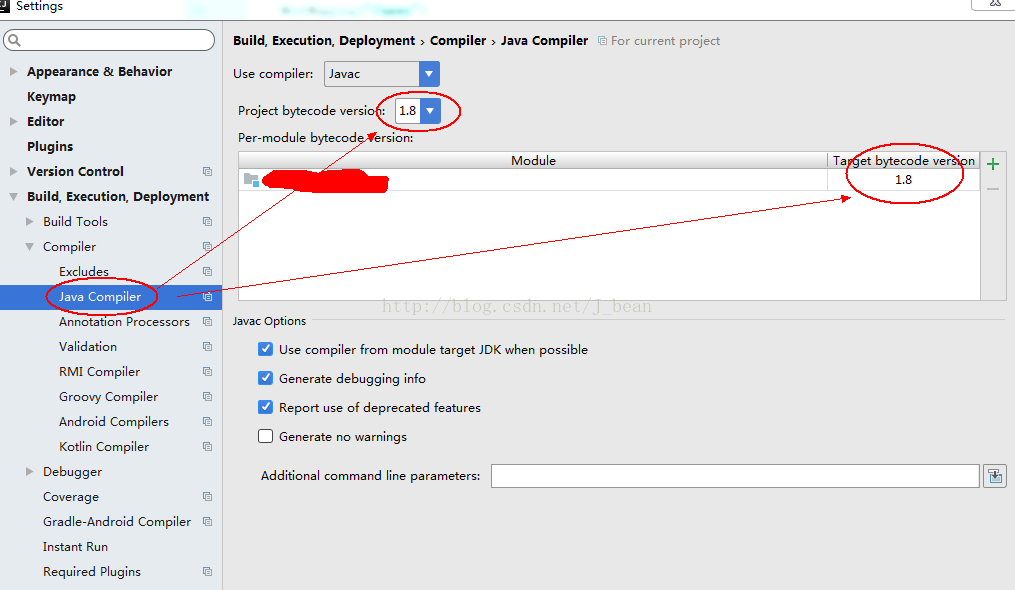
When using idea to start a project, an error is reported: Error:java : Compilation failed: internal java compiler error
(1) Error reason: the setting in Java compiler is inconsistent with the Java version used in the current project.
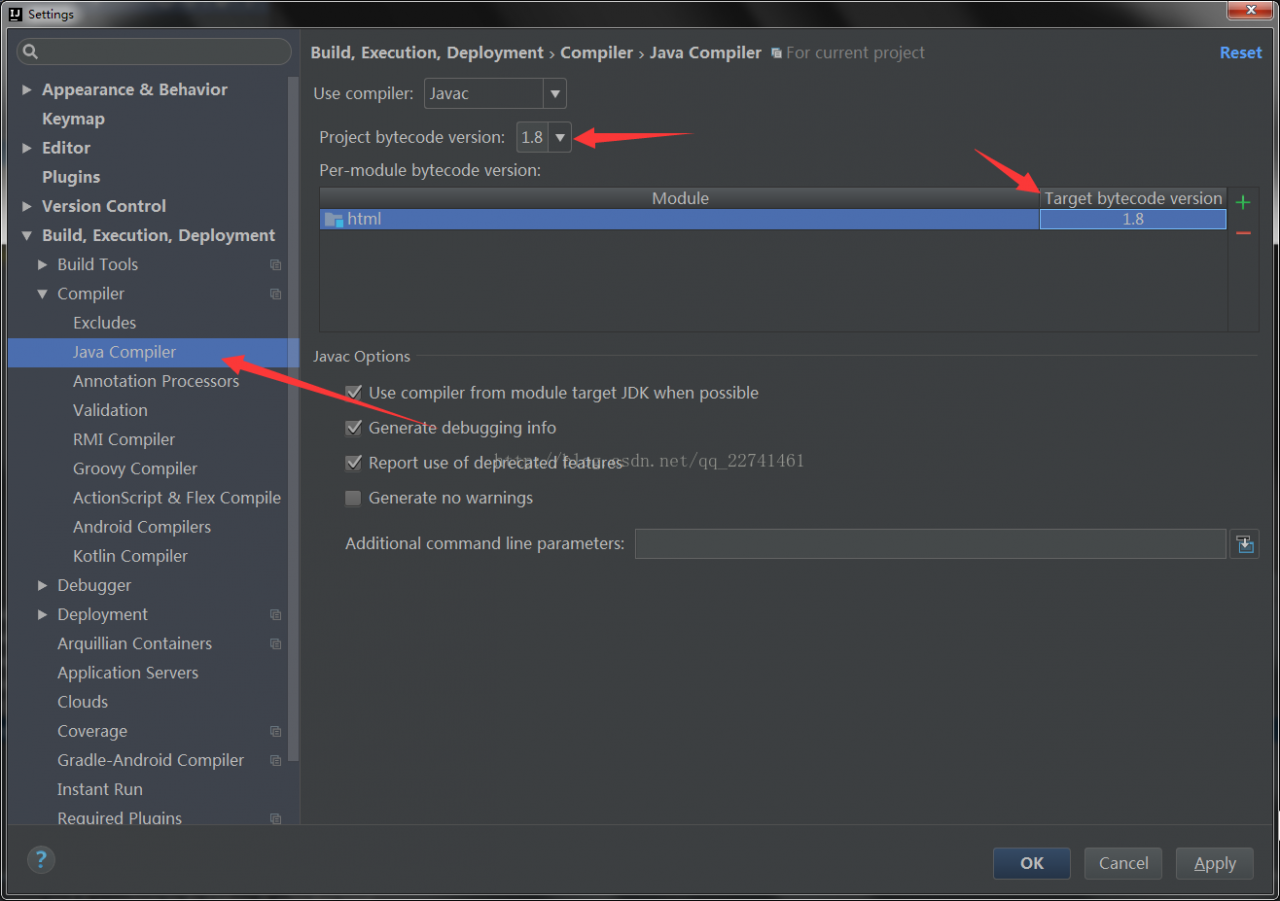
(2) Solution: if Java 1.8 is used in the project, it should be set to 1.8 in Java compiler.
The settings are as follows:

References: Click to open the link
Idea Tomcat start error Error:java : Compilation failed: internal java compiler error

solution:

In the figure, set the above project to the corresponding JDK version, and my 1.8 is set to 1.8
resolvent:
make
this program will look for a file named
makefile in your directory, and then execute it.
If you have several makefiles, then you can execute them with the command:
make -f MyMakefile
There are several other switches to the
make utility. For more info,
man make.
Build Process
Compiling by hand The trivial way to compile the files and obtain an executable, is by running the command:
g++ main.cpp hello.cpp factorial.cpp -o hello
The basic Makefile The basic makefile is composed of:
target: dependencies
[tab] system command
This syntax applied to our example would look like:
all:
	g++ main.cpp hello.cpp factorial.cpp -o hello
[Download
here]
To run this makefile on your files, type:
make -f Makefile-1
On this first example we see that our target is called
all. This is the default target for makefiles. The
make utility will execute this target if no other one is specified.
We also see that there are no dependencies for target
all, so
make safely executes the system commands specified.
Finally, make compiles the program according to the command line we gave it.
Using dependencies Sometimes is useful to use different targets. This is because if you modify a single file in your project, you don’t have to recompile everything, only what you modified.
Here is an example:
all: hello

hello: main.o factorial.o hello.o
	g++ main.o factorial.o hello.o -o hello

main.o: main.cpp
	g++ -c main.cpp

factorial.o: factorial.cpp
	g++ -c factorial.cpp

hello.o: hello.cpp
	g++ -c hello.cpp

clean:
	rm -rf *o hello
[Download
here]
Now we see that the target all has only dependencies, but no system commands. In order for make to execute correctly, it has to meet all the dependencies of the called target (in this case all).
Each of the dependencies are searched through all the targets available and executed if found.
In this example we see a target called clean. It is useful to have such target if you want to have a fast way to get rid of all the object files and executables.
Using variables and comments You can also use variables when writing Makefiles. It comes in handy in situations where you want to change the compiler, or the compiler options.
# I am a comment, and I want to say that the variable CC will be
# the compiler to use.
CC=g++
# Hey!, I am comment number 2. I want to say that CFLAGS will be the
# options I'll pass to the compiler.
CFLAGS=-c -Wall

all: hello

hello: main.o factorial.o hello.o
	$(CC) main.o factorial.o hello.o -o hello

main.o: main.cpp
	$(CC) $(CFLAGS) main.cpp

factorial.o: factorial.cpp
	$(CC) $(CFLAGS) factorial.cpp

hello.o: hello.cpp
	$(CC) $(CFLAGS) hello.cpp

clean:
	rm -rf *o hello
[Download
here]
As you can see, variables can be very useful sometimes. To use them, just assign a value to a variable before you start to write your targets. After that, you can just use them with the dereference operator $(VAR).
Where to go from here With this brief introduction to Makefiles, you can create some very sophisticated mechanism for compiling your projects. However, this is just a tip of the iceberg. I don’t expect anyone to fully understand the example presented below without having consulted some
Make documentation (which I had to do myself) or read pages 347 to 354 of your Unix book.
CC=g++
CFLAGS=-c -Wall
LDFLAGS=
SOURCES=main.cpp hello.cpp factorial.cpp
OBJECTS=$(SOURCES:.cpp=.o)
EXECUTABLE=hello

all: $(SOURCES) $(EXECUTABLE)

$(EXECUTABLE): $(OBJECTS)
	$(CC) $(LDFLAGS) $(OBJECTS) -o $@

.cpp.o:
	$(CC) $(CFLAGS) $< -o $@
[Download
here]
If you understand this last example, you could adapt it to your own personal projects changing only 2 lines, no matter how many additional files you have !!!.
Hector Urtubia
Setting a bit
Use the bitwise OR operator (|) to set a bit.
number |= 1 << x;
That will set bit x.
Clearing a bit
Use the bitwise AND operator (&) to clear a bit.
number &= ~(1 << x);
That will clear bit x. You must invert the bit string with the bitwise NOT operator (~), then AND it.
Toggling a bit
The XOR operator (^) can be used to toggle a bit.
number ^= 1 << x;
That will toggle bit x.
Checking a bit
You didn’t ask for this but I might as well add it.
To check a bit, AND it with the bit you want to check:
bit = number & (1 << x);
That will put the value of bit x into the variable bit.
===============================================================================================================================
Nobody mentioned the STL: std::bitset<N>.
Or the boost version: boost::dynamic_bitset.
No need to roll your own:
#include <bitset>
#include <iostream>

int main()
{
    std::bitset<5> x;

    x[1] = 1;
    x[2] = 0;
    // Note x[0-4]  valid

    std::cout << x << std::endl;
}
[Alpha:] > ./a.out
00010
Boost version allows a runtime sized bitset compared with STL compile time sized bitset.
===============================================================================================================================
The other option is to use bit fields:
struct bits {
    unsigned int a:1;
    unsigned int b:1;
    unsigned int c:1;
};

struct bits mybits;
defines a 3-bit field (actually, it’s three 1-bit felds). Bit operations now become a bit (haha) simpler:
To set or clear a bit:
mybits.b = 1;
mybits.c = 0;
To toggle a bit:
mybits.a = !mybits.a;
mybits.b = ~mybits.b;
mybits.c ^= 1;  /* all work */
Checking a bit:
if (mybits.c)
This only works with bits in fixed positions. Otherwise you have to resort to the bit-twiddling techniques described in previous posts.
===============================================================================================================================
It is sometimes worth using an enum to name the bits:
enum ThingFlags = {
  ThingMask  = 0x0000,
  ThingFlag0 = 1 << 0,
  ThingFlag1 = 1 << 1,
  ThingError = 1 << 8,
}
Then use the names later on. I.e. write
thingstate |= ThingFlag1;
thingstate &= ~ThingFlag0;
if (thing | ThingError) {...}
to set, clear and test. This way you hide the magic numbers from the rest of your code.
Other than that I endorse Jeremy’s solution.
===============================================================================================================================
I use macros defined in a header file to handle bit set and clear:
/* a=target variable, b=bit number to act upon 0-n */
#define BIT_SET(a,b) ((a) |= (1<<(b)))
#define BIT_CLEAR(a,b) ((a) &= ~(1<<(b)))
#define BIT_FLIP(a,b) ((a) ^= (1<<(b)))
#define BIT_CHECK(a,b) ((a) & (1<<(b)))

/* x=target variable, y=mask */
#define BITMASK_SET(x,y) ((x) |= (y))
#define BITMASK_CLEAR(x,y) ((x) &= (~(y)))
#define BITMASK_FLIP(x,y) ((x) ^= (y))
#define BITMASK_CHECK(x,y) ((x) & (y))
===============================================================================================================================
From snip-c. zip’s bitops.how:
/*
**  Bit set, clear, and test operations
**
**  public domain snippet by Bob Stout
*/

typedef enum {ERROR = -1, FALSE, TRUE} LOGICAL;

#define BOOL(x) (!(!(x)))

#define BitSet(arg,posn) ((arg) | (1L << (posn)))
#define BitClr(arg,posn) ((arg) & ~(1L << (posn)))
#define BitTst(arg,posn) BOOL((arg) & (1L << (posn)))
#define BitFlp(arg,posn) ((arg) ^ (1L << (posn)))
OK, let’s analyze things…
The common expression in all of these that you seem to be having problems with is “(1L << (posn))”. All this does is create a mask with a single bit on and which will work with any integer type. The “posn” argument specifies the position where you want the bit. If posn==0, then this expression will evaluate to:
0000 0000 0000 0000 0000 0000 0000 0001 binary.
If posn==8, it will evaluate to
0000 0000 0000 0000 0000 0001 0000 0000 binary.
In other words, it simply creates a field of 0’s with a 1 at the specified position. The only tricky part is in the BitClr() macro where we need to set a single 0 bit in a field of 1’s. This is accomplished by using the 1’s complement of the same expression as denoted by the tilde (~) operator.
Once the mask is created it’s applied to the argument just as you suggest, by use of the bitwise and (&), or (|), and xor (^) operators. Since the mask is of type long, the macros will work just as well on char’s, short’s, int’s, or long’s.
The bottom line is that this is a general solution to an entire class of problems. It is, of course, possible and even appropriate to rewrite the equivalent of any of these macros with explicit mask values every time you need one, but why do it?Remember, the macro substitution occurs in the preprocessor and so the generated code will reflect the fact that the values are considered constant by the compiler – i.e. it’s just as efficient to use the generalized macros as to “reinvent the wheel” every time you need to do bit manipulation.
Unconvinced?Here’s some test code – I used Watcom C with full optimization and without using _cdecl so the resulting disassembly would be as clean as possible:
—-[ TEST.C ]—————————————————————-
#define BOOL(x) (!(!(x)))

#define BitSet(arg,posn) ((arg) | (1L << (posn)))
#define BitClr(arg,posn) ((arg) & ~(1L << (posn)))
#define BitTst(arg,posn) BOOL((arg) & (1L << (posn)))
#define BitFlp(arg,posn) ((arg) ^ (1L << (posn)))

int bitmanip(int word)
{
      word = BitSet(word, 2);
      word = BitSet(word, 7);
      word = BitClr(word, 3);
      word = BitFlp(word, 9);
      return word;
}
—-[ TEST. OUT (disassembled) ]———————————————–
Module: C:\BINK\tst.c Group: ‘DGROUP’ CONST,CONST2,_DATA,_BSS
Segment: TEXT BYTE 00000008 bytes
0000 0c 84 bitmanip or al,84H 0002 80 f4 02 xor ah,02H 0005 24 f7 and al,0f7H 0007 c3 ret
No disassembly errors
—-[ finis ]—————————————————————–
===============================================================================================================================
===============================================================================================================================
