Tag Archives: application

19 Android must kill gadgets

19 Android must kill gadgets

1. Xappdbg
xappdbg is an application development tool that can change the parameters in the code during operation. This tool can save you a lot of time, because you don’t have to recompile and run your program for every small change of the application.

2. Chkbugreport
this tool can quickly check the output Android error reports. It does semantic analysis from a large number of text files output by Android error reporting tool, and then parses them into a more readable document, which is easier to analyze. Chkbugreport is also an open source project.
3. Apkanalyser
this is a static and virtual analysis tool. You can have a comprehensive overview of the application architecture. You can use it to check API references, check application dependencies, and decompile bytecode. Apkanalyser is a complete open source tool chain. It supports modifying the application binary code. You can repackage, install, run and verify the results of logcat.

4. Appxplore
with the appxplore tool, you can browse all the apps installed on your Android device, and analyze the details of many apps — app version, package name, certificate, permission, signature, activities and other information that can’t be viewed on many devices. Appxplore is especially useful for checking the memory size occupied by the application when it is running and whether the files can be moved to the SD card. Similarly, developers can test and ensure the quality of the application. This ensures that the application displays the appropriate permissions on the manifest file.
5. Memory analyzer (MAT)
memory analyzer on eclipse is a fast and functional Java heap analysis tool, which can help you find memory leaks and reduce memory overhead. Using memory analyzer, we can analyze millions of objects and multiple heap dumps, quickly count the number of objects left, so that we can see which objects prevent the garbage collector from collecting. Finally, run a report to automatically report the suspicious place that caused the leak.
6. Eclipse Plug-in sqlitemanger
this plug-in can help developers view and modify SQLite database on eclipse.
7. Robotium
robotium is a testing framework, which can simply write a powerful and robust automatic black box test container for Android applications. With robotium, test developers can support a variety of Android activities to write function, system and acceptance test scripts. Robotics fully supports activity, dialogues, toast, menus and context menus.
8. Acra
acra is a function library that allows Android applications to automatically issue Google doc format crash reports. Android developers can get the data of application crash or wrong behavior through acra. If a crash occurs, your application will not add user alerts beyond the existing system crash alerts or reporting functions. If toast, status bar or direct dialog mode is used, the “forced close” dialog will no longer be displayed. Even if the reminder function of the native system on the device is turned on, another report cannot be sent.
Br> the Android binder will convert all of your Android layout statements into a series of XML files. Type a prefix, select the range to paste on the XML file, and then click generate. Select “verb” to find out why all the areas are skipped.
10. The ever expanding ecosystem of Android devices has brought unique challenges to test applications. Spoon simplifies this task by assigning execution of instrumentation tests and displaying results in a more meaningful way. Instead of trying to be a new form of testing, spoon makes the current instrumentation testing more useful. With the application’s APK and instrumentation APK, spoon can run tests on multiple devices at the same time. Once all the tests are completed, a static HTML summary is generated that includes the details of the various device tests.
11. Android content provider code generator
do you often copy and paste a lot of code to write a content provider?Then this code generation tool can help you.
12. Start your next android app in 10 seconds. Android KickStarter uses the most popular library to help you quickly build a configured android app. It creates and configures projects for you, and focuses directly on the code!
13. Android holo color generator
this Android holo color generator allows you to simply create Android components for your application, such as editext or spinner, and use your own colors. It will generate all nine necessary patch assets and related XML drawables and styles files, which can be directly copied into your project.
14. Actionbar style generator
this actionbar style generator allows you to easily create a concise, attractive and bug free custom actionbar. It will generate all nine necessary patch assets and related XML drawables and styles files, which can be copied directly into your project.
15. Asset studio
asset Studio allows you to quickly and easily generate icons from existing images, clip art or text resources.
16. Little eye labs
little eye labs is a performance analysis tool for Android applications. Its product has been renamed “little eye” instead of “little eye appinsight”. Keep our product catalog concise, consistent with the overall theme that we focus on simplicity in each part of our work.
Main features:
outline any application;
record and playback video;
front end and background usage;
consumption of CPU, memory and data;
manual or automatic heap dump;
save and share.
17. The concept of “overdraw” is considered to be very important in the Android world. At the Google I/O conference, few speeches emphasized the importance of reducing overdraft. This is the first tool (the best I know) that can help us easily identify overdrafts.
Main features
3D query;
find overdraft;
box model;
combine with DDMS;
view hierarchy;
background/content;
webgl;
2D to 3D to 2D;
· more
18. Android Button Maker
Android Button Maker is a tool that can generate button code online. The Android API provides drawable resources for geometric shapes defined by XML files, including colors, boundaries, and gradients. The generation of these buttons is based on XML code in drawable form, which can load faster than ordinary PNG buttons. You can customize the properties of the button on the settings panel and get its source code.
19. Jsonschema2pojo
is used to generate POJO (plain old Java object) class on JSON architecture. This small and powerful tool can save you the time to write POJO.

Exception loading sessions from persistent storage

Tomcat error:
serious: IOException while loading persistent sessions: java.io.EOFException
Exception loading sessions from persistent storage

Error Description:
0 The session data stored in the hard disk failed to read. Eofexception indicates that the end of the file or the end of the file stream was unexpectedly reached during the input process, resulting in the failure of reading data from the session. This exception is a problem of Tomcat itself, generally because some active sessions were persisted when Tomcat was shut down abnormally last time. When Tomcat was restarted, Tomcat tried to recover these sessions N but failed to read

Solution:
find the corresponding project under Tomcat / work / Catalina / localhost session.ser File, and then delete it

The original text is reproduced from: http://blog.csdn.net/angeldhp/article/details/4742075

Configuring OpenGL in VS

 
VS2010
GLUT Download Address:
http://www.opengl.org/resources/libraries/glut/glutdlls37beta.zip
Glut. H – & gt; C:/Program Files (x86)/Microsoft SDKs/Windows/v7.0 A/Include/gl
glut.dll,glut32.dll —> C:/Windows/ SYSWOW64 (Windows 7 64-bit operating system)
– & gt; C:/Windows/System32 (Windows 7 32-bit operating system)
glut.lib,glut32.lib —> C:/Program Files (x86)/Microsoft Visual Studio 10.0/VC/lib
!!!!! No!!!!! With # define macros GLUT_DISABLE_ATEXIT_HACK
So a lot of people Glut. h didn’t know where to put it, and they created a new folder, and a lot of people Glut. h said,
To search the GL folder, place Glut. h in the GL folder that contains the two files Glut. h and Glut. h.
Direct copy of the following routine compilation can be passed
Routine as follows
#include < gl/glut.h>
Void myDisplay (void)
{
glClear (GL_COLOR_BUFFER_BIT);
glRectf(-0.5f, -0.5f, 0.5f, 0.5f);
glFlush ();

} int main (int arg c, char * argv [])
{
glutInit (& amp; argc, argv);
glutInitDisplayMode (GLUT_RGB | GLUT_SINGLE);
glutInitWindowPosition (100, 100);
glutInitWindowSize (400, 400);
GlutCreateWindow (” First OpenGL program “);
glutDisplayFunc (& amp; myDisplay);
glutMainLoop ();
return 0;
}
VS2008
The first step is to choose a compilation environment
now the mainstream of Windows compiled environment have Visual Studio, Broland c + + Builder, Dev – c + +, etc., they are all support OpenGL.

I chose Visual Studio 2008 and VC6++ as the environments to learn OpenGL.

Second, install the GLUT toolkit

Glutters
Glutters
Glutters
Glutters
Glutters
Glutters
Glutters
Glutters

Windows GLUT download address :(size about 150K)

http://www.opengl.org/resources/libraries/glut/glutdlls37beta.zip

cannot be downloaded from the above address, please use the links below:

http://upload.programfan.com/upfile/200607311626279.zip

install GLUT for Windows:

2, Search for “gl.h” in “My Computer” and find the folder in which it is located

If it is VC++6, then Glut.h should be copied in “D:/Program Files/
MicrosoftVisualStudio/VC98/Include/GL folder “). If it’s VisualStudio2008, copy Glut.h to
X :/Program Files/Microsoft/Visual Studio 9.0/VC/include/GL X is the disk symbol that you use to install VS. If you install VC++, there is a GL file in it. Visual Studio 2008 needs to go to it yourself
Create a new one)

3, let the glut of decompression. Lib and glut32 lib on static libraries in the folder (that is, with the include side by side under the lib folder).

4, let the glut of decompression. DLL and glut32 DLL in the operating system directory under the system32 folder. (Typical location: C:/Windows/System32)

Step 3: Set up an OpenGL project

VisualStudio2008 or VC++6:

choose File – & gt; New-> The Project, and then
Select Win32 Console Application, (not Win32 Application). Select a name and press OK. Click Application Settings on the left side of the resulting dialog box, locate the Empty Project, check it, and select Finish. Then add a code file to the project, called “opengl.c”, and note that you end the file with.c.

is done, just like any other project.


include <

#include < GL/glut.h>

#pragma comment(lib, “opengl32.lib”)

#pragma comment(lib, “glu32.lib”)

#pragma comment(lib, “glut32.lib”)


rst OpenGL program

A simple OpenGL program is as follows:
(Note that if you need to compile and run, GLUT needs to be installed correctly, as described above.)

# include & lt; GL/glut.h>

void myDisplay (void)

{

glClear (GL_COLOR_BUFFER_BIT);

glRectf(-0.5f, -0.5f, 0.5f, 0.5f);

glFlush ();

}

int main(int argc, char *argv[])

{

glutInit (& amp; Arg c, argv);

glutInitDisplayMode (GLUT_RGB | GLUT_SINGLE);

glutInitWindowPosition (100, 100);

glutInitWindowSize (400, 400);

GlutCreateWindow (” First OpenGL program “);

glutDisplayFunc (& amp; myDisplay);

glutMainLoop ();

return 0;

}

This program draws a white rectangle in the center of a black window. Each of the statements is explained below.

First, you need to include the header file #include
; GL/glut.h> So this is the header file for GLUT.

GL/gl.h> And & lt; GL/glu.h> , but both files are automatically included in the GLUT header file and do not need to be included again.

then look at the main function.

int main(int argc, char *argv[])
int main(int argc, char *argv[]) Comrades who have not seen it, please read the book more, and then look down when you understand.

Notice that all statements in main begin with GLUT, except for the return at the end.
The functions that begin with GLUT are all functions provided by the GLUT toolkit, and the functions used are described below.

1, glutInit (GLUT) — This function must be called once before another GLUT is used. Glutinit (& Arg C, Arg V.

2, glutInitDisplayMode, set the display mode, including GLUT_RGB said using RGB color, and the matching and GLUT_INDEX (using the index color). GLUT_single means to use a single buffer, as does GLUT_DOUBLE (to use a double buffer). For more information, please Google yourself. Of course, there will be some explanations in future tutorials.

>
>
>
>
>
>
>
>

>
>
>
>

5, GlutCreateWindow, create the window based on the information set above. Parameters will be used as the title of the window. Note: The window is not immediately displayed on the screen after it is created. You need to call glutMainLoop to see the window.

6, glutDisplayFunc, set up a function, when the need for drawing, this function will be invoked. (This statement is not accurate, but the accurate statement may not be easy for beginners to understand, so say for the time being).

(This may not be obvious to beginners, but for now it is enough to know that this function displays a window and waits for the window to close before returning.)

in glutDisplayFunc function, we set up “when need drawing, please call myDisplay function”. So myDisplay function is going to be used to draw the graph. When you look at the three function calls in MyDisplay, you see that they all start with GL.
Functions that start with GL are standard OpenGL functions, and the ones we use are described below.

GL_Color_BUFFER_BIT clears the color, and glClear clears other things, but I won’t cover them here.

2, Glrectf, draw a rectangle. The four parameters represent the horizontal and vertical coordinates of the two points located on the diagonal.

3, Glflush, which ensures that previous OpenGL commands are executed immediately (rather than having them wait in the buffer). It works similarly to fflush(stdout).


Android avoids memory leak: reasonable use of getcontext() and getapplication ()

To conclude:
GetApplicationContext () can fetch the Application object, and getContext() is generally considered to return an Activity object (which, of course, is not actually limited to the Activity). 2. For Application, you can see from the Manifest file that an Application typically has only one Application node. Application is just an Application, that is, as long as the current Application is still running, it can get to the Application object. 3.Application is a long reference, and Activity is a short reference. Application is suitable for storing objects that need to be read repeatedly, such as the user’s username and password, the current Settings of the Application, and so on. When an Activity is applied to the current active form, such as displaying a Dialog, or creating a new View, the context object passed in should be the current Activity, not the Application.
    
Android applications limit heap memory to 16M (note: heap memory is also related to device performance; available heap memory for high performance devices may be 24M or more), with phone functions taking up a portion of the heap and developers having very limited access to it. If you’re not going to run out of memory, your application should use as little as possible so that other programs don’t get killed when they run. The more applications the Android system can hold in memory, the faster users can switch between applications. As part of my work, I researched memory leaks in Android applications and found that most of the time it was the same problem: holding a long reference to the Context.
In Android, Context is used for many operations, but mostly to load or access resources. This is why all Widget components receive a Context parameter in the constructor. For a typical Android Application, there are usually two contexts, namely Activity and Application. Developers often need the context to select an Activity when passing between classes or methods.

this indicates that Views have a reference to the entire Activity, so anything in your Activity will be held by Views, which are generally held by the view hierarchy and its corresponding resources. So, if you give away the Context, you’re giving away some memory. If you’re not careful, it’s very easy to reveal an Activity.
when the screen direction changes, the system will save its state by default, destroy the current Activity, and create a new one. To do this, Android reloads the application’s UI from resources. Now let’s say you’re developing an app that contains a lot of bitmaps, and you don’t want to load bitmaps every time you switch screens. So the easiest way to do this is to use the static static field.

Practice based on how to tango with Django 1.7 (1)

The point of the book is to develop an application called Rango. To develop this application, it will cover most of the core content of making web applications.
2.4Rango: Initial Design and Planning
2.4.1 Design overview
Your client needs to set up a website called Rango, which allows users to browse their own customized web pages. In Spanish language, rango used to mean “sort through quality” or “place in the hierarchy of society” (see https://www.vocabulary.com/dictionary/es/rango).

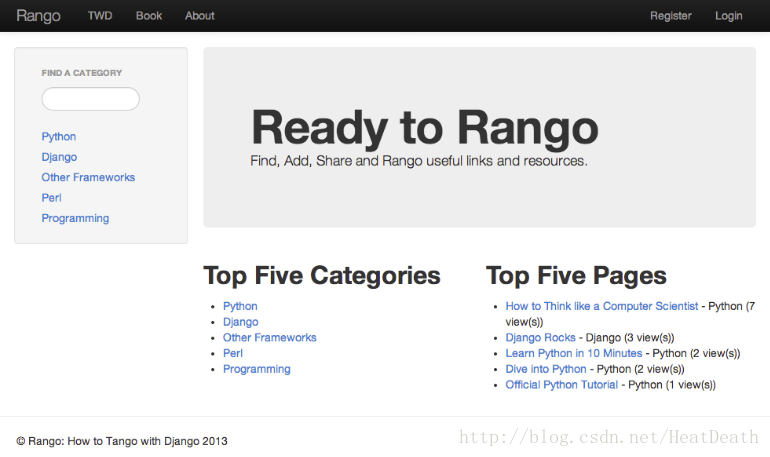
On the home page of the site, visitors can see:

The 5 Most viewed pages the 5 highest quality directories How visitors can browse or find a directory

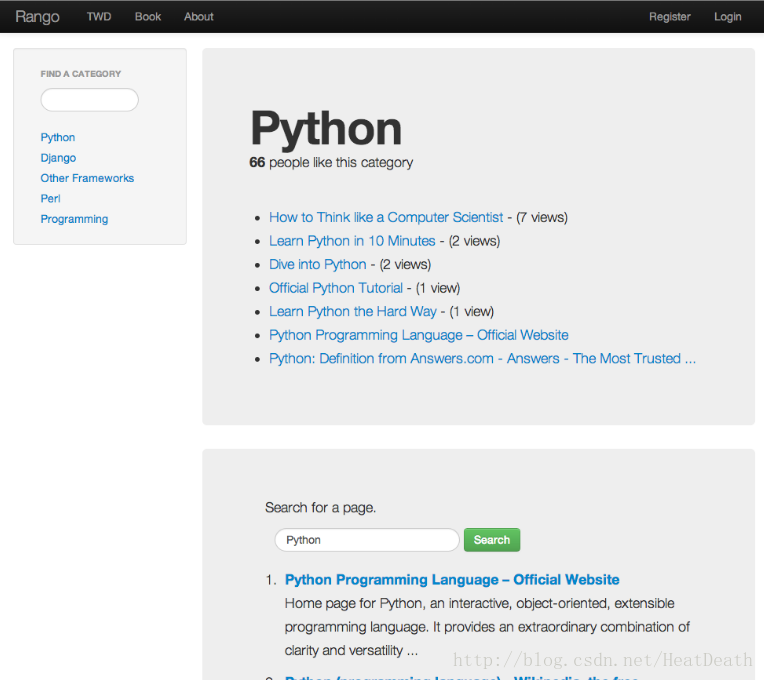
When a user views a directory page, it will display:

Directory name, number of visits, number of likes; A page close to the directory (showing the page title and its URL); Some search functions (via Bing’s search API) are used to find other pages that can be linked to this directory

A particular directory, the name of the directory the client wants, the number of times each directory page has been visited and how many users have clicked the ‘like’ button to be recorded. Each directory can be accessed via a readable URL – e.g. /rango/books-about-django/. Only registered users can search and add pages to the catalog. In the meantime, visitors can sign up for an account.

At first glance, the app looks strange. In fact, it’s just a list of directories, and they can link to the page, right?However, there is still a lot of complexity to deal with. First, let’s try to draw a picture of what we want to develop.
2.5 practice
Before going on, consider the instructions below and try to draw a design.
A framework URL binding of the N-tier or system architecture diagram home page and catalog page is the entity-relationship diagram that we are going to implement the data model
2.6 N- layer structure
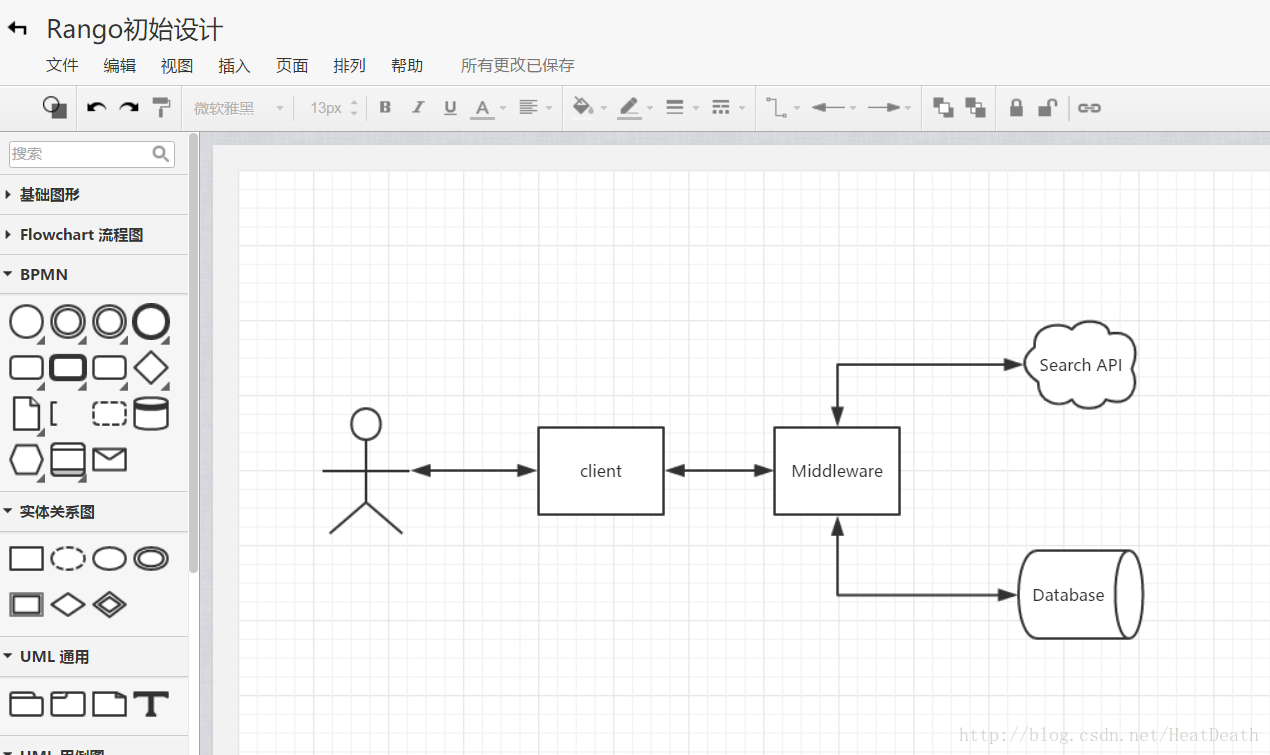
Rango is a variant of the 3-tier structure in which most Web applications are structured, and requires interaction with an external service.
The UML diagram is drawn using Processon

If we were to create Web applications using Django, we would need the following techniques for each layer.
Client is a browser (i.e. Chrome, Firefox, Safari, etc.) that will return HTML/CSS page; Middleware is a Django application that will form the end of developing Django built into a Web service; database will be SQLite3 database engine based on Python; search API will be Bing search API
Although we had to deal with all the pieces above, most of the focus of the book was on developing middleware.
2.7 wire frame
Wireframes are a great way to design a website’s interface. They save a lot of time and are different from tool-dependent hand drawing. For Rango, we would like its home page to look like the figure below.

The directory page is shown in the figure below:

2.8 Page and URL mappings
By the rule description, we have confirmed that we will present two pages to the user at different times. To get to different pages we need to map the URL, which is the text that the user enters in the browser to get to the page.Rango’s URL map is shown below.
/rango/about/ will point to the About page view./ Rango /category/ will point to each category page view, which might be:

The game; Python trick code or compiler

/rango/etc/, which sets aside etc for future functional implementation
When we create an application, we might need to create some other URL mappings. But those are the ones that we need to build in the first place. Also consider that if the provided directory name does not exist, we need to convert the directory name to a valid URL string.
As we dig deeper into the book, we’ll get a handle on creating web pages with the Django framework and using the model-View-Template design pattern. Now that we have a general idea of the URL mapping and web page interface, we also need to define the data model to provide the data for our application.
2.9 Entity-relationship diagram
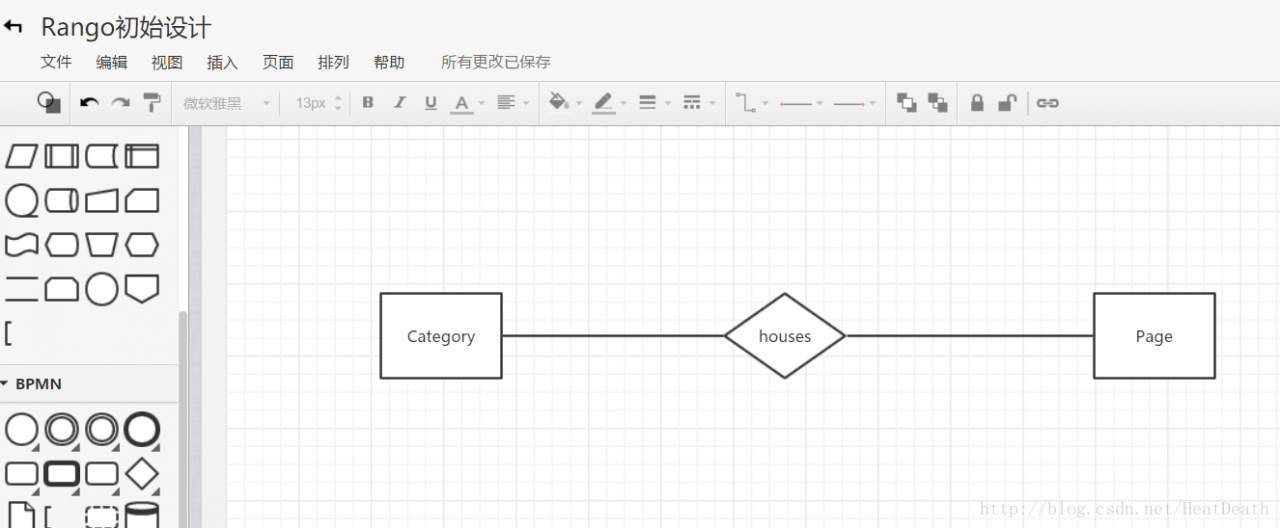
Given the rules, we know that there are at least two entities: a directory and a page. One directory can hold many pages at the same time. We can describe our data model through the ER diagram below.

Note that a page can be in one or more directories. So we need to have a many-to-many relationship. To make things less complicated, let’s make the simple assumption that a directory can contain multiple pages, but a page can only belong to one directory. This does not prevent a page from appearing in two different directories – in a less-than-ideal situation, the page might enter twice.
Writing technical notes is a great hobby, especially when you know it will happen again! By writing them down, you can communicate with your development team to ensure that the same problems can be solved quickly.
Str for string or char,Int for integer,URL for URL, FK for Foreign Key.

We also have a user table – not shown here, but described later. In the following sections we will see how to instantiate these data models in Django and learn how to use Django’s ORM to connect to a database.
2.10 summarize
These designs and instructions will be helpful in building our Web applications. The same techniques and procedures we will use apply to most data-driven websites. Familiarity with these specifications and designs is of great benefit to us.
If you already have Python2.7 and Django1.7 installed, and you know how to set up your path from the command line, you can skip the Django basics chapter. Otherwise, let’s look at chapter three.
2.10.1 Work with the Django official tutorial
We recommend that the Django official tutorial be used as an exercise for each chapter of the book. You can find the correspondence between the chapters in the two books in the table below. The official teaching exercises will help you get a deep understanding of the Django framework and improve your skills.
Tango woth Django Django Tutorial
Chapter 3 Part 1 – Models
Chapter 5 Part 2 – The Admin Interface
Chapter 6 Part 3 – URLs and Views
Chapter 7 Part 4 – Templates
Chapter 18 Part 5 – Testing
Chapter 11 Part 6 – CSS

error code 11 – Administrative Limit Exceeded

The problem is ldap server has limitation for the user about numbers of entries searched.

Open your directory server (name), Configuration Folder, Performance. On right panel check Client Control folder. You may see:

Size limit

Look-through limit

Time limit

Idle timeout

The look-through limit specifies the maximum number of entries that will be examined for a search operation.

The size limit specifies the maximum number of entries the server returns to the client application in response to a search operation.

The time limit specifies the maximum time the server spends processing a search operation.

The idle timeout specifies the time a client connection to the server can be idle before the server drops the connection.

Change these options to “unlimited” can resolve this problem.