Tag Archives: Android

Perfect solution Error:Execution failed for task ‘: APP:transformClassesWithDexForDebug ‘… Problem

believe that everyone in the Android development can not avoid to be integrated in the process of the third party after a project, integration, sometimes it will encounter this ash often hate transformClassesWithDexForDebug, detailed Log is as follows:


Error:Execution failed for task ':APP:transformClassesWithDexForDebug'.
> com.android.build.api.transform.TransformException: com.android.ide.common.process.ProcessException: java.util.concurrent.ExecutionException: java.lang.UnsupportedOperationException

The main reason for this problem is that the introduction of Libary overlaps with some Libs in existing projects. Please check in detail and make sure that there is only one copy of lib in use, such as v4, v7, utdid.jar, etc.

if you use other android’s official support library see, http://developer.android.com/tools/support-library/features.html

if there is still a problem after the above situation check, you can try to use the following configuration to solve the problem

defaultConfig {
    ...
    minSdkVersion 14
    targetSdkVersion 21
    ...

    //Enabling multidex support.
    multiDexEnabled true
}
dependencies {
    compile ´com.android.support:multidex:1.0.1´
}


and then in the manifest we introduce this, if there is a custom AppApplication, let your own AppApplication inherit this class

<?xml version="1.0" encoding="utf-8"?>
<manifest xmlns:android="http://schemas.android.com/apk/res/android"
    package="com.example.android.multidex.myapplication">
    <application
        ...
        android:name="android.support.multidex.MultiDexApplication">
        ...
    </application>
</manifest>

may also be a JDK version 1.8 problem, which is not an accident, so suspect that Gradle has compatibility problems with JDK 1.8 and try to reduce the number of JDK dependencies to 1.7

compileOptions {
    sourceCompatibility JavaVersion.VERSION_1_7
    targetCompatibility JavaVersion.VERSION_1_7
}

can be run or there will be errors after the configuration is completed, so we can also add this sentence in app.bulid and re-run after that. The specific amount or 4g can be seen from the computer configuration modification (2g, 3g, 6g, 8g).

dexOptions {
    javaMaxHeapSize "4g"
}

the above is the Error: I met in the Execution failed for task ‘: APP: transformClassesWithDexForDebug’ all solutions, sharing out hope to help everyone.


Failed to resolve: com.android.support:appcompat-v7:27.

I think many novices using AndroidStudio will run into the following problem the first time they start a new project:

[problem description]

for this problem, I think if I don’t know the solution, I will install the relevant plug-in

as shown in the following diagram

well, I’m not going to say any more nonsense about this kind of problem and I’m going to go straight to my solution, which is

[solution]

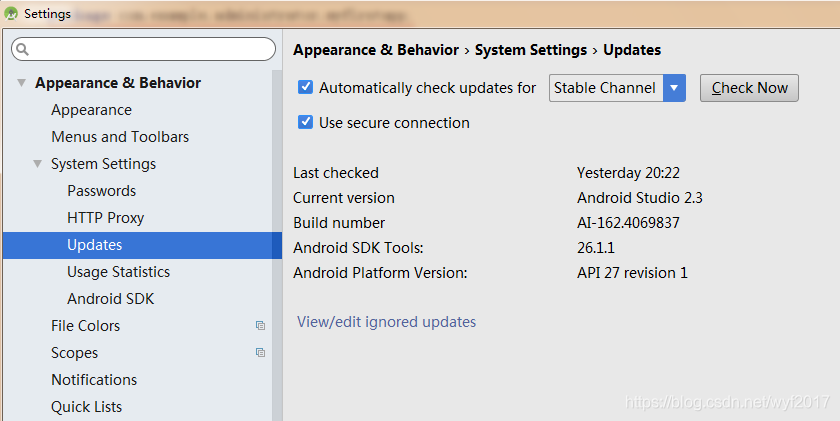
1. Click on the File – & gt; Settings appear as shown below

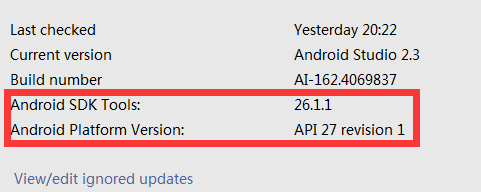
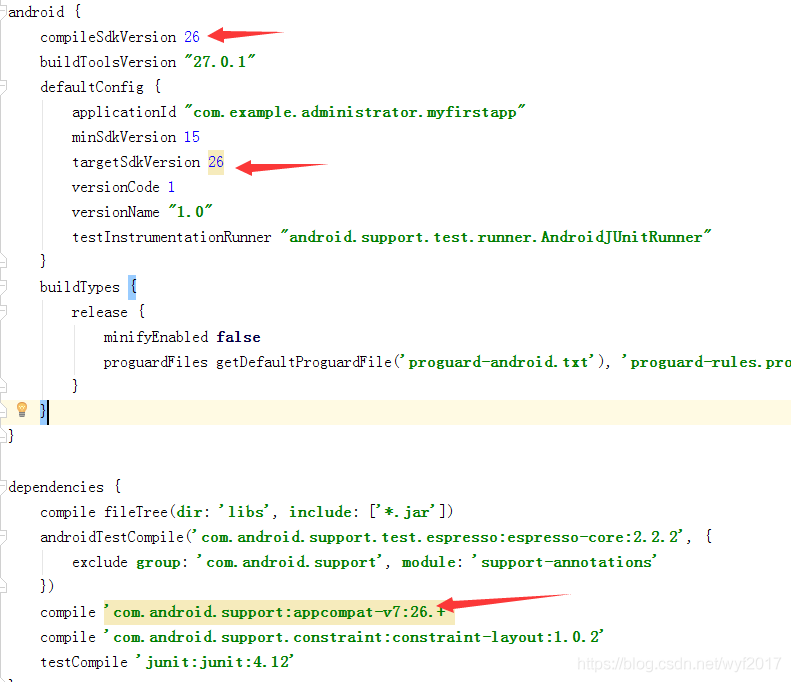
and then let’s look at the bottom red line that I drew, these two represent our SDK model and Android API version

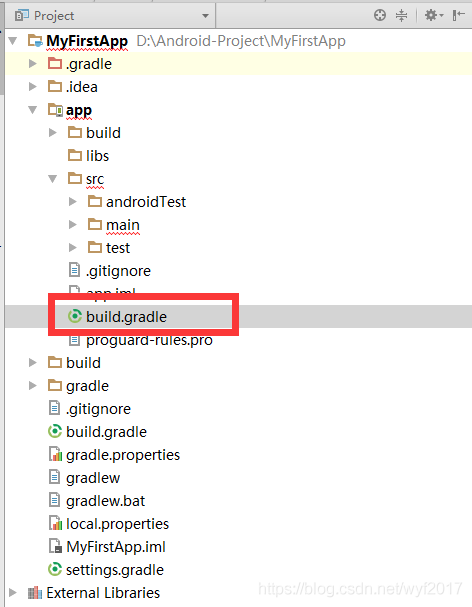
2. We switch our process items from Android– > Project, then click builde.gradle

in the red line box as shown below

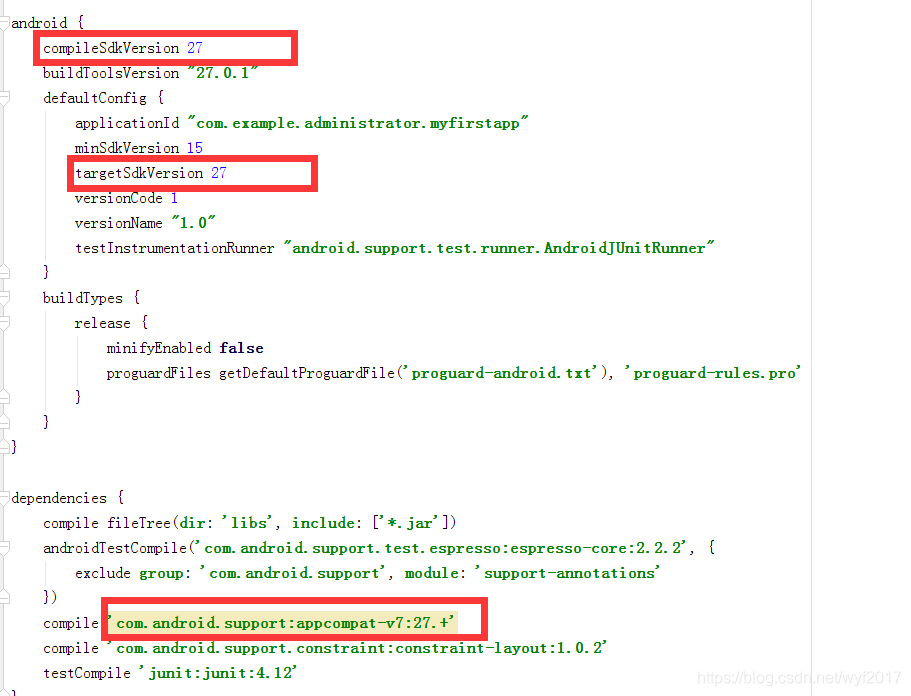
appears as follows

what I’m drawing in the figure above is the thing that we’re going to change because we just saw that our SDK version is 26 so we just change the red line from 27 to 26 in the figure like this

then click Try Again as shown above. Wait a moment, and the problem will be solved.

and then we’re done. Isn’t that easy?If you need more learning resources, please pay attention to the public number in the upper left corner.

Failure [INSTALL_FAILED_UPDATE_INCOMPATIBLE: Package com.* signatures do not match the previously

problem description:

Performing Streamed Install
adb: failed to install app-debug.apk: Failure [INSTALL_FAILED_UPDATE_INCOMPATIBLE: Package com.*.app signatures do not match the previously installed version; ignoring!]

encountered this problem when installing the phone application from the command line adb install-r app-debug.apk.

reason: the previous version is already installed on the phone, and the application may not be found on the desktop, but there are directories and cache files in the phone system. Many other approaches were tried, and the problem was eventually solved by executing the uninstall command.

solution: run the command adb uninstall com.*. App uninstall the program, and then execute adb install-r app. debug.apk, the program is installed successfully.

Javabinder:

JavaBinder: !!! FAILED BINDER TRANSACTION !!! Solution analysis for exceptions

is the cause of

I have been in charge of the development of the company’s mobile multimedia app. Recently, I was in charge of A project: in an Activity, I read the picture files in the external usb disk and encapsulated them as

public class MediaFileBean implements Serializable {
private static final long serialVersionUID = 1L;
private String name = "";
private String time = "";
private String path = "";
private Bitmap bitmap;//图片第一帧,即缩略图
private String fileName = "";
private int isLove = -1;
private FileFormat fileFormate;
private String sortLetters;

    ......
}

and display thumbnails in a list, when you click on the display image, pass all the data to B (dedicated to display the image) :

AActivity.java:
private void enterBActivity(ArrayList<MediaFileBean> mPhotoList, int position) {
    Intent intent = new Intent(mActivity, BActivity.class);
    intent.putExtra(Constants.PHOTO_ITEM_LIST, mPhotoList);//将扫描出来的图片文件传递给B
    intent.putExtra(Constants.PHOTO_CURRENT_POSITION, position);
    startActivity(intent);
}

B receives data from A:

//onCreate()中调用initData()
public void initData() {
    ......
    mPhotoList = (ArrayList<MediaFileBean>) getIntent().getSerializableExtra(Constants.PHOTO_ITEM_LIST);
    currentPosition = getIntent().getIntExtra(Constants.PHOTO_CURRENT_POSITION, -1);
    ......
}

but if the usb disk contains a lot of pictures, no matter how point, is not into the B page, the program does not crash, background print logcat, found JavaBinder:!!! FAILED BINDER TRANSACTION !!! Error

cause of occurrence

online search, the general reason is that the Bitmap should not be more than 40KB for data delivery with intents. According to the official website, data delivery with intents is limited, the maximum size is about 1M

solution

1. Try not to pass the Bitmap in intents. saves the bitmap to be passed in the SD, instead of the url in the Intent.

2. If you really want to pass the Bitmap, to its compression

`/**
 * 压缩图片
 * 该方法引用自:http://blog.csdn.net/demonliuhui/article/details/52949203
 * @param image
 * @return
 */
public static Bitmap compressImage(Bitmap image) {
    ByteArrayOutputStream baos = new ByteArrayOutputStream();
    image.compress(Bitmap.CompressFormat.JPEG, 100, baos);//质量压缩方法,这里100表示不压缩,把压缩后的数据存放到baos中
    int options = 100;
    while (baos.toByteArray().length/1024 > 100) {  //循环判断如果压缩后图片是否大于100kb,大于继续压缩
        baos.reset();//重置baos即清空baos
        image.compress(Bitmap.CompressFormat.JPEG, options, baos);//这里压缩options%,把压缩后的数据存放到baos中
        options -= 10;//每次都减少10
    }
    ByteArrayInputStream isBm = new ByteArrayInputStream(baos.toByteArray());//把压缩后的数据baos存放到ByteArrayInputStream中
    Bitmap bitmap = BitmapFactory.decodeStream(isBm, null, null);//把ByteArrayInputStream数据生成图片
    return bitmap;
}`

3. data to be passed to the global variable

is not helpful if you have a large amount to pass. In my example above, even if I remove the bitmap variable from the bean, I still get an error because the array I’m passing is too large! Another way to think about it is that the data to be passed will be placed in a fixed value in the life cycle and assigned to value at any time. When you think about it, it is appropriate to put it in the Application:

public class MediaApplication extends Application {
    // 用于传递的图片数据
    private List<MediaFileBean> mPhotoList;
    private static MediaApplication mInstance;
    @Override
    public void onCreate() {
        super.onCreate();
        mInstance = this;
    }

    public synchronized static MediaApplication getInstance() {
        return mInstance;
    }

    public void setPhotoList(ArrayList<MediaFileBean> list){
        this.mPhotoList = list;
    }

    public List<MediaFileBean> getPhotoList(){
        return this.mPhotoList;
    }

}

when A jumps to B:

private void enterBActivity(ArrayList<MediaFileBean> mPhotoList, int position) {
    MediaApplication.getInstance().setPhotoList(mPhotoList);
    Intent intent = new Intent(mActivity, BActivity.class);
    intent.putExtra(Constants.PHOTO_CURRENT_POSITION, position);
    startActivity(intent);
}

B received A data:

@Override
public void initData() {
    mPhotoList = (ArrayList<MediaFileBean>) MediaApplication.getInstance().getPhotoList();// 解决异常:JavaBinder: !!! FAILED BINDER TRANSACTION !!!
    currentPosition = getIntent().getIntExtra(Constants.PHOTO_CURRENT_POSITION, -1);
}

Installation failed with message Invalid File

Installation failed, message file is invalid:K: Project \app\build\intermediates\split-apk\with_ImageProcessor\debug\slices\slice_0.apk It is possible to fix the problem by uninstalling the existing version of the apk and reinstalling it.

Warning: Uninstalling will delete application data!

Do you want to uninstall an existing application?


The Android project running into the emulator is reporting this problem:

Click the Build tab -> Clean Project

Click on the Build tab – in Building APKs

Translated with www.DeepL.com/Translator (free version)

Error:Execution failed for task ‘:app:preDexDebug’. > com.android.ide.common.process.ProcessExceptio

error :

Error:Execution failed for task ‘:app:preDexDebug’.
> com.android.ide.common.process.ProcessException: org.gradle.process.internal.ExecException: Process ‘command ‘C:\Program Files\Java\jdk1.7.0_67\bin\java.exe’ finished with non-zero exit value 1

reason: the configuration in gradle

compileSdkVersion 23
buildToolsVersion ‘24.0.0 rc3’

compileSdkVersion and buildToolsVersion are inconsistent

changes compileSdkVersion as well as buildToolsVersion

compileSdkVersion 23
buildToolsVersion ‘23.0.0’

and then just compile it once.

AS3.5 Error gradle project sync failed.Basic functionality(e.g.editing,debugging) will not work

The functionality of

Android Studio has reported an error for the gradle project sync failed.Basic functionality(e.g.editing,debugging) will not work


1. Environment configuration of Android SDK Next you should encounter a yellow box: gradle project sync failed.Basic functionality(e.g.editing,debugging) will not work

this error don’t worry

you first need to configure the Android environment variable

environment configuration of Android SDK
is the same as Java JDK, computer — properties — advanced system Settings — environment variable in the bottommost right corner — system variable below — new

1, create a new environment variable, the variable name is ANDROID_HOME, the variable value is D:\adt-bundle-windows-x86_64-20140702\ SDK (subject to your installation directory, make sure there are tools, add-ons and other folders in it), click ok.

2. Add the value of the user variable after PATH; %ANDROID_HOME%\platform-tools; Click Ok. Add the system variable PATH; D:\adt-bundle-windows-x86_64-20140702\sdk\tools

to test whether the JDK is installed successfully:
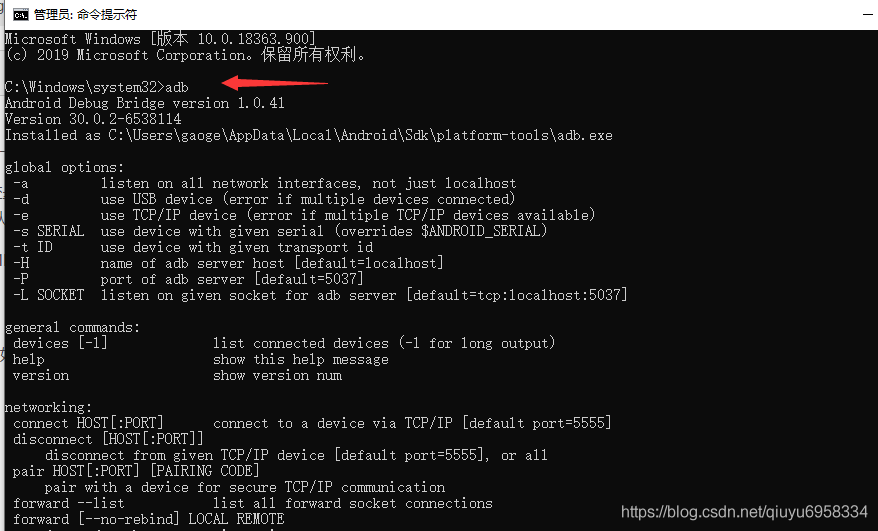
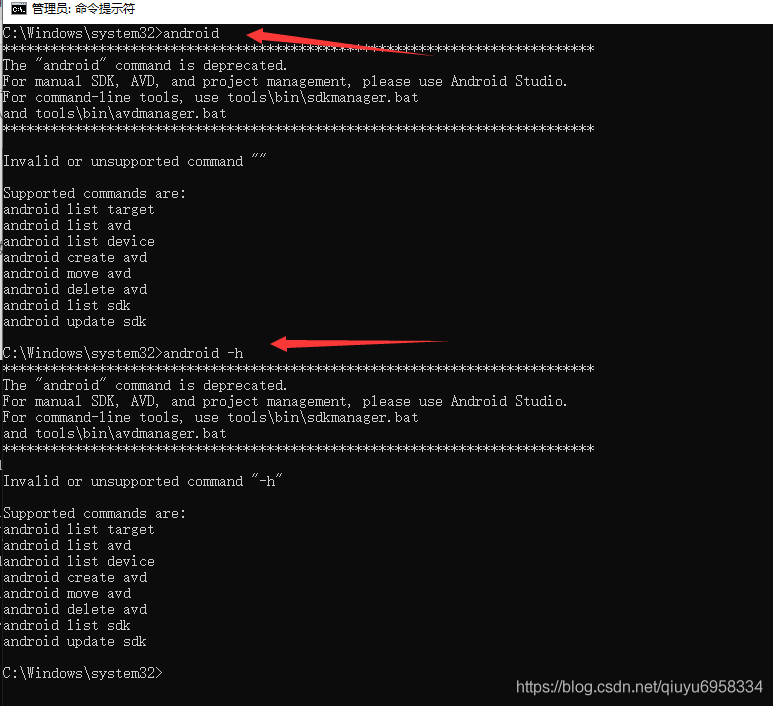
click run — type CMD — enter — type adb — enter. If a lot of English appears, as shown in the figure below, it means the configuration is successful. After typing Android, start Android SDK Manager. Or type “Android-h”.

click to download

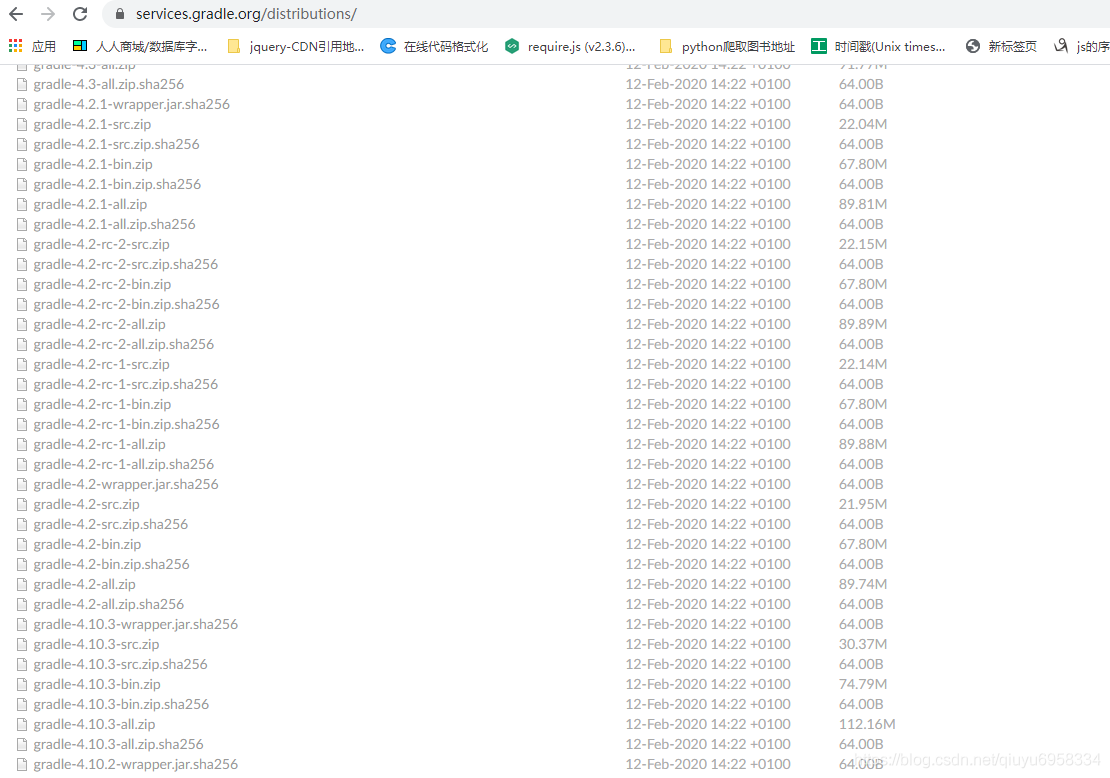
https://services.gradle.org/distributions/

android studio Error Gradle project sync failed. Please fix your project and try again

  • Android Studio may report Gradle project sync failed. Please fix your project and try again, the reason should be that some of the Gradle items are not properly configured.

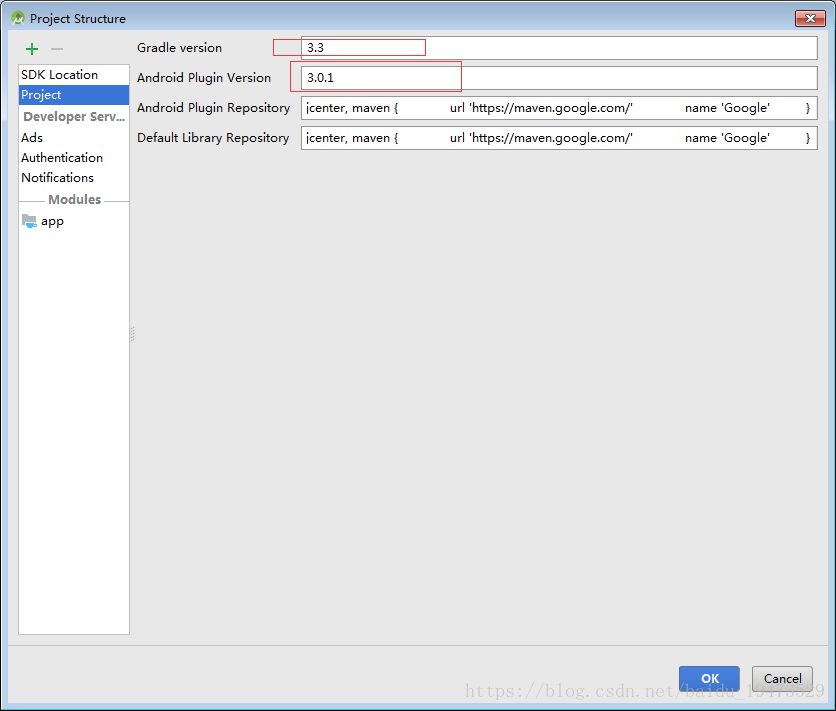
  • open File – >

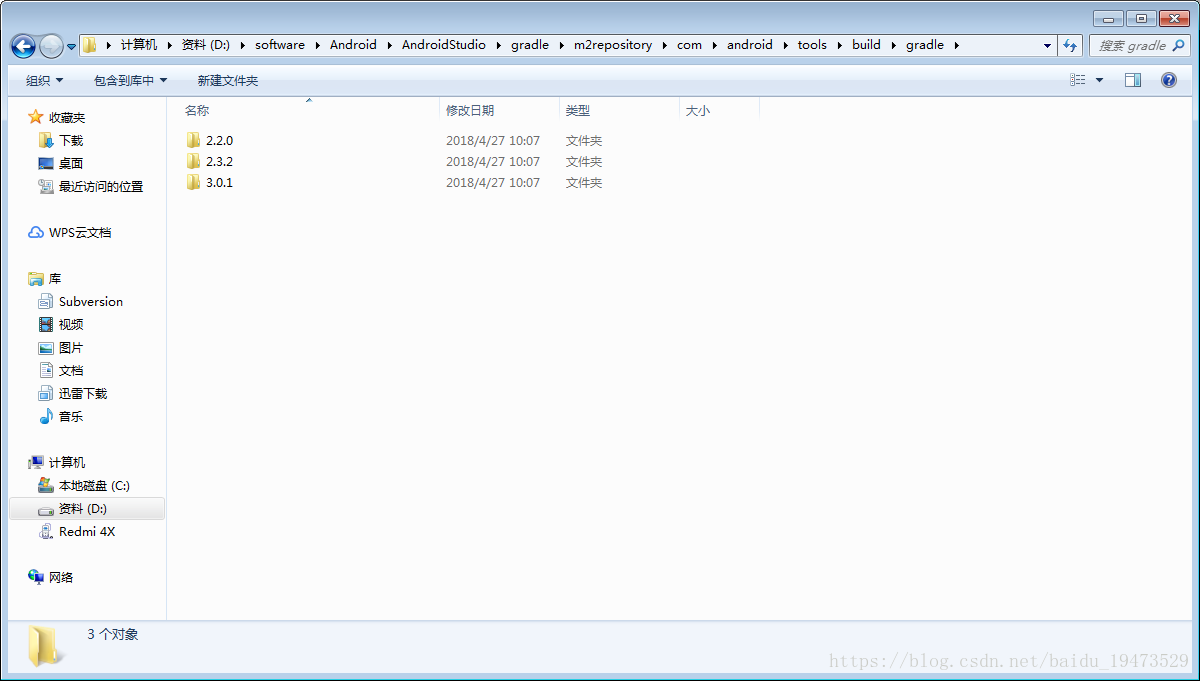
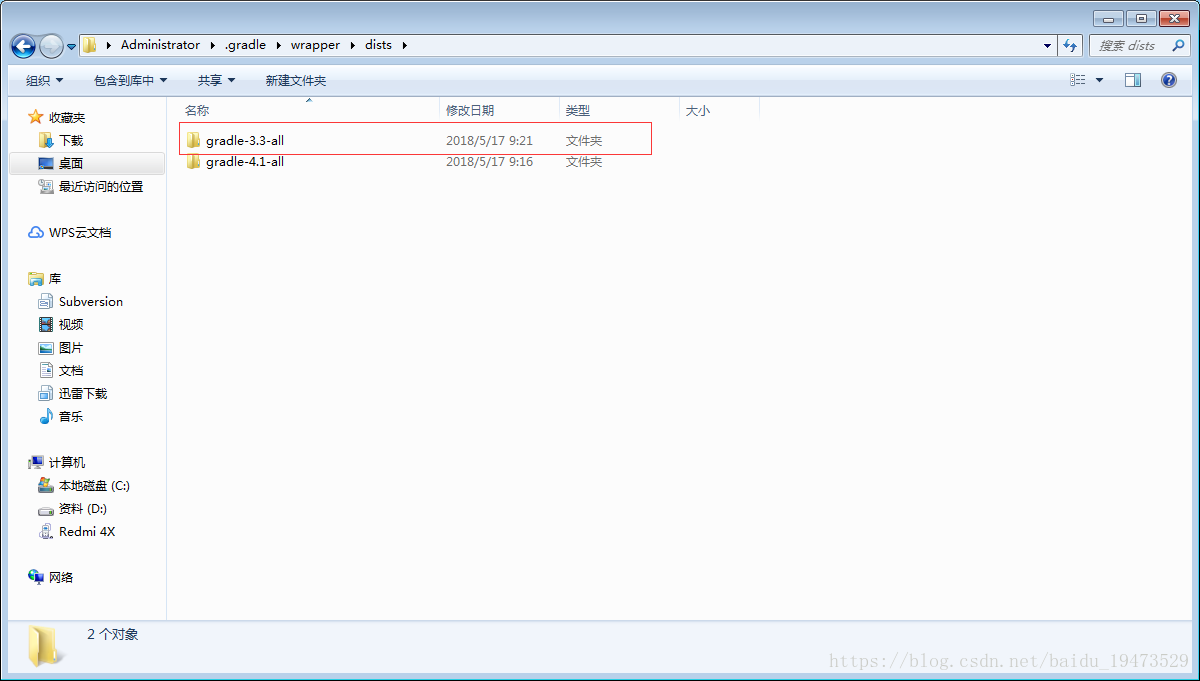
  • the two versions must be locally available, and must be compatible. How do you know if you have them locally?The following 2 pictures show their respective paths.


(gradle\m2repository\com\ Android \tools\build\gradle)


(the default path for Windows is in C:\Users\ administrator.gradle \wrapper\ covariance)

If the following packets cannot be downloaded, you must manually download them by following the value of the distributionUrl property in the gradle\wrapper\gradle-wrapper.properties file under the current project.

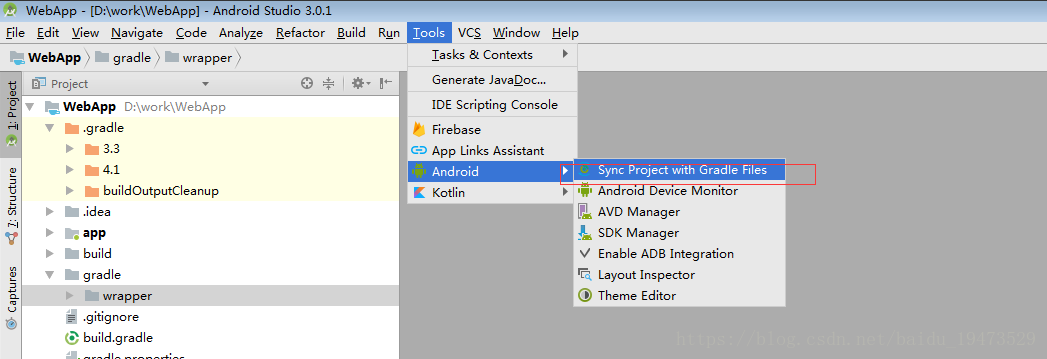
  • the synchronized

  • you can now run the project.

  • Android error: ADB port is occupied( adb.exe ,start-server’ failed — run manually if necessary)

    error message:
    10:28:32 adb server version (31) doesn’t match this client (39); This time…
    10:28:32 could not read ok from ADB Server
    10:28:32 * failed to start daemon
    10:28:32 error: Always connect to the daemon
    10:28:32 ‘I: \ AndroidSDK \ platform – the tools \ adb exe, start – server’ failed – run manually if necessary

    today, when I opened AS for debugging, I found that adb could not run and I could not connect to the mobile phone. What situation, yesterday was still good, how not today??

    the first thought is that the port may be occupied, so open the DOS command, casually typed out a line:

    adb kill-server (杀掉adb进程),

    So it’s

    and then it’s

    adb start-server (启动adb)

    but found no “* server not running *” and
    “adb server version (39) doesn’t match this client (36); This time…
    * daemon started successfully * “message. Embarrassing ~

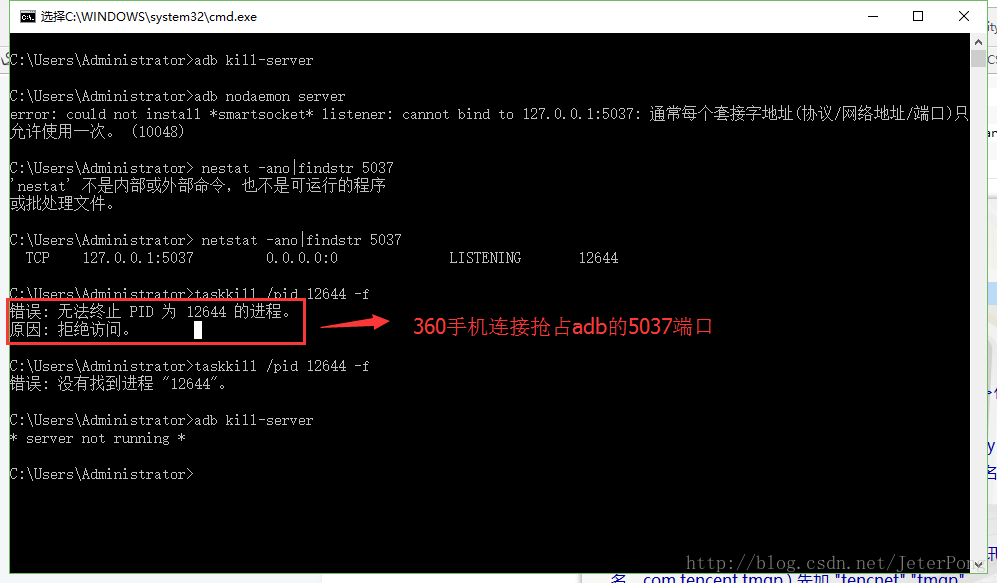
    baidu check, it turns out that adb’s port is occupied by some (unknown) process. Well, to find out why, let’s analyze which process is so mischievously using this port.
    opens DOS command window

    输入: adb nodaemon server 回车

    found to be occupied by process 12466. Then I opened task Manager to see that the 5037 interface was occupied by the original 360 bundled mobile assistant. I tried to stop the process, but was denied access. Well, enough rogue, enough rogue, but also forced occupation not to kill the process, so skin, why not god?

    in desperation, decided to a simple direct violence method, directly put 360(including bundled software) to uninstall. It’s ok to try adb kill- Server again, but you can also turn on ADB debugging in AS.

    Reference links:

    https://blog.csdn.net/suomalixiongmao/article/details/51158666

    Installation failed with message Failed to finalize session : INSTALL_FAILED_INVALID_APK

    problem:

    modified some things yesterday, debugging show this error, before is to uninstall before installation, and then re-run it, but this time, run several times, the phone has also restarted several times, or error, a little bit close to crash.

    reason:

    is not clear

    resolved:

    method 1:

    this morning I found the memory space of the phone was a little full, then I cleaned it up, and the debugging was successful again.

    method 2:

    there are other ways online, the above can not solve this you can try this:

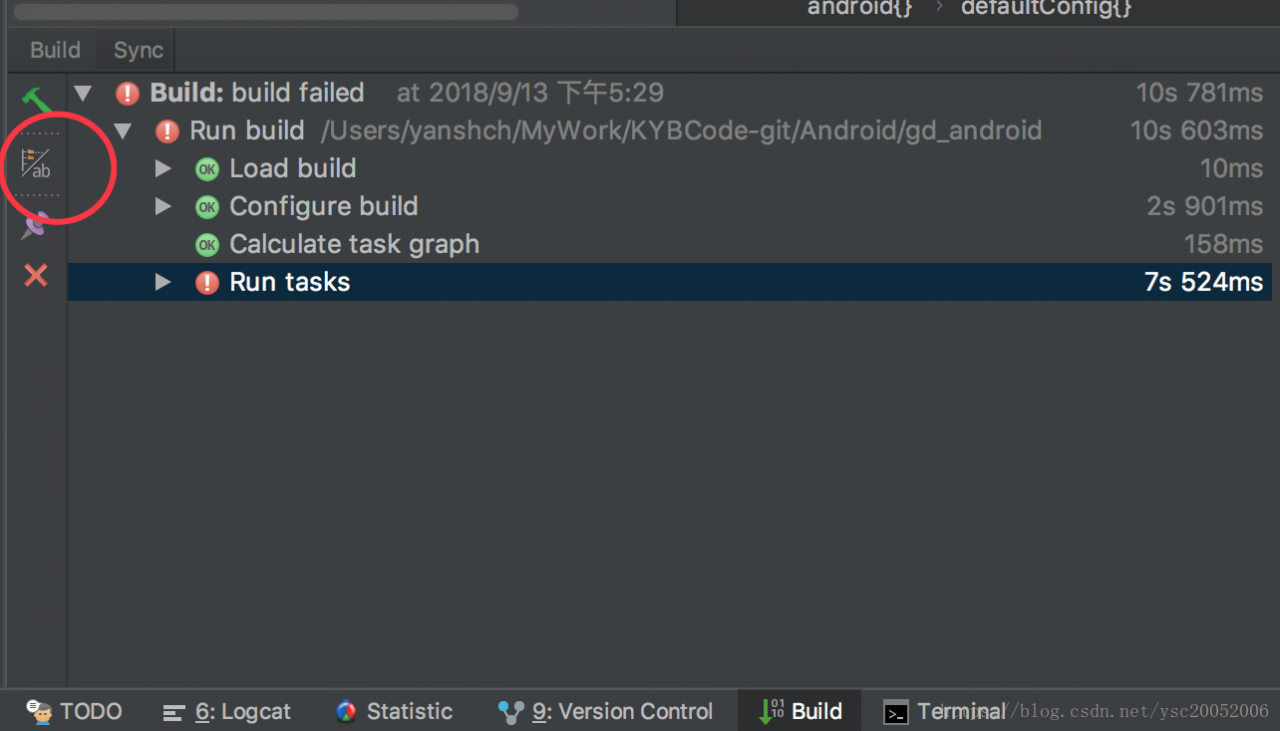
    click Build, click Clean Project, then click Rebuild Project, then run.

    https://blog.csdn.net/qq_36826618/article/details/84638404

    method 3:

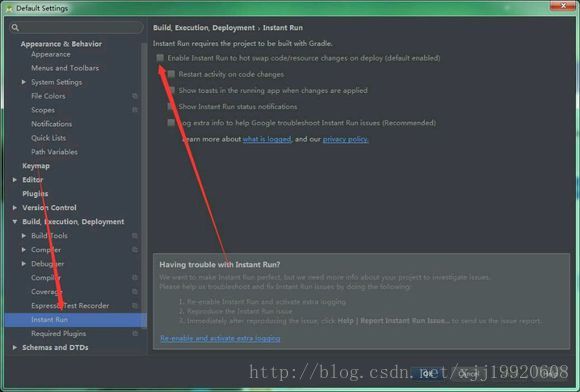
    File -> Settings… -> Build -> Debuger -> Instant Run-> Uncheck the first TAB to Enable Instant Run… .

    reference: https://www.cnblogs.com/lihuawei/p/10516201.html

    others:

    another problem:

    AndroidStudio 安装Gradle问题gradle project sync failed.Basic functionality(e.g.editing,debugging) will n

    is a problem that I don’t understand very well, so I basically use the most direct solution every time:

    create a new project. Gradle,. Idea, gradle. Build a copy of the new project folder to the current project folder. It is a good idea to make a backup copy before using, as repostories may differ in Gradle.build.

    if not you can refer to the other: https://blog.csdn.net/runrun117/article/details/93311522