Tag Archives: Android

Solve gradle project refresh failed

recently reinstalled the system, and then re-installed Android Studio encountered a pit, opened the Studio to create the project prompted gradle project refresh failed to find all kinds of methods, I have seen a lot of solutions on the Internet, some have tried to no effect, the following is my own solution can refer to.

step 1: find the Studio Android directory D:\Android\Android Studio\gradle, copy the downloaded file to the directory

step 2: download the gradle version: https://pan.baidu.com/s/1hsKUK6K password: 7 im3

part 3: set the proxy address my Settings are as follows (of course you can also try to set No proxy) :
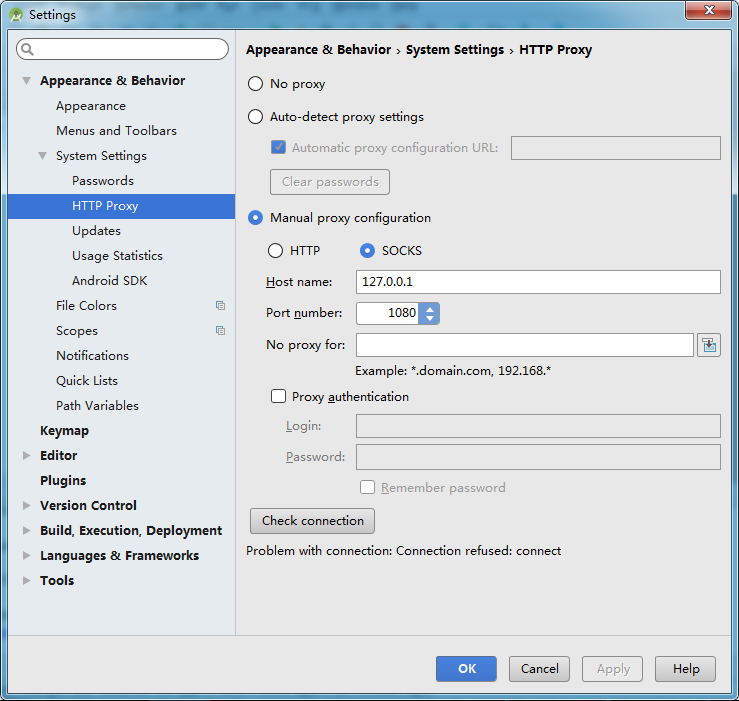
      

Step 4: restart Android Studio,


if the problem has not been solved, I recommend using the following solution:

thank blogger: bear bear children turn from: https://www.jianshu.com/p/43b795895a79

different situations will have different solutions, you need to open the log file to find the detailed error information.

C:\Users\{Username}\.AndroidStudio2.1\system\log

1. Mandatory IPV4

add the variables in the environment variable

_JAVA_OPTIONS

set a variable’s value to,

– Djava.net.preferIPv4Stack=true

restart Android Studio, automatic update gradle.

2. Update JDK1.7 to JDK1.8

File-> Other Settings-> Default Project Structure… Delete. Gradle file

delete folder

c:\users\{username}\. Gradle

then restart Android Studiao to update gradle. Open the gradle properties file for the project and add the following configuration items:

org.gradle. Jvmargs = -xmx512m-xx :MaxPermSize=512m

.

5. Set the correct gradle version

File-> Settings

Build,Execution,Deployment-> Build Tools-> Gradle

this solves the Gradle version mismatch problem. 6. Manual synchronous gradle

Tools-> Android-> Sync Project with Gradle Files

7.

Build-> Clean Project

8. Invalidate and Restart

File-> Invalidate Caches/Restart…

Invalidate and Restart

9. Update android SDK

for the problem of not downloading the corresponding version of SDK, download as required.

10. Change the engineering build directory. The grade file

is sometimes Gradle this’ project_name 】 【 ‘project refresh failed: No cached version of the android. View the build: Gradle: 2.10 + available for offline mode.

Encounter this kind of situation will open the project directory of the build. Gradle file, after change

dependencies {

classpath ‘com. Android. View the build: gradle: 2.10 +’

}

open C: \ Users \} {your user name \. Gradle \ caches files, found no below 2.10 directory, under normal circumstances, When you restart Studio, if you don’t, you will re-download the file directory. If you can’t download it normally, just copy it and put it in the directory.

this is just the solution to my problem, maybe you have the same problem as me, I hope this blog can help you.

Quick solution org.gradle.api . tasks.TaskExecutionException : Execution failed for task ‘: app:compileJava ‘

problems encountered in development

gradle cannot compile org. Gradle. API. The tasks. TaskExecutionException: Execution failed for task ‘: app: compileJava’

if you have the same problem, hopefully in less than a minute, read on:

as shown in figure:

error graph

error graph details

or you can click on the details

org.gradle.api.tasks.TaskExecutionException: Execution failed for task ':front-core:compileJava'.
at org.gradle.api.internal.tasks.execution.ExecuteActionsTaskExecuter.executeActions(ExecuteActionsTaskExecuter.java:100)
at org.gradle.api.internal.tasks.execution.ExecuteActionsTaskExecuter.execute(ExecuteActionsTaskExecuter.java:70)
at org.gradle.api.internal.tasks.execution.OutputDirectoryCreatingTaskExecuter.execute(OutputDirectoryCreatingTaskExecuter.java:51)
at org.gradle.api.internal.tasks.execution.SkipUpToDateTaskExecuter.execute(SkipUpToDateTaskExecuter.java:62)
at org.gradle.api.internal.tasks.execution.ResolveTaskOutputCachingStateExecuter.execute(ResolveTaskOutputCachingStateExecuter.java:54)
at org.gradle.api.internal.tasks.execution.ValidatingTaskExecuter.execute(ValidatingTaskExecuter.java:60)
at org.gradle.api.internal.tasks.execution.SkipEmptySourceFilesTaskExecuter.execute(SkipEmptySourceFilesTaskExecuter.java:97)
at org.gradle.api.internal.tasks.execution.CleanupStaleOutputsExecuter.execute(CleanupStaleOutputsExecuter.java:87)
at org.gradle.api.internal.tasks.execution.ResolveTaskArtifactStateTaskExecuter.execute(ResolveTaskArtifactStateTaskExecuter.java:52)
at org.gradle.api.internal.tasks.execution.SkipTaskWithNoActionsExecuter.execute(SkipTaskWithNoActionsExecuter.java:52)
at org.gradle.api.internal.tasks.execution.SkipOnlyIfTaskExecuter.execute(SkipOnlyIfTaskExecuter.java:54)
at org.gradle.api.internal.tasks.execution.ExecuteAtMostOnceTaskExecuter.execute(ExecuteAtMostOnceTaskExecuter.java:43)
at org.gradle.api.internal.tasks.execution.CatchExceptionTaskExecuter.execute(CatchExceptionTaskExecuter.java:34)
at org.gradle.execution.taskgraph.DefaultTaskGraphExecuter$EventFiringTaskWorker$1.run(DefaultTaskGraphExecuter.java:248)
at org.gradle.internal.progress.DefaultBuildOperationExecutor$RunnableBuildOperationWorker.execute(DefaultBuildOperationExecutor.java:336)
at org.gradle.internal.progress.DefaultBuildOperationExecutor$RunnableBuildOperationWorker.execute(DefaultBuildOperationExecutor.java:328)
at org.gradle.internal.progress.DefaultBuildOperationExecutor.execute(DefaultBuildOperationExecutor.java:199)
at org.gradle.internal.progress.DefaultBuildOperationExecutor.run(DefaultBuildOperationExecutor.java:110)
at org.gradle.execution.taskgraph.DefaultTaskGraphExecuter$EventFiringTaskWorker.execute(DefaultTaskGraphExecuter.java:241)
at org.gradle.execution.taskgraph.DefaultTaskGraphExecuter$EventFiringTaskWorker.execute(DefaultTaskGraphExecuter.java:230)
at org.gradle.execution.taskgraph.DefaultTaskPlanExecutor$TaskExecutorWorker.processTask(DefaultTaskPlanExecutor.java:123)
at org.gradle.execution.taskgraph.DefaultTaskPlanExecutor$TaskExecutorWorker.access$200(DefaultTaskPlanExecutor.java:79)
at org.gradle.execution.taskgraph.DefaultTaskPlanExecutor$TaskExecutorWorker$1.execute(DefaultTaskPlanExecutor.java:104)
at org.gradle.execution.taskgraph.DefaultTaskPlanExecutor$TaskExecutorWorker$1.execute(DefaultTaskPlanExecutor.java:98)
at org.gradle.execution.taskgraph.DefaultTaskExecutionPlan.execute(DefaultTaskExecutionPlan.java:626)
at org.gradle.execution.taskgraph.DefaultTaskExecutionPlan.executeWithTask(DefaultTaskExecutionPlan.java:581)
at org.gradle.execution.taskgraph.DefaultTaskPlanExecutor$TaskExecutorWorker.run(DefaultTaskPlanExecutor.java:98)
at org.gradle.internal.concurrent.ExecutorPolicy$CatchAndRecordFailures.onExecute(ExecutorPolicy.java:63)
at org.gradle.internal.concurrent.ManagedExecutorImpl$1.run(ManagedExecutorImpl.java:46)
at java.util.concurrent.ThreadPoolExecutor.runWorker(ThreadPoolExecutor.java:1142)
at java.util.concurrent.ThreadPoolExecutor$Worker.run(ThreadPoolExecutor.java:617)
at org.gradle.internal.concurrent.ThreadFactoryImpl$ManagedThreadRunnable.run(ThreadFactoryImpl.java:55)
at java.lang.Thread.run(Thread.java:745)
Caused by: org.gradle.api.internal.tasks.compile.CompilationFailedException: Compilation failed; see the compiler error output for details.
at org.gradle.api.internal.tasks.compile.JdkJavaCompiler.execute(JdkJavaCompiler.java:50)
at org.gradle.api.internal.tasks.compile.JdkJavaCompiler.execute(JdkJavaCompiler.java:35)
at org.gradle.api.internal.tasks.compile.NormalizingJavaCompiler.delegateAndHandleErrors(NormalizingJavaCompiler.java:98)
at org.gradle.api.internal.tasks.compile.NormalizingJavaCompiler.execute(NormalizingJavaCompiler.java:51)
at org.gradle.api.internal.tasks.compile.NormalizingJavaCompiler.execute(NormalizingJavaCompiler.java:37)
at org.gradle.api.internal.tasks.compile.CleaningJavaCompilerSupport.execute(CleaningJavaCompilerSupport.java:35)
at org.gradle.api.internal.tasks.compile.CleaningJavaCompilerSupport.execute(CleaningJavaCompilerSupport.java:25)
at org.gradle.api.tasks.compile.JavaCompile.performCompilation(JavaCompile.java:207)
at org.gradle.api.tasks.compile.JavaCompile.compile(JavaCompile.java:192)
at org.gradle.api.tasks.compile.JavaCompile.compile(JavaCompile.java:124)
at sun.reflect.GeneratedMethodAccessor780.invoke(Unknown Source)
at sun.reflect.DelegatingMethodAccessorImpl.invoke(DelegatingMethodAccessorImpl.java:43)
at java.lang.reflect.Method.invoke(Method.java:498)
at org.gradle.internal.reflect.JavaMethod.invoke(JavaMethod.java:73)
at org.gradle.api.internal.project.taskfactory.IncrementalTaskAction.doExecute(IncrementalTaskAction.java:46)
at org.gradle.api.internal.project.taskfactory.StandardTaskAction.execute(StandardTaskAction.java:39)
at org.gradle.api.internal.project.taskfactory.StandardTaskAction.execute(StandardTaskAction.java:26)
at org.gradle.api.internal.tasks.execution.ExecuteActionsTaskExecuter$1.run(ExecuteActionsTaskExecuter.java:121)
at org.gradle.internal.progress.DefaultBuildOperationExecutor$RunnableBuildOperationWorker.execute(DefaultBuildOperationExecutor.java:336)
at org.gradle.internal.progress.DefaultBuildOperationExecutor$RunnableBuildOperationWorker.execute(DefaultBuildOperationExecutor.java:328)
at org.gradle.internal.progress.DefaultBuildOperationExecutor.execute(DefaultBuildOperationExecutor.java:199)
at org.gradle.internal.progress.DefaultBuildOperationExecutor.run(DefaultBuildOperationExecutor.java:110)
at org.gradle.api.internal.tasks.execution.ExecuteActionsTaskExecuter.executeAction(ExecuteActionsTaskExecuter.java:110)
at org.gradle.api.internal.tasks.execution.ExecuteActionsTaskExecuter.executeActions(ExecuteActionsTaskExecuter.java:92)
... 32 more

gradlew compileDebugSource — stacktrac-info
tip: If according to the command not found then the next AndroidStudio generated gradlew under which path in the root directory, and then CD to the project root directory and then in the above command prefix./(slash in front of a point) can
the above command in the terminal of AndroidStudio input, recompile view gradle specific error message
run after the above command:

Task :front-core:compileJava FAILED
Putting task artifact state for task ':front-core:compileJava' into context took 0.0 secs.
Up-to-date check for task ':front-core:compileJava' took 0.001 secs. It is not up-to-date because:
  Task has failed previously.
All input files are considered out-of-date for incremental task ':front-core:compileJava'.
Compiling with JDK Java compiler API.
警告: [options] 未与 -source 1.7 一起设置引导类路径
/Users/mrq/AndroidStudioProjects/SenseInsight/common/front-core/src/main/java/com/sensetime/insight/front/Visitor.java:25: 警告: @Builder will ignore the initializing expression entirely. If you want the initializing expression to ser as default, add @Builder.Default. If it is not supposed to be settable during building, make the field final.
private int age = -1;
            ^
/Users/mrq/AndroidStudioProjects/SenseInsight/common/front-core/src/main/java/com/sensetime/insight/front/Visitor.java:30: 警告: @Builder will ignore the initializing expression entirely. If you want the initializing expression to serve as default, add @Builder.Default. If it is not supposed to be settable during building, make the field final.
private String gender = "";
               ^
/Users/mrq/AndroidStudioProjects/SenseInsight/common/front-core/src/main/java/com/sensetime/insight/front/FaceImage.java:36: 警告: @Builder will ignore the initializing expression entirely. If you want the initializing expression to sve as default, add @Builder.Default. If it is not supposed to be settable during building, make the field final.
private int sended = 0;
            ^
/Users/mrq/AndroidStudioProjects/SenseInsight/common/front-core/src/main/java/com/sensetime/insight/front/detect/FaceHandler.java:8: 错误: 程序包com.sun.tools.internal.jxc.ap不存在
import com.sun.tools.internal.jxc.ap.Const;
                                ^
1 个错误
3 个警告

:front-core:compileJava (Thread[Task worker for ':',5,main]) completed. Took 1.239 secs.

FAILURE: Build failed with an exception.

* What went wrong:
Execution failed for task ':front-core:compileJava'.
> Compilation failed; see the compiler error output for details.

the above error is very detailed, one error, three warnings can be ignored, direct to the error

/Users/mrq/AndroidStudioProjects/SenseInsight/common/front-core/src/main/java/com/sensetime/insight/front/detect/FaceHandler.java:8: 错误: 程序包com.sun.tools.internal.jxc.ap不存在
import com.sun.tools.internal.jxc.ap.Const;
                            ^

, you can see what’s going on, what’s going on in which path, which class, what’s going on and my problem is I can’t find this package, and I can just fix it and I’m sure as long as I get to the problem, it’s not that hard for the programmer monkey to fix it, right?

actually, my problem was that I made a mistake when I was running Constant, and the Const package was automatically imported. However, my AndroidStudio did not set the automatic deletion of useless packages, so this problem occurred when I was packing. Here, I would also like to show the Settings of AndroidStudio’s automatic guide package and automatic delete package

automatic guide set

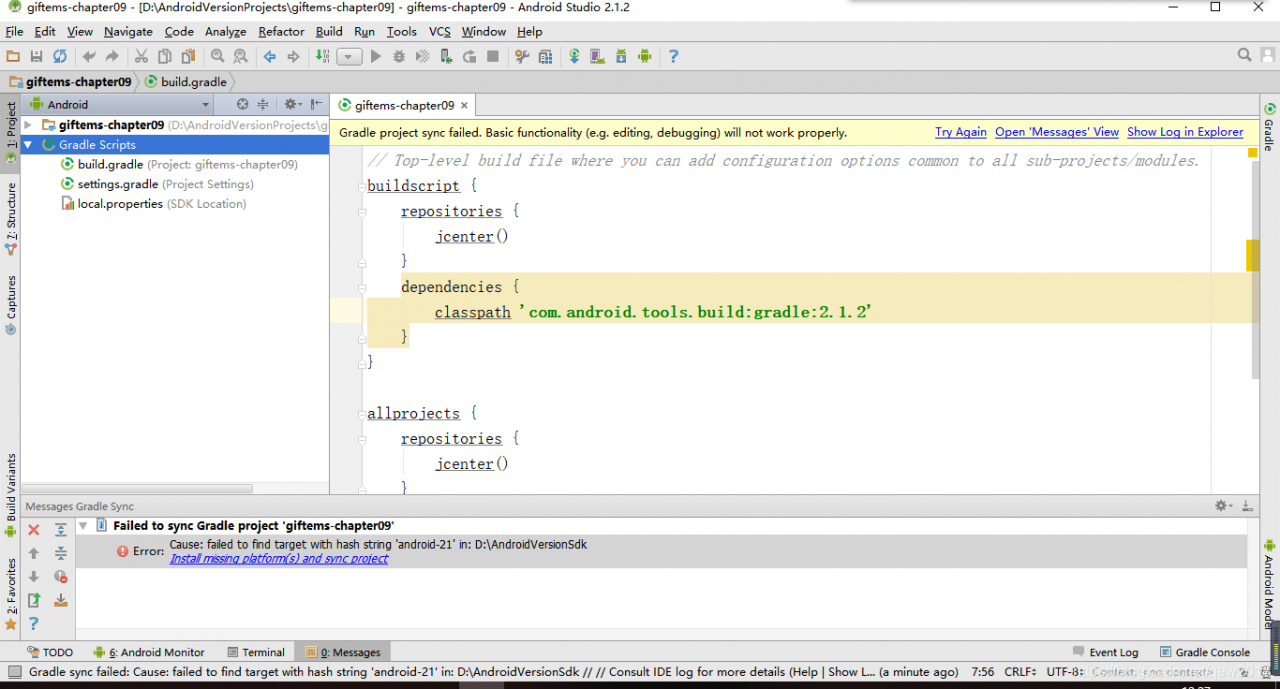
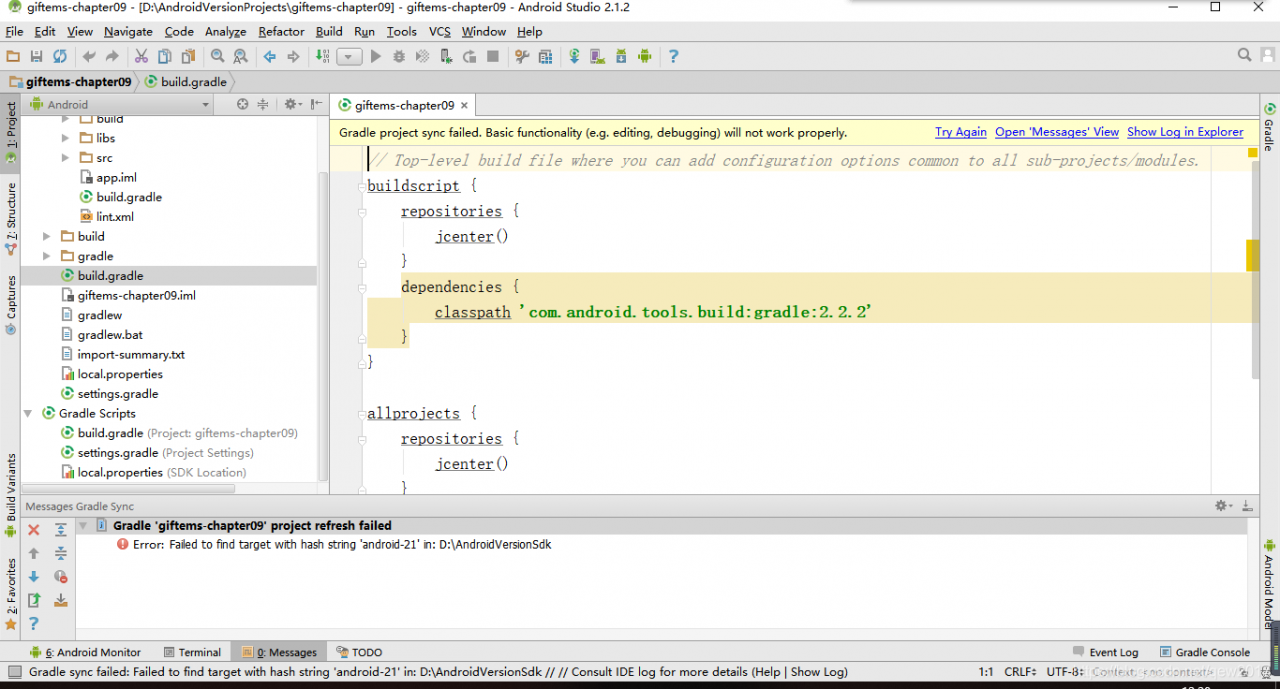
Failed to find target with hash string”android-21″ in:D:\AndroidVersionSdk

encountered this problem when I imported the project today. After a long time, I finally finished

find your previous project open, copy the contents of build.gradle into this project, if there is no project before, you can refer to my previous blog to solve

// Top-level build file where you can add configuration options common to all sub-projects/modules.

buildscript {
    repositories {
        jcenter()
    }
    dependencies {
        classpath 'com.android.tools.build:gradle:2.1.2'

        // NOTE: Do not place your application dependencies here; they belong
        // in the individual module build.gradle files
    }
}

allprojects {
    repositories {
        jcenter()
    }
}

task clean(type: Delete) {
    delete rootProject.buildDir
}


Installation error: install_ FAILED_ VERSION_ DOWNGRADE

1. Problem tip

2. Solution

is because you have installed an application with the same package name on your phone or emulator, and the current versionCode you are running is less than the versionCode of the application you have installed, so you will be prompted that the installation fails!

solution:

1. Uninstall the Apk that has been installed before.

2. Raise the value of android:versionCode in the manifest profile!

resources: http://stackoverflow.com/questions/13808599/android-emulator-installation-error-install-failed-version-downgrade

Completely solve install_ FAILED_ UPDATE_ Incompatible installation error, the installation package is not consistent with the previous installation package signature on the device

thoroughly resolves the installation error of INSTALL_FAILED_UPDATE_INCOMPATIBLE installation packages signed with those on previous devices

ps: I finally changed the package name… Don’t offer such services such as nacionbolinblog/p/5402652.html

sometimes development problems: will encounter in the company work, the company’s IDE can run the program, copy the program home, run again, will appear the following error:

INSTALL_FAILED_UPDATE_INCOMPATIBLE

reason: your installation package is not signed with the previous installation package on the device. At Baidu, some people said: running too many times will also appear above problems, but I have not encountered.

simple processing:

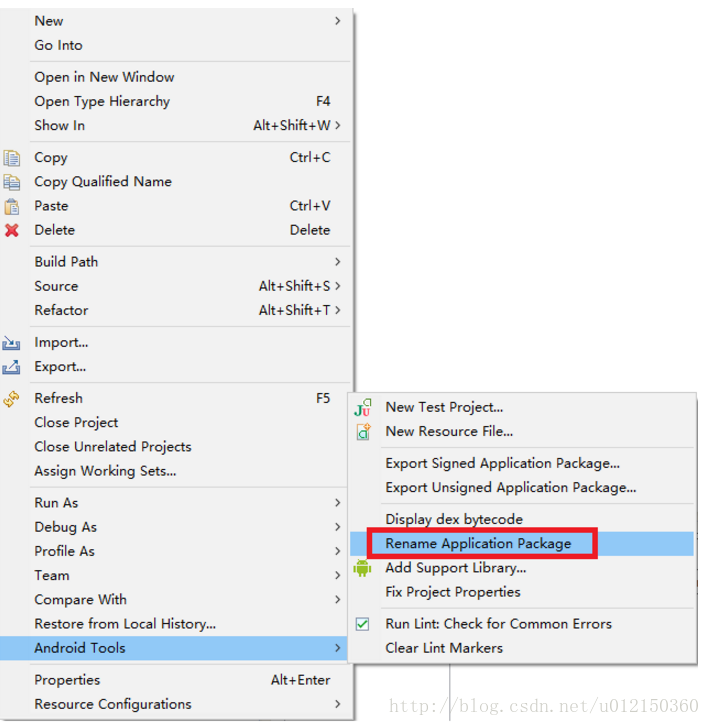
if your program is just a running game, not a very important program, then you can just change the package name. I’ve done this before.

steps: as shown in figure:

but in actual work, we are not allowed to change the package name, such as associated with WeChat, alipay, baidu map, etc., our package name is submitted to their official website.

so what do we do?

provides a crappy way to compare: if you’re testing the phone, format the test phone.

the following is a more complete screening process:

problem: when debugging, it USES the default signature (that is, the debug signature), while when exporting, it USES its own debug signature, which cannot be installed on the same phone.

solution:

if your previous program USES the default signature (i.e., debug signature), once the new signature application will not be able to overwrite the installation, you must uninstall the original program to install.

– & gt; Everyone else uninstalls and installs, but my phone doesn’t.

– & gt; Me: Uninstall the old one, also root, and delete the data/data/ package name.

– & gt; Installation tip: Replace app, sales assistant 1.0 replace 1.0.. Prompt program not installed.

– & gt; Does the system hold the relevant package name and signature information?

– & gt; If be, also Baidu does not put where this information.

continue to baidu: find the package name information stored in the/data/system/packages. The XML, need root cell phone only can see the file from a mobile phone.

– & gt; Just delete the package name information that the application contains.

step:

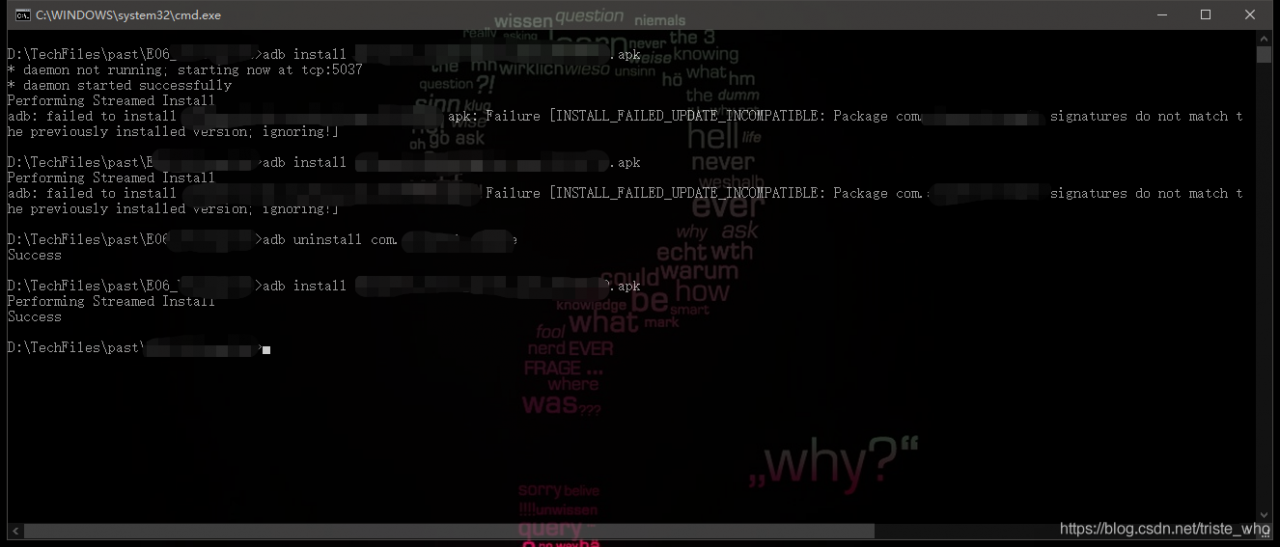
  1. uninstall the previous installation package with “adb uninstall package name”, then try to install it, if not, proceed to the next step.

  2. in/data/system/packages. The XML file containing the application’s package name information

    my practice: 2.1 root mobile phone, is my meizu, directly to the root. After installing RE manager, enter/data/system/packages. The XML copy the file to the other place, share to the computer, computer modified, covered in the original file.

    reference practice: my mobile phone does not work. 2.2 use adb pull command to export the file, modify it, and import it with adb push.

    2.3 the above steps do not work, first adb remount (means to remount the system partition) and then adb pull command export the file, complete the modification, and import with adb push.

    2.4 the above steps do not work,

     ---> 执行  adb shell  命令  -- 执行的是Linux的命令
    
     ---> su (手机应该会弹出权限信息提示~~告诉你需要管理权限,并确认)  -- 获得超级权限
    
     ---> ls -l (查看当前目录下所有可见文件的详细属性)  drwxrwx--x   (d--文件夹)


           这边怎么跑出一个system?回答:没有听说过Android除了Root还有system权限  你说的是user权限吧
    
           参考:http://bbs.csdn.net/topics/360175988
    
     ---> mount -o remount,rw /data (重新将文件夹为可读可写。)  我的手机出现( Operation not permitted),没办法下一步
    
     ---> chmod 777 /data 
    
     或者参考别人的做法:http://blog.sina.com.cn/s/blog_4ba5b45e0102ek4k.html 
    

    2.5 does not work, using the 2.1 method.

  3. reinstall the new application can be

reference: http://blog.csdn.net/philofly/article/details/8090210

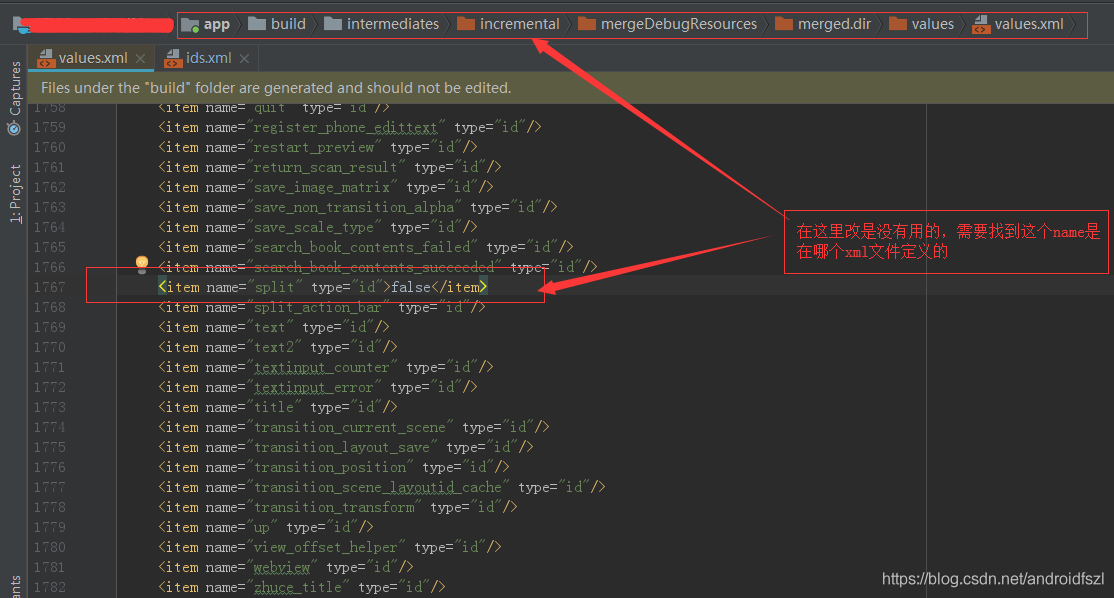
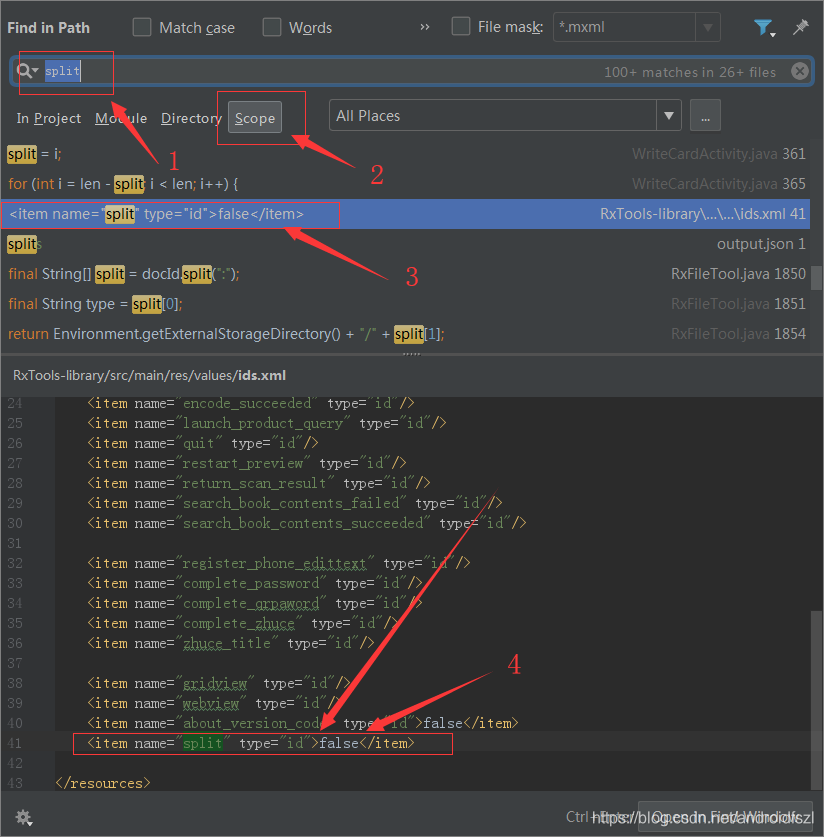
Android resource compilation failed (How to Fix)

there are many reasons for this problem on the Internet, I will not say more, the following is my more stupid solution, you can try;

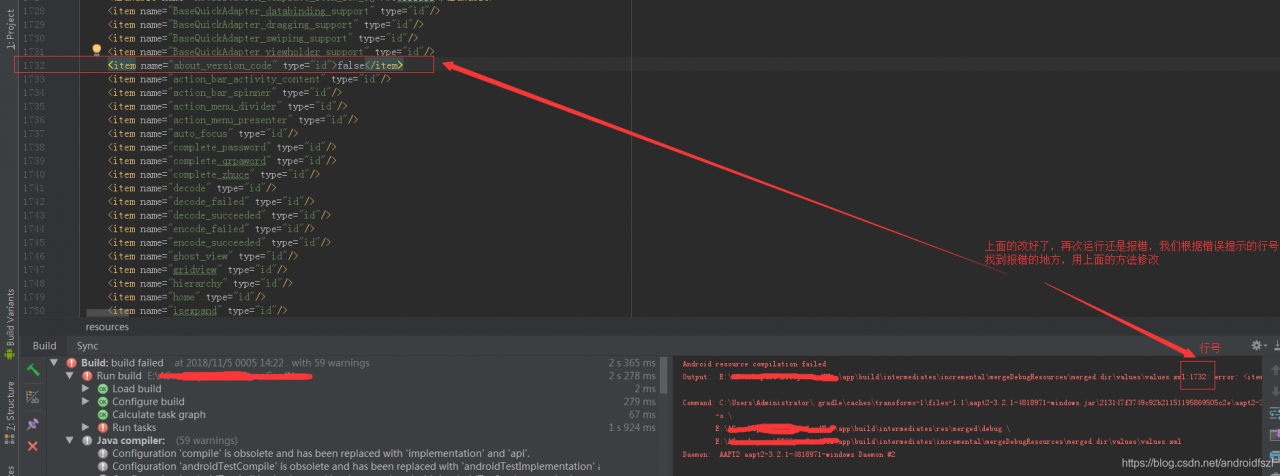
when you see this problem, you might have a line of files that you can click on, and click on the error.

if there is no place to click, you can also find the specific place according to the directory and “line number”;

>

>

>

>

>

>

>

>

>

>

>

>

>

>

>

>

>

>

>

>

>

>

error:

, if you don’t know how to change it, you can go to baidu;

is basically the point where the problem is solved (if that’s the only place you’re wrong).

and I’m not done here, but you see, I have two wrong lines here.

let’s fix the wrong one and run it:

take a look, it was reported wrong, this time there is no reverse can click, and then jump to the reported wrong position;

but it doesn’t matter, there’s a table of contents and a corresponding line number, we can still find the error location. Then, using the above method, search for areas where the format is wrong, and change it to the correct one:

is modified, and it will run normally.

ADB:INSTALL_ FAILED_ UPDATE_ Incompatible [solved]

installation encounters this

adb: failed to install xxxxxxx.apk: 
Failure [INSTALL_FAILED_UPDATE_INCOMPATIBLE: 
Package com.xxx.xxxx signatures do not match the previously installed version; ignoring!]

uninstall the app with the same package name and then install

adb uninstall com.xxx.xxxx


but looking at this discussion on Stack Overflow, it doesn’t seem to say what the problem is because of
link: https://stackoverflow.com/questions/31489567/manually-installing-an-updated-apk-fails-with-signatures-do-not-match-the-previ
ultimately find another q&a
https://stackoverflow.com/questions/49757862/install-failed-update-incompatible-package-signatures-do-not-match-the-previous?Rq = 1
said domestic a blog: https://blog.bihe0832.com/android-v2-issue.html
reason involves the jarsigner, don’t know why the company network temporarily can’t open it, see you later add study reasons.

Finished with error: Gradle task assembleDebug failed with exit code 1

recently encountered the following bug during development with flutter :

during run,

Finished with error: Gradle task assembleDebug failed with exit code 1

at this point if you are in a hurry to pack for someone else, you can scan with flutter clean and then re-run. The first time always succeeds,

then, after the first run, the error will continue.

you can’t just flutter clean all the time and then run, that would be a waste of time, not a long-term solution.

———————————————–

according to the above line of error Google has encountered many similar situations, but the reasons for the error are different, and I did not see the possibility of

is the same reason that I’m in this situation,

———————

but the answer is that running the flutter run-v will give you more detailed information about the error, but still not much use.

the information obtained from the flutter run-v does not locate the cause of the error.

flutter as a new cross-platform solution is really a pitfall, but the problem will always be solved and the project will continue to be done,

————–

then began to think, until the day before yesterday off work or not this situation, yesterday since noon had this problem, so

Can

find clues in git’s commit records?

——————————–

then starts to look through the Git commit record of this period and finds a suspicious

import 'package:inin/features/searchpage/SearchUserPage.dart%20';

Is there an extra %20 after

?

————————

so delete this line, flutter clean, re-run, the problem finally does not appear.

solved the case…

Solution to error opening trace file: no such file or directory (2) in Android

this error may occur frequently in android projects:

error opening trace file: No such file or directory (2)
combined with the Internet search and their own experience to give the following some solutions:

is usually a problem with the file androidmainfest.xml:

1. Check whether the version of android API is consistent with that of the emulator;

2, delete < USES – SDK android: minSdkVersion = “8” android: targetSdkVersion = “15”/& gt;
add & lt; USES – the permission of the android: name = “android. Permission. WRITE_EXTERNAL_STORAGE”/& gt;

3. Check whether tag tags appear in pairs in XML files;

4. Check the androidmainfest.xml file for missing the corresponding activity event. activity> Or change the class name in a Java file and forget to change it back in an XML file.

if this error occurs while testing with a physical machine, try shutting down the machine before restarting it.

Session app error launching activity solution

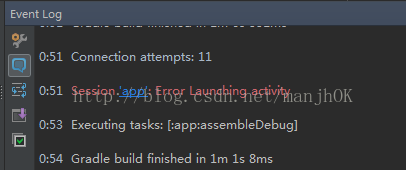
As one: Launching activity of Session ‘app’ : Error , Launching activity cannot be launched on real machine. The solution is to close instant run

in the File – & gt; Settings-> Build, Execution,Deployment find Instant Run, remove the option before Instant Run,

click OK OK, recompile the running app


2: must open mobile developer debugging, even can detect equipment, should should ensure that the manual open