Tag Archives: Android

Android: Can’t create handler inside thread that has not called Looper.prepare() [Solved]

Error reason:

You can't refresh the UI thread in a subthread in Android

resolvent:

//Refresh the UI using the runOnUiThread method
runOnUiThread(new Runnable() {
    @Override
    public void run() {
        //refresh UI
    }
});

common problem:

When calling locationmanager to get the current location information and upload it in real time, the reason for this error is that locationmanager needs to be used in the main thread. The following methods are recommended:

@Override
protected void onCreate(Bundle savedInstanceState) {    
    super.onCreate(savedInstanceState);
    setContentView(R.layout.activity_main);

    //upload location messages
    Button btnUploadGPS = (Button)findViewById(R.id.btn_upload_gps);
    if (btnUploadGPS != null){
        btnUploadGPS .setOnClickListener(new View.OnClickListener() {
            @Override
            public void onClick(View v) {
                uploadGPS();
            }
        });
    }
}

private void uploadGPS(){    
    final LocationManager locationManager = (LocationManager) getSystemService(Context.LOCATION_SERVICE);
    Location location = locationManager.getLastKnownLocation(LocationManager.GPS_PROVIDER);
    locationManager.requestLocationUpdates(
            LocationManager.GPS_PROVIDER,
            2000,
            (float) 0.01,
            new LocationListener() {
                @Override
                public void onLocationChanged(Location location) {
                    asyncUploadGPS(location);
                }

                @Override
                public void onStatusChanged(String provider, int status, Bundle extras) {

                }

                @Override
                public void onProviderEnabled(String provider) {
                    asyncUploadGPS(locationManager.getLastKnownLocation(provider));
                }

                @Override
                public void onProviderDisabled(String provider) {
                    asyncUploadGPS(null);
                }
            }
    );
}

private void asyncUploadGPS(final Location currentLocation) {
    new Thread(new Runnable() {
        @Override
        public void run() {
            //upload loacation messages
        }
    }).start();
}
[Solved] Android Error: java.lang.IllegalStateException: Not allowed to start service Intent

Android error: java.lang.illegalstateexception: not allowed to start service intent

Error resolution 12

Today’s test threw me a crash message:

Caused by: java.lang.IllegalStateException: Not allowed to start service Intent { cmp=xxx }: app is in background uid UidRecord{xxx u0a136 CEM idle procs:1 seq(0,0,0)}

Can it be hard for me
once you see it, you can see that it’s a background service startup error. Just put the service in the foreground, easy

In fact, Google took a look
https://stackoverflow.com/questions/46445265/android-8-0-java-lang-illegalstateexception-not-allowed-to-start-service-inten
The problem is that Android 8.0 does not allow the creation of background services.

Solution:

Method 1:

The simplest way is to directly open the front desk service
set the service to the front desk in oncreate of your service class

if (Build.VERSION.SDK_INT >= Build.VERSION_CODES.O) {
       startForeground(1, new Notification()); 
}

Of course, this method will show what is running on the status bar of Android 5.0 and 6.0 phones please refer to the following method

Method 2:

The method from here

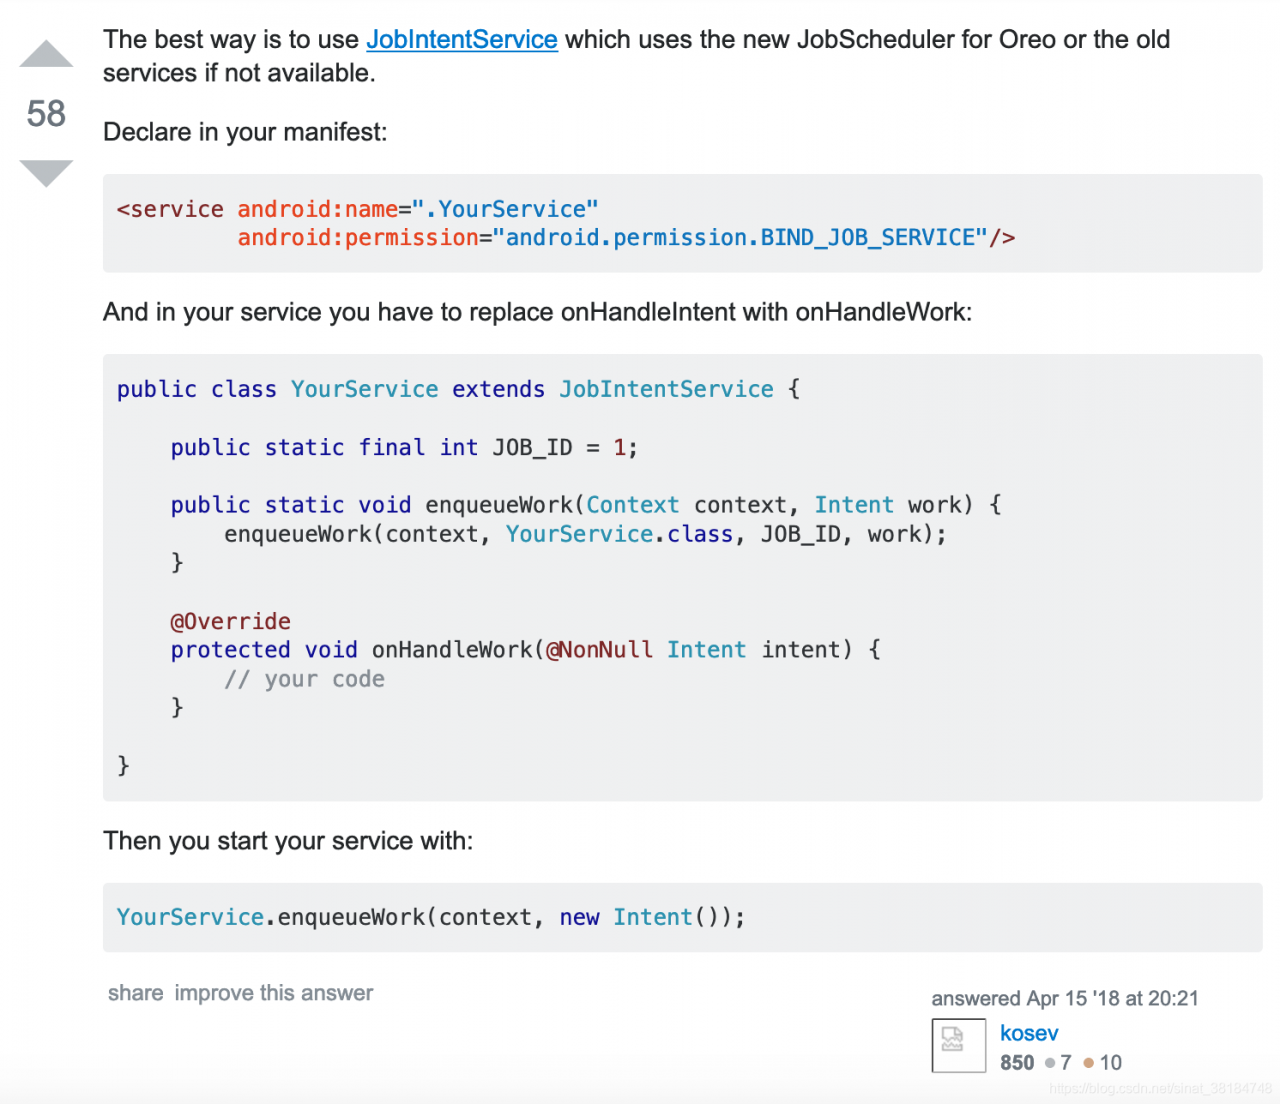
first modify the service configuration in your manifest file

<service android:name=".YourService"
         android:permission="android.permission.BIND_JOB_SERVICE"/>

Then change the modification inheritance of your service class to extensions jobintentservice
and add the following code

    public static final int JOB_ID = 1;

    public static void enqueueWork(Context context, Intent work) {
        enqueueWork(context, YourService.class, JOB_ID, work);
    }

    @Override
    protected void onHandleWork(@NonNull Intent intent) {
        // your code
    }

The startup service is modified as follows.

YourService.enqueueWork(context, new Intent());

However, I tested that the content in onstartcommand() does not execute. No reason has been found
I hope you can help me with the analysis.

It’s over

Not allowed to bind to service Intent [How to Solve]

<service android:name=".RecentTaskService"
    android:permission="xxx.xxx.xxx"
    android:exported="true">
    <intent-filter>
        <action android:name="xxx.xxx.xxx" />
    </intent-filter>
</service>

The bound service needs to set the attribute exported = true in the node;

If permission is set for the bound service, you need to declare permission when binding the service

<permission android:name="xxx.xxx.xxx" />
<uses-permission android:name="xxx.xxx.xxx" />


Network agent problem: task: preparekotlinbuildscriptmodel up-to-date

The error code is as follows

> Task :prepareKotlinBuildScriptModel UP-TO-DATE
IOException: https://dl.google.com/android/repository/addons_list-3.xml
java.net.ConnectException: Connection refused: connect
IOException: https://dl.google.com/android/repository/addons_list-2.xml
java.net.ConnectException: Connection refused: connect
IOException: https://dl.google.com/android/repository/addons_list-1.xml
java.net.ConnectException: Connection refused: connect
Failed to download any source lists!

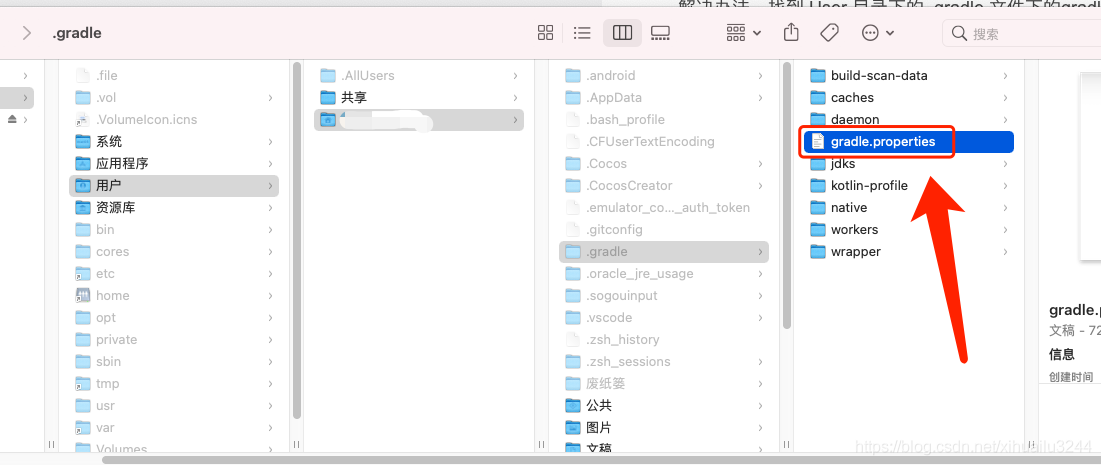
The solution is to find the gradle.properties file under the. Gradle file in the user directory, open and delete the proxy configuration, IP and port with proxy (not just IP)!!!! And ports!!)

Failed in Android compilation: solution to setup Jack server problem

        The following error occurred when compiling Android:

[ 28% 1127/3932] Ensuring Jack server is installed and started
FAILED: setup-jack-server

Picture:


Reason: when Jack compiles, there may be multiple people compiling at the same time. At this time, there may be two people using the same port, resulting in port conflict and timeout.

Solution: modify the port number (modify the. Jack settings and. Jack server/config. Properties files)  

Step 1:

        Open the. Jack settings file in the root directory of the project, and modify Jack. Server. Service. Port and   Jack.server.admin.port port. Set the port number as large as possible to reduce the probability of port collision. For example, I set jack.server.service.port to 28078 and jack.server.admin.port to 28079

# Server settings
SERVER_HOST=localhost
SERVER_PORT_SERVICE=28078
SERVER_PORT_ADMIN=28079

# Internal, do not touch
SETTING_VERSION=4

  Step 2:

        Open the. Jack-server/config.properties file in the root directory of the project, and set jack.server.service.port and jack.server.admin.port to the same values as the steps.

jack.server.idle=180
jack.server.max-service.by-mem=1\=2147483648\:2\=3221225472\:3\=4294967296
jack.server.shutdown=21600
jack.server.time-out=7200
jack.server.max-jars-size=104857600
jack.server.service.port=28078
jack.server.admin.port=28079
jack.server.config.version=4
jack.server.max-service=4
jack.server.deep-idle=900

  After modification, if there is no conflict, you can compile normally.

MAC Adb Shell Error: -bash: adb: command not found, adb

When the MAC system uses ADB for the first time, it reports an error because it needs to configure tools,

When using the MAC for development, you use the ADB instruction to perform some operations. If you have not configured the Android environment variables, you will encounter the problem of ADB: command not found. You need to configure the Android environment variables on the Mac

Operation steps:

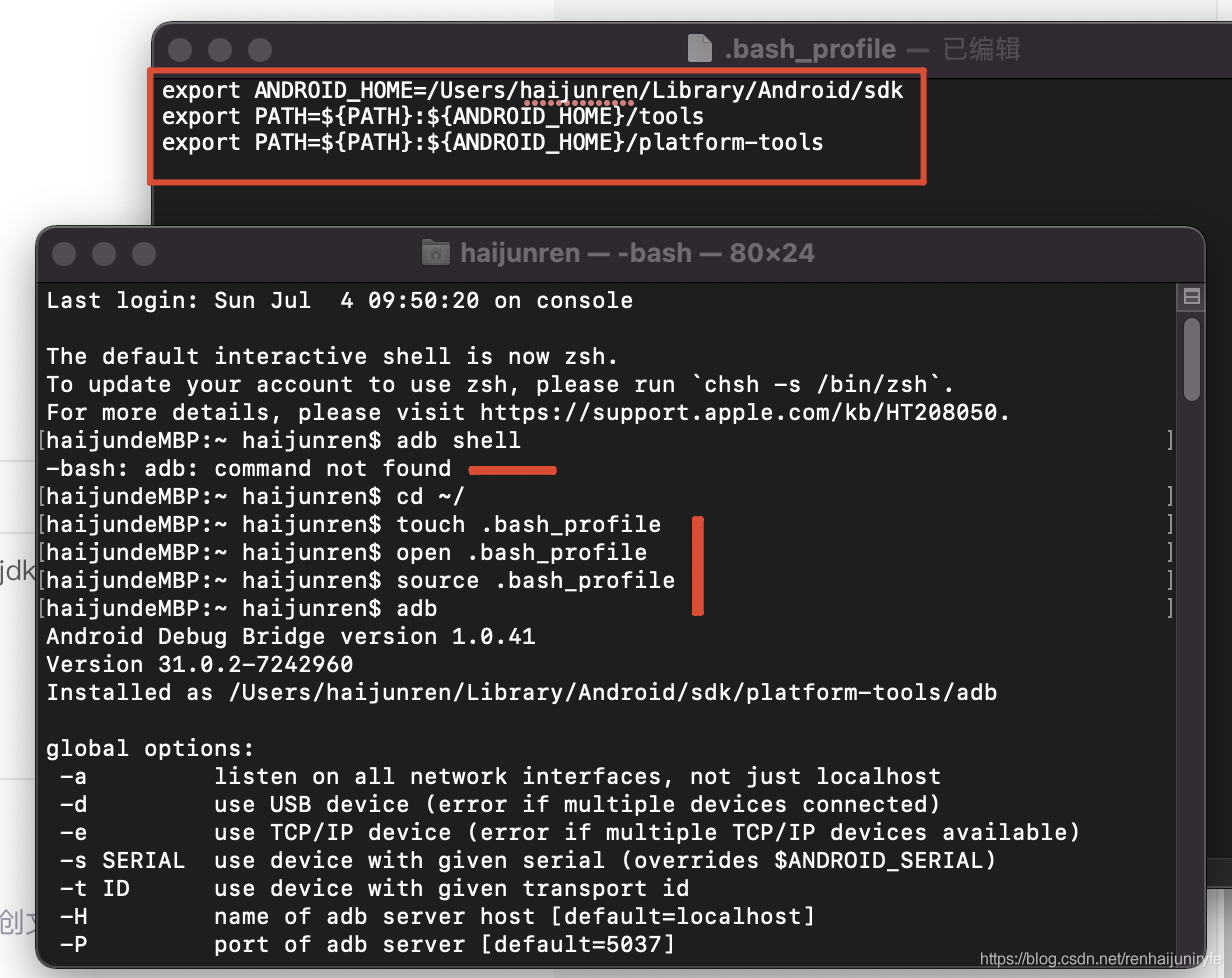
1. Open the terminal terminal of the Mac and enter Cd ~/[enter the home directory of the current user]
2. Enter touch. Bash_ Profile [if not. Bash_ Profile, create a file]
3. Enter open. Bash_ Open the file we created and a text edit box will pop up. If the environment is configured for the first time, the text edit box will be blank.
4 . export ANDROID_ HOME=/Users/haijunren/Library/Android/sdk
export PATH=${PATH}:${ANDROID_ HOME}/tools
export PATH=${PATH}:${ANDROID_ Home}/platform tools
note: Android in 4_ Home should be filled in according to its own SDK path, and the rest can be copied directly. As for the SDK path, you can open Android studio and search the SDK in preference (Windows setting) to view it
Enter source. Bash in the terminal_ Profile [make our changes effective]
Enter ADB [verify whether the configuration is complete, if the ADB: command not found is not displayed, the configuration is complete]

Android Studio Warning: Process ‘command ‘git‘‘ finished with non-zero exit value 1

At first, I thought it was a JDK problem. Later, I changed the JDK version and did not fix it. Looking up the information on the Internet, we found that it might be a git problem.

Enter git config user. Name in terminal   No corresponding user name was output.

Then configure the user name and mailbox

$ git config --global user.name usename
$ git config --global user.password password
$ git config --global user.password email

Mac Appium Error: Error executing adb Exec. Original error…

Appium error on MAC, error executing ADB exec. Original error

Error message: error executing adbexec. Original error: ‘command’/users/noogler/library/Android/SDK/platform tools/ADB – P 5037 – s clb7n18528000446 shell ‘settings delete global hidden_ api_ policy_ pre_ p_ apps; settings delete global hidden_ api_ policy_ p_ apps; settings delete global hidden_ api_ policy” exited with code 1

Process summary

Error information

: Error executing adbExec. Original error: ‘Command ‘/Users/noogler/Library/Android/sdk/platform-tools/adb -P 5037 -s CLB7N18528000446 shell ‘settings delete global hidden_ api_ policy_ pre_ p_ apps; settings delete global hidden_ api_ policy_ p_ apps; settings delete global hidden_ api_ policy’’ exited with code 1

Process

After clicking the start session button in appium, you can enter the page without screenshot and throw an error. After a long time in Google, stackworkflow, CSDN and GitHub failed to solve the problem for a long time. After updating the bundle tools of Android studio to the Android 11 version, it still has no effect. The SDK version of Android studio has 29 30 31. The Android device version connected to the computer is 10. The calling of the third-party Android SDK has been modified, but there is no solution.

adb shell settings put global hidden_ api_ policy_ p_ apps 1
*adb shell settings put global hidden_ api_ policy_ pre_ p_ Apps 1 reduces the version of appium desktop from 1.21 to 1.17!! So I tried to use version 1.21 on another iMac, and it also started successfully! The result of appium doctor is that all required and optional are installed. The Java SDK version is also 1.8. Try to find the appium configuration file to see if the configuration of 1.21 is different from that of 1.17. Finally, the ADB stopped responding, and the kill – server didn’t respond. It’s better to restart. Fortunately, after the restart, appium version 1.21 also successfully started the session, and no error was reported. 😂😂

Summary

If the results of appium doctor are all installed, there are also versions of Android SDK, JDK version is also 1.8, and so on. Direct suggestion

adb kill-server
adb start-server
adb shell

Maybe it can be solved. If there is no solution, you are welcome to throw out the mistakes and discuss them together. Even if I agree, it is not allowed to reprint

[Solved] Failed to resolve: com.serenegiant:common:1.5.20

When using an appcloud project composed of multiple import modules, failed to resolve: com.se appears after the operation UI on the tablet side of the project is imported and synchronized renegiant:common : 1.5.20 find for many days can not solve, but today found the corresponding solution, record the first time to solve the bug excited, pro test effective.

Solution:

1. download the required common package

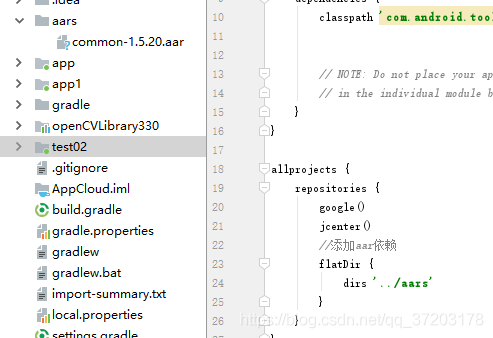
2. Set up an AARS folder in the root directory of the whole project, and unzip the downloaded common package and put it in it

After adding the folder and common package, you need to add the corresponding AAR dependency in the build. Gradle of the root directory, as shown on the right side of the figure above.

3. AAR dependency code to be added

//Adding aar dependencies
flatDir {
    dirs '../aars'
}

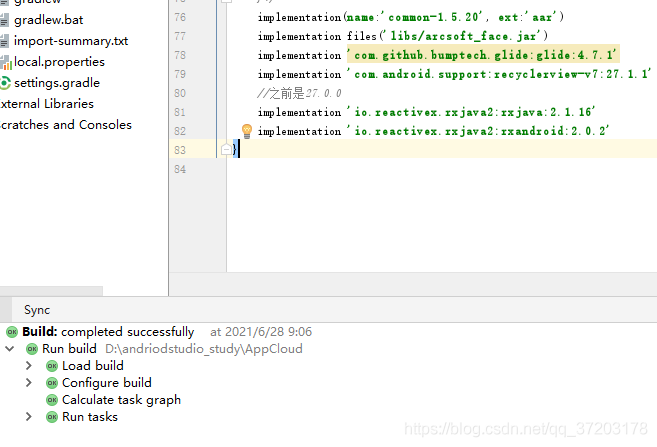
4. Set in build.gradle of the module to be referenced

implementation(name:'common-1.5.20', ext:'aar')

And note the previous code about the package, such as

implementation('com.serenegiant:common:1.5.20') {
    exclude module: 'support-v4'
}

Or

api “com.se renegiant:common :${commonLibVersion}”

5. After modification, synchronize the whole project, and then the problem is solved.

[Solved] Ubuntu20.04 Error: “Failed to install the following Android SDK packages as some licences have not..“error

After installing Android studio under Ubuntu, importing the project and building, the following error appears:

The problem is that licenses are not matched well

There are only two steps to solving the problem:

1. Open file – & gt; Settings

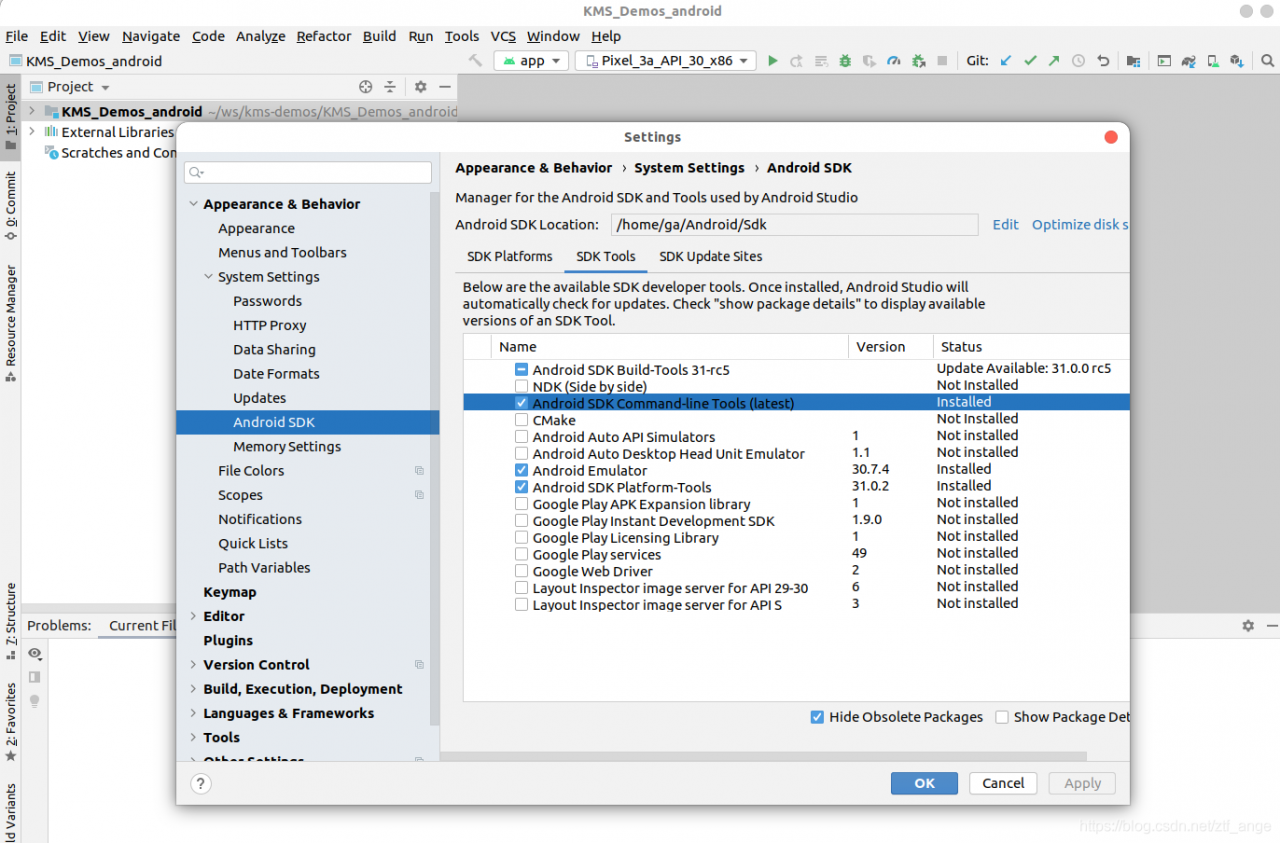
After the settings interface appears, enter appearance – & gt; System Settings -> Android SDK -> SDK Tools

Download Android SDK command line tools (latest) in SDK tools interface

2. After downloading, CMD line tools will be installed in the SDK directory ~/Android/SDK by default. If your directory is different, you need to modify it accordingly

Execute on the command line

yes | sudo ~/Android/Sdk/cmdline-tools/latest/bin/sdkmanager --licenses

The problem is solved. Build can run normally

Note: 1. In some articles, you can directly run the sdkmanager under ~/Android/SDK/tools/bin /, which will report an error

 java.lang.NoClassDefFoundError

The reason is that Ubuntu 20.04 installs OpenSDK 11 by default, which will conflict with the JRE that comes with Android Studio.
Uninstalling OpenSDK 11 and installing a lower version of JavaSDK is more troublesome.

arm-eabi-gcc: command not found [How to Solve]

Scene

Busybox compiling arm architecture on Ubuntu

Operation

    1. install the cross compiler tool</ ol>
sudo apt-get install gcc-arm-linux-gnueabi
      1. modify the configuration file and use the cross compile tool </ OL>
make defconfig
vim .config
# Modify
...
-# CONFIG_STATIC is not set
+CONFIG_STATIC=y
....
-CONFIG_CROSS_COMPILER_PREFIX=""
+CONFIG_CROSS_COMPILER_PREFIX="arm-linux-gnueabi-"
...
        1. compiling busybox of arm architecture
make android_defconfig

reference resources

https://github.com/yongce/AndroidDevNotes/blob/master/notes/tools/0006-busybox-android.asc