Greek alphabet, we started to know it from primary school, but I still rely on the pronunciation of it. Especially in the analysis of university mathematics, there are so many Greek letters that many classical formulas are represented by Greek letters. It has naturally become an indispensable symbol in the field of mathematics, turning the complex content of mathematics into clear, easy to understand and approachable.
Today, why talk about the Greek alphabet? I have to use it when I wrote latex the day before yesterday
ε
Speaking of, what we found in Baidu Encyclopedia is
ϵ
The symbol is not what I want, and my hatred of Baidu suddenly increases several times. I found the correct way to write it from Google, including other commonly used Greek letters. By the way, I also want to introduce the upper and lower case forms of Greek letters. Think of what you want to use frequently, so write it down for subsequent use. Do enough homework to make yourself more convenient and successful. Enjoy it!
The usage of Greek letters in latex
In latex, the Greek letter should be written as a formula. In the $$sign, use the slash and the English symbol of Greek letter.
Greek letters in latex form
For ease of understanding, show how to write Greek letters in code symbols.
$\epsilon$
Results: there was no significant difference between the two groups
ϵ
Greek alphabet
Greek lowercase and uppercase
latex form
Greek lowercase and uppercase
latex form
latex form
α
A
\alpha A
μ
N
\mu N
β
B
\beta B
ξ
Ξ
\xi \Xi
γ
Γ
\gamma \Gamma
o O
o O
δ
Δ
\delta \ Delta
π
Π
\pi \Pi
ϵ
ε
E
\epsilon \varepsilon E
ρ
ϱ
P
\rho \varrho P
ζ
Z
\zeta Z
σ
Σ
\sigma \Sigma
η
H
\eta H
τ
T
\tau T
θ
ϑ
Θ
\theta \vartheta \Theta
υ
Υ
\upsilon \Upsilon
ι
I
\iota I
ϕ
φ
Φ
\phi \varphi \Phi
κ
K
\kappa K
χ
X
\chi X
λ
Λ
\lambda \Lambda
ψ
Ψ
\psi \Psi
μ
M
\mu M
ω
Ω
\omega \Omega
The usage of Greek alphabet in other programming languages
In other programming languages, the implicit latex method is used
Binary tree is a very important data structure, many other data structures are based on the evolution of binary tree. For binary tree, there are depth traversal and breadth traversal. Depth traversal has three traversal methods: preorder, middle order and postorder. Breadth traversal is what we usually call level traversal. Because the definition of tree itself is a recursive definition, it is not only easy to understand but also very concise to use the recursive method to realize the three traversal of tree. For breadth traversal, it needs the support of other data structures, such as heap. Therefore, for a piece of code, readability is sometimes more important than the efficiency of the code itself.
The four main traversal ideas are as follows
Preorder traversal: root node — & gt; left subtree — & gt; right subtree
Middle order traversal: left subtree — & gt; root node — & gt; right subtree
Postorder traversal: left subtree — & gt; right subtree — & gt; root node
Level traversal: just traverse by level
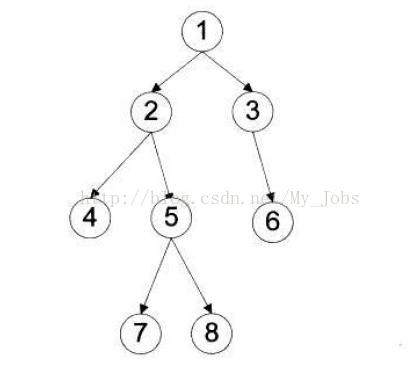
For example, find the following binary tree traversal
1) According to the traversal idea mentioned above: root node — & gt; left subtree — & gt; right subtree, it is easy to write recursive version:
public void preOrderTraverse1(TreeNode root) {
		if (root != null) {
			System.out.print(root.val+"  ");
			preOrderTraverse1(root.left);
			preOrderTraverse1(root.right);
		}
	}
2) Now let’s talk about the non recursive version:
According to the order of preorder traversal, first visit the root node, then visit the left and right subtree. Therefore, for any node, the first part is to access it directly, and then repeat the above steps when judging whether the left subtree is empty or not until it is empty. If it is empty, you need to access the right subtree. Note that after accessing the left child, you need to access the right child in turn. Therefore, you need the support of stack as a data structure. For any node, the specific steps are as follows:
a) Access it, and put the node into the stack, and set the current node as the left child;
b) Judge whether the node node is empty. If it is empty, take out the top node of the stack and leave the stack, and set the right child as the current node; otherwise, repeat step a) until the current node is empty or the stack is empty (it can be found that the nodes in the stack are stored just to access the right child)
1) According to the above traversal idea: left subtree — & gt; root node — & gt; right subtree, it is easy to write recursive version:
public void inOrderTraverse1(TreeNode root) {
		if (root != null) {
			inOrderTraverse1(root.left);
			System.out.print(root.val+"  ");
			inOrderTraverse1(root.right);
		}
	}
2) non recursive implementation, with the explanation of the preceding order, the middle order is relatively simple, the same reason. It’s just that the order of access is moved to the time of stack exit. The code is as follows:
1) According to the traversal idea mentioned above: left subtree — & gt; right subtree — & gt; root node, it is easy to write recursive version:
public void postOrderTraverse1(TreeNode root) {
		if (root != null) {
			postOrderTraverse1(root.left);
			postOrderTraverse1(root.right);
			System.out.print(root.val+"  ");
		}
	}
2) Non recursive code, not to write
4、 Level traversal
Hierarchy traversal code is relatively simple, just need a queue, first add the root node in the queue. Then, for any node, when it is out of the queue, it can be accessed. At the same time, if the left child and the right child are not empty, enter the queue. The code is as follows:
public void levelTraverse(TreeNode root) {
		if (root == null) {
			return;
		}
		LinkedList<TreeNode> queue = new LinkedList<>();
		queue.offer(root);
		while (!queue.isEmpty()) {
			TreeNode node = queue.poll();
			System.out.print(node.val+"  ");
			if (node.left != null) {
				queue.offer(node.left);
			}
			if (node.right != null) {
				queue.offer(node.right);
			}
		}
	}
5、 Depth first traversal
In fact, depth traversal is the pre order, middle order and post order above. But in order to ensure that it corresponds to breadth first traversal, it is also written here. The code is also easy to understand. In fact, it is preorder traversal. The code is as follows: 0
public void depthOrderTraverse(TreeNode root) {
		if (root == null) {
			return;
		}
		LinkedList<TreeNode> stack = new LinkedList<>();
		stack.push(root);
		while (!stack.isEmpty()) {
			TreeNode node = stack.pop();
			System.out.print(node.val+"  ");
			if (node.right != null) {
				stack.push(node.right);
			}
			if (node.left != null) {
				stack.push(node.left);
			}
		}
	}
Du [- abcdhhklmssx] [- L & lt; symbolic link & gt;] [- X & lt; file & gt;] [– block size] [– exclude = & lt; directory or file & gt;] [– max depth = & lt; directory level & gt;] [– help] [– version] [directory or file]
Common parameters:
-A or – all displays disk usage for each specified file, or for each file in the directory.
-B or – bytes displays the size of the directory or file in bytes.
-C or – total displays not only the size of the directory or file, but also the sum of all the directories or files.
-D or – dereference args displays the source file size of the specified symbolic connection.
-H or – human readable in units of K, m and G to improve the readability of information.
-H or – Si is the same as – H, but K, m and G are converted to 1000 instead of 1024.
-K or – kilobytes in 1024 bytes.
-L or – count links repeatedly calculate the file of hardware connection.
-L & lt; symbolic connection & gt; or – dereference & lt; symbolic connection & gt; displays the source file size of the symbolic connection specified in the options.
-M or – megabytes in 1MB.
-S or – summarize displays only the total, the size of the current directory.
-S or – separate dirs displays the size of each directory, excluding the size of its subdirectories.
-X or – one file Xsystem is based on the file system at the beginning of processing. If there are other different file system directories, they will be omitted.
-X & lt; file & gt; or – exclude from = & lt; file & gt; specify a directory or file in & lt; file & gt.
– exclude = & lt; directory or file & gt; skips the specified directory or file.
– max depth = & lt; the number of directory layers & gt; is ignored when the number of directory layers exceeds the specified number.
– help displays help.
– version displays the version information.
1 & gt; to display the disk usage of a directory tree and each subtree
du /home/linux
This shows the number of disk blocks in the / home / Linux directory and each subdirectory.
2 & gt; to display the disk usage of a directory tree and each subtree in 1024 bytes
du -k /home/linux
This shows the number of 1024 byte disk blocks in the / home / Linux directory and each subdirectory.
3 & gt; displays the disk usage of a directory tree and each subtree in MB
du -m /home/linux
This shows the number of MB disk blocks in the / home / Linux directory and each subdirectory.
4 & gt; displays the disk usage of a directory tree and each subtree in GB
du -g /home/linux
This shows the number of GB disk blocks in the / home / Linux directory and each subdirectory.
5 & gt; view the size of all directories and subdirectories under the current directory:
du -h .
“.” represents the current directory. It can also be changed to a clear path
-H means to display in the humanized form of K, m and G
6 & gt; view the size of the user directory in the current directory, and do not want to see other directories and their subdirectories:
du -sh user
-S means to summarize, that is, only one summarized value is listed
du -h –max-depth=0 user
–Max depth = n means only to drill down to the n-th level directory. If it is set to 0, it means not to drill down to the subdirectory.
7 & gt; list the sizes of all directories and files in the user directory and its subdirectories:
du -ah user
-A means including directory and file
a
8 & gt; lists the size of the directory in the current directory whose name does not include the XYZ string:
du -h –exclude=’*xyz*’
9 & gt; want to list more information about the size of the user directory and subdirectories in one screen:
du -0h user
-0 (zero bar) indicates that the information of each directory listed is directly output to the next directory instead of newline.
10 & gt; displays all disk usage for only one directory tree
du -s /home/linux
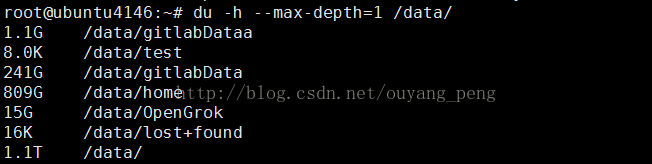
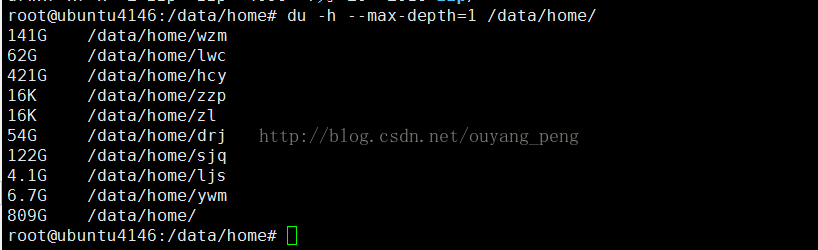
11 & gt; view the size of each folder: Du – h — max depth = 1
To view the specified directory:
The code is as follows: where / path represents the path
In the C / C + + language, the division of integer number will be carried out (rounding off the decimal part). For example, int a = 15 / 10; the result of a is 1.
The same is true in Java, so when dividing two int data and returning a floating-point data, you need to force type conversion. For example, float a = (float) BGC, where B and C are int data.
Python is divided into three kinds of division: traditional division, precise division and floor division.
Traditional division
If it is an integer division, perform the floor division, if it is a floating-point division, perform the precise division.
>>>1/2
0
>>>1.0/2.0
0.5
Precise division
Division always returns the real quotient, whether the operands are integer or floating-point. Execute from__ future__ The import division directive can do this.
Starting from Python 2.2, an operator / / is added to perform floor Division: / / division. Regardless of the numeric type of the operands, the decimal part is always discarded and the nearest number in the number sequence smaller than the real quotient is returned.
>>>1//2
0
>>>1.0//2
0
>>>-1//2.0
-1
Built in function divmod() divmod (a, b), return (A / / B, a% B)
1、 Download and install phantomjs according to your own platform https://phantomjs.org/download.html
2、 Call a JS file to access the URL connection that needs to be collected
// Example using HTTP POST operation

"use strict";
var page = require('webpage').create(),
    system = require('system'),
    server = system.args[1],
    settings = {
    encoding: "utf8",
    headers: {
        "Content-Type": "text/html",
        "Cookie": "cookie",
        "User-Agent": "Mozilla/5.0 (iPhone; CPU iPhone OS 11_0 like Mac OS X) AppleWebKit/604.1.38 (KHTML, like Gecko) Version/11.0 Mobile/15A372 Safari/604.1"
    }
};

page.open(server, settings, function (status) {
    var content = page.evaluate(function() {
       return document.getElementById('uiContent').innerHTML;
    });
    console.log(content);
    phantom.exit();
});
Recently, we need to realize the communication between three raspberry pie terminals in an Internet composed of two switches
Because raspberry pie has a gigabit network port, we need to match the IP addresses of three raspberry pies in the same network segment. So we need to change the address.
Unlike the computer version of Ubuntu system, raspberry pie is not easy to implement interface settings. Under Ubuntu, you just need to click the network icon, and then edit the wired link in the edit link at the bottom.
The method of configuring IP address for raspberry pie is as follows:
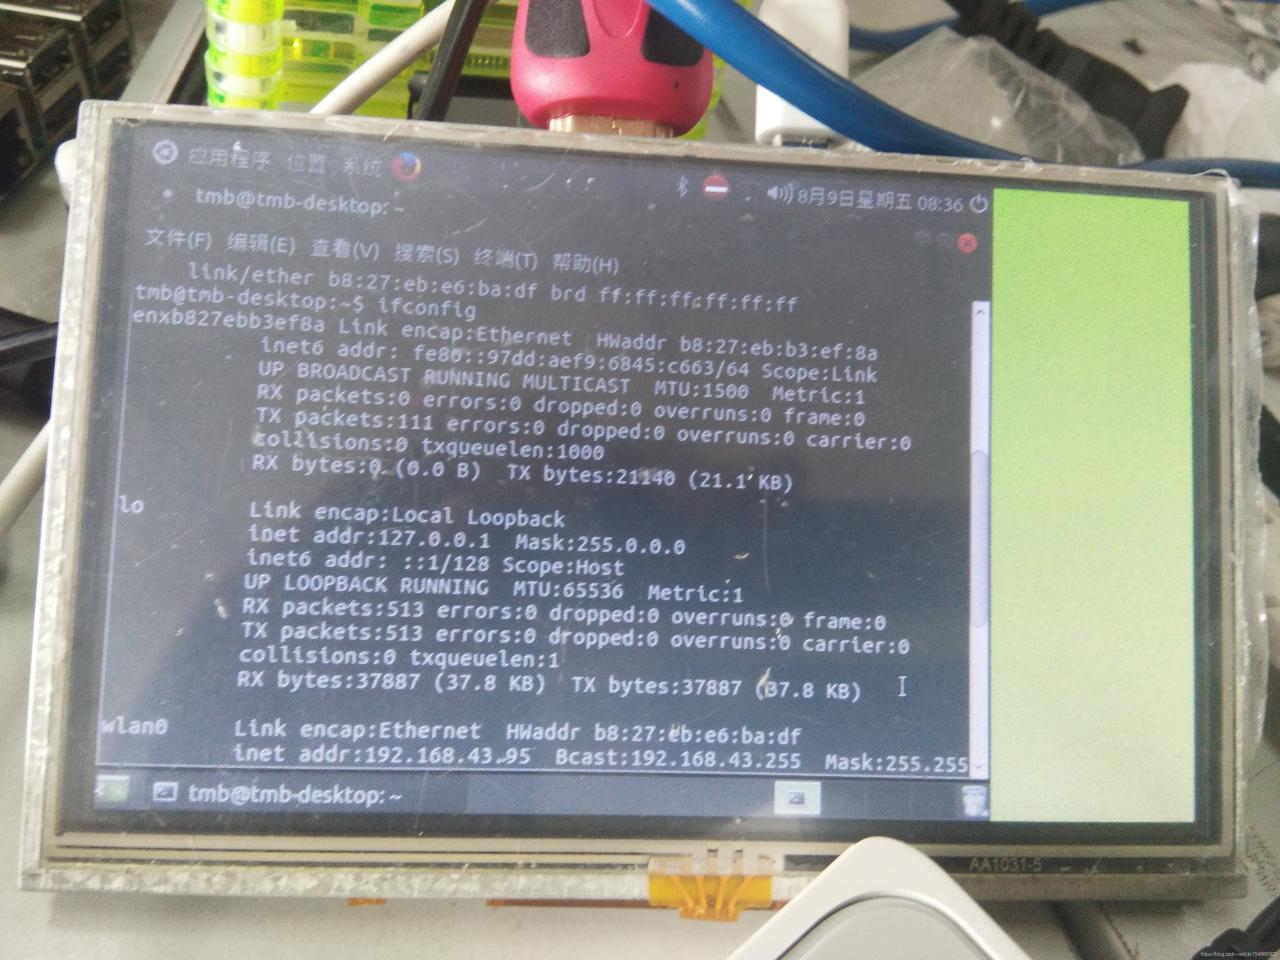
1. Now the terminal input ifconfig to view the local cable link interface
You can see that there is a wired connection port of enxb827bb3ef8a on the top, which is the name of the wired gateway. Or you can see it through the following of hwaddr
Remember the name
2. Terminal input:
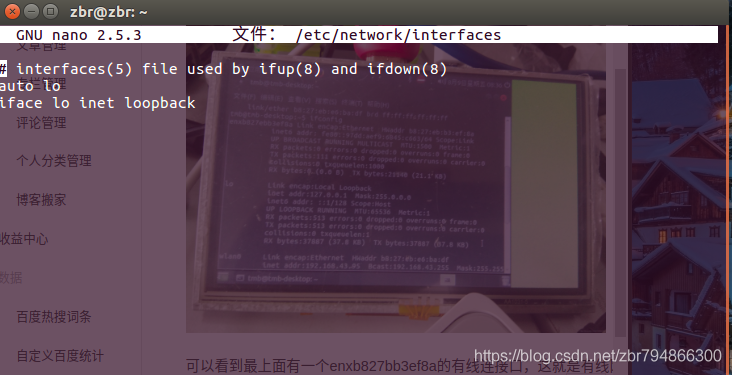
sudo nano /etc/network/interfaces
Then a black interface (network configuration file) will be opened, which may display the following contents:
Then add the following:
auto lo
iface lo inet loopback
auto enxb827bb3ef8a  //It is the name of the previous view
iface enxb827bb3ef8a inet static
address 192.168.1.2    //IP address
netmask 255.255.255.0    //NetMask
gateway 192.168.1.1     //Gateway
Then press Ctrl + O to save, press enter to confirm, and press Ctrl + X to exit
Today, I try to use ptyhon to do a function of grabbing web content and generating word document. The function is very simple. Make a record for future use.
The third-party component Python docx is used to generate word, so install the third-party component first. As Python installed under Windows does not have the module of setuptools by default, you need to install the module of setuptools first
1. It can be found on the official website of Python https://bootstrap.pypa.io/ez_ setup.py , save the code locally and execute: Python EZ_ setup.py
2. Download Python docx( https://pypi.python.org/pypi/python-docx/0.7.4 )After downloading, unzip and go to XXX / python-docx-0.7.4 to install Python docx: Python setup.py install
In this way, the installation of Python docx is successful. You can use it to operate word documents. Here is a reference for the generation of word documents https://python-docx.readthedocs.org/en/latest/index.html
HTML parsing uses sgmlparser in sgmllib, and URL content acquisition uses urllib and urllib2
to parse
The code is as follows:
# -*- coding: cp936 -*-
from sgmllib import SGMLParser
import os
import sys
import urllib
import urllib2
from docx import Document
from docx.shared import Inches
import time

##Get the url to be parsed
class GetUrl(SGMLParser):
    def __init__(self):
        SGMLParser.__init__(self)
        self.start=False
        self.urlArr=[]


    def start_div(self,attr):
        for name,value in attr:
            if value=="ChairmanCont Bureau":#Fixed values in page js
                self.start=True


    def end_div(self):
        self.start=False


    def start_a(self,attr):
        if self.start:
            for name,value in attr:
                self.urlArr.append(value)


    def getUrlArr(self):
        return self.urlArr

##Parse the url obtained above to get useful data
class getManInfo(SGMLParser):
    def __init__(self):
        SGMLParser.__init__(self)
        self.start=False
        self.p=False
        self.dl=False
        self.manInfo=[]
        self.subInfo=[]

    def start_div(self,attr):
        for name,value in attr:
            if value=="SpeakerInfo":#Fixed values in page js
                self.start=True

    def end_div(self):
        self.start=False

    def start_p(self,attr):
        if self.dl:
            self.p=True

    def end_p(self):
        self.p=False

    def start_img(self,attr):
        if self.dl:
            for name,value in attr:
                self.subInfo.append(value)


    def handle_data(self,data):
        if self.p:
            self.subInfo.append(data.decode('utf-8'))


    def start_dl(self,attr):
        if self.start:
            self.dl=True

    def end_dl(self):
        self.manInfo.append(self.subInfo)
        self.subInfo=[]
        self.dl=False

    def getManInfo(self):
        return self.manInfo


urlSource="http://www.XXX"
sourceData=urllib2.urlopen(urlSource).read()

startTime=time.clock()
##get urls
getUrl=GetUrl()
getUrl.feed(sourceData)
urlArr=getUrl.getUrlArr()
getUrl.close()
print "get url use:" + str((time.clock() - startTime))
startTime=time.clock()


##get maninfos
manInfos=getManInfo()
for url in urlArr:#one url one person
    data=urllib2.urlopen(url).read()
    manInfos.feed(data)
infos=manInfos.getManInfo()
manInfos.close()
print "get maninfos use:" + str((time.clock() - startTime))
startTime=time.clock()

#word
saveFile=os.getcwd()+"\\xxx.docx"
doc=Document()
##word title
doc.add_heading("HEAD".decode('gbk'),0)
p=doc.add_paragraph("HEADCONTENT:".decode('gbk'))


##write info
for infoArr in infos:
    i=0
    for info in infoArr:
        if i==0:##img url
            arr1=info.split('.')
            suffix=arr1[len(arr1)-1]
            arr2=info.split('/')
            preffix=arr2[len(arr2)-2]
            imgFile=os.getcwd()+"\\imgs\\"+preffix+"."+suffix
            if not os.path.exists(os.getcwd()+"\\imgs"):
                os.mkdir(os.getcwd()+"\\imgs")
            imgData=urllib2.urlopen(info).read()

            try:
                f=open(imgFile,'wb')
                f.write(imgData)
                f.close()
                doc.add_picture(imgFile,width=Inches(1.25))
                os.remove(imgFile)
            except Exception as err:
                print (err)


        elif i==1:
            doc.add_heading(info+":",level=1)
        else:
            doc.add_paragraph(info,style='ListBullet')
        i=i+1


doc.save(saveFile)
print "word use:" + str((time.clock() - startTime))
When starting the whole spring boot project, an error occurred:
could not resolve placeholder
Reason: the configuration file is not specified, because there are multiple configuration files under Src/main/resources, such as application- dev.properties , boss.properties And so on.
Solution: method 1:
in application.properties Join in
spring.profiles.active= @env@
Used to automatically decide which profile to choose.
Method 2: (not a good method)
@Configuration
@EnableTransactionManagement
// Added by yourself, specifying the configuration file
@PropertySource(value = "classpath:application-dev.properties", ignoreResourceNotFound = true)
public class DruidDBConfig {

    private static final Logger LOG = LoggerFactory.getLogger(DruidDBConfig.class);

    @Value("${spring.datasource.url}")
    private String dbUrl;

    @Value("${spring.datasource.username}")
    private String username;
    。。。
}
The official document says that the V-link directive has been replaced by a new & lt; router link & gt; component directive, which has been completed by the component in Vue 2.
Note: <router link> does not support target = "_Blank ", if you want to open a new tab, you must use the <a> tab.
But in fact, vue2 version of <router link>supports target = “_The “blank” attribute (tag = “a”) is as follows:
1 <router-link target="_blank" :to="{path:'/home',params:{id:'8'}}">open home in a new page</router-link>
2. Programming navigation:
Sometimes it is necessary to realize page Jump in click event or function, so you can use the example method of router to realize it by writing code.
What we often use is$ router.push And$ router.go However, after vue2.0, this method does not support the properties of new window opening. This is the time to use this$ router.resolve , as follows