HAXM Hardware-assisted virtualization engine
Open Task Manager to check whether virtualization is on
If used
Enter the BIOS option
security–》Virtulization–>“ Intel(R) Virtualization Technology”–> Enabled
HAXM Hardware-assisted virtualization engine
Open Task Manager to check whether virtualization is on
If used
Enter the BIOS option
security–》Virtulization–>“ Intel(R) Virtualization Technology”–> Enabled
In PG_ Add the IP to hbaconf and restart postgreql
as follows:[ https://blog.csdn.net/qq_ 36434219/article/details/118277681]

Note: there are many IP addresses added, one by one… You can directly configure the fixed network segment. For example, the above figure can be configured as follows:
192.168.3.0/24 represents having 254 IP addresses: from 192.168.1.1 to 192.168.1.254
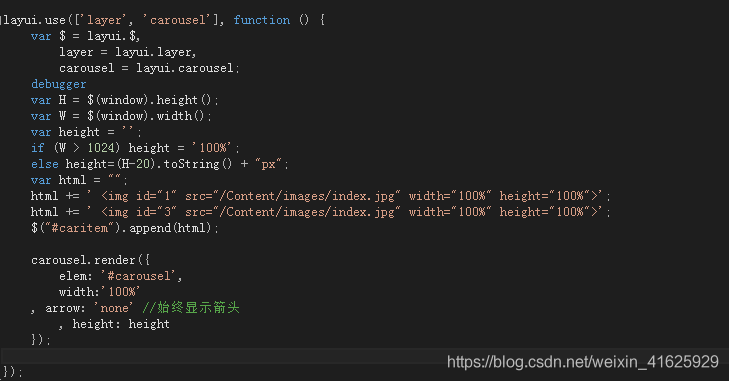
Layui’s official definition of carousel height is placed in
carousel.render({height:''...})In the method Pixels and percentages are supported. But the author has a demand, the carousel chart needs the background to return to the front according to the data permission control
And you need to set the height dynamically, not the fixed number of pixels and the proportion, and the height needs to be adjusted according to the current height
Adjust the pixels of the computer, such as how high is 1024 pixels, how high is normal pixels.
No more nonsense, just go to JS code:
Installation problems with sass
There is a problem in installing node sass sass loader: the version is too high and incompatible
resolvent:
npm installl [email protected]
npm installl [email protected] --save-dev
![]()
In main.js, define a global time filter through: Vue. Filter().
the first parameter is the name of the filter, such as: dataform,
the second parameter is the processing function of the time filter: function(), which needs to specify a formal parameter: originval, which is to process the time data
to get the originval time, first update the date and pass the originval to you, that is, to get a date object of the time according to the local time
Get four digit year through getfullyear()
Get the month through getmonth(). The month starts from 1, so make it + 1
if the month is less than two digits, fill in 0 in the front by calling. Padstart (2, ‘0’). The first parameter represents the total length of the number of digits, and the second parameter is a string. If the number of digits is less than two, which string should be filled in
Get the current date through: getdate()
Get the current hour through: gethours()
Get the current minutes through: getminutes()
Get the current seconds by: getseconds()
Let the obtained date, time, minute and second be spliced into a complete date string
return ${y} - ${m} - ${D} - ${HH}: ${mm}: ${SS}
//Format time filter
vue.filter (‘dataform ‘, function (originval) {
const DT = new date (originval)
const y = dt.getFullYear()
const m = (dt.getMonth() + 1 + ‘’).padStart(2, ‘0’)
const d = (dt.getDate() + ‘’).padStart(2, ‘0’)
const hh = (dt.getHours() + ‘’).padStart(2, ‘0’)
const mm = (dt.getMinutes() + ‘’).padStart(2, ‘0’)
const ss = (dt.getSeconds() + ‘’).padStart(2, ‘0’)
return ${y}-${m}-${d} ${hh}:${mm}:${ss}

Create a new rabbitmq server script in the/etc/init. D directory
In the script, you need to modify Erlang path, daemon, control, init in path_LOG_Dir and PID_File parameter
#!/bin/sh
#
# rabbitmq-server RabbitMQ broker
#
# chkconfig: - 80 05
# description: Enable AMQP service provided by RabbitMQ
#

### BEGIN INIT INFO
# Provides:          rabbitmq-server
# Required-Start:    $remote_fs $network
# Required-Stop:     $remote_fs $network
# Description:       RabbitMQ broker
# Short-Description: Enable AMQP service provided by RabbitMQ broker
### END INIT INFO

# Source function library.
. /etc/init.d/functions
export HOME=/root
PATH=/sbin:/usr/sbin:/bin:/usr/bin:/usr/local/erlang/bin
NAME=rabbitmq-server
#DAEMON=/usr/local/rabbitmq/rabbitmq_server-3.8.17/sbin/${NAME}
#CONTROL=/usr/local/rabbitmq/rabbitmq_server-3.8.17/sbin/rabbitmqctl
DAEMON=/usr/local/rabbitmq/rabbitmq_server-3.8.17/sbin/${NAME}
CONTROL=/usr/local/rabbitmq/rabbitmq_server-3.8.17/sbin/rabbitmqctl
DESC=rabbitmq-server
USER=root
ROTATE_SUFFIX=
INIT_LOG_DIR=/usr/local/rabbitmq/rabbitmq_server-3.8.17/var/log/rabbitmq
PID_FILE=/usr/local/rabbitmq/rabbitmq_server-3.8.17/var/run/rabbitmq/pid

START_PROG="daemon"
LOCK_FILE=/var/lock/subsys/$NAME

test -x $DAEMON || exit 0
test -x $CONTROL || exit 0

RETVAL=0
set -e

[ -f /etc/default/${NAME} ] && . /etc/default/${NAME}

ensure_pid_dir () {
    PID_DIR=`dirname ${PID_FILE}`
    if [ ! -d ${PID_DIR} ] ; then
        mkdir -p ${PID_DIR}
        chown -R ${USER}:${USER} ${PID_DIR}
        chmod 755 ${PID_DIR}
    fi
}

remove_pid () {
    rm -f ${PID_FILE}
    rmdir `dirname ${PID_FILE}` || :
}

start_rabbitmq () {
    status_rabbitmq quiet
    if [ $RETVAL = 0 ] ; then
        echo RabbitMQ is currently running
    else
        RETVAL=0
        ensure_pid_dir
        set +e
        RABBITMQ_PID_FILE=$PID_FILE $START_PROG $DAEMON \
            > "${INIT_LOG_DIR}/startup_log" \
            2> "${INIT_LOG_DIR}/startup_err" \
            0<&- &
        $CONTROL wait $PID_FILE >/dev/null 2>&1
        RETVAL=$?
        set -e
        case "$RETVAL" in
            0)
                echo SUCCESS
                if [ -n "$LOCK_FILE" ] ; then
                    touch $LOCK_FILE
                fi
                ;;
            *)
                remove_pid
                echo FAILED - check ${INIT_LOG_DIR}/startup_\{log, _err\}
                RETVAL=1
                ;;
        esac
    fi
}

stop_rabbitmq () {
    status_rabbitmq quiet
    if [ $RETVAL = 0 ] ; then
        set +e
        $CONTROL stop ${PID_FILE} > ${INIT_LOG_DIR}/shutdown_log 2> ${INIT_LOG_DIR}/shutdown_err
        RETVAL=$?
        set -e
        if [ $RETVAL = 0 ] ; then
            remove_pid
            if [ -n "$LOCK_FILE" ] ; then
                rm -f $LOCK_FILE
            fi
        else
            echo FAILED - check ${INIT_LOG_DIR}/shutdown_log, _err
        fi
    else
        echo RabbitMQ is not running
        RETVAL=0
    fi
}

status_rabbitmq() {
    set +e
    if [ "$1" != "quiet" ] ; then
        $CONTROL status 2>&1
    else
        $CONTROL status > /dev/null 2>&1
    fi
    if [ $?!= 0 ] ; then
        RETVAL=3
    fi
    set -e
}

rotate_logs_rabbitmq() {
    set +e
    $CONTROL rotate_logs ${ROTATE_SUFFIX}
    if [ $?!= 0 ] ; then
        RETVAL=1
    fi
    set -e
}

restart_running_rabbitmq () {
    status_rabbitmq quiet
    if [ $RETVAL = 0 ] ; then
        restart_rabbitmq
    else
        echo RabbitMQ is not runnning
        RETVAL=0
    fi
}

restart_rabbitmq() {
    stop_rabbitmq
    start_rabbitmq
}

case "$1" in
    start)
        echo -n "Starting $DESC: "
        start_rabbitmq
        echo "$NAME."
        ;;
    stop)
        echo -n "Stopping $DESC: "
        stop_rabbitmq
        echo "$NAME."
        ;;
    status)
        status_rabbitmq
        ;;
    rotate-logs)
        echo -n "Rotating log files for $DESC: "
        rotate_logs_rabbitmq
        ;;
    force-reload|reload|restart)
        echo -n "Restarting $DESC: "
        restart_rabbitmq
        echo "$NAME."
        ;;
    try-restart)
        echo -n "Restarting $DESC: "
        restart_running_rabbitmq
        echo "$NAME."
        ;;
    *)
        echo "Usage: $0 {start|stop|status|rotate-logs|restart|condrestart|try-restart|reload|force-reload}" >&2
        RETVAL=1
        ;;
esac

exit $RETVAL
Set permissions
chmod a+x /etc/init.d/rabbitmq-serverStartUp Actions Manager
chkconfig --add /etc/init.d/rabbitmq-serverRabbitmq Sweatshirt: https://blog.csdn.net/qq_39135287/article/details/95725385
![]()
Check whether the following configuration is normal:
host、port、password、database
It is correct for standard bash, but in order to speed up the boot up, Ubuntu uses dash instead of traditional bash
solution: cancel dash
1. Execution: sudo dpkg reconfigure dash
2. Option: select No
1. Journalctl – Xe print job for zabbix-agent.service failed because a configured resource limit was exceeded
2. Journal CTL – Xe print PID… Not runnable
resolvent:
Check whether there is a folder named ZABBIX in the/run directory. If not, create a new one
# mkdir zabbix
Then start ZABBIX
# systemctl start zabbix-agent
# systemctl status zabbix-agent
Shame to say, in fact, for vscode configuration, the writer of C/C + + only referred to the tutorial, and then copied several JSON files, but did not understand the meaning.
For this problem, we need to solve the compilation problem, so in task.json, my configuration file is as follows
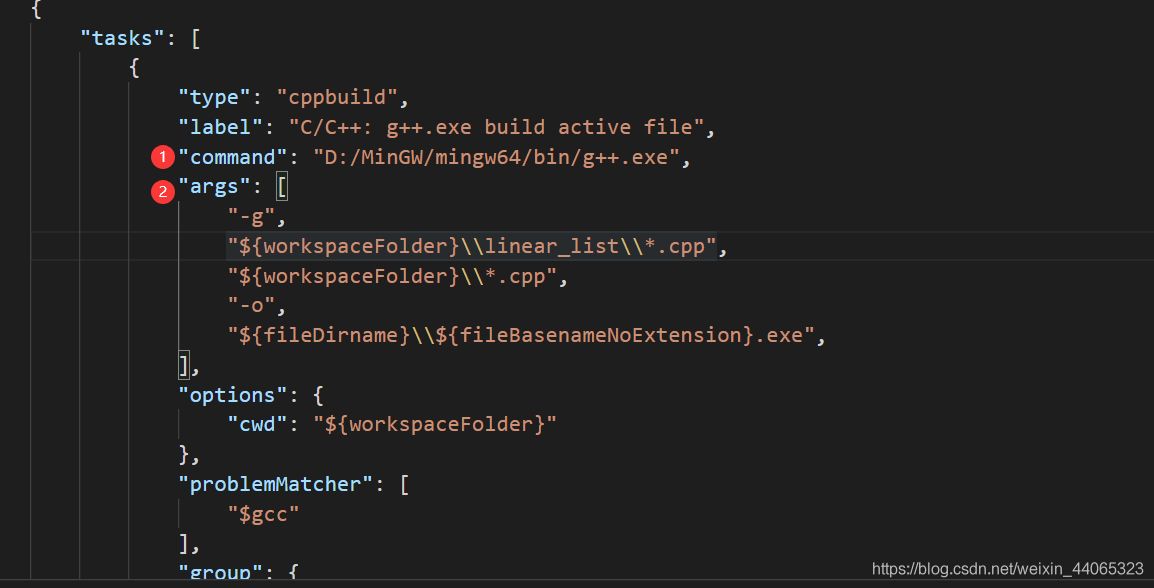
in which two parameters are command and args
Command: compiler for compilation args: command for compilation
As a matter of fact, it can be seen from the familiar partners of GCC. Here we post the parameter

so we need to connect our file names. The workspace in front represents the workspace, so we only need to write our own directory name at the back, as shown in the figure of linear_ List, connect them.
1. First of all, to determine whether it is an environmental variable
If you input javac command and Java command in the command line, you can output a lot of things, which means that there is no problem in the configuration of environment variables. Otherwise, you need to configure environment variables
First, create a new Java_ The value of the home variable is the installation path of JDK. For example, my value is “D:// developtools/Java/JDK”. The contents in quotation marks, excluding quotation marks, are the same below.
Then add% Java after the path variable_ Home% \ bin “and% Java_ HOME%\jre\bin”
Create a new classpath variable with the value of “.”,% JAVA_ HOME%\lib;% JAVA_ HOME%\lib\tools.jar;”
The environment variables are configured.
2. If the path of the java file is correct, it is still reported that Java cannot find or load the main class, that is the problem of the package name. CMD locates in the SRC folder of the module, calls the Java command, and the bytecode file name is with the package name
![]()
That’s it
Start zookeeper under windows and prompt zookeeper audit is disabled; Indicates that the startup failed, as follows:
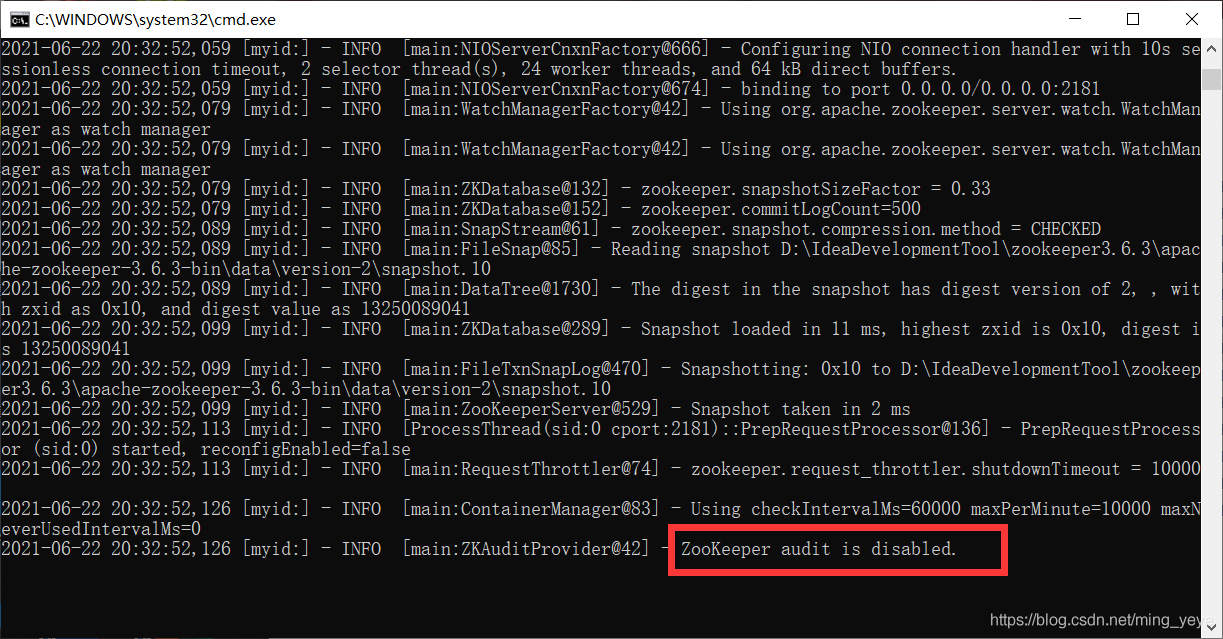
Reason: I’m running zookeeper version 3.6.3. It seems that there will be this phenomenon in versions above 3.6. The reason is that the newly added audit log of zookeeper is turned off by default when the new version is started, so this situation occurs.
terms of settlement:
1. In the configuration file conf of zookeeper, open the file zoo.cfg:
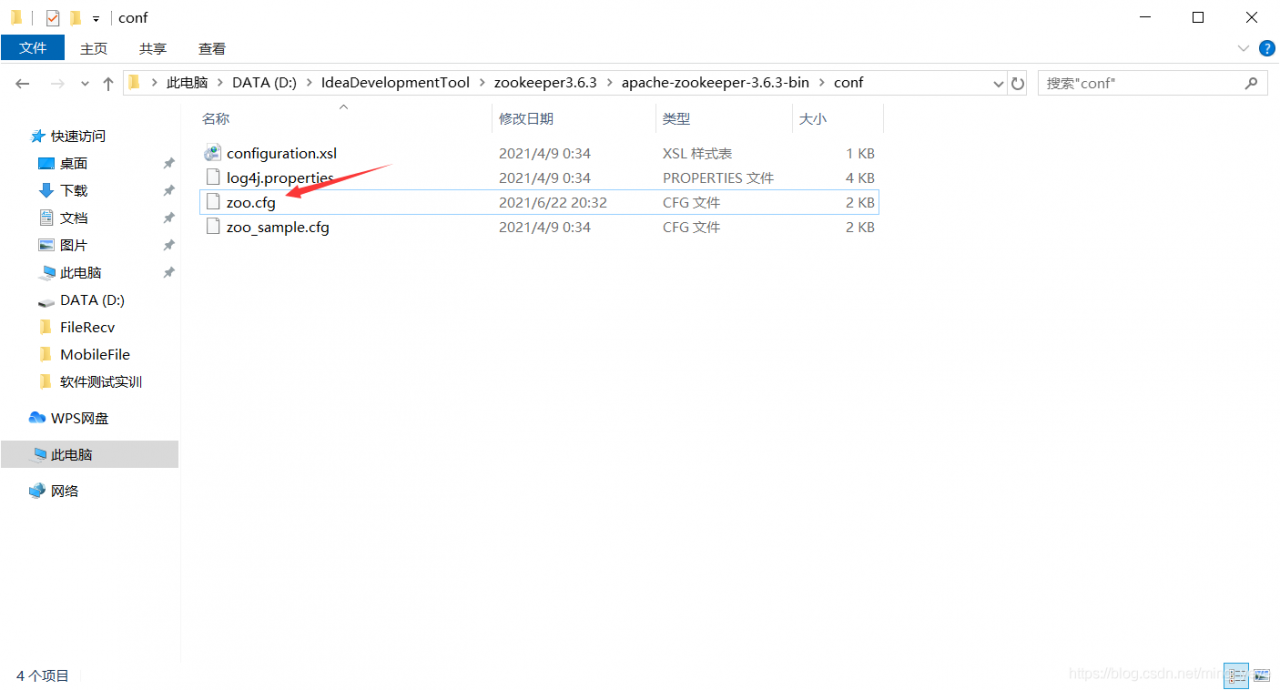
Attachment: the zoo.cfg file is a copy of the zoo_ Sample.cfg file. In the zoo.cfg file, the data storage path and the port number used when starting zookeeper are modified.
2. Modify the zoo.cfg file by adding admin.enable = true
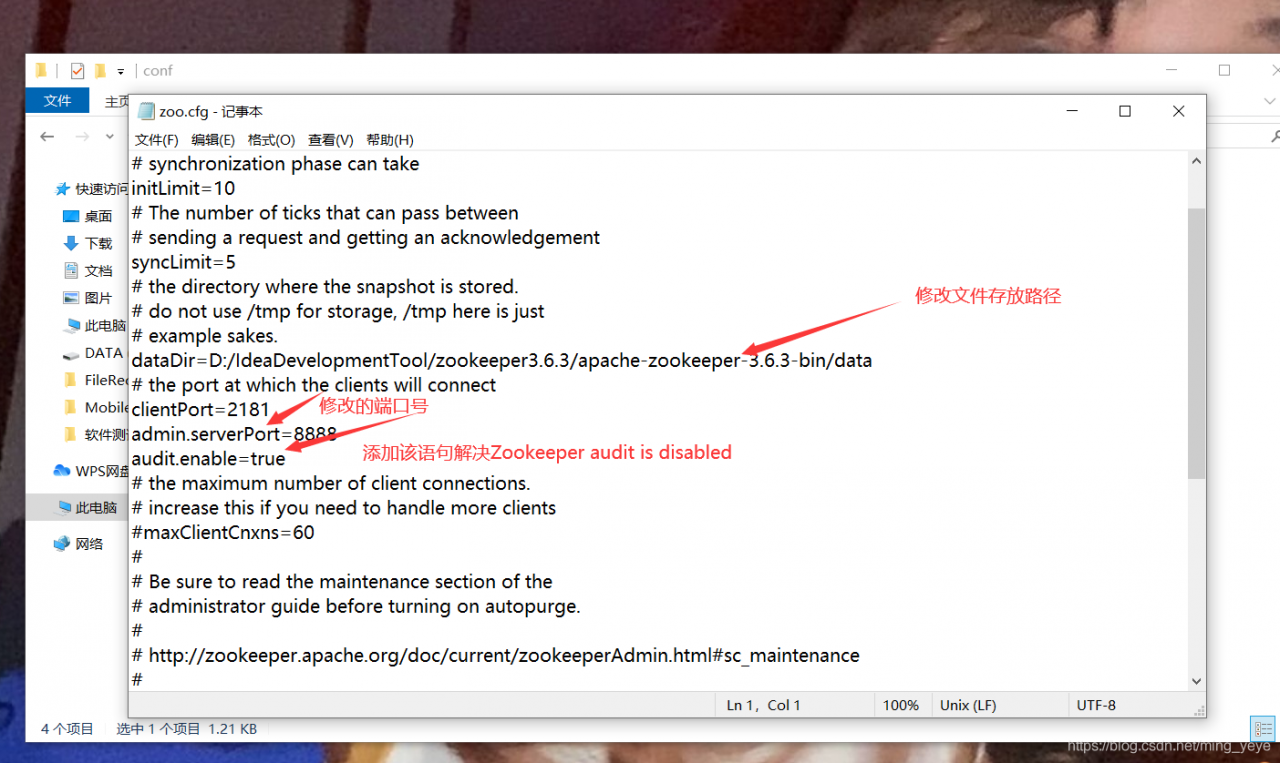
3. Save, restart zookeeper (double-click zkserver. CMD in bin directory), start successfully!

Hope to help you!!