[Solved] vite2+vue3 jsx Error: React is not defined

Vite2 + vue3 uses JSX to report an error: react is not defined

If JSX is not used in react, for error reporting:

React is not defined

It is required to add the following configuration to the vite.config.js file:

export default {
  esbuild: {
    jsxFactory: 'h',
    jsxFragment: 'Fragment',
    jsxInject: "import { h } from 'vue';"
  }
}

The last sentence is equivalent to the injection of vite. The helper automatically introduces h

[Solved] git Error: error: Your local changes to the following files would be overwritten by merge

A git pull error, error: Your local changes to the following files would be overwritten by merge, occurs because changes to the local branch are not saved when git pulls.

There are two general solutions. There is also a special case, that is, the change of permissions such as file reading and writing.

Method 1: discard local changes

If the local modification is not important, you can directly discard the local modification:

# Discard all local uncommitted changes
git checkout .

Some local files are newly added but not Add, the status in git status is untrack , and they need to be deleted through git clean

# First check what files will be deleted
git clean -nxdf

# Make sure the files that will be deleted are correct, then execute the delete
git clean -xdf

# You can also delete files one by one, for example, delete file xxx
git clean -f xxx

Or

Direct execution:

git reset --hard
git pull

Note: discarding local files is a dangerous operation and must be considered before deleting.

Method 2: temporarily store to the stack area

If local modifications are important. If it needs to be used later, the current modification can be temporarily stored in the stack area:

# Staging to the stack area
git stash

# View stash contents
git stash list

To use local modification, apply the stash content to the local branch:

git stash pop

The contents in stash are popped up. If multiple temporary contents are saved, the pop-up order is first in and last out (stack).

If you do not want to pop up the content, but still apply the stash content to the local branch:

git stash apply

In this way, the contents in stash will not be ejected.

In addition, you can manually delete the content in stash

# Delete the contents of a specified stash, the name of which can be obtained from the git stash list
git stash drop xxx
# Delete all stash content
git stash clear

Generally:

 git stash
 git commit
 git stash pop

Git stash: back up the contents of the current workspace, read the relevant contents from the latest submission, and ensure that the workspace is consistent with the last submission. At the same time, save the current workspace content to the GIT stack
git stash Pop: read the last saved content from the GIT stack and recover the relevant content of the workspace. Since there may be multiple stash contents, it is managed by stack. Pop will read the contents from the latest stash and recover them
git stack list: displays all backups in the GIT stack. You can use this list to decide where to recover
git stack clear: clear the GIT stack. At this time, graphical tools such as gitg will be used to find out which nodes of the original stash have disappeared.

Note: merge after using git stash to temporarily store content, and then git stash pop, branch conflict may be reported. At this time, you can create a new branch locally and recover the stash content on the new branch.

exceptional case:

Git prompts that the file has been modified, but the actual content has not been modified. The reason is that all git libraries will ignore the change of FileMode.

Git diff prompts the change of FileMode, as follows:

git diff xxx
diff --git a/xxx b/xxx
old mode 100755
new mode 100644

Solution:

#Terminal Execution 
git config --add core.filemode false

[Solved] npm install Error: error code ERR_SOCKET_TIMEOUT

1. Error information

New project, Vue + element, NPM install, The error information reported at that time is as follows.

error code ERR_SOCKET_TIMEOUT
9673 error network Socket timeout
9674 error network This is a problem related to network connectivity.
9674 error network In most cases you are behind a proxy or have bad network settings.
9674 error network
9674 error network If you are behind a proxy, please make sure that the
9674 error network 'proxy' config is set properly.  See: 'npm help config'
9675 verbose exit 1
9676 timing npm Completed in 545124ms
9677 verbose unfinished npm timer reify 1661242562981
9678 verbose unfinished npm timer reify:unpack 1661242811008
9679 verbose unfinished npm timer reifyNode:node_modules/svgo 1661242811170
9680 verbose code 1

2. Solutions

//Step 1


npm install webpack webpack-cli --global


//Step 2
npm install rxjs


//Step 3
npm install webpack webpack-cli --global


//Finally, direct boot success
npm run dev 


[Solved] Mybatis Error: Resources.getResourceAsStream(resource) cannot find the method

Problem Description: mybatisdemo.java
when loading the core configuration file of mybatis and obtaining SqlSessionFactory, the getResourceAsStream() method is marked in red, and the idea indicates that there is no such method.

1, Load the core configuration file of mybatis and get the SqlSessionFactory
    String resource = "mybatis-config.xml";
    InputStream inputStream = Resources.getResourceAsStream(resource);
    SqlSessionFactory sqlSessionFactory = new SqlSessionFactoryBuilder().build(inputStream);
    
Error:Cannot resolve method ‘getResourceAsStream‘ in ‘Resources‘

Solution: import import.org.apache.ibatis.io.Resources

~~

If the error is still reported, it will display: org.apache.ibatis.io does not exist, check the setting information of Maven.

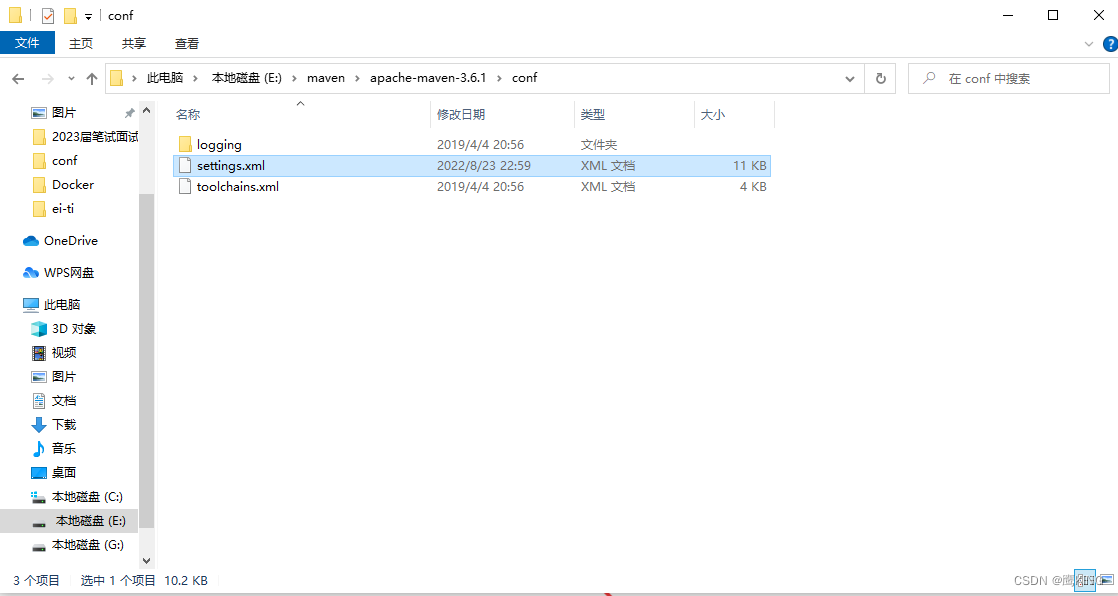
1. First, open the installation root directory of Maven and find settings.xml

Set up the storage repository in settings.xml:
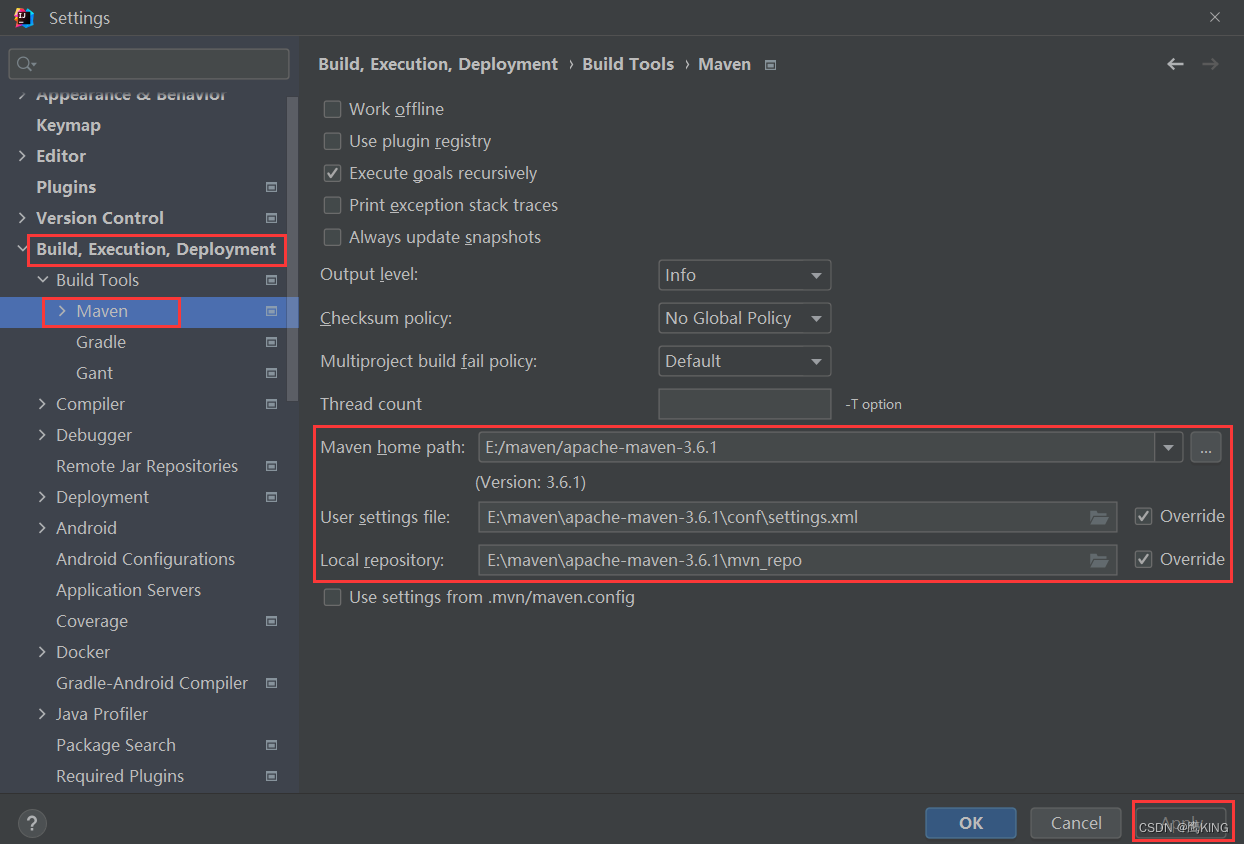
<localRepository>E:\maven\apache-maven-3.6.1\mvn_repo</localRepository>

2. Enter the IDE and make settings
File-Settings-Build,Execution,Depolyment-BuildTools-Maven
take the following configuration as an example:

At this time, the problem was solved!

[Solved] Vue2 Cross-domain Error: AxiosError net::ERR_FAILED, Network Error, ERR_NETWORK

Request scenario:

current page URL: http://127.0.0.1:8000/testcase
URL of jump request page: http://127.0.0.1:5000/testcase_orm
When using Axios request, the page prompts cross domain error

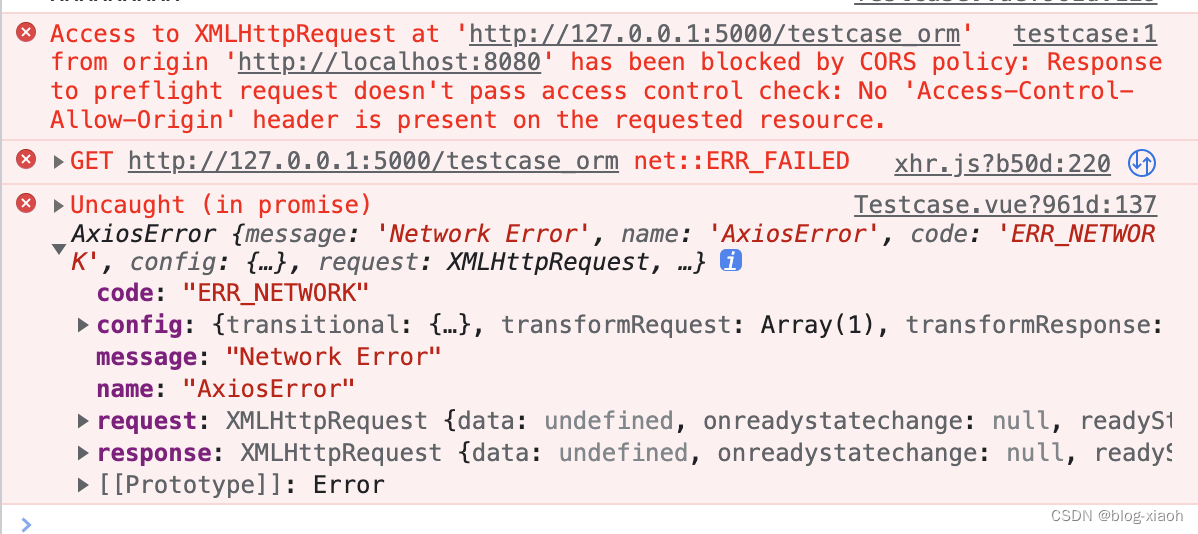
Cross-domain error reporting information

Access to XMLHttpRequest at ‘http://127.0.0.1:5000/testcase_orm’ from
origin ‘http://localhost:8080’ has been blocked by CORS policy: No
‘Access-Control-Allow-Origin’ header is present on the requested
resource.

AxiosError {message: ‘Network Error’, name: ‘AxiosError’, code:
‘ERR_NETWORK’

Screenshot of vue2 cross domain error report

through the analysis of the code and the error report information, the problem appears in the cross domain request (cross domain request: the browser does not allow the current source request to access another different source request. The source refers to the request agreement, domain name, and port number. If one of the three is inconsistent, it is a cross domain request)

current URL request URL Is it cross-domain Result analysis
http://www.kuakuakua.com http://www.kuakuakua.com/index.html no Same origin (the same domain name, protocol, and port number)
http://www.kuakuakua.com https://www.kuakuakua.com cross domain Different protocols (http/https)
http://www.kuakuakua.com http://www.javashuo.com/ cross domain Different domain names (www.kuakuakua.com/www.javashuo.com)
http://www.kuakuakua.com:8080 http://www.kuakuakua.com:8081 cross domain Different port numbers (8080/8081)

Solution

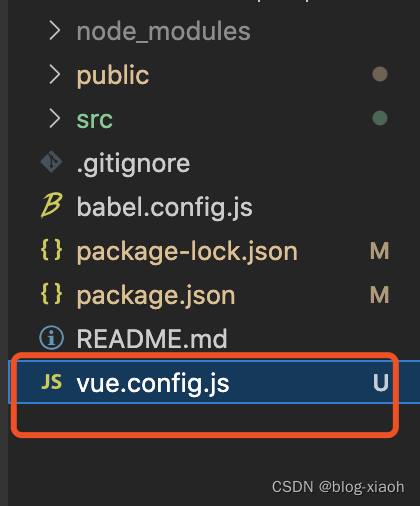
  • Step 1: Find the vue.config.js file in the project directory and open it for editing

insert image description here

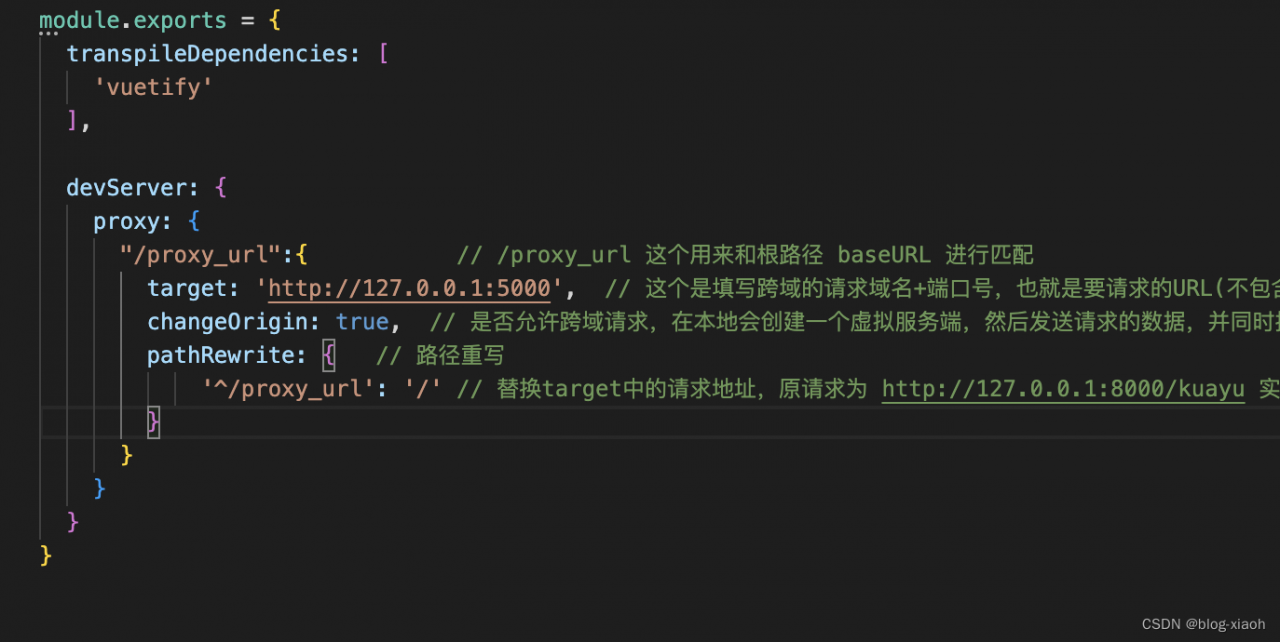
  • Step 2: According to the structure in the figure, copy the given code to module.exports

insert image description here

devServer: {
    proxy: {
      "/proxy_url":{           // /proxy_url This is used to match with the root path baseURL
        target: 'http://127.0.0.1:5000', // this is to fill in the cross-domain request domain + port number, that is, the URL to request (does not include the URL path)
        changeOrigin: true, // whether to allow cross-domain requests, a virtual server will be created locally, then send the requested data, and receive the requested data at the same time, so that the server and the server to interact with the data will not have cross-domain problems
        pathRewrite: { // path rewrite
            '^/proxy_url': '/' // replace the request address in target, the original request is http://127.0.0.1:8000/kuayu the actual request is http://127.0.0.1:8000/proxy_url/kuayu  
        }
      }
    }
  }
  • Step 3: Find the main.js file and set axios.defaults.baseURL to /proxy_url
axios.defaults.baseURL = ‘/proxy_url’
  • Step 4: Then the axios request in the methods in the xxx.vue file can be used normally. The complete request URL here is http://127.0.0.1:5000/testcase_orm (Step 4 is just to provide an example, the specific request URL Request according to the URL of your own project)
methods:{
    getCaseList: function(){
        console.log("xxxxxxxxx")
        console.log('Check if the interface call is successful')
        this.$axios.get('/testcase_orm').then((result)=>{
             console.log('Check if the interface call is successful, if it is called, it is successful')
             console.log(result)
        })
    }
  }

Solution Analysis.
Cross-domain problem, you can let the server to add the request header field information and allow cross-domain access, the server-side cross-domain problem is not described in this article, interested to see another Django cross-domain problem solving blog post

The vue cross domain problem is solved by using a proxy solution, which is forwarded to the target server through a proxy on the local server, so that the cross domain is only for the browser, and the cross domain problem does not occur for requests sent by the node service, thus solving the browser cross domain problem.

[Solved] Echarts Error: TypeError: Cannot read properties of null (reading getAttribute )

The above problem was encountered when using echarts

Generally, there are the following cases.
1. echarts.init(document.getElementById("xxxx") is written in the wrong format, such as adding a # in front of the id.

2. initialize operation when the element is not loaded out (stack a debugger on top of the initialized code to easily determine). Here specifically in vue.

If an error is reported you can put the code inside mounted.
mounted() {    
	this.initEcharts();   
}

Differences between mounted and created:

created:Called before the template is rendered into html, applied to initialize some attribute values and then rendered into view requirements.
mounted:Called after the template is rendered into html, to initialize the page and then perform some operations on the dom nodes of the html after it is finished.

[Solved] Docker Run Tomcat Error: Cannot find /usr/local/tomcat/bin/setclasspath.sh

Docker reports an error when running Tomcat

Cannot find /usr/local/tomcat/bin/setclasspath.sh
This file is needed to run this program

After trying, use the add command packaged with dockerfile

RUN unset CATALINA_HOME

Invalid after attempt

The prompt is that setclasspath.sh cannot be found, because this Tomcat restarts repeatedly

So use the command to copy a bin directory to the current folder

docker cp Docker_id:/usr/local/tomcat/bin ./

The result shows that setclasspath.sh exists, so where is the problem? Look for the error reporting code

In the catalina.sh script, the part causing the problem is as follows:


  if [ -r "$CATALINA_HOME"/bin/setclasspath.sh ]; then
    . "$CATALINA_HOME"/bin/setclasspath.sh
  else
    echo "Cannot find $CATALINA_HOME/bin/setclasspath.sh"
    echo "This file is needed to run this program"
  fi

The square brackets plus the -r command means to test whether the file is read-only. Similarly, – x tests whether the file is executable

In the problematic system, the – R command call in the container is abnormal.

Try to start a temporary tomcat8 authentication,

docker run -it --rm --entrypoint=/bin/bash tomcat:8

Note: executing the docker run command with the –rm command option is equivalent to executing docker rm -v after the container exits
execute command

root@f338debf92f6:/usr/local/tomcat# [[ -r /bin/bash ]]
root@f338debf92f6:/usr/local/tomcat# echo $?
1

Executed on a normal system

root@0083a80a9ec2:/usr/local/tomcat# [[ -r /bin/bash ]]
root@0083a80a9ec2:/usr/local/tomcat# echo $?
0

The command ‘$?’ indicates the exit status of the previous command or the return value of the function
for exit status, 0 indicates no error, and any other value indicates an error. In general, most commands return 0 upon successful execution and 1 upon failure. Some commands return other values, indicating different types of errors.

How to solve it
this is related to the faccessat2 system call. Due to the bug in runc, if your kernel does not support faccessat2, it will fail. There is an article saying that upgrading the kernel to 5.8 or above may work well, but I have tried it hard, because the kernel with the problem is 5.10
Method 1: update runc >= 1.0.0-rc93

Method 2: — privileged switch to run the container

Specific implementation of method 1:

View the original runc version

runc -v

Download version 1.0.0-rc95 of runc.amd64

Download address: releases · opencontainers/runc · GitHub

Name change and Execution Authority

mv runc.amd64 runc && chmod +x runc

View and back up the original runc

whereis runc

Some systems are in the /usr/bin/ directory, some systems are in the /usr/local/bin/ directory, the following commands are in the /usr/local/bin/ directory, the following commands are in the /usr/bin/ directory, change the directory yourself

mv /usr/local/bin/runc /usr/local/bin/runcbak

Overwrite the original runc

cp runc /usr/local/bin/runc

View the new version of runc

runc -v

Restart docker

systemctl restart docker

Method 2: concrete implementation

Docker run execution

docker run --privileged=true -p 8080:8080 tomcat:8

Add in docker-compose.yml

version: '2'
services:
    tomcat:
     container_name: tomcat
     image: tomcat:8
     ports:
         - '8080:8080'
     environment:
         - TZ=Asia/Shanghai
     privileged: true
     restart: always
[Solved] Error in nextTick: “TypeError: undefined is not iterable

Error in nextTick: “TypeError: undefined is not iterable (cannot read property Symbol(Symbol.iterator))”


The parent component did not pass the corresponding parameter Found:

<label-template
   :image-list="checkImageList"
   :tag-list="tagList"
   @onAllFeatures="onAllFeatures"
   :active-tab="activeTab"
   @next-page="nextPage"
   @previous-page="previousPage"
 />
historicalList.length //The parent component does not pass list, but the child component uses it and gets the length

Nltk Library Download error: [errno: 11004] getaddrinfo failed

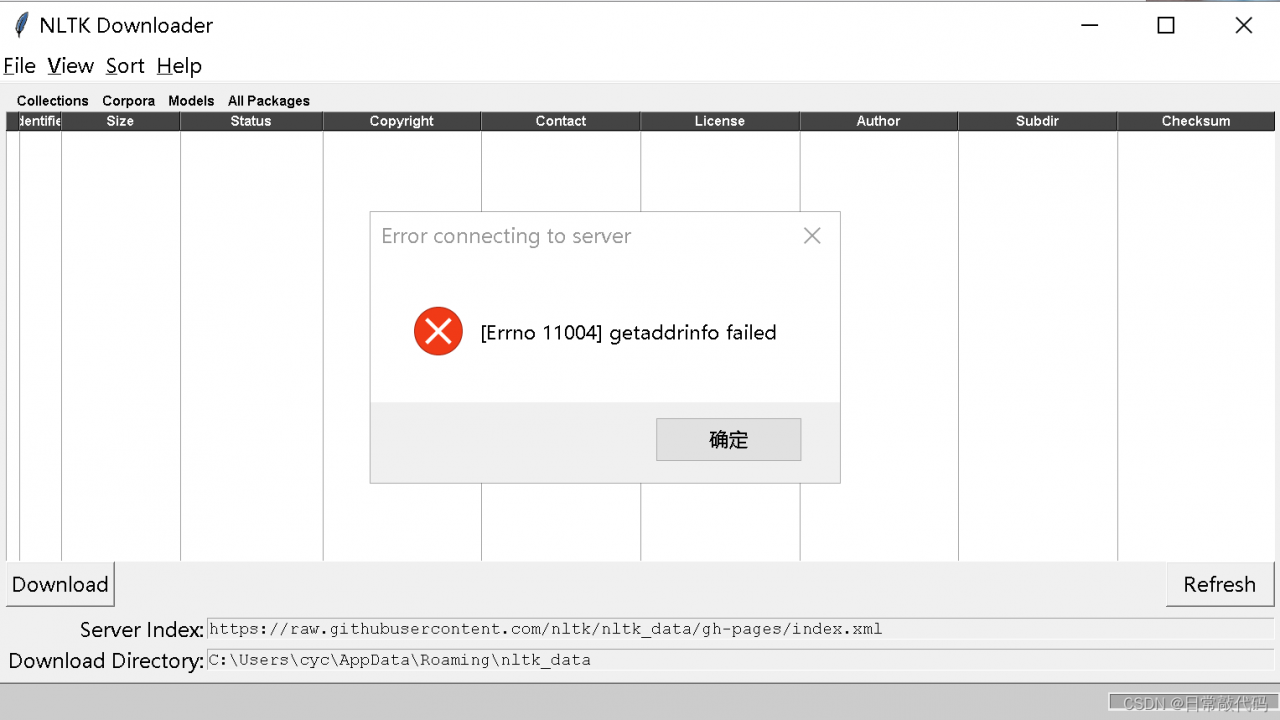
Download the natural language processing nltk library and install it under win10. The error is as follows:

IP address of raw.githubusercontent.com could not found

since the hosts cannot be modified and saved in normal mode, it needs to be run in management mode

Solution:

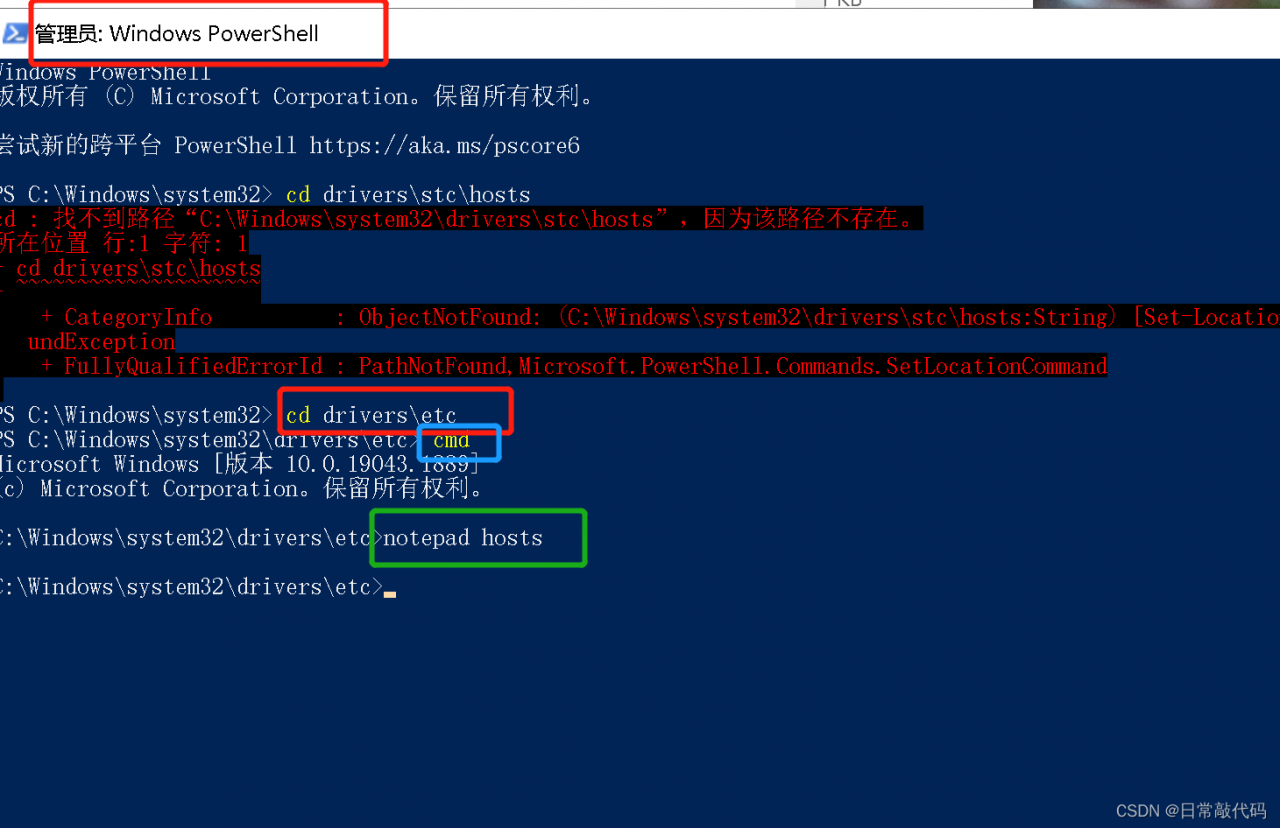
  1. Run Power Shell as administrator
  2. Go to the hosts directory: C:\Windows\system32\drivers\etc
  3. Enter cmd, notepad hosts, and enter to modify the hosts file.
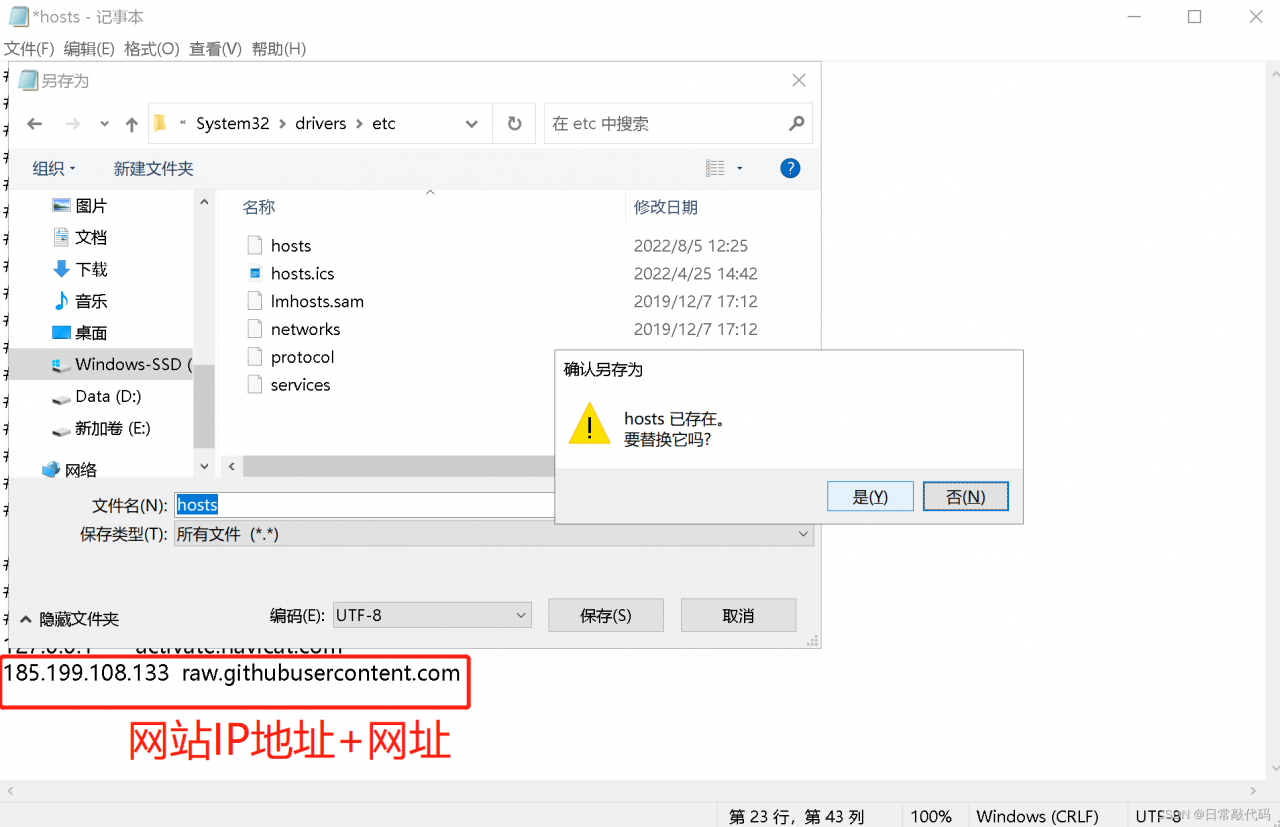
  4. Add the website ip address and URL in the last line of the hosts file and save it.


If the IP address of raw.github is changed frequently, you need to query the URL first: open the URL to query the IP address: https://www.ipaddress.com/ Enter raw.githubusercontent Com to get the IP address

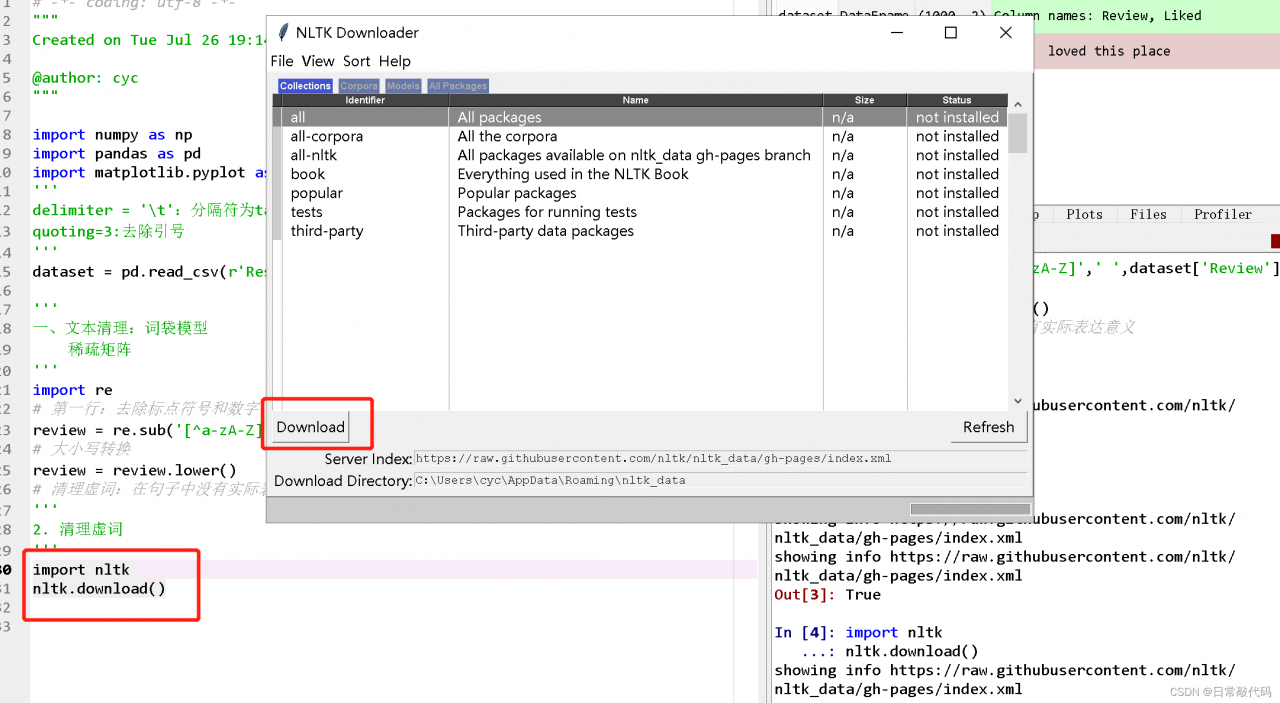
Test succeeded

[Solved] Nuxt Import qrcodejs2.js / QRCode.js Error: document is not defined

preface

qrcodejs2.js/QRCode.js plug-in is in normal Vue.js project works normally. When you are in nuxt.js when used in the project, there will be an error, because qrcodejs2.js/qrcode.js the plug-in internally uses “browser specific (such as window/document) objects”. When compiled into nuxt.js without these, an error will be generated.

This article will provide you with the way to introduce the plug-in from 0-1, which runs perfectly.

Qrcodejs2.js and QRcode JS can be used.

First step

Download the adapter nuxt.js plug-in core code online.

Step 2

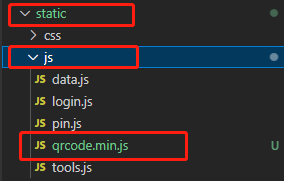
Prepare the file you just downloaded.

Put the QRcode.min.js file into the JS folder under the static static directory of the project (create one if you don’t have one).

Step 3

This step requires you to read the notes carefully, and you must understand why the path is written in this way.

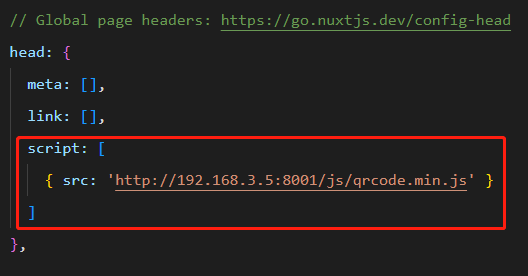
Open the project nuxt.config.js configuration file, add the following code to the head configuration item:

// For now, we are using the local IP address http://192.168.3.5:8001 because we are in a development environment.
// Please replace it when you deploy your project later.
// --------- ---------- ---------- ---------- ---------
// For example, my future website deployment will be: http://www.demo.com
// Then this is how it should be written: http://www.demo.com/js/qrcode.min.js
// [domain + /js/qrcode.min.js]

src: 'http://192.168.3.5:8001/js/qrcode.min.js'

As shown in the following figure, pay attention to the position:

Step 4

At this point, your project can use the plug-in.

Cancel your import Import Code:

Test use

Or the original way of use:

// QRCode The keyword is a wrapped instance of the plugin, you can't change it!
let qrcode = new QRCode(qrcodeImgEl, {
    width: 100,
    height: 100,
    colorDark: '#000000',
    colorLight: '#ffffff',
    correctLevel: QRCode.CorrectLevel.H
})