Category Archives: Python

[Solved] RuntimeError: NCCL error in: XXX, unhandled system error, NCCL version 2.7.8

Project scenario:

This problem is encountered in distributed training,
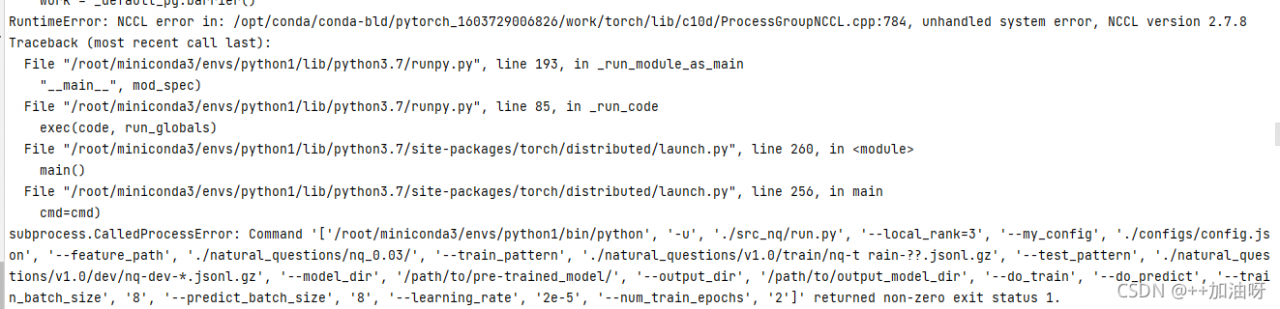

Problem description

Perhaps parallel operation is not started???(


Solution:

(1) First, check the server GPU related information. Enter the pytorch terminal to enter the code

python
torch.cuda.is_available()# to see if cuda is available.
torch.cuda.device_count()# to see the number of gpu's.
torch.cuda.get_device_name(0)# to see the gpu name, the device index starts from 0 by default.
torch.cuda.current_device()# return the current device index.

Ctrl+Z Exit
(2) cd enters the upper folder of the file to be run

 CUDA_VISIBLE_DEVICES=0,1,2,3,4,5 python -m torch.distributed.launch --nproc_per_node=6 #启动并行运算

Plus files to run and related configurations

 CUDA_VISIBLE_DEVICES=0,1,2,3,4,5 python -m torch.distributed.launch --nproc_per_node=6  src_nq/create_examples.py --vocab_file ./bert-base-uncased-vocab.txt \--input_pattern "./natural_questions/v1.0/train/nq-train-*.jsonl.gz" \--output_dir ./natural_questions/nq_0.03/\--do_lower_case \--num_threads 24 --include_unknowns 0.03 --max_seq_length 512 --doc_stride 128

Problem-solving!

[Solved] RuntimeError: Error(s) in loading state dict for YOLOX:

After training the model, an error occurs when running the demo.py inference file in YOLOX, and the running code with the error is as follows:

Run Code

python tools/demo.py image -f exps/example/yolox_voc/yolox_voc_s.py -c YOLO_outputs/yolox_voc_s_1/best_ckpt.pth  --path assets/dog.jpg --conf 0.25 --nms 0.45 --tsize 640 --save_result --device [cpu/gpu]

Note:

 -f exps/example/yolox_voc/yolox_voc_s.py

This command must match, not the yolox used for testing before training_s.py, which is configured by yourself. If you don’t correct it, you will always report the following errors.

Of course, if the above instructions are OK, this error still occurs, that is, the category corresponding error in the demo.

Take my own example, I use VOC format datasets, but the default in the demo file is COCO_CLASSES, so this will definitely report an error, so we have to change it in the demo.py file.

First, find the file yolox/data/datasets/_init_.py and add the following code to the file.

from .voc_classes import VOC_CLASSES

Then enter tools/demo.py file

About 15 lines, Modify

from yolox.data.datasets import COCO_CLASSES

to

from yolox.data.datasets import VOC_CLASSES

Modify about 100 lines of cls_names in Predictor:

to

Set the function of about 300 lines

Change to

No error will be reported during operation, successful! NICE!

[Solved] Pytorch Error: RuntimeError: expected scalar type Double but found Float

Problem description:

This error occurs when LSTM is used for data training, I convert the numpy data directly to the tensor data type in the torch:

RuntimeError: expected scalar type Double but found Float

Cause analysis:

The data type of the tensor is incorrect

x_train_tensor = torch.from_numpy(x_train)
y_train_tensor = torch.from_numpy(y_train)

Solution:

Convert the original tensor to the torch.float32 type

x_train_tensor = torch.from_numpy(x_train).to(torch.float32)
y_train_tensor = torch.from_numpy(y_train).to(torch.float32)

[Solved] AttributeError: module ‘distutils‘ has no attribute ‘version‘

mmyolo + tensorboard failed to start error:

File "D:\Anaconda3\envs\mmyo\lib\site-packages\mmengine\visualization\vis_backend.py", line 495, in _init_env
    from torch.utils.tensorboard import SummaryWriter
  File "D:\Anaconda3\envs\mmyo\lib\site-packages\torch\utils\tensorboard\__init__.py", line 4, in <module>
    LooseVersion = distutils.version.LooseVersion
AttributeError: module 'distutils' has no attribute 'version'

Reason:

The version of setuptools is too higher.

Solution:
Install the lower version of setuptools via the following command:
 

pip install setuptools==56.1.0

[Solved] pandas ExcelWrite AttributeError: ‘NoneType‘ object has no attribute ‘group‘

An error is reported when writing the specified cell. When the following two sentences are executed

name_format = workbook.add_format({'font_color': '#0000FF'})
worksheet.write('k1', os.path.basename(gtk_agile_bom_path), name_format)
  File "E:\Gerrit_Project\pyenv\bomflyenv\lib\site-packages\xlsxwriter\worksheet.py", line 82, in cell_wrapper
    new_args = xl_cell_to_rowcol(first_arg)
  File "E:\Gerrit_Project\pyenv\bomflyenv\lib\site-packages\xlsxwriter\utility.py", line 126, in xl_cell_to_rowcol
    col_str = match.group(2)
AttributeError: 'NoneType' object has no attribute 'group'


Solution:

I found that k1,k lowercase can not be written, change it to the upper case: K1, and then run it OK

worksheet.write('K1', os.path.basename(gtk_agile_bom_path), name_format)

[Solved] AttributeError: ‘HTMLWriter‘ object has no attribute ‘_temp_names‘

Error Message (Error 1):

TypeError: render() got an unexpected keyword argument ‘mode‘

Solution for Error1:

Tried setting gym and pyglet to

  • gym:0.17.1
  • pyglet:1.5.0

Note: This method will solve the problem above.

However, An new error (Error 2) will be reported:

AttributeError: ‘HTMLWriter’ object has no attribute ‘_temp_names’

Solution for Error2:

  • Open the .py file where you wrote your code (the same file you wrote your code in)
  • Find your animate_frames method. (If you don’t have it, you can ignore it, I don’t have it, then just put the first block of code from step 3 at the top)
  • Add the code before the animate_frames method (add the package to the top).
import matplotlib.pyplot as plt
from IPython.display import HTML

def display_animation(anim):
    plt.close(anim._fig)
    return HTML(anim.to_jshtml())

Find the following code:

display(display_animation(anim, default_mode='XXX'))

Change it to:

display(display_animation(anim))

The following code can be deleted or ignored:

from JSAnimation.IPython_display import display_animation

Failed to Create New Environment Error: Collecting package metadata (current_repodata.json): failed.

Recently, due to the need to set up a new environment for the GUI interface, an error occurred in the header line during the process of creating a new environment. 

The significance of creating a new environment
As each project requires different libraries and their versions, running the project in the root directory will be much more complicated, which is why many people will choose to use a virtual environment. That is, suppose you do project A with package versions PyQt5=’5.5.1′ and sklearn=’0.22.1′, and project B with package versions PyQt5=’5.6.1′ and sklearn=’0.23.1′, then you have to uninstall PyQt5 5.5.1 and sklearn0.22.1 and install PyQt5 5.6.1′ and sklearn0.23.1, but then you have to uninstall the previous package version to do something like project 1, so it’s a lot of trouble to go back and forth, so why not create virtual environment A with PyQt5 5.5.1 and sklearn0.22.1, virtual environment B with PyQt5 5.6.1′ and sklearn0.23.1, and do project A will use virtual environment A, and project B will use virtual environment B, which will not interfere with each other and improve the convenience a lot.

Question restatement:

If you have reinstalled anaconda, a file named .condarc will be automatically generated in the user directory on the C drive.
When using the commands conda install and conda create, the following problem occurs: Collecting package metadata (current_repodata.json): failed

First, a few words about the role of the .condarc file.

.condarc starts with a dot and generally indicates the configuration file for the conda application, in the user’s home directory (windows: C:\\users\\\username\\, linux: /home/username/).

For the .condarc configuration file, which is an optional (optional) runtime configuration file, this file is not available by default and is only created automatically after you have executed the conda config command. This file is the configuration file for conda in YAML format. For example, you can set the channel to install the package, whether to automatically update conda, whether to allow other channels, and other settings.

Solution:

1. Open Anaconda Prompt and enter the following command

conda config --show-sources

As shown in the figure, the running result is displayed that the .condarc file is in the C:\Users\DELL folder

2. Delete .condarc file

The problem was solved successfully!!!

python3 ./gen_ldc_version_info.py > utils/ldc_version_info_.d make: *** [utils/ldc_version_info_.d] Error 1

1.  Error

python3 ./gen_ldc_version_info.py > utils/ldc_version_info_.d make: *** [utils/ldc_version_info_.d] Error 1


2. Solution:

wget -c https://github.com/ldc-developers/ldc/releases/download/v1.30.0/ldc2-1.30.0-linux-x86_64.tar.xz
tar -xJvf ldc2-1.30.0-linux-x86_64.tar.xz
cd ldc2-1.30.0-linux-x86_64/bin
echo "export PATH=`pwd`:$PATH" >> /etc/profile
source /etc/profile

It will be OK! if the solution does not work for you. please leave a comment and let me know.

[Solved] Failed to initialize GLFW AttributeError: ‘NoneType’ object has no attribute ‘point_size’

Story background
When I reproduced OpenPCDet, I wanted to use the demo.py file to visualize the results I got, But the following error occurred.

[Open3D WARNING] Failed to initialize GLFW
AttributeError: 'NoneType' object has no attribute 'point_size'

Through the issue provided by OpenPCDet, we probably know that this is caused by the lack of visualization tools on our ubuntu, In order to solve this problem, we need to do a vnc forwarding to our desktop. The detailed process is provided below.
Solution
First give the solution that can solve the problem:xfce4 & vnc
1. The installation is as follows If there are some packages missing when running 3, please install it by yourself

sudo apt install xfce4
sudo apt install xrdp vnc4server

2. Compile the xstartup file
1] First, go to your ~/.vnc folder, if you don’t create one by yourself. Note that sudo permissions cannot be used in this part
2] In the vim xstartup file of the .vnc folder, which is configured as follows

# Uncomment the following two lines for normal desktop:
# unset SESSION_MANAGER
# exec /etc/X11/xinit/xinitrc

#[ -x /etc/vnc/xstartup ] && exec /etc/vnc/xstartup
#[ -r $HOME/.Xresources ] && xrdb $HOME/.Xresources
#xsetroot -solid grey
#vncconfig -iconic &
#x-terminal-emulator -geometry 80x24+10+10 -ls -title "$VNCDESKTOP Desktop" &
#x-window-manager &
#firefox &
dbus-launch xfce4-session

3. Use the following tools to view the current status
#Start the vnc service to set the resolution and window id

vncserver -geometry 1366x768 :2
#kill current window
vncserver -kill :2
#List all vnc windows Make sure the port you created yourself
sudo ps -aux|grep vnc

For example, my own port is 5902 because it is specified as 2,Please add a picture description
Then click on the port, to add the corresponding port.
Secondly, we can see that the local address is localhost:port [127.0.0.1:5902] under the port, insert image description here

5. Finally, we can visualize our final result in this place

[Solved] PyCharm Failed to Start Error: failed to create jvm.jvm path…

1. The following error appears when starting pycharm:

2. No matter what you install to C, D, E and other disks. Go to the C drive to find!

[If you are not too troublesome, you can install everything to search and find!]

Mine is at the location below

3. Solution:

The operation you did can be repaired, usually because the value is set too large to start!

If you can’t fix it, then you can delete the file directly.

[Solved] Django backend error: Assertion failed: (NSViewIsCurrentlyBuildingLayerTreeForDisplay()

Complete error

Assertion failed: (NSViewIsCurrentlyBuildingLayerTreeForDisplay() != currentlyBuildingLayerTree), function NSViewSetCurrentlyBuildingLayerTreeForDisplay

Solution

Because matplotlib is used in the backend, Add the following codes in the drawing code:

import matplotlib
matplotlib.use('Agg')

Then use the following code after the drawing is over:

plt.close()