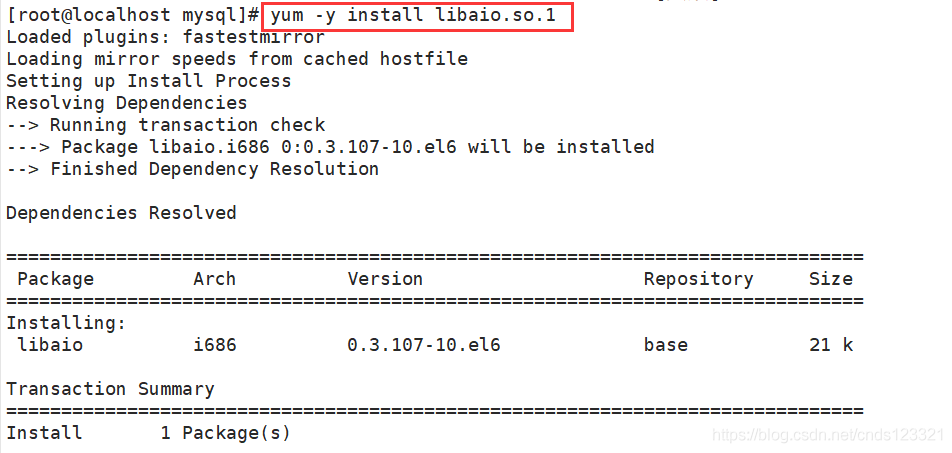
Abnormal
Execute the service mysqld start command in centos6 system to start the MySQL service. An error is reported

reason
Libaio. So. 1 dependency package is missing.
solve
Just install
Abnormal
Execute the service mysqld start command in centos6 system to start the MySQL service. An error is reported
reason
Libaio. So. 1 dependency package is missing.
solve
Just install
The error is as follows:
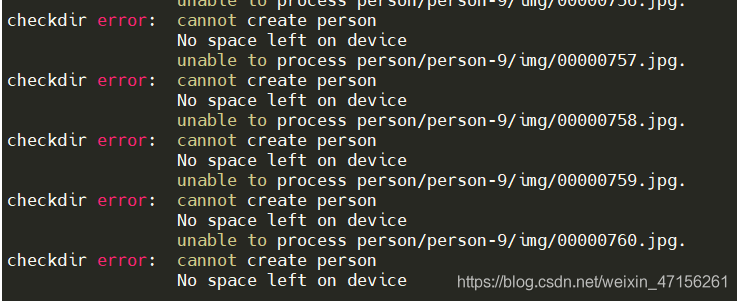
solution: add sudo before unzip command, such as sudo unzip person.zip
Decompress multiple compressed packages: unzip ‘*. Zip’
All mirror URLs are not using ftp, http[s] or file
Because the support of centos6 has been officially stopped
To solve this problem, execute the following command:
sed -i "s|enabled=1|enabled=0|g" /etc/yum/pluginconf.d/fastestmirror.conf

mv /etc/yum.repos.d/CentOS-Base.repo /etc/yum.repos.d/CentOS-Base.repo.backup

curl -o /etc/yum.repos.d/CentOS-Base.repo https://www.xmpan.com/Centos-6-Vault-Aliyun.repo

yum clean all

yum makecache
It’s OK
Problem description
When using termux, it is found that the permissions are not enough by using commands. After switching to root by using Su, it is found that many previous commands cannot be used
First, echo $path to view the environment variable of root
Results: in/SBIN/Su/Su/bin/Su/xbin/system/bin/system/xbin
It is found that these three are all in the root path, without/data/data/com.termux/files/usr/bin, so the command here can’t be executed naturally
Exit switch to normal user.
Echo $path view environment variables
The value is/data/data/com. Termux/files/usr/bin/data/data/com. Termux/files/usr/bin/applets
That is to say, you just need to tell root the variables of ordinary users
Here is the solution——————————————————————————————-
In order to ensure the security of the system, the temporary variable is used to save the error
export PATH=/data/data/com.termux/files/usr/bin:/data/data/com.termux/files/usr/bin/applets:$PATH
(tell root the executable
Note that there is no space beside the equal sign, the colon in English: segmentation, the front part is the path value of ordinary users: the Lib path of ordinary users (because some commands also need the library files we download), just paste it
)
export LD_ LIBRARY_ PATH=/data/data/com.termux/files/usr/lib
(link LIB)
be careful!! For the sake of safety, the operation I posted is temporary. Exit will restore the original identity or turn it off or reopen it. But it’s absolutely safe.
For your convenience, you can create a script to quickly use the downloaded function.
Cd ~ (home directory)
VIM getmytermuxorders (create a file)
Enter the following:
#!/bin/bash
export PATH=/data/data/com.termux/files/usr/bin:/data/data/com.termux/files/usr/bin/applets:$PATH
export LD_LIBRARY_PATH=/data/data/com.termux/files/usr/lib
echo "LYM_nb"
: WQ save exit
Then exit returns to the original user
When you want to use the root permission again in the future:
Su or TSU comes to root
Run the source command directly in the home directory
source getMyTermuxOrdersIf output lym_ NB means that all bin functions of termux have been obtained
You can also use export, echo $path, env and other commands to confirm
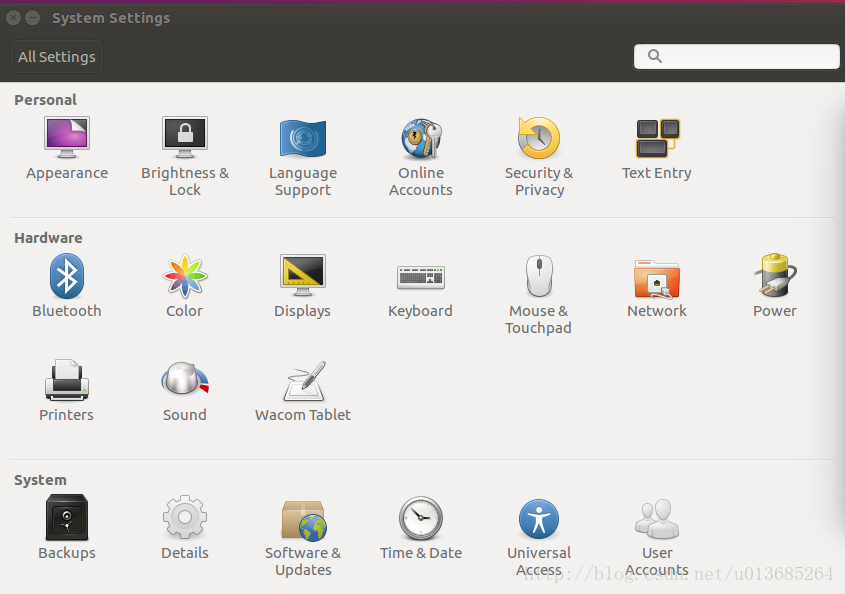
Today, there are many problems with the graphics card driver. One of them is that after the computer restarts, the resolution of the display screen becomes 800600, and the normal resolution is 19201080. There is no other resolution option in the system settings, so it cannot be modified. Try to create the xorg. Conf file, which is described on the Internet, to set the custom desktop resolution. After the modification, the resolution has changed, but it is 1600 * 1200, which is still very abnormal. Using the combination of CVT and xrandr to modify the resolution indicates another error, xrandr: failed to get size of gamma for output default. One problem after another, what a tangle!
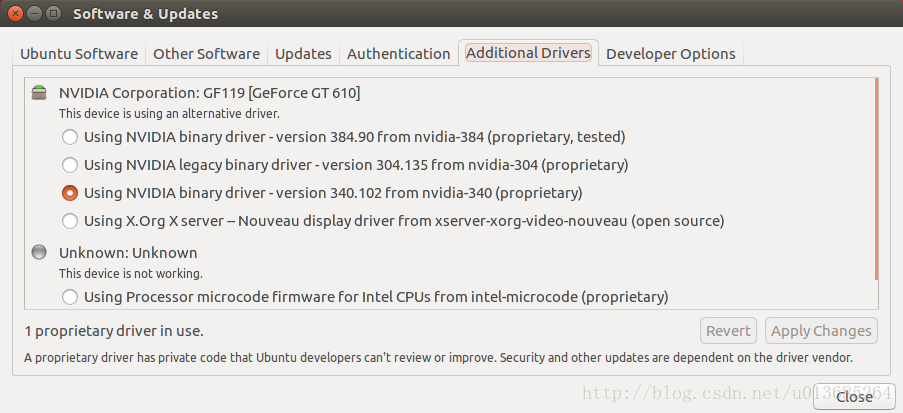
It has to be said that it’s really unpleasant to search these professional problems with Baidu in China. What often appears are some irrelevant or unsolvable web pages. Fortunately, it’s all solved now, and the problem is still in the driver side of the graphics card [1]. Software & amp; update in system settings; In updates, click additional drivers and change it to NVIDIA driver (I choose the third one here, as shown in the figure below). The application modification needs to wait for a little time, restart the computer after completion, and the resolution is normal again.
After the driver is re installed, the problem of circular login appears again. You may encounter it later. Record the solution here.
ctrl +alt +f2
sudo service lightdm stop
sudo apt-get --purge remove nvidia-*
After many months, I stepped on the big pit of circular login again, but the previous solution was invalid. Another possible problem is that the owner and all groups of the. Xauthority file become root. There is a. Xauthority file in the user’s home directory. View the owner and all groups of the file
ls -la .Xauthority
If it is root, you need to change it to your login user:
sudo chown username:username .Xauthority
(there will always be all kinds of accidents in the actual solution, one by one, don’t worry.)
nginx.conf
server
   max-content-length
site-avalables site-enabled
The file name of this sample configuration file is Default
edit file: /etc/nginx/sites available/default
# If there are multiple servers, configure them here, and modify the proxy_pass
upstream flask {
        server 127.0.0.1:5000;
        server 127.0.0.1:5001;
}
server {

        listen 80 default_server;
        listen [::]:80 default_server;

		# Set the maximum upload data size allowed by nginx service for users
		# Adjust the upload file size limit setting parameter according to business requirements
		client_max_body_size 10m;

        # Cache file size setting 0 means no limit
        # Use the default configuration, exceeding the size will result in an error.net::ERR_INCOMPLETE_CHUNKED_ENCODING error
        proxy_max_temp_file_size 0;

        root /var/www/html;

        index index.html index.htm index.nginx-debian.html;

        server_name _;

        location/{
                # Requests are forwarded to the gunicorn server
                proxy_pass http://127.0.0.1:5000;

                # Requests are forwarded to multiple gunicorn servers
                # proxy_pass http://flask;

                # Set the request header and pass the header information to the server side
                proxy_set_header Host $host;

                # Set request header and pass original request ip to gunicorn server
                proxy_set_header X-Real-IP $remote_addr;
        }
}
Another way of writing
Modify the nginx configuration file so that nginx receives the request and forwards it to the uwsgi server
upstream test_server{
	server 10.211.55.2:8000;
}

#gzip  on;
server {
	listen  8000;
	server_name api.baidu.site;

	location/{
		include uwsgi_params;
		uwsgi_pass test_server;
	}

}

server {
	listen       80;
	server_name  www.baidu.site;

	#charset koi8-r;

	#access_log  logs/host.access.log  main;
	location /xadmin {
		include uwsgi_params;
		uwsgi_pass test_server;
 	}

	location /ckeditor {
		include uwsgi_params;
		uwsgi_pass test_server;
	}

	location/{
		root   /home/python/Desktop/front_end_pc;
		index  index.html index.htm;
	}

	error_page   500 502 503 504  /50x.html;
	location = /50x.html {
		root   html;
	}

}Case 1: nginx has service
Nginx installed in Linux will register service service by default. You can directly start, stop and restart according to the following operations
service nginx start  # start
service nginx stop  # stop
service nginx restart  # restart
Case 2: the original nginx service is not clear
Find the installation directory of nginx to understand the situation of nginx
# Find Nginx installation information
find/-name nginx

# Go to the nginx sbin directory and restart
. /nginx -s reload

# If you have modified the Nginx configuration, check the configuration with -t
. /nginx -t

# Check to see if it starts
ps aux | grep nginx
# or
ps -ef | grep nginx
Nginx more
Adding prefix to nginx agent of Python flash project
deployment of ngnix + gunicorn + Flash project in Ubuntu environment
Problem scenario
ubuntn originally has Python 3.5. Now, after upgrading and installing Python 3.7, the following problems appear in multiple scenarios:
problem 1 status 1
subprocess.CalledProcessError: Command '('lsb_release', '-a')' returned non-zero exit status 1.
Question 2 status 2
returned non-zero exit status 2.
resolvent
# Find the lsb_release file first, you may need to add sudo
find/-name lsb_release
# Delete when found
rm -rf /usr/bin/lsb_release
Attachment:
I refer to the process notes of upgrading python3.7.1 under Ubuntu (recommended)
When installing a certificate with Apache OpenSSL instead of IIS on Windows Server, Apache could not be restarted if I replaced it with a legitimate certificate even though it worked with the certificate, so I will describe how to deal with it as a memorandum. I will.
First of all, when you say Apache on Windows, in many cases, it is common to install it on a local PC with Xampp etc. and the certificate does not work due to OpenSSL.
In that case, first suspect a port conflict with another application.
If you look at netstat, you can check other apps that use 80 or 443, so if you change the port number on the web server side or the app side, it will be solved.
I think this is a rare case, but it is a solution for Windows Server.
Under normal circumstances, it is unlikely that you are running an app that has port conflicts on Windows Server.
Therefore, it is assumed that the certificate can be installed, and although a warning is issued on https for the time being, it is in a state where it can be accessed.
If you apply for a legitimate certificate and replace it, you may run into trouble that Apache cannot be restarted.
In such a case, take a look at the Apache error log.
AH02577: Init: SSLPassPhraseDialog builtin is not supported on Win32 (key file C:/apache/conf/ssl.key/server.key)
AH02311: Fatal error initialising mod_ssl, exiting. See C:/apache/logs/error.log for more information
AH02564: Failed to configure encrypted (?) private key cloudshift.jp:443:0, check C:/apache/conf/ssl.key/server.key
SSL Library Error: error:0D0680A8:asn1 encoding routines:asn1_check_tlen:wrong tag
SSL Library Error: error:0D08303A:asn1 encoding routines:asn1_template_noexp_d2i:nested asn1 error
SSL Library Error: error:0D0680A8:asn1 encoding routines:asn1_check_tlen:wrong tag
SSL Library Error: error:0D07803A:asn1 encoding routines:asn1_item_embed_d2i:nested asn1 error (Type=RSAPrivateKey)
SSL Library Error: error:04093004:rsa routines:old_rsa_priv_decode:RSA lib
SSL Library Error: error:0D0680A8:asn1 encoding routines:asn1_check_tlen:wrong tag
SSL Library Error: error:0D07803A:asn1 encoding routines:asn1_item_embed_d2i:nested asn1 error (Type=PKCS8_PRIV_KEY_INFO)
AH00016: Configuration Failed
I’ve cut off the beginning of the log for a moment, but I think you’ll get an error like this.
Notice the very first log.
SSLPassPhraseDialog builtin is not supported on Win32 (key file C:/apache/conf/ssl.key/server.key)
In short, Win32 doesn’t support SSL passphrases! That’s crack.
When you apply for the certificate, when you create the key file, you probably registered your passphrase, so you need to delete it.
Create a file without passphrase from the command line as follows.
openssl rsa -in C:/apache/conf/ssl.key/server.key -out C:/apache/conf/ssl.key/nopassserver.key
You will be prompted for a passphrase, enter it and press Enter.
Then, I think that C: /apache/conf/ssl.key/nopassserver.key is created, so after that,
if you rewrite the key file name of ssl.conf to nopassserver.key and restart Aapche, it will be fine and the startup will be confirmed. I can do it.
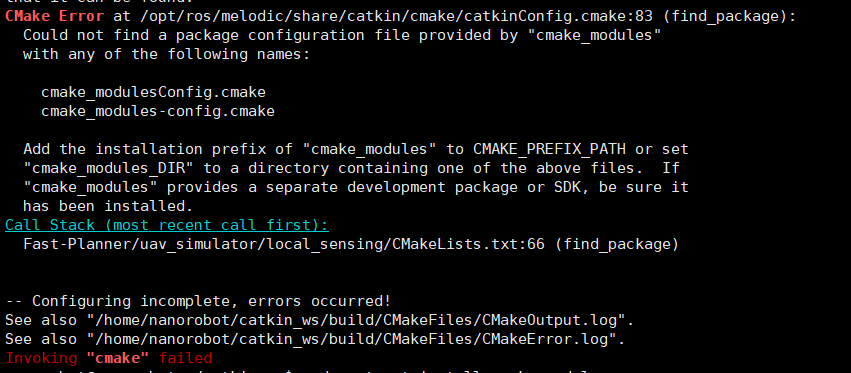
Tips for the Less module cmake_modules:
CMake Error at /opt/ros/melodic/share/catkin/cmake/catkinConfig.cmake:83 (find_package):
Could not find a package configuration file provided by “cmake_modules”
with any of the following names:
cmake_modulesConfig.cmake
cmake_modules-config.cmake
Add the installation prefix of “cmake_modules” to CMAKE_PREFIX_PATH or set
“cmake_modules_DIR” to a directory containing one of the above files. If
“cmake_modules” provides a separate development package or SDK, be sure it
has been installed.
Call Stack (most recent call first):
Fast-Planner/uav_simulator/local_sensing/CMakeLists.txt:66 (find_package)
– Configuring incomplete, errors occurred!
See also “/home/nanorobot/catkin_ws/build/CMakeFiles/CMakeOutput.log”.
See also “/home/nanorobot/catkin_ws/build/CMakeFiles/CMakeError.log”.
Invoking “cmake” failed
Two Methods:
cmake_modules https://github.com/ros/cmake_modules

Then it is
mkdir build
cd build
cmake ..
make .
sudo make install
Demand
Original address: http://ip :54774/api_ Name
now requires you to access the specified port through the domain name: https://api.example.com/api_ name
realization
The most important thing is to configure the reverse proxy address of location
When we enter the
domain name/API_ Name
will be mapped by nginx toIP or domain name: 54774/API_ Namepath go to the nginx directory, opennginx. Conf, addreverse proxy:server { listen 80; listen 443 ssl http2; server_name https://api.example.com; # Reverse Proxy location ~ ^/api_name { proxy_pass http://ip:54777; } #SSL-START SSL-related configuration, please do not delete or modify the next line with the comment 404 rules #error_page 404/404.html; ssl_certificate /www/server/panel/vhost/cert/api.example.com/fullchain.pem; ssl_certificate_key /www/server/panel/vhost/cert/api.example.com/privkey.pem; ssl_protocols TLSv1.1 TLSv1.2 TLSv1.3; ssl_ciphers EECDH+CHACHA20:EECDH+CHACHA20-draft:EECDH+AES128:RSA+AES128:EECDH+AES256:RSA+AES256:EECDH+3DES:RSA+3DES:!MD5; ssl_prefer_server_ciphers on; ssl_session_cache shared:SSL:10m; ssl_session_timeout 10m; add_header Strict-Transport-Security "max-age=31536000"; error_page 497 https://$host$request_uri; #SSL-END #ERROR-PAGE-START Error page configuration, which can be commented, deleted or modified #error_page 404 /404.html; #error_page 502 /502.html; #ERROR-PAGE-END #PHP-INFO-START PHP reference configuration, can be commented or modified #include enable-php-72.conf; #PHP-INFO-END #REWRITE-START URL rewrite rule reference, the modification will cause the panel to set the pseudo-static rules are invalid #include /www/server/panel/vhost/rewrite/api.example.com.conf; #REWRITE-END #Files or directories to which access is prohibited location ~ ^/(\.user.ini|\.htaccess|\.git|\.svn|\.project|LICENSE|README.md) { return 404; } #One Click Application for SSL Certificate Verification Directory Related Settings location ~ \.well-known{ allow all; } }
overload configuration file:
./nginx -s reload
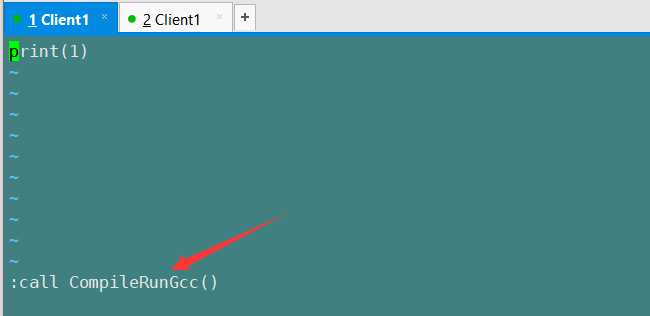
Fault description
Modify the ~/.vimrc configuration file to run the py script with one click. The
content of the vimrc configuration file is as follows
map <F5> :call CompileRunGcc()<CR>

func! CompileRunGcc()
    exec "w"
    if &filetype == 'c'
        exec '!g++ % -o %<'
        exec '!time ./%<'
    elseif &filetype == 'cpp'
        exec '!g++ % -o %<'
        exec '!time ./%<'
    elseif &filetype == 'python'
        exec '!time python %'
    elseif &filetype == 'sh'
        :!time bash %
    endif
endfunc
vim a.py press F5 as follows
Use script
" <f5> run python programmer
map <f5> :w<cr>:!python %<cr>
Can run normally
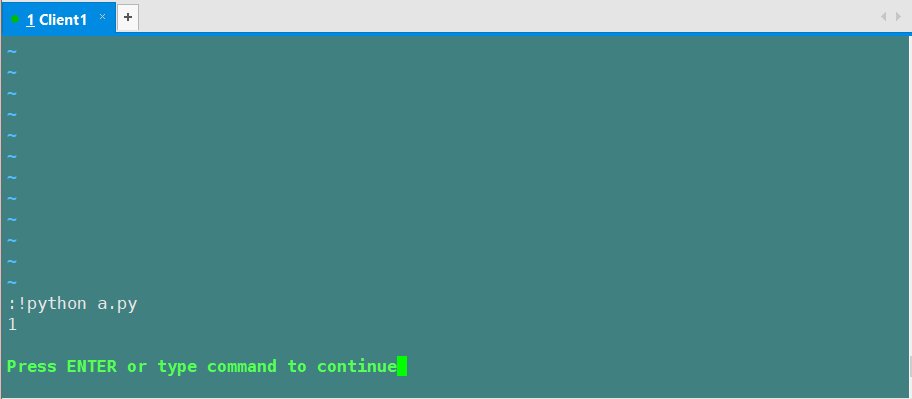
In other words, the contents of the function body cannot be executed.
The cause of the fault
was resolved on December 23, 2020. The cause of the /etc/profilealias alias vim='/usr/bin/vi, there is an alias in the file , that is, the vim command actually uses vi
Solution
to /etc/profilefile alias vim='/usr/bin/vichange alias vim='/usr/bin/vimcan be.
Here are the solutions to other problems
. The VI in Centos only installs vim-minimal-7.x by default. No matter you enter vi or vim to view the file, the syntax function cannot be enabled normally. Therefore, two other components need to be installed with yum: vim-common-7.x and vim-enhanced-7.x.
#View vim components
[root@client1 ~]# rpm -qa | grep vim
vim-enhanced-7.4.629-7.el7.x86_64
vim-filesystem-7.4.629-7.el7.x86_64
vim-X11-7.4.629-7.el7.x86_64
vim-common-7.4.629-7.el7.x86_64
vim-minimal-7.4.629-7.el7.x86_64

#install vim
yum -y install vim*