error when starting SpringBoot project
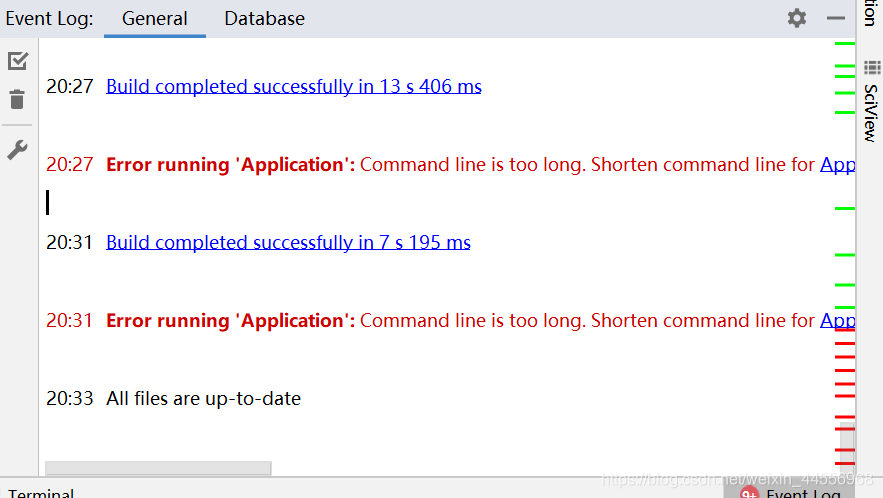
solution:
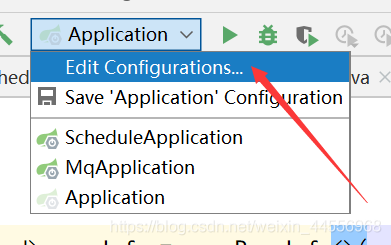
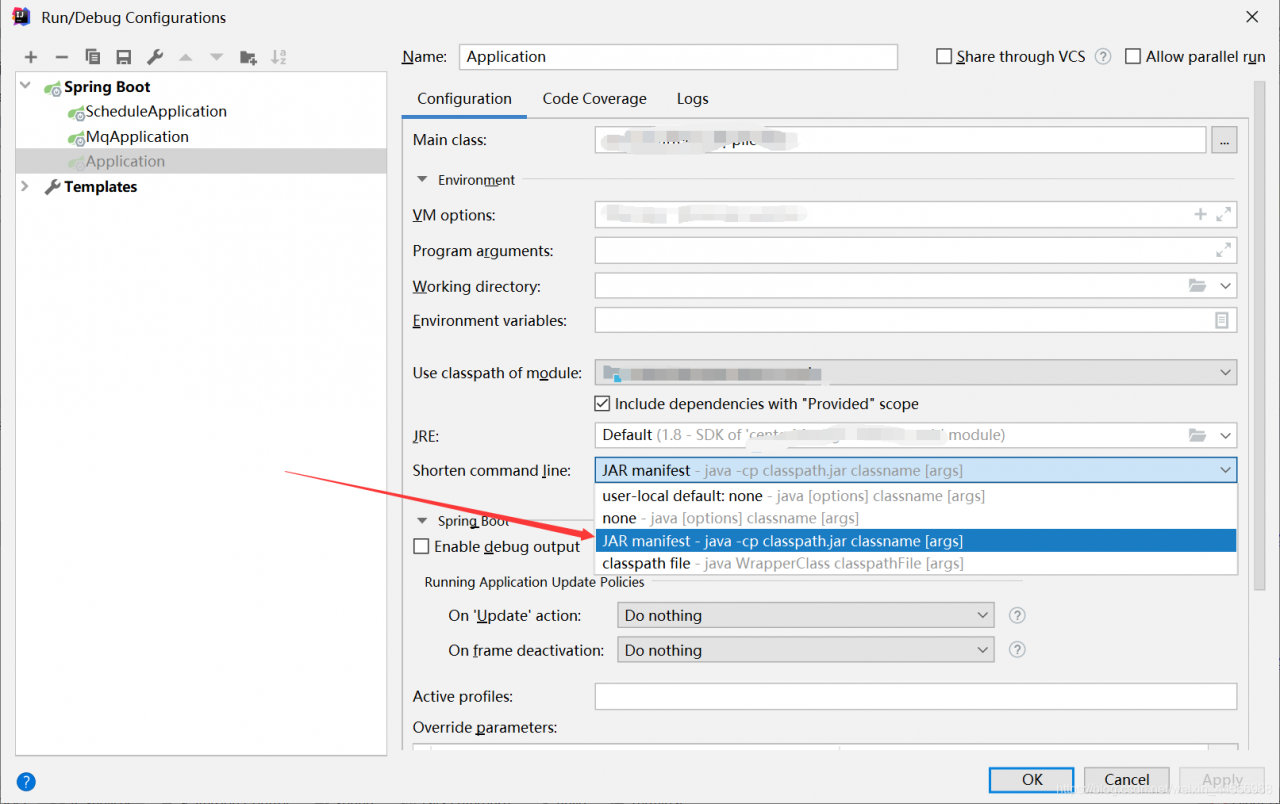
choose Edit Configurations
today in learning JSP met under the premise that jars have EL expression as the output, not be parsed
found in the page directive lack isELIgnored = “false” add ok
<%@ page language="java" contentType="text/html; charset=utf-8"
pageEncoding="utf-8" isELIgnored="false" %>
presumably servlet3.0 turns off parsing of EL expressions
by default
1. Encapsulate form data into Map collection
1. Create MapAction class
import cn.entity.User;
import com.opensymphony.xwork2.ActionSupport;

import java.util.Map;

public class MapAction extends ActionSupport {
    private Map<String, User> map;

    public Map<String, User> getMap() {
        return map;
    }

    public void setMap(Map<String, User> map) {
        this.map = map;
    }

    @Override
    public String execute(){

        System.out.println(map);
        return NONE;
    }
}
2. Create a map. The JSP
<%@ page contentType="text/html;charset=UTF-8" language="java" %>
<html>
<head>
    <title>Title</title>
</head>
<body>
    <form action="${pageContext.request.contextPath}/map.action" method="post">
        username:<input name="map[0].username" type="text"><br>
        password:<input name="map[0].password" type="password"><br>
        <br><br>
        username:<input name="map[1].username" type="text"><br>
        password:<input name="map[1].password" type="password"><br>
        <input type="submit" name="Submit" value="提交">
    </form>
</body>
</html>
Add the following statement
to the struts.xml file
<struts>
    <package name="myPackage" extends="struts-default" namespace="/">
<!--        <action name="data3" class="cn.data.DateDemo2Action"></action>-->
<!--        <action name="list" class="cn.data.ListAction"></action>-->
        <action name="map" class="cn.data.MapAction"></action>
    </package>
</struts>
** flow: ** browser in parsing the form data will find the getMap method in the MapAction entity class to get the Map class object, and then in the User entity class to find setUsername() and other set methods to encapsulate the data in the entity class object
To sum up: encapsulate the data List set contract Map the same
huawei cloud kunpeng server docker installation vim error, architecture is Arm64,
W: Failed to fetch http://ftp.tw.debian.org/debian/dists/jessie/Release Unable to find expected entry 'main/binary-arm64/Packages' in Release file (Wrong sources.list entry or malformed file)
, I can’t find
root@d15291ceae43:/etc/mysql# apt-get install vim
Reading package lists... Done
Building dependency tree
Reading state information... Done
E: Unable to locate package vim
and then update failed
root@d15291ceae43:/etc/mysql# apt-get update
Ign http://ftp.tw.debian.org jessie InRelease
Hit http://ftp.tw.debian.org jessie Release.gpg
Hit http://ftp.tw.debian.org jessie Release
W: Failed to fetch http://ftp.tw.debian.org/debian/dists/jessie/Release  Unable to find expected entry 'main/binary-arm64/Packages' in Release file (Wrong sources.list entry or malformed file)
solution, add source
printf "deb http://archive.debian.org/debian/ jessie main\ndeb-src http://archive.debian.org/debian/ jessie main\ndeb http://security.debian.org jessie/updates main\ndeb-src http://security.debian.org jessie/updates main" > /etc/apt/sources.list
update
apt-get update
installs
again
apt-get install vim
installed successfully
when querying after EO has added Validation Validation parameters, “No constructor found in…” The problem of
online baidu, is the construction method caused by the exception
but I’m going to add Validation and error
reason:
raw data does not conform to the validation rules, or @notempty
delete garbage data & in the library; When the validation rule is modified, it is correct
nginx configuration folder cd /usr/local/nginx/conf
vim nginx.conf
......

http {
    ......

    server {
        listen       80;
        server_name  location;

        #charset koi8-r;

        #access_log  logs/host.access.log  main;

        location/{
            root   html/index/;
            index  index.html index.htm;
        }
        ......

    }

    # 访问 www.test1.com 网站,默认解析到 http://ip/test1 项目
    server {
        listen       80;
        server_name  www.test1.com;

        location/{
            root   html/test1/;
            index  index.html index.htm;
        }

        error_page   500 502 503 504  /50x.html;
        location = /50x.html {
            root   html;
        }
    }

    # 访问 www.test2.com 网站,默认解析到 http://ip/test2 项目
    server {
        listen       80;
        server_name  www.test2.com;

        location/{
            alias   html/test2/;
            index  index.html index.htm;
        }

        error_page   500 502 503 504  /50x.html;
        location = /50x.html {
            root   html;
        }
    }

    ......

}
domain name resolution address is the server’s IP, access to nginx will determine which site to request, and then match to the corresponding project
nginx configuration folder cd /usr/local/nginx/conf
vhostCreate www.test.com.conf
under the folder vhost
server {
    listen       80;
    server_name  www.test.com;

    location/{
        root   html/www.test.com;
        index  index.html index.htm;
    }

    error_page   500 502 503 504  /50x.html;
    location = /50x.html {
        root   html;
    }

}
pay attention to change
rootpath (www.test.comcome in to visit the project path)
here newwww.test.comcan be named according to your domain name, according to the above template, Changeserver_name and root.
. Create a newproject name for each project
nginx configuration folder cd /usr/local/nginx/conf
vim nginx.conf
......


http {
    ......

    #引入其它配置
    include       vhost/*.conf;

    ......

}
domain name resolution address is the server's IP, access to nginx will determine which site to request, and then match to the corresponding project
reference blog:
Rust language
When you edit the Rust “Thebook” second chapter “guess” game Code in VS Code, try adding a rand dependency in cargo. Toml, which is
cargo.toml
[dependencies]
rand = "0.7.3"
after typing $cargo build on the command line,
is found
Cargo invocation has failed: Error: exit code: 101.
such a popup reminder, prompt crate enable failure.
OUTPUT window prompts as follows:
Running `cargo build --bin=instances --package=instances
--message-format=json`...
    Blocking waiting for file lock on package cache
    Updating crates.io index warning: spurious network error (2 tries remaining): failed to send request: 操作超时 ; class=Os (2)
    warning: spurious network error (1 tries remaining): failed to send request: 操作超时 ; class=Os (2)
    error: failed to get `rand` as a dependency of package `instances v1.46.0 (D:\DataFiles\CodesLearning\RUST\Instances)`

Caused by:   failed to load source for dependency `rand`

Caused by:   Unable to update registry `https://github.com/rust-lang/crates.io-index`

Caused by:   failed to fetch `https://github.com/rust-lang/crates.io-index`

Caused by:   failed to send request: 操作超时  ; class=Os (2)
it turned out that the connection to Github was timed out. This problem will also be pop-ups for installed updates that are ignored when checking the rust-Analyzer plug-in version every time VS Code is started.
below provides the method to connect to Github. This method also applies to the problem of not being able to connect to Github when a web page is logged on. IP addresses are usually added to the HOSTS file.
host files in C:// Windows/system32/dreivrs/etc directory. You can right click -> Property changes the write permission of User before editing and saving.
can be learned that the current lot by https://github.com.ipaddress.com/www.github.com website IP address has been changed, so a lot of articles referred to in the hosts change have failed. The code added to the hosts file is provided as follows:
#Github
140.82.113.4 github.com
of course, it is more recommended to use the above link to query before making changes, to prevent IP address update invalid. Finally, don’t forget to save the file hosts, , and unwrite User .
recently dual system collapsed, so choose wsl2, save trouble in the future, the first is the installation method, here posted my reference to some posts and introduction:
win10 installation method of wsl2 and docker-ce:
https://blog.csdn.net/xianxi9883/article/details/107358445/
win10 on container virtualization:
https://blog.csdn.net/leenhem/article/details/105359112
http://www.xitongcheng.com/jiaocheng/win10_article_53803.html
introduces wsl2 installation driver and nvidia-docker method:
https://zhuanlan.zhihu.com/p/149517344
here are some of the problems I ran into:
is
curl https://get.docker.com | shspeed is very slow, tried two days all can’t, finally changed a unicom network…
solved in minutes
followed by:
curl -s -L https://nvidia.github.io/nvidia-docker/gpgkey | sudo apt-key add -prompt me GPG: no valid OpenPGP data found.
then I start from the browser open https://nvidia.github.io/nvidia-docker/gpgkey, download this file to the ubuntu folder
sudo apt-key add gpgkeysolution
and then
curl -s -L https://nvidia.github.io/nvidia-docker/$distribution/nvidia-docker.list | sudo tee /etc/apt/sources.list.d/nvidia-docker.listbecause I couldn’t find nvidia-docker in the last update of the whole process, so I checked the nvidia-docker list and found nothing, so I opened the previous link separately, took the data and wrote it in by myself.
deb https://nvidia.github.io/libnvidia-container/stable/ubuntu16.04/$(ARCH) /
#deb https://nvidia.github.io/libnvidia-container/experimental/ubuntu16.04/$(ARCH) /
deb https://nvidia.github.io/nvidia-container-runtime/stable/ubuntu16.04/$(ARCH) /
#deb https://nvidia.github.io/nvidia-container-runtime/experimental/ubuntu16.04/$(ARCH) /
deb https://nvidia.github.io/nvidia-docker/ubuntu16.04/$(ARCH) /
, that’s what it is. If you want to open it yourself, you can use
https://nvidia.github.io/nvidia-docker/$distribution/nvidia-docker.list, where $distribution changing its own system name
and finally, success.
in Object class
public boolean equals(Object obj) {
        return (this == obj);
    }
we can see if the Object class is judging the same Object, let’s take a look at the following example
Employee emp1 = new Employee("张三", 5000, 2005, 5 ,5);
Employee emp2 = new Employee("张三", 5000, 2005, 5 ,5);
System.out.println(emp2.equals(emp1));
stop here and think about what’s going to come out?
, I’m sure a lot of beginners like me think it will output true. But the answer is false. Why?We’re looking at the only line of code in the body of the method
return (this == obj);
, what does this==obj stand for?In fact, what we’re doing here is determining whether this is the same address as obj, or whether it’s the same object in the heap.

it is easy to see that emp1 and emp2 do not store the same address in the stack, so it will print false.
2. Next, let’s look at the equals method in the String class
public boolean equals(Object anObject) {
		//判断是否同一个对象
        if (this == anObject) {
            return true;
        }
        //判断anObject 是否是String的实例对象
        	//如果是的话判断两个String对象的长度是否相等
        			//如果相等再判断每一个字符是否相等
        if (anObject instanceof String) {
            String anotherString = (String)anObject;
            int n = value.length;
            if (n == anotherString.value.length) {
                char v1[] = value;
                char v2[] = anotherString.value;
                int i = 0;
                while (n-- != 0) {
                    if (v1[i] != v2[i])
                        return false;
                    i++;
                }
                return true;
            }
        }
        return false;
    }
The equals method in the
String class does two things. The first method is the same as the equals method in Object. If not the same object, then determine whether the length is equal, then determine whether each character is equal.
gdal_viewshed -md 10000 -ox 12509311 -oy 4769484 -a_nodata 0 srtm_59_05_3857.tif viewshed.tif
from osgeo import gdal

ds = gdal.Open('srtm_59_05_3857.tif')
band = ds.GetRasterBand(1)
gdal.ViewshedGenerate(srcBand=band, driverName='GTiff', targetRasterName='viewshed.tif', creationOptions=None, observerX=12509311, observerY=4769484, observerHeight=2, targetHeight=0, visibleVal=255, invisibleVal=0, outOfRangeVal=0, noDataVal=0, dfCurvCoeff=0.85714, mode=2, maxDistance=10000)


we know that pytorch itself comes with a data visualization tool, but when I used the visualization tool, I found that when I trained to use it, it would suddenly get stuck. It turned out that Pytorch incorporated the Tensorboard feature, and I read some blogs that said it was very easy to implement, so It took me some time to research and implement the change, so I Shared it again.
since we used pytorch to train the model before, tensorflow has never been installed, but if we use tensorboard, it will report an error if only tensorboard is installed. Also, note that the version to be installed should be at least version 1.14.
conda install tensorflow==1.14 will install the tensorboard
2. Tensorboard programming
from torch.utils.tensorboard import SummaryWriter
writer = SummaryWriter()
writer add_scalar(‘ Loss/train ‘, train_loss.avg, epoch)
writer.add_scalar(‘ lr ‘, lr, (‘ images’, grid, epoch)
grid = vutils.make_grid(image)
self.write.add_image (‘ images’, grid, epoch)
3. Visualize
, if done correctly, will generate a run folder under the current folder, which contains a file with many English letters.
at this point you in the terminal input tensorboard – logdir = runs will be
 at this point, you can click on the url into the HTTP. But when I used it, I found that it didn’t work.
tensorboard –logdir=run absolute path, this is ok, you can try both!
enters an integer, and then a floating point number (the number with the decimal point).
summation of two Numbers, and output. And then take the square root of theta and theta and print it out.
then converts the output value to a String (you can use the string.valueof () function), truncating the first six characters (with decimal points).
integer x floating-point number y
integer and the sum of floating point Numbers
and the square root of
and the square root of the first six characters
2
3.141592654
5.141592654
2.2675080273286796
2.2675
The answer
import java.util.Scanner;

public class Main {
    public static void main(String[] args) {
        Scanner scanner = new Scanner(System.in);
        int num1 = scanner.nextInt();
        double num2 = scanner.nextDouble();
        System.out.println(num1 + num2);
        System.out.println(Math.sqrt(num1 + num2));
        System.out.println(String.valueOf(Math.sqrt(num1 + num2)).substring(0,6));
    }
}