Category Archives: How to Fix

What to do if you repeatedly format a cluster

note: if you just want to solve this problem you can skip 1,2 and go straight to the 3 and 4 solution steps

  1. one-click start cluster view where the datanode’s log is
    sh start-all.sh

enter the log view
use shift+g to enter the last row mode, in the upward turn, see the first INFO, there is WARN below, there is a prompt message, about the datenode clusterID and namenode clusterID is not consistent.

  1. enter CD/export/servers/hadoop – server – cdh5.14.0/hadoopDatas/datanodeDatas/current/
    see cat VERSION

    this is consistent with the namenode old ID
    3. delete current

    for each node in the cluster

    1. just restart the cluster, and check whether all the starts have been successful
      sh start-all-sh

Connection between PHP 7.4 and MySQL (MariaDB) under Ubuntu (kali Linux)

PHP7 or above has abolished the mysql function library, so the mysql_connect() function is no longer available. The new function libraries MySQli and PDO can completely replace this library. This article mainly introduces two kinds of library functions, PHP and mysql connection and encountered problems.

experiment, all content in ubuntu18.04.3 can also be fully run.

installation problem

PHP is connected to mysql using apache+PHP+mysql, as each part has been pre-installed in kali, see resources for details: kali installs apache, mysql, PHP. Here I want to talk about the installation need to pay attention to the problem, apache and mysql installation generally will not have problems, focus on PHP installation. After the configuration of resources is completed, create a new file index.php under /var/www. HTML folder. The content is as follows:

<?php

phpinfo();

?>

opens apache, which is enabled by default. If you are not sure, you can run the following command:

/etc/init.d/apache2 start

the following results:

the server has opened, the browser input address: http://localhost/index.php, appeared normal PHP configuration information:
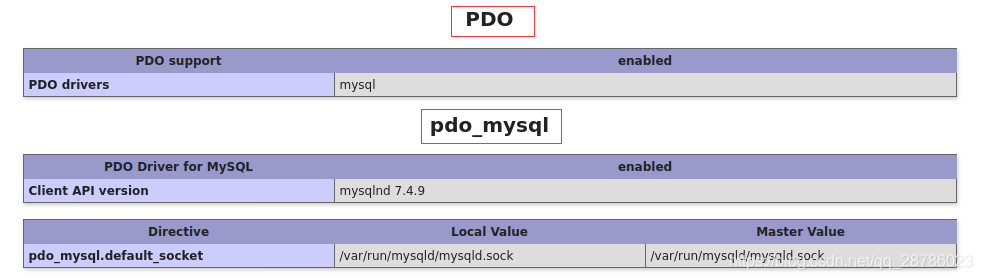
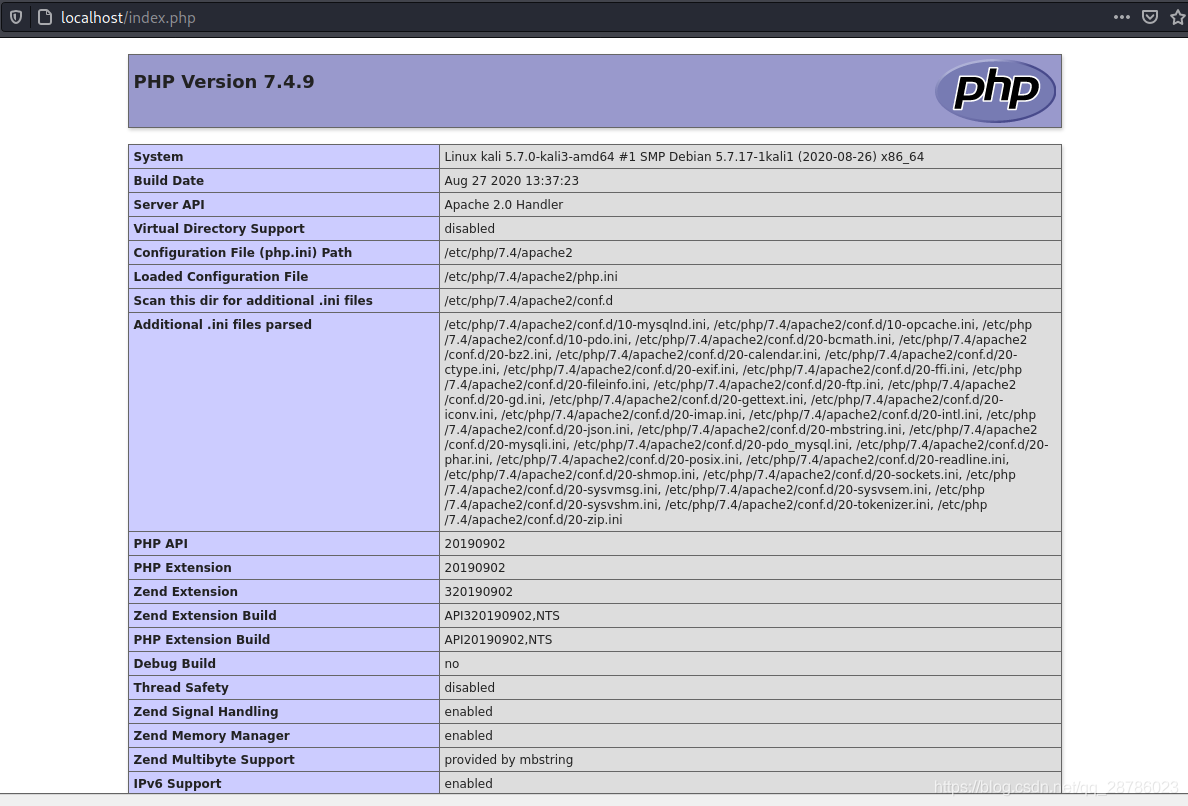
page provides PHP configuration details and extension module has been installed, need to emphasize the extension module!!!!!! This can cause a very common problem: the PHP information page displays normally, the static PHP page can be displayed, but the dynamic interactive page is blank! , which is often the result of PHP’s corresponding extension module not being installed. For example, the modules needed this time are MySQli and PDO (these two libraries are independent, but the two libraries are used to realize the connection between PHP and mysql respectively). However, in the latest VERSION of PHP, mySQli library will not be installed by default, which causes the mysqli functions in the PHP page will not be executed, forming a blank page.


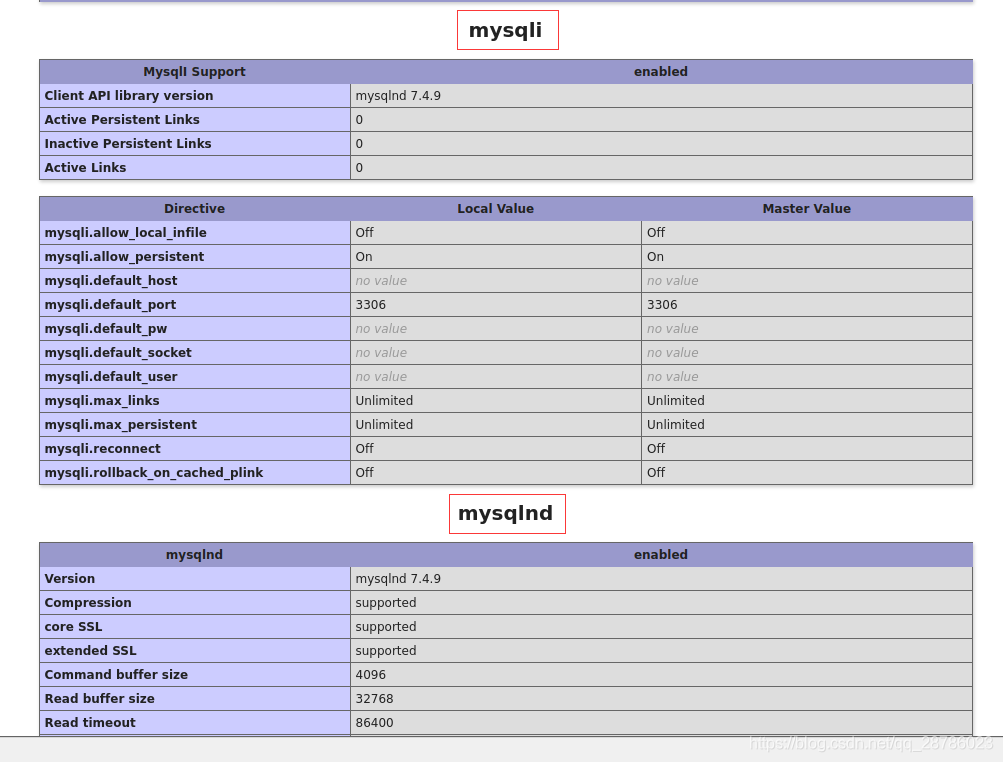
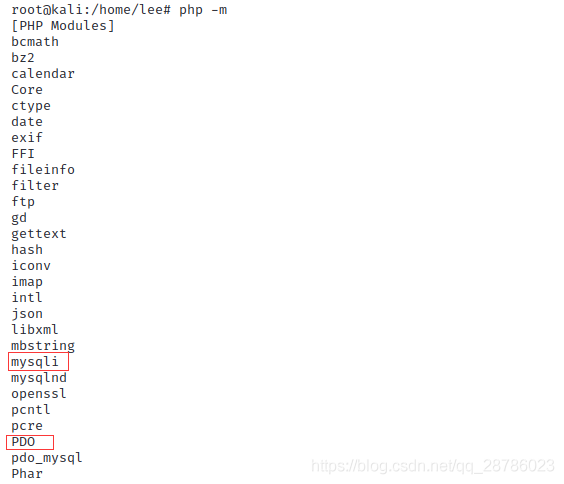
direct command line input:

php -m

lists the extensions that have been installed:

I have now installed them. If you do not have these modules, you can install them with the following command (see reference 2 for more details) :

sudo apt-get install php7.4-mysqli //这里我的php版本是7.4.9
sudo apt-get install php7.4-PDO

at this point, all configuration is complete.

MySQL create user with authorization

Mysql can log in confidentially under

kali and default to root, while ubuntu requires a more detailed command:

mysql  #kali下
--------------------------------
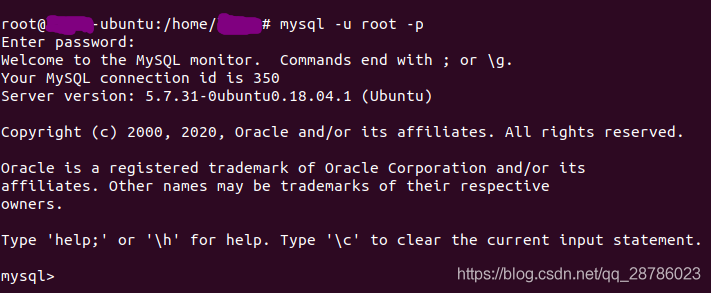
mysql -u root -p #kali下和ubuntu下均可,更正式

kali>

or ubuntu kali is recommended

one of the most common problems here is to report an error:
ERROR 2002 (HY000) : Can ‘t connect to local MySQL server through socket’/var/run/mysqld/mysqld. The sock ‘
there are all kinds of solution to the problem, sometimes only restart MySQL Can solve the problem:

systemctl restart mysql

create user

database operation commands are case sensitive.
into Mysql, the relevant user creation and authorization commands are as follows:

#drop database kali; #由于已经完成数据库的操作,数据库已经存在,这里将其删除,重新演示
show databases; #列出当前存在的数据库
create database kali;  #创建数据库kali
use kail;  #使用kali
#drop user 'lee'@'localhost';  #删除当前用户lee
create user 'lee'@'localhost' identified by '123';  #创建新用户,这条命令涉及PHP代码,下面详细说
select user,host,password from mysql.user; #列出所有用户、所属主机、密码(默认经过加密)


identified by ‘123’; **create user ‘lee’ @’ localhost ‘identified by’ 123 ‘;
create user ‘username’ @’ host ‘identified by’ password ‘;
username: created username;
host: specify which host the user can log in on. If it is a local user, use localhost. If you want the user to log in from any remote host, use the wildcard %;
password: the user’s login password, the password can be empty, if empty, the user can log in the server without the password;

The user information created by

is placed in mysql.user.

user authorization

authorizes the new user created. Authorization refers to the operation that the user can perform on the database, such as adding, deleting, modifying, checking, etc. The command is:

grant all privileges on kali.* to 'lee'@'localhost' identified by '123' with grant option;
flush privileges;  #权限刷新

grant privileges on databasename. Tablename to ‘username’ @’ host ‘

privileges: privileges on the user, such as SELECT, INSERT, UPDATE, etc. ALL
databasename: databasename
tablename: Table name, represented by * if you want to grant the user permission to operate on all databases and tables.

for more detailed permissions, see resources 3: MySQL create users and authorizations. As a matter of fact, the connection between PHP and mysql can already be detected at this point. For a clearer representation, the contents of the database can be printed on the page. First create the content.

database content creation

basic database operation, command as follows:

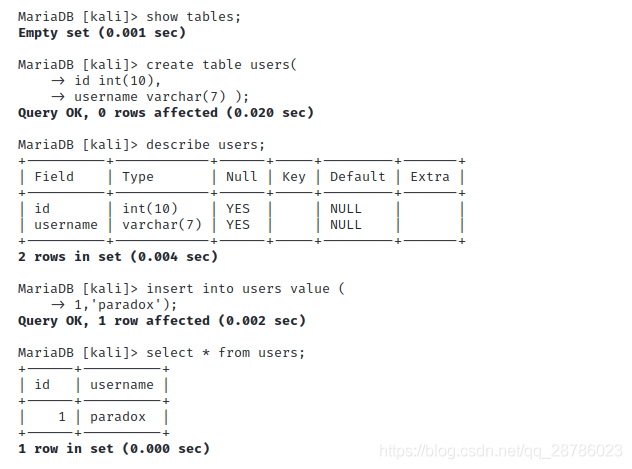
show tables;  #显示当前数据库下所有列表
create table users(
    -> id int(10),
    -> username varchar(7) );  #创建table,赋予属性
describe users;  #描述表
insert into users value (1,'paradox');  #插入数据
select * from users;  #显示数据

PHP7 connection mysql

PHP7 has abolished the mysql library. If you want to establish PHP and mysql interaction, you can do it through mysqli and PDO library functions. This article does not elaborate on the differences and USES of mysql, MySQli and PDO. You can read Resources 4-6 for details.

PHP mysqli interacts with mysql

mysqli is object-oriented and process-oriented. Set up mysqli.php in the folder /var/www. HTML /. The content is as follows:

<?php
    /*
    面向对象风格,格式及参数说明:
    $mysqli = new Mysqli($serve,$username,$password,$dbname);
    $serve:所使用的用户主机名称,这里是本地用户localhost
    $username: 数据库用户名,上面设置为lee
    $password:用户对应的密码
    $dbname:所使用的数据库。默认的话,会调用上一个打开的数据库
    */
    $mysqli = new mysqli("localhost", "lee", "123", "kali");
    if(!$mysqli)  {
        echo"database error";
    }else{
        echo"php env successful";
    }
    $mysqli->close();
?>

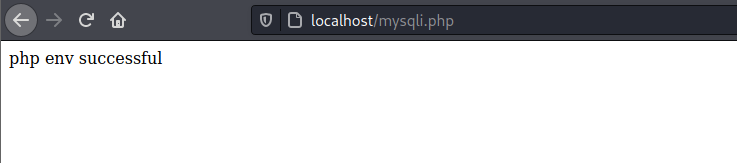
your browser input address: http://localhost/mysqli.php, the connection is successful.

PHP PDO interacts with mysql

PDOPDO’s biggest advantage over MySQLi is that PDO supports a wide variety of databases, while MySQLi only supports MySQLi. PDO’s advantages will come into play when a program wants to switch from mysql to SQL Server or Oracle in the future, because the database switch is transparent to the interface, the PHP code changes very little, and if you’re using MySQLi, you’ll have to rewrite everything you use for the database.
PDO can establish a connection in three ways: connects to the database in the form of parameters; Connect to the database through A URI; Connect to the database in the form of a configuration file. The latter two require configuration files, the first of which is used here. Similarly, under /var/www. HTML/create a file called pdo.php that reads as follows:

<?php
$dbms='mysql';
$dbName='kali';
$user='lee';
$pwd='123';
$host='localhost';
$dsn="$dbms:host=$host;dbname=$dbName";
$pdo=new PDO($dsn,$user,$pwd);
echo "PDO连接MySQL成功";
?>

, the parameter here has the same meaning, just pay attention to the format of $DSN. Enter the address http://localhost/pdo.php in the browser and the connection is successful as follows:

Of course,

can also output the contents of the database, create a file pdoo.php, the content is as follows:

<?php
header("Content-type:text/html;charset=utf-8");
$dns = 'mysql:host=localhost;dbname=kali';
$username = 'lee';
$password = '123';

try{ // PDO连接数据库若错误则会抛出一个PDOException异常
	$PDO = new PDO($dns,$username,$password);
	$result = $PDO->query('select * from users');
	$data = $result->fetchAll(PDO::FETCH_ASSOC); 
	// PDO::FETCH_ASSOC表示将对应结果集中的每一行作为一个由列名索引的数组返回
	print_r($data);
} catch (PDOException $error){
	echo 'connect failed:'.$error->getMessage();
}

?>

your browser input: http://localhost/pdoo.php, shows the database content:

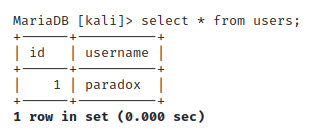
this is the front insert data in the database:

Common attributes and methods of list and map in Dar

list common properties and methods

common property

1,length gets the length of list

main() {
  var list = ['red','yellow','pink'];
  print(list.length);
}

2, judge whether it is empty

main() {
  var list = ['red','yellow','pink'];
  print(list.isEmpty);
}

3, not null

main() {
  var list = ['red','yellow','pink'];
  print(list.isNotEmpty);
}

4, the array flips

main() {
  var list = ['red','yellow','pink'];
  print(list.reversed.toList());
}
(pink, yellow, red)

common method

1, add data

main() {
  var list = ['red','yellow','pink'];
  list.add("green");
  print(list);
}
[red, yellow, pink, green]

2, find data indexOf, find return index, can’t find return -1

main() {
  var list = ['red','yellow','pink'];
  var res = list.indexOf('yellow');
  print(res);

}  

1

3, removed data (‘ value ‘),removeAt(index)

main() {
  var list = ['red','yellow','pink'];
  list.remove('yellow');
  list.removeAt(1);

  print(list);

}  
[red]

4, modify data fillRange(start,end,value) without end

main() {
  var list = ['red','yellow','pink'];
  list.fillRange(1, 2,'green');
  print(list);

}

[red, green, pink]

5, insert data insert(index,value) to the specified position. Insert

from index

main() {
  var list = ['red','yellow','pink'];
  list.insert(1, 'green');
  print(list);
}

[red, green, yellow, pink] 

main() {
  var list = ['red','yellow','pink'];
  list.insertAll(1, ['green','white']);
  print(list);
  
} 
[red, green, white, yellow, pink]

6, convert to string join(‘, ‘), instead of the original list

main() {
  var list = ['red','yellow','pink'];
  var str = list.join(',');
  print(str);

}
 
red,yellow,pink

7, convert string to array split(‘ – ‘), do not change the original string

main() {
  var str = 'red-yellow-pink';
  var list = str.split('-');
  print(list);
  print(str);
  
}  
[red, yellow, pink]
red-yellow-pink

8, for(var item in list) loop list

main() {
  var list = ['red','yellow','pink'];
  for(var item in list) {
    print(item);
  }
}

red
yellow
pink

9,map loop list

main() {
  var list = [1,2,3,4];
  var newList = list.map((value) => value * 2);
  print(newList.toList());
}

10, see if the set satisfies some condition any

main() {
  var list = ['red','yellow','pink'];
  var f = list.any((value) => value == 'red');
  print(f);
  print(list);
  
}

11, through the set can not add repeated collection, so can not get

through the index

main() {
  var set = new Set();
  set.add('red');
  set.add('yellow');
  set.add('pink');
  set.add('red');
  print(set.toList());
}  

[red, yellow, pink]

maps type common properties and methods

1, get all keys

main() {
  var person = {
    'name':'张三',
    'age':20,
  };
  print(person.keys.toList());
}

[name, age]

2, get all values

main() {
  var person = {
    'name':'张三',
    'age':20,
  };
  print(person.values.toList());
}

3, determine whether the attribute isEmpty isEmpty

main() {
  var person = {
    'name':'张三',
    'age':20,
  };
  print(person.isEmpty);
  
}
false

common method

1, remove the specified key data (key)

main() {
  var person = {
    'name':'张三',
    'age':20,
  };
  person.remove('name');
  print(person);
}
{age: 20}

2, addAll({‘ key ‘:’ value ‘})

main() {
  var person = {
    'name':'张三',
    'age':20,
  };
  person.addAll({
    'sex':'男',
  });
  print(person);
}

{name: 张三, age: 20, sex: 男}

3, check to see if the fields are in the map containsKey(key), return true/false does not change the original pair like

main() {
  var person = {
    'name':'张三',
    'age':20,
  };
  var boo = person.containsKey('name');
  print(boo);

}

true

blog address
related documents
github document address

Two ways of fuzzy query in mybatis

can be added % in the test class or % in the SQL of the configuration file in two ways:
the first way is to add:
test class:

 public void findByName(){
        List<User> users = userDao.findByName("王");
        for (User user:users){
            System.out.println(user);
        }
    }

profile:

<selectid="findByName"parameterType="string"resultType="com.itheima.daomain.User">
            select * from user where username like '%${value}%';
 </select>

the second test class adds %
test class:

 public void findByName(){
       List<User> users = userDao.findByName("%王%");
        for (User user:users){
            System.out.println(user);
        }
    }

profile:

<selectid="findByName"parameterType="string"resultType="com.itheima.daomain.User">
        select * from user where username like #{username};
</select>

Python string prefix

string prefix

meaning

  • u stands for unicode and can store Chinese characters.
  • b for bytes, can not store Chinese.
  • r represents raw and does not recognize escape characters.
  • f format.

Use

print(r"tes\nt")

Encapsulation of Axios and management of API interface in Vue

first of all we need to understand why we want to encapsulate API

  • here is mainly code reuse, encapsulation, call again, directly to call the line, save a lot of repeated code, greatly reduce the amount of code

followed by the encapsulation of the API


interacts with the background to retrieve data in vue projects. We usually use the axios library, which is a promise-based HTTP library that runs on the browser side and in node.js. It has many nice features, such as intercepting requests and responses, canceling requests, converting JSON, client-side defense XSRF, and so on.

if you’re not familiar with axios you can check out the axios website oh, honey!

Js
I usually create a new folder in my project’s SRC directory, and then I create a new http.js and an api.js file. The HTTp.js file is used to encapsulate our AXIOS and APi.js files to manage our interfaces uniformly.

let’s take a look at the code in action, dear!

  • http.js code operation
//第一步:引入axios 
import axios from 'axios';

//在这里设置开发环境和生产环境的默认路径
//development是开发环境 production是生产环境
if(process.env.NODE_ENV=='development'){
    axios.defaults.baseURL='http://120.53.31.103:84/api/app/'
}
if(process.env.NODE_ENV=='production'){
    axios.defaults.baseURL='https://wap.365msmk.com'
}

//这里是设置请求超时时间 时间为5秒(可以自己进行设置)
axios.defaults.timeout=5000;
//在请求拦截可以设置权限 
//如果不设置数据会请求失败或为空数据,在这里也可以用来判断token
axios.interceptors.request.use(
    config=>{
        config.headers={DeviceType:"H5"}	//在这里写的是H5
        return config;
    }
)

//封装get请求
export function get(url,params){
    return new Promise((resolve,reject)=>{
        axios.get(url,{
            params:params
        }).then(res=>{
            resolve(res)
        }).catch(err=>{
            reject(err)
        })
    })
}

//封装post请求
export function post(url,params){
    return new Promise((resolve,reject)=>{
        axios.post(url,
         params
        ).then(res=>{
            resolve(res.data)
        }).catch(err=>{
            reject(err.data)
        })
    })
}
  • API. Js code operation
//引入http.js
import {get,post} from './http.js'

// 设置get或者post请求
export function getList(){
	return get('api/app/recommend/appIndex?')
}

//讲师详情的主讲课程
//在里面可以传递id,参数等
export function getTeacherXiang(params){
	return post('api/app/teacher/mainCourse',params)
}

One of the advantages of

API interface management is that we have centralized the API. If we need to modify the interface later, we can directly find the corresponding modification in api.js, instead of going to every page to find our interface and then modify it again. The key is, in case of modification the quantity is quite big, specification GG. In addition, if we modify the interface directly in our business code, it is easy to touch our business code and cause unnecessary trouble.

friendly tip : in order to avoid careless mistakes, it is best to write comments for each interface.

  • use the encapsulated method

in the vue file

//引入封装好的方法
import { getBanner} from "../../api/api.js";

async mounted() {
    var data= await getBanner();
  //获取完数据就可以直接打印出来了
    console.log(data);
}

friendship tips : the person who wrote this blog is not true. If there are any mistakes, please kindly put forward

Zuul gateway routing URL and service ID configuration

there are two routing configurations in zuul:

1. Map

by accessing IP and port Numbers

2. Map

by service name

based on the code in the previous section:

first I cluster both service providers and service consumers:

first configure the first:

change gateway application.yml

server:
  port: 8090
eureka:
  client:
    service-url:
      default-zone: http://localhost:8761/eureka
spring:
  application:
    name: zuul-service
zuul:
  routes:
    feign:
      path: /feign/**
      url: http://localhost:8085/

accesses the path path through path and url mapping and accesses the url directly to the address corresponding to the url, which is obviously not good, because the address of the service must be known, and the number of clusters may be dynamically extended, which only realizes proxy forwarding and cannot realize load balancing. Where /feign/* represents only one path, /feign/* represents the following multiple paths

accessed through the gateway:


let’s look at the second one:

The

profile is as follows:

server:
  port: 8090
eureka:
  client:
    service-url:
      default-zone: http://localhost:8761/eureka
spring:
  application:
    name: zuul-service
zuul:
  routes:
    api-a:
      path: /feign/**
      service-id: eureka-feign
#zuul:
#  routes:
#    feign:
#      path: /feign/**
#      url: http://localhost:8085/

now that you are registered on eureka, you should get the registered service information, access the micro service through the service id, write the service name here with the service-id, and also implement the routing and melting functions.

is then accessed through the gateway:

and the third: zuul.routes. Service name: access path

zuul:
  routes:
    eureka-feign: /feign/**

if you ignore a micro service and do not use the gateway, set this:

zuul:
    #忽略某个微服务
  ignored-services: eureka-feign

forward jumps to local url:

zuul.routes.api-a.path=/user/**
zuul.routes.api-a.url=forward:/user

routing prefix:

zuul.prefix

does not take effect by default. To take effect, zuul.stripprefix =false sets the omitted prefix to false

zuul.routes.api-a.path=/user/**
zuul.routes.api-a.stripPrefix=false

if you want to configure routing rules in order, you must use the yml file, not the properties file

zuul:
  routes:
    users:
      path: /user/**
    others:
      path: /**

my github address

About solving the problem that vscode files cannot be edited

many times when we use VSCode to open a file sent by someone else or modify a configuration file, we will find that the file cannot be modified.

does not mean that files cannot be modified, but VSCode editing adopts the mode similar to Vim editor. Only when you type I can you modify. After the modification is completed, you can type Command+S(MacOS) or Control+S(Windows) is unable to save.

detailed usage of the vim editor can be seen in [MIT open class (a missing lesson in computer education)]3. Editor (Vim).

Linux virtual machine network “job for” network.service failed because the control process exited with error code”

problem description: ping occurrence Network is unsaid to be


restart network card: service network restart, error

Job for network.service failed because the control process exited with error code. See "systemctl status network.service" and "journalctl -xe" for details.

state is failed

sudo systemctl status network.service
● network.service - LSB: Bring up/down networking
   Loaded: loaded (/etc/rc.d/init.d/network; bad; vendor preset: disabled)
   Active: failed (Result: exit-code)
     Docs: man:systemd-sysv-generator(8)
  Process: 3253 ExecStart=/etc/rc.d/init.d/network start (code=exited, status=1/FAILURE)

solution:

systemctl disable NetworkManager

How to realize automatic assembly in springboot

spring boot itself is a framework that serves the spring framework. It can simplify configuration files, quickly build micro-blog applications, build tomcat built-in, and run directly without packaging deployment.
and one of the features I find most convenient is convention over configuration, which allows programmers to focus more on the business logic.
where EnableAntoConfiguration defaults to the dependent starter for automatic
springboot automatic assembly principle is :
1.Spring application.run implementation process has refreshContext(context), which internally parsed the label on our configuration class, and the annotation @enableantoconfiguration
2. Parses @ EnableAntoConfiguration this annotation of @ the configuration of the Import into class @ AntoConfigurationImportSelector
3. @ AntoConfigurationImportSelector. This class has methods SpringFactoriesLoder loadFactoryNames (getStringFactoriesLoaderFactoryClass (), getBeanClasLoader ()); The purpose is to read the meta-inf /spring.factories file
. Spring.factories file in the project in jarbao configure the Configuration class to be assembled automatically.

(element UI component table) how to add a style to a table

when using the Element UI to design a table, the style of the table might look something like this, if not specially decorated, but sometimes we need to add some style.

check the official documentation and we find the following properties. The style is controlled by the classification of row, cell, header-row and header-cell.

0

2

3

4

6

0

0

0

0

0

0

0

parameter description type optional value 1 default value
5 row-class-name 7 row className callback method, can also use a string to set a fixed className for all rows. Function({row, rowIndex})/String / /
row-style 1 row style callback method, also can use a fixed Object to set the same style for all rows. Function({row, rowIndex})/Object / /
cell-class-name 1 cell className callback method. Td>

Function({row, column, rowIndex, columnIndex})/String / /
cell-style 1 cell style callback method, can also use a fixed Object to set the same style for all cells. Td>

Function({row, column, rowIndex, columnIndex})/Object / /
header-row-class-name 1 header rows can also be set to a fixed className using a string. Function({row, rowIndex})/String / /
header-row-style 1 style callback method. Function({row, rowIndex})/Object / /
header-cell-class-name 1 Td>

Function({row, column, rowIndex, columnIndex})/String / /
header-cell-style 1 header cell style callback method, can also use a fixed Object to set the same style for all header cells. Function({row, column, rowIndex, columnIndex})/Object / /

add a black background to the table below, with white text darkening

adds the cell-style and header-cell-style properties to el-table and passes in the function, which is the same because the table header and table data are styled the same.

<el-table :cell-style="cellStyle" :header-cell-style="cellStyle">

Below

is the function body

cellStyle() {
    return {
        background: "#000000",
        color: "#ffffff",
    };
},