ERROR: ERROR installing cocoapods:
ERROR: Failed to build gem native extension.
The current directory:/Library/Ruby/Gems/2.3.0/Gems/ffi – 1.12.2/ext/ffi_c
/ System/Library/Frameworks/Ruby framework Versions/2.3/usr/bin/Ruby – I/Library/Ruby/Site/2.3.0 – r. cf9u3w/siteconf20200303-68332-1. The rb extconf. Rb
MKMF. Rb can ‘t find the header files for the ruby at/System/Library/Frameworks/ruby framework Versions/2.3/usr/lib/ruby/include/ruby. H
extconf failed, exit code 1
Gem files will remain installed in/Library/Ruby/Gems/2.3.0/Gems/ffi – 1.12.2 for inspection.
Results logged to/Library/Ruby/Gems/2.3.0/extensions/universal – Darwin – 18/2.3.0 ffi – 1.12.2/gem_make. Out
Trying to upgrade CocoapoDS requires a correct operation flow and the following command
1. Update GEM: Sudo GEM update — System
Remove gem Sources –remove https://ruby.taobao.org/
3. Modify gem sources: gem Sources -a https://gems.ruby-china.com
4, check whether the gem source is the latest: gem Sources – L
5. Update Cocoapods: Sudo Gem Install -n /usr/local/bin Cocoapods
6. Check the updated CocoapoDS version: POD — Version
Still no success.
wangpeideMacBook-Pro:~ wangpei$ rvm -v
-bash: rvm: command not found
Use the command RVM command to find the problem as follows: -bash: RVM: Command Not Found
Execute \curl -sSL https://get.rvm.io | basket-s stable –ruby
wangpeideMacBook-Pro:~ wangpei$ \curl -sSL https://get.rvm.io | bash -s stable --ruby
Downloading https://github.com/rvm/rvm/archive/1.29.9.tar.gz
Downloading https://github.com/rvm/rvm/releases/download/1.29.9/1.29.9.tar.gz.asc
Found PGP signature at: 'https://github.com/rvm/rvm/releases/download/1.29.9/1.29.9.tar.gz.asc',
but no GPG software exists to validate it, skipping.
Upgrading the RVM installation in /Users/wangpei/.rvm/
    RVM PATH line found in /Users/wangpei/.mkshrc /Users/wangpei/.profile /Users/wangpei/.bashrc /Users/wangpei/.zshrc.
    RVM sourcing line found in /Users/wangpei/.profile /Users/wangpei/.bash_profile /Users/wangpei/.zlogin.
Upgrade of RVM in /Users/wangpei/.rvm/ is complete.

Thanks for installing RVM 🙏
Please consider donating to our open collective to help us maintain RVM.

👉  Donate: https://opencollective.com/rvm/donate


Ruby enVironment Manager 1.29.9 (latest) (c) 2009-2017 Michal Papis, Piotr Kuczynski, Wayne E. Seguin

ruby-2.6.3 - #removing src/ruby-2.6.3..
Searching for binary rubies, this might take some time.
No binary rubies available for: osx/10.14/x86_64/ruby-2.6.3.
Continuing with compilation. Please read 'rvm help mount' to get more information on binary rubies.
Checking requirements for osx.
Perform source/Users/XXXXXX. RVM/scripts/RVM RVM started
  * To start using RVM you need to run `source /Users/wangpei/.rvm/scripts/rvm`
    in all your open shell windows, in rare cases you need to reopen all shell windows.
wangpeideMacBook-Pro:huobicloud_ios wangpei$ source /Users/wangpei/.rvm/scripts/rvm
RVM use ruby – 2.6.3
Execute the install command Sudo gem install Cocoapods or Sudo gem install -n /usr/local/bin cocoapods
ERROR:  Could not find a valid gem 'cocoapods' (>= 0), here is why:
          Unable to download data from https://gems.ruby-china.com/ - no such name (https://gems.ruby-china.com/specs.4.8.gz)
ERROR:  Possible alternatives: cocoapods
wangpeideMacBook-Pro:~ wangpei$ gem sources -l
*** CURRENT SOURCES ***

https://gems.ruby-china.com/
wangpeideMacBook-Pro:~ wangpei$ sudo gem update --system
Latest version already installed. Done.
wangpeideMacBook-Pro:~ wangpei$ sudo gem install -n /usr/local/bin cocoapods
Successfully installed cocoapods-1.9.2
Parsing documentation for cocoapods-1.9.2
Done installing documentation for cocoapods after 1 seconds
1 gem installed
wangpeideMacBook-Pro:~ wangpei$ pod --version
1.9.2
[Transfer] mdt wds deployment windows Litetouch deployment failed, Return Code = -2147467259 0x80004005 solution…
Combination chemotherapy wds deployment windows Litetouch deployment failed,return code = -2147467259 0 x80004005 resolution
Mark.
http://isee131.blog.51cto.com/619759/518771
It’s deployments that turn out to be wrong.
Litetouch deployment failed, return code = -2147467259 0x80004005
It’s been a long day, but I finally got the results back. Write it down.
Method 1
On your Windows 7 reference PC, open the registry editor. Navigate to the HKLM \ system \ settings. Look for a multi-string value called “CloneTag”. I’m guessing it’s not there. Add a new multistring value named “CloneTag”. The actual value doesn’t matter. I’m not sure if the case on the name matters, so I mimicked the error message. Export the HKLM\system\settings key and save it to the .reg file. Edit the .reg file and remove all other entries except for the CloneTag value.
Run cscript to start the task sequence selector. Select your Sysprep and capture the Task Sequence. Enter your credentials and start.
When it gets to the part where the sysprep is executed, run the .reg file to quickly import the CloneTag multi-string value. If you see that it continues to sport, then you should be clear.
Method 2
Go to the Scripts folder in your DS box and create a backup of the LTISysprep file somewhere on your desktop so you will have a copy and if anything goes wrong open the LTISysprep file with Notepad and remove osshell. MACHINE\System\Setup\CloneTag’ line off and save the file to update your deployment share continues by logging in to the referenced computer and on your DS machine.
Run the LiteTouch script to capture p_w_picpath on
Method 3.
The reason for this failure is that the registry key CloneTag under HKLM\system\settings was deleted during sysprep startup:
1.
Enter your sysprep and capture the task sequence, execute sysprep, Options tab, Add, Registry Settings. Enter “System\Settings” in the “Key” box, and enter the CloneTag in the “Value Name” box, and place the “Value” in the CloneTag. ” box is left blank. The whole step is to add the registry entry back to the HKLM\system\setup after the sysprep is complete.
2. (Same approach as suggested by Jimmy lami)
You can also modify the script to prevent deletion of registry entries. Go to the deploymentshare folder and look for the script named LITSysprep in the scripts folder. Right-click on edit to make changes in the script. You can remove the oShell.RegDelete “HKEY_LOCAL_MACHINE\SystemSetup\CloneTag” or you may want to add. // infront to convert it to a comment.
Android studio error compilation failed see the compiler error output for details.
Android studio ran error, reporting error compilation failed see the compiler error output for details.
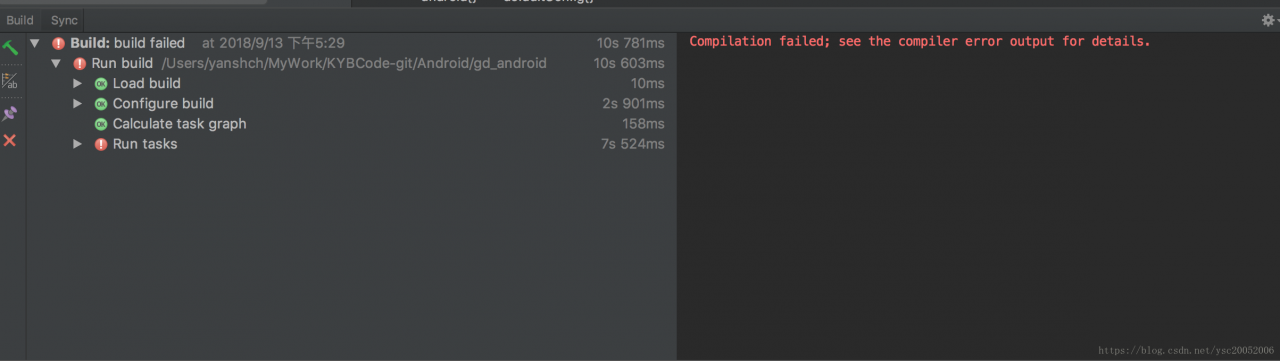
I’ve been looking for a long time and here it is:
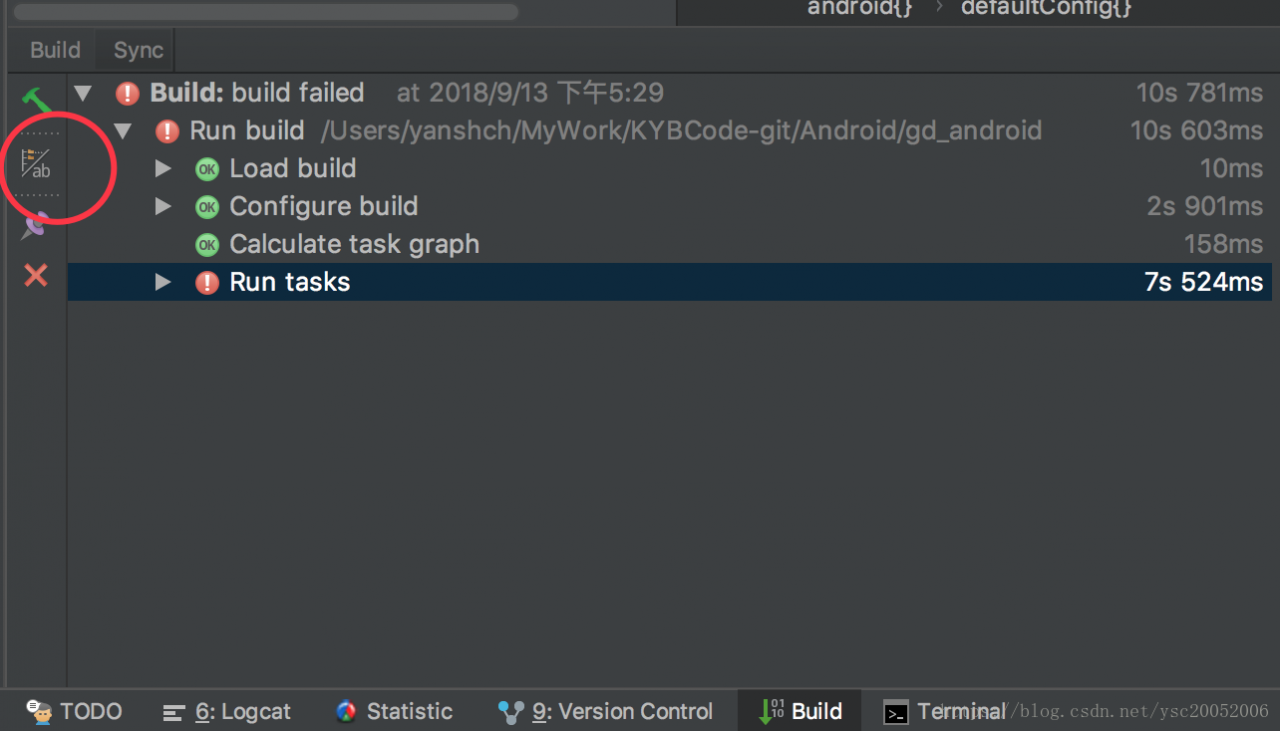
Click on this place, switch to display mode, mama of ~~~~~~~~~~~~~~ ~~ can also be so!!!!!
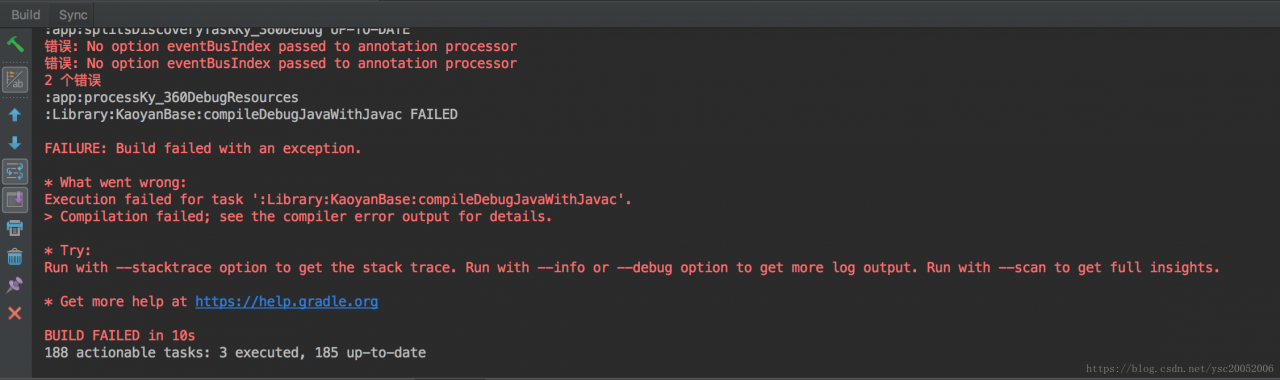
Well, it’s clear what went wrong there.
vscode import numpy error:DLL load failed: The specific module could not be found
An error description
- anaconda prompt, import numpy in normal vscode, import numpy error: DLL load failed
Error reason
Vscode failed to properly initialize the environment variable
The solution
Open the vscodesettings.json file
(type)               CTRL + SHIFT + P
(search for:)        open settings
(click:)             Preferences: Open Settings (JSON)
Add three lines
{
    ... # any other settings you have already added (remove this line)

    "terminal.integrated.shell.windows": "C:\\WINDOWS\\System32\\cmd.exe",
    "terminal.integrated.shellArgs.windows": ["/K", "x:\\xxx\\Anaconda3\\Scripts\\activate.bat x:\\xxx\\Anaconda3"],
    "python.condaPath": "x:\\xxx\\Anaconda3\\Scripts\\conda.exe"
}
Under Linux, git cannot be used, prompt sign_and_send_pubkey: signing failed: agent refused operation
Under Linux, Git cannot be used if the server has already added a public key
Git Clone and other functions cannot be used under Linux. Prompt:
sign_and_send_pubkey: signing failed: agent refused operation
In turn (if no public key is added) :
ssh-add
eval $(ssh-agent -s)
Execute (public key has been added) :
eval $(ssh-agent -s)
Eval $(sSH-Agent-s) system runs at startup
Obviously, the above method requires executing eval $(sSH-agent-s) before using Git for the first time. Otherwise, it is not friendly to use an error. We want to avoid the trouble of eval $(ssh-agent-s) once and for all, which is unlikely to be remembered. Therefore, I need to initialize this command when the system boot, help me to execute this command.
Current user (if you prefer “any configuration is for users”)
modify ~/.bashrc, vim ~/.bashrc
add this line (suggested at the end) :
# 启动 ssh-agent,“> .null”是为了解决在终端喊一嗓子的问题(其实就是将它输出到一个.null文件中去了)
eval $(ssh-agent) > .null
All users (recommended)
modify (may need sudo, add it yourself as necessary) /etc/bashrc, vim /etc/bashrc
add this line (it is recommended to add it at the end) :
# 启动 ssh-agent,“> .null”是为了解决在终端喊一嗓子的问题(其实就是将它输出到一个.null文件中去了)
eval $(ssh-agent) > .null
ORA-12545: Connect failed because target host or object does not exist
DGMGRL> switchover to testogg;
Performing switchover NOW, please wait...
Operation requires a connection to instance "testogg" on database "testogg"
Connecting to instance "testogg"...
Connected.
New primary database "testogg" is opening...
Operation requires startup of instance "testogg_stdby" on database "testogg_stdby"
Starting instance "testogg_stdby"...
Unable to connect to database
ORA-12545: Connect failed because target host or object does not exist

Failed.
Warning: You are no longer connected to ORACLE.

Please complete the following steps to finish switchover:
	start up instance "testogg_stdby" of database "testogg_stdby"

DGMGRL>
View the Alert log log, indicating that log_archive_dest_2 is invalid. Db_unique_name is not correct.
Switchover: Primary highest seen SCN set to 0x0.0x1a410d
ARCH: Noswitch archival of thread 1, sequence 113
ARCH: End-Of-Redo Branch archival of thread 1 sequence 113
ARCH: LGWR is actively archiving destination LOG_ARCHIVE_DEST_3
ARCH: Standby redo logfile selected for thread 1 sequence 113 for destination LOG_ARCHIVE_DEST_3
Archived Log entry 32 added for thread 1 sequence 113 ID 0xe0779467 dest 1:
ARCH: Archiving is disabled due to current logfile archival
Primary will check for some target standby to have received alls redo
Final check for a synchronized target standby. Check will be made once.
Archive destination LOG_ARCHIVE_DEST_2 invalidated
DB_UNIQUE_NAME tesgogg is not in the Data Guard configuration
LOG_ARCHIVE_DEST_3 is a potential Physical Standby switchover target
Active, synchronized target has been identified
Target has also received all redo
Check the setting of log_archive_dest_2, there is a problem with db_unique_name, change, prompt and log_archive_dest_3 because the value is the same.
SYS@testogg_stdby>alter system set log_archive_dest_2= 'SERVICE=tesgogg ASYNC VALID_FOR=(ONLINE_LOGFILES,PRIMARY_ROLE) DB_UNIQUE_NAME=testogg';
alter system set log_archive_dest_2= 'SERVICE=tesgogg ASYNC VALID_FOR=(ONLINE_LOGFILES,PRIMARY_ROLE) DB_UNIQUE_NAME=testogg'
*
ERROR at line 1:
ORA-02097: parameter cannot be modified because specified value is invalid
ORA-16021: session LOG_ARCHIVE_DEST_3 destination cannot be the same as session
LOG_ARCHIVE_DEST_2 destination
If you look at log_ARCHIve_dest_3, you see that log_archive_dest_3 is configured. However, this parameter is not set when you build the Data Guard. This parameter is generated by the Broker itself after the Broker is configured. After clearing, set log_archive_dest_2.
SYS@testogg_stdby>show parameter log_archive_dest_3

NAME				     TYPE	 VALUE
------------------------------------ ----------- ------------------------------
log_archive_dest_3		     string	 service="testogg", LGWR ASYNC
						 NOAFFIRM delay=0 optional comp
						 ression=disable max_failure=0
						 max_connections=1 reopen=300 d
						 b_unique_name="testogg" net_ti
						 meout=30, valid_for=(all_logfi
						 les,primary_role)
log_archive_dest_30		     string
log_archive_dest_31		     string
SYS@testogg_stdby>alter system set log_archive_dest_3='';

System altered.

SYS@testogg_stdby>alter system set log_archive_dest_2= 'SERVICE=tesgogg ASYNC VALID_FOR=(ONLINE_LOGFILES,PRIMARY_ROLE) DB_UNIQUE_NAME=testogg';

System altered.
Once set up, there is still a problem with not being able to switch data Guard. Check the configuration of the Broker. Discover that in the configuration of the database, the host being connected is hostname, not IP address.
DGMGRL> show database verbose testogg_stdby;

Database - testogg_stdby

  Role:            PHYSICAL STANDBY
  Intended State:  APPLY-ON
  Transport Lag:   (unknown)
  Apply Lag:       (unknown)
  Apply Rate:      (unknown)
  Real Time Query: OFF
  Instance(s):
    testogg_stdby

  Properties:
    DGConnectIdentifier             = 'testogg_stdby'
    ObserverConnectIdentifier       = ''
    LogXptMode                      = 'ASYNC'
    DelayMins                       = '0'
    Binding                         = 'OPTIONAL'
    MaxFailure                      = '0'
    MaxConnections                  = '1'
    ReopenSecs                      = '300'
    NetTimeout                      = '30'
    RedoCompression                 = 'DISABLE'
    LogShipping                     = 'ON'
    PreferredApplyInstance          = ''
    ApplyInstanceTimeout            = '0'
    ApplyParallel                   = 'AUTO'
    StandbyFileManagement           = 'AUTO'
    ArchiveLagTarget                = '0'
    LogArchiveMaxProcesses          = '4'
    LogArchiveMinSucceedDest        = '1'
    DbFileNameConvert               = '/u01/app/oracle/oradata/testogg/, /u01/app/oracle/oradata/testogg_stdby/'
    LogFileNameConvert              = '/u01/app/oracle/oradata/testogg/, /u01/app/oracle/oradata/testogg_stdby/'
    FastStartFailoverTarget         = ''
    InconsistentProperties          = '(monitor)'
    InconsistentLogXptProps         = '(monitor)'
    SendQEntries                    = '(monitor)'
    LogXptStatus                    = '(monitor)'
    RecvQEntries                    = '(monitor)'
    ApplyLagThreshold               = '0'
    TransportLagThreshold           = '0'
    TransportDisconnectedThreshold  = '30'
    SidName                         = 'testogg_stdby'
    StaticConnectIdentifier         = '(DESCRIPTION=(ADDRESS=(PROTOCOL=tcp)(HOST=dbtrain)(PORT=1521))(CONNECT_DATA=(SERVICE_NAME=testogg_stdby_DGMGRL)(INSTANCE_NAME=testogg_stdby)(SERVER=DEDICATED)))'
    StandbyArchiveLocation          = '/archive_log/'
    AlternateLocation               = ''
    LogArchiveTrace                 = '0'
    LogArchiveFormat                = '%t_%s_%r.dbf'
    TopWaitEvents                   = '(monitor)'

Database Status:
DGM-17016: failed to retrieve status for database "testogg_stdby"
ORA-12514: TNS:listener does not currently know of service requested in connect descriptor
ORA-16625: cannot reach database "testogg_stdby"

DGMGRL>
Check the hosts file of the host and backup library and find that there is no host address. Add. Perform the switch again under the DGMGRL command line. The switch between main and backup is normal.
DGMGRL> switchover to testogg
Performing switchover NOW, please wait...
Operation requires a connection to instance "testogg" on database "testogg"
Connecting to instance "testogg"...
Connected.
New primary database "testogg" is opening...
Operation requires startup of instance "testogg_stdby" on database "testogg_stdby"
Starting instance "testogg_stdby"...
ORACLE instance started.
Database mounted.
Database opened.
Switchover succeeded, new primary is "testogg"
结束
Failed to load the native TensorFlow runtime.
Failed to load the native TensorFlow runtime.
Running CPU version of object Detection’s sample program, which appears when importing tensorFlow:
Failed to load the native TensorFlow runtime.
The solution is: PIP install –upgrade –ignore — Installed tensorFlow
Update tensorflow good
the original link: https://blog.csdn.net/sy20173081277/article/details/82977893
Mac install pycurl error: python setup.py egg_info" failed with error code 1”
(env3) [MrYang:Desktop]$ python3 -m pip install pycurl
Looking in indexes: http://mirrors.aliyun.com/pypi/simple/
Collecting pycurl
  Downloading http://mirrors.aliyun.com/pypi/packages/e8/e4/0dbb8735407189f00b33d84122b9be52c790c7c3b25286826f4e1bdb7bde/pycurl-7.43.0.2.tar.gz (214kB)
    100% |████████████████████████████████| 215kB 3.1MB/s
    Complete output from command python setup.py egg_info:
    Using curl-config (libcurl 7.43.0)
    Traceback (most recent call last):
      File "<string>", line 1, in <module>
      File "/private/var/folders/dx/m2t9qg010gg9pk5v8xzt4gxc0000gn/T/pip-install-bn546qog/pycurl/setup.py", line 913, in <module>
        ext = get_extension(sys.argv, split_extension_source=split_extension_source)
      File "/private/var/folders/dx/m2t9qg010gg9pk5v8xzt4gxc0000gn/T/pip-install-bn546qog/pycurl/setup.py", line 582, in get_extension
        ext_config = ExtensionConfiguration(argv)
      File "/private/var/folders/dx/m2t9qg010gg9pk5v8xzt4gxc0000gn/T/pip-install-bn546qog/pycurl/setup.py", line 99, in __init__
        self.configure()
      File "/private/var/folders/dx/m2t9qg010gg9pk5v8xzt4gxc0000gn/T/pip-install-bn546qog/pycurl/setup.py", line 316, in configure_unix
        specify the SSL backend manually.''')
    __main__.ConfigurationError: Curl is configured to use SSL, but we have not been able to determine which SSL backend it is using. Please see PycURL documentation for how to specify the SSL backend manually.

    ----------------------------------------
Command "python setup.py egg_info" failed with error code 1 in /private/var/folders/dx/m2t9qg010gg9pk5v8xzt4gxc0000gn/T/pip-install-bn546qog/pycurl/
The solution is as follows
# First upgrade PIP
Sudo Python-m PIP install — Upgrade — Force PIP
You can then specify the version number to install (the version number can be found in the error log)
Sudo PIP install pycurl = = 7.43.0
Solve the Google Chrome Failed to load resource: net::ERR_FAILED problem
Problem description:
when using ajax to access the json file, use the Google browser opens, there will be a problem: the diagram below
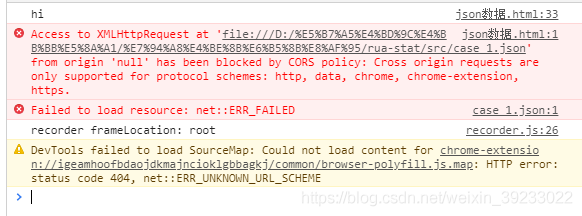
problem solving:
1, because of the problems appeared a cross-domain, to find relevant solutions to cross-domain solutions
2, use vscode editor, install live – server plug-in, as shown in figure method is used to open the HTML file, will be forced to make it under the same server. 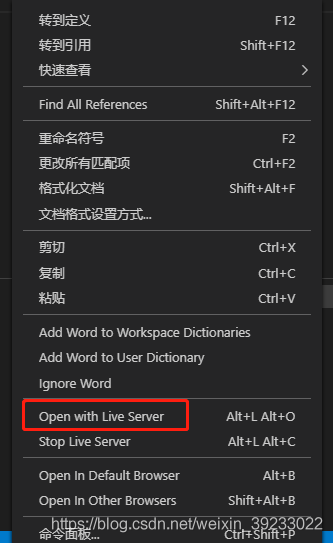
mysql Error: Failed to open file “file_name” error 2/error 22
The reason is the same: mysql imports SQL according to the relative path query. For example, When I open mysql in the WWW folder, I enter source Form /test.sql to query the file in the WWW folder.
Solution: Simple, use CMD to enter the folder where SQL files exist, then open mysql, and then import SQL files
Centos7 offline installation of redis and PHP extension redis
Redis related packages
Phpredis – 2.2.4. Tar. Gz
phpredis-develop.zip
Redis – 4.0.6. Tar. Gz
Link: https://pan.baidu.com/s/1eSOwqhO password: af4c
1. Unzip, compile and install tar-Zxvf Redis-4.0.6.tar.gz
CD redis – 4.0.6/SRC
make
make install
2. You can see some green files when moving ls redis-4.0.6/ SRC
mkdir -p /usr/local/redis/etc ###etc has a storage configuration file
mkdir -p /usr/local/redis/bin ###bin is used to store commands
Copy redis.conf under redis.4.0.6 to /usr/local/redis/etc/
cp ../redis. Conf/usr/local/redis/etc /
copy the green file under redis-4.0.6/ SRC folder to /usr/local/redis/bin
cp green file name /usr/local/redis/bin/
CD/usr/local/redis/bin
ls
3. Start redIS service. Starting the RedIS service requires the command Redis-server./ Redis-server
Warning: no config file specified,
after the termination
/redis server/usr/local/redis/etc/redis. Conf
now redis is running in the foreground
redis runs in the background
vi /usr/local/redis/etc/redis.conf
search: /daemonize
changes the daemonize configuration entry to yes
save exit
./redis-server /usr/local/redis/etc/redis.conf
ps -ef | grep redis
pstree -p | grep redis ## tree display
netstat – NTLP | grep 6379 ### port
[linuxidc@localhost bin]$ /usr/local/redis/bin/redis-cli
127.0.0.1:6379 & gt;// hint
indicates successful client login
4. Join systemctl configure redis vi/usr/lib/systemd/system/redis. Service
[Unit]
Description=Redis
After=network.target
[Service]
#Type=forking
PIDFile=/run/redis_6379.pid
ExecStart =/usr/local/redis/bin/redis server/usr/local/redis/etc/redis. Conf – daemonize no
ExecReload=/bin/kill -s HUP $MAINPID
ExecStop =/usr/local/redis/bin/redis – 127.0.0.1 cli – h – p 6379 shutdown
PrivateTmp=true
[Install]
WantedBy=multi-user.target
save exit
systemctl daemon-reload
systemctl start redis
systemctl enable redis
systemctl is-enabled redis
if an error occurs
systemctl enable redis
Failed to execute operation: Bad message
Please check the/usr/lib/systemd/system/redis. Service file
5. Install the PHPREdis-Develop.zip extension if you have PHP installed
download address: https://github.com/phpredis/phpredis/archive/develop.zip
unzip phpredis – develop. Zip
cd phpredis-develop
/usr/local/php7/bin/phpize
./configure –with-php-config=/usr/local/php7/bin/php-config
make
(see result: Don’t forget to run ‘make test’. That is success.)
make install
(see the results as follows: Installing Shared extensions:/usr/local/php7/lib/PHP/extensions/no – debug – non – ZTS – 20160303 /
)
: Shared extensions, has generated the dynamic link library file redis. So.
can check if there is redis.so
ls/usr/local/php7/lib/PHP/extensions/no – debug – non – ZTS – 20160303 /
file redis.so path
phpredis-develop/modules/redis.so
phpredis-develop/.libs/redis.so
/usr/local/php7/lib/php/extensions/no-debug-non-zts-20160303/redis.so
three files are the same file
Configure php.ini to add after extension
extension=redis.so
restart PHP
Test redis CD
vi test.php
< ?php
$redis = new redis();
$redis-> The connect (‘ 127.0.0.1, 6379);
echo ‘Connection to server successfully’;
echo ‘Server is running:’ . $redis-> ping();
:wq
to perform the test. The PHP
php test.php
in case of Fatal error: Uncaught error: Class ‘redis’ not found
may be because running the PHP command and apache or ngnix may use a different php.ini. Even if you see redis loaded in php.ini, you also need to add redis module in php.ini to the PHP command line.
address:
1. View phpinfo in php.ini location
/usr/local/php7/etc/php.ini
2. Search the php.ini file location
/usr/local/php7/lib/
3. Cp/usr/local/php7/etc/PHP ini/usr/local/php7/lib/PHP ini
4. Restart php-fpm nginx redis
5. Execute test.php
[root@192 /]# php test.php
Connection to server successfullyServer is running:+PONG[root@192 /]#
php -m | grep redis
keytool error: java.lang.Exception: Failed to establish chain from reply
keytool error: java.lang.Exception: Failed to establish chain from reply
Didn’t solve the problem, find a lot of articles, baidu search to an article in English https://www.veritas.com/support/en_US/article.000021204 later
The following is mentioned:
Problem
When importing an SSL certificate to Clearwell’s keystore, an error is encountered.
Error Message
keytool error: java.lang.Exception: Failed to establish chain from reply
Cause
Root and/or Intermediate certificates have not been imported order.
I checked that I commented out the original step and did not execute it
That is, import the self-signed certificate (that is, my root certificate) information into the server secret key library
Modify the following, perform this step first, then perform normal.
Summary: The order in which certificates are imported into the secret key library is important, and if there is a root certificate or a multi-level certificate authority, they must be imported level by level from top to bottom.