Category Archives: How to Fix

After adb is connected to an android phone, remount failed: operation not permitted when adb remount is a roundabout solution

I like to start to play with some small tools, trick or treat, feeling after the start, the impression is more profound, but also can deeply understand some things, in this process, there will be some problems, start to solve, quite fun. The last time I played the phone at adb, I almost crashed it, and then with a little effort, I repaired it myself, to a false alarm. Tonight I tried to get the file into the box with ADB, and as a result, an adb Remount (to make the file system writable) prompted a denial of operation not permitted.  

I initially thought it was a root issue, but if you want to get out of the shell and use ADB Remount, what’s the root issue?So, you have to do it inside the shell. The purpose of adb Remount is to make the file system available, so we might as well make the file directory writable directly in the shell with root permission, thus indirectly solving the problem, as follows (192.168.1.100 is the IP address of my Xiaomi phone) :

Of course, the key command can also be: mount -o Remount, RW-T yaffs2 /dev/block/mtdblock3 /system. In addition, the Windows path, we must not type a letter to write in, directly dragged into the file can ah.    

Ok, when you encounter a problem, try to solve it, direct method, indirect method, white cat black cat can be. Now it’s done, so summarize and record it.  

Solve QQ startup error: Initialization failure: 0x0000000C

1. We find the “command prompt” in the attachment in the start menu bar, then right-click and select “Run as administrator”.
2. From the command line, we type: “NETSH WINSOCK RESET CATALOG”.
3. After hitting enter, the interface as shown in the figure will appear. You are prompted to reset the WinSock directory successfully. You need to restart the computer to complete the reset.
4. After restarting the computer, you will find that your QQ, other software and network can work normally.

greendao insert data UNIQUE constraint failed: PURCHASE_ORDER_TABLE._id (code 1555)

On the face of it, I encountered this problem recently when the project was about to go live
In Greendao’s database table, the ID field is unique due to the insertion of data with duplicate IDS
However, our business logic is that if the database is emptied and the data is inserted, it is theoretically impossible to have duplicate ids

DaoUtils.getDaoSession().getPurchaseOrderTableDao().insertInTx(mPurSkuList);

The number of lines of code goes to this location
The first thing that comes to mind is that the data table may not be completely cleaned up, but after debugging, it is indeed completely cleaned up
Continue debugging and find problems

Mongodb connection authentication auth failed solution

System: centos7
mongo client: mongo2.6.12
mongo server: mongo3.6
Connection error:

2018-07-02T11:51:48.904+0800 Error: 18 { ok: 0.0, errmsg: "auth failed", code: 18, codeName: "AuthenticationFailed" } at src/mongo/shell/db.js:1292
exception: login failed

Reason: Due to the low version of Mongo Client, the authentication mechanism is not supported, resulting in client authentication failure.
Solutions:

sudo yum remove mongodb
sudo yum remove mongodb-server

Install Mongodb3.6 version
Refer to CentOS 7 to install MongoDB 3.6
After successful installation, according to the authentication mechanism set by the server, select scRAM-SHA-1 or MongoDB-CR, and default to SCRAM-SHA-1
Connection command:

mongo -authenticationDatabase admin -u user -p pass -host hostname -port 27017 [--authenticationMechanism SCRAM-SHA-1]

(gedit:10072): dconf-WARNING **: failed to commit changes to dconf: connection closed

Problem: writing a hello.c file in Linux has reported an error

The possible reason is that the GCC source
input was not installed

rpm -q gcc


how to install GCC source in Linux
to write the simplest c program hello.c can refer to the blog below
to create c program hello.c

under root would be considered for normal users, or su-.

Shell curl command reported an error: (60) SSL certificate problem: self signed certificate

The curl command sends HTTPS requests to the server

root@53c79d8a7095:~# curl --header "PRIVATE-TOKEN: Nf1kK4MeF4fPMo7d4jY2" https://172.16.0.168/api/v4/projects?search=xxxx
curl: (60) SSL certificate problem: self signed certificate
More details here: https://curl.haxx.se/docs/sslcerts.html

curl failed to verify the legitimacy of the server and therefore could not
establish a secure connection to it. To learn more about this situation and
how to fix it, please visit the web page mentioned above.

And then I did a search, and at first I thought it was the Daijiguo blog that said you need to set the parameters, but in fact that should be PHP related Settings. Then continue to Google, find bytxl, curl need to add -k, wget need to add --no-check-certificate :

curl --header "PRIVATE-TOKEN: Nf1kK4MeF4fPMo7d4jY2" https://172.16.0.168/api/v4/projects?search=xxxx -k

wget 'https://172.16.0.168/api/v4/projects?search=xxxx -k' --no-check-certificate

conclusion
A bad keyboard is worse than a good memory! Hope to speed up the speed of solving the problem!

ArcGIS Earth 1.7 beta installation method-solve the 0X80070057.DirectX device creation failed problem

Recently, ArcGIS Earth 1.7 beta was released. It tried to install the flagship version of Windows 7 on LAN PC. After an afternoon’s attempt, the installation was finally successful.
1. Download ArcGIS Earth 1.7 Beta
Download: Download address
64 – bit
2. After installation, error report: 0X80070057.DirectX device Creation failed
3. It was assumed that the Invidia video card driver was not installed properly, but the video card was GTX 1050 TI
Go to nvidia’s website to download the latest graphics driver: download address
4. After installation, still report an error. DrectX 11 has no problem by running the DirectX diagnostic tool (CMD — DXDIAG).
5. Maybe the LAN computer system is not patched, so download the patch: patch download
After installing Windows 6.1-KB2670838-x64.mSU, the problem is resolved.
 

Bitcoin Bitcoin node installation

A series of articles on how Bitcoin makes money, an online currency invented by computer hackers, has no borders, no government and no center. No government printing money, no inflation. In the global computer network, the free realization of currency exchange and circulation.
This series of articles is about procedures and strategies, not mining…
About the author:
Zhang (zhang Conan), programmers/Quant: Java, R, Nodejsblog: http://blog.fens.meemail: [email protected]
Reprint please indicate the source:

bitcoin比特币节点安装

preface
The first step of quantitative transactions is to obtain data, so the most direct way to obtain bitcoin data is to build a bitcoin client, directly from the bitcoin public chain above the synchronous ledger to obtain data. The foundation of the Bitcoin network is based on centrless nodes and transparency, so that each node can get the full amount of data in the Bitcoin network.
So, let’s start by building a Bitcoin client node.
directory
The

    bitcoin installation process starts the node of bitcoin

Bitcoin installation process
The procedure for installing the Bitcoin client from the source code is divided into the following seven steps:

    1. download the library from github switch to the latest version of the installation system dependent library run autogen.sh script run configure script run make and make install verify that bitcoin has been installed successfully </ol b> Now, let’s do it step by step. The Linux system environment used in this article is Linux Ubuntu 16.04 LTS 64bit.
    1. 1.1 Download the codlibrary from Bitcoin’s official Github.
    1. The process of installing Git is not much more than a simple command apt Install Git.

> git clone https://github.com/bitcoin/bitcoin.git
> cd bitcoin

1.2 Find the latest TAG version as V0.16.0.


> git tag
noversion
v0.1.5
...
v0.16.0
v0.16.0rc1
v0.16.0rc2
v0.16.0rc3
v0.16.0rc4
v0.2.0
...
v0.9.3
v0.9.3rc1
v0.9.3rc2
v0.9.4
v0.9.5
v0.9.5rc1
v0.9.5rc2

Switch to the latest version of the branch.


> git checkout v0.16.0

1.3 Install the system tools that need to be depended on, here will use Libtool, pkg-config, libboost, libDB toolkit, need to install in advance.


> apt install libtool
> apt install pkg-config
> apt install libboost-all-dev
> apt install libdb5.3++-dev 
> apt install libevent-dev

1.4 Compile with the./ Autogen.sh script,


> ./autogen.sh 

1.5 Run the configure script
When you’re done, you find that the current target has generated a configure file, and then run the configure file. At run time, a BerkerlyDB error occurs specifying that a version 4.8 BerkerlyDB is required. There are two solutions. The first solution is to download the corresponding version of BerkerlyDB. Second, skip this step. Let’s start with the second approach and skip the BerkeleyDB compatibility check.


> ./configure
configure: error: Found Berkeley DB other than 4.8, required for portable wallets (--with-incompatible-bdb to ignore or --disable-wallet to disable wallet functionality)

> ./configure --with-incompatible-bdb

1.6 Perform make and make install.


> make 
> make install

1.7 Verify that bitcoin has been installed successfully
Verify that the bitcoin installation is successful. There are two commands bitcoind and BitcoI. We need to check if this boot command is installed in the system environment.
Bitcoind, the node used to start Bitcoin, synchronizes ledger data. Bitcoin-cli, used to communicate with bitcoind nodes.
View the system installation location of the boot command.


> which bitcoin-cli
/usr/local/bin/bitcoin-cli

> which bitcoind
/usr/local/bin/bitcoind

View the help information for bitcoind and Bitcoin-CLi commands, respectively.


> bitcoind -help
> bitcoin-cli -help

That completes the installation of the client of Bitcoin.
2. Start the Bitcoin node
Start bitcoin’s core client program with the bitcoind command. Before running it, I’ll define a bitcoin.conf configuration file to set up the user accessing RPC-JSON.
New configuration file.bitcoin/ Cobit.conf. Set the RPC user’s account and password. Please set it according to the requirements of complex password setting. The configuration item for the official recommended Bitcoin.conf file, open the file.


> vi .bitcoin/bitcoin.conf

rpcuser=bsspirit
rpcpassword=98jfidayelqlvjieJDIjda

Start the BitcoIND server and write the data to /data/ BTC directory to print out the output in the console.


> bitcoind -datadir=/data/btc -conf=/root/.bitcoin/bitcoin.conf -printtoconsole

2018-05-30 01:51:06 Bitcoin Core version v0.16.0 (release build)
2018-05-30 01:51:06 InitParameterInteraction: parameter interaction: -whitelistforcerelay=1 -> setting -whitelistrelay=1
2018-05-30 01:51:06 Assuming ancestors of block 0000000000000000005214481d2d96f898e3d5416e43359c145944a909d242e0 have valid signatures.
2018-05-30 01:51:06 Setting nMinimumChainWork=000000000000000000000000000000000000000000f91c579d57cad4bc5278cc
2018-05-30 01:51:06 Using the 'sse4' SHA256 implementation
2018-05-30 01:51:06 Using RdRand as an additional entropy source
2018-05-30 01:51:06 Default data directory /root/.bitcoin
2018-05-30 01:51:06 Using data directory /data/btc
2018-05-30 01:51:06 Using config file /root/.bitcoin/bitcoin.conf
2018-05-30 01:51:06 Using at most 125 automatic connections (1024 file descriptors available)
2018-05-30 01:51:06 Using 16 MiB out of 32/2 requested for signature cache, able to store 524288 elements
2018-05-30 01:51:06 Using 16 MiB out of 32/2 requested for script execution cache, able to store 524288 elements
2018-05-30 01:51:06 Using 4 threads for script verification
2018-05-30 01:51:06 scheduler thread start
2018-05-30 01:51:06 HTTP: creating work queue of depth 16
2018-05-30 01:51:06 Config options rpcuser and rpcpassword will soon be deprecated. Locally-run instances may remove rpcuser to use cookie-based auth, or may be replaced with rpcauth. Please see share/rpcuser for rpcauth auth generation.
2018-05-30 01:51:06 HTTP: starting 4 worker threads
2018-05-30 01:51:06 Using wallet directory /data/btc
2018-05-30 01:51:06 init message: Verifying wallet(s)...
2018-05-30 01:51:06 Using BerkeleyDB version Berkeley DB 5.3.28: (September  9, 2013)
2018-05-30 01:51:06 Using wallet wallet.dat
2018-05-30 01:51:06 CDBEnv::Open: LogDir=/data/btc/database ErrorFile=/data/btc/db.log
2018-05-30 01:51:06 Cache configuration:
2018-05-30 01:51:06 * Using 2.0MiB for block index database
2018-05-30 01:51:06 * Using 8.0MiB for chain state database
2018-05-30 01:51:06 * Using 440.0MiB for in-memory UTXO set (plus up to 286.1MiB of unused mempool space)
2018-05-30 01:51:06 init message: Loading block index...
2018-05-30 01:51:06 Opening LevelDB in /data/btc/blocks/index
2018-05-30 01:51:07 Opened LevelDB successfully
2018-05-30 01:51:07 Using obfuscation key for /data/btc/blocks/index: 0000000000000000
2018-05-30 01:51:08 LoadBlockIndexDB: last block file = 0
2018-05-30 01:51:08 LoadBlockIndexDB: last block file info: CBlockFileInfo(blocks=1, size=293, heights=0...0, time=2009-01-03...2009-01-03)
2018-05-30 01:51:08 Checking all blk files are present...
2018-05-30 01:51:08 LoadBlockIndexDB: transaction index disabled
2018-05-30 01:51:08 Opening LevelDB in /data/btc/chainstate
2018-05-30 01:51:08 Opened LevelDB successfully
2018-05-30 01:51:08 Using obfuscation key for /data/btc/chainstate: 6adad0af82f188f1
2018-05-30 01:51:08 Loaded best chain: hashBestChain=000000000019d6689c085ae165831e934ff763ae46a2a6c172b3f1b60a8ce26f height=0 date=2009-01-03 18:15:05 progress=0.000000
2018-05-30 01:51:08 init message: Rewinding blocks...
2018-05-30 01:51:09 init message: Verifying blocks...
2018-05-30 01:51:09  block index            2369ms
2018-05-30 01:51:09 init message: Loading wallet...
2018-05-30 01:51:09 nFileVersion = 160000
2018-05-30 01:51:09 Keys: 2001 plaintext, 0 encrypted, 2001 w/ metadata, 2001 total
2018-05-30 01:51:09  wallet                   67ms
2018-05-30 01:51:09 setKeyPool.size() = 2000
2018-05-30 01:51:09 mapWallet.size() = 0
2018-05-30 01:51:09 mapAddressBook.size() = 0
2018-05-30 01:51:09 mapBlockIndex.size() = 279999
2018-05-30 01:51:09 nBestHeight = 0
2018-05-30 01:51:09 Imported mempool transactions from disk: 0 succeeded, 0 failed, 0 expired, 0 already there
2018-05-30 01:51:09 AddLocal(103.211.167.71:8333,1)
2018-05-30 01:51:09 Discover: IPv4 eth0: 103.211.167.71
2018-05-30 01:51:09 Bound to [::]:8333
2018-05-30 01:51:09 Bound to 0.0.0.0:8333
2018-05-30 01:51:09 init message: Loading P2P addresses...
2018-05-30 01:51:09 torcontrol thread start
2018-05-30 01:51:09 Loaded 2445 addresses from peers.dat  9ms
2018-05-30 01:51:09 init message: Loading banlist...
2018-05-30 01:51:09 init message: Starting network threads...
2018-05-30 01:51:09 dnsseed thread start
2018-05-30 01:51:09 net thread start
2018-05-30 01:51:09 addcon thread start
2018-05-30 01:51:09 init message: Done loading
2018-05-30 01:51:09 opencon thread start
2018-05-30 01:51:09 msghand thread start
2018-05-30 01:51:09 New outbound peer connected: version: 70015, blocks=525031, peer=0
2018-05-30 01:51:11 New outbound peer connected: version: 70015, blocks=525031, peer=1

....

Startup parameters:
-Datadir, which specifies the directory -conf, and -printtoconsole, which specifies the configuration file for console output
If you want to do background execution, you can add the -daemon parameter. At the same time, remove the -printtoConsole parameter and print it out in a later log file.


> bitcoind -datadir=/data/btc -conf=/root/.bitcoin/bitcoin.conf -daemon
Bitcoin server starting

# View the log, in the directory where the data is exported, to track the debug.log file.
> tail -f /data/btc/debug.log 
11-04-11 22:01:50' progress=0.001211 cache=23.8MiB(165438txo)
2018-05-30 04:21:12 UpdateTip: new best=00000000000044640cb1d3e034f8df6604d1ac1346e6162bfca8dc60c4bbd887 height=117873 version=0x00000001 log2_work=61.645341 tx=403428 date='2011-04-11 22:02:29' progress=0.001212 cache=23.8MiB(165441txo)
2018-05-30 04:21:12 UpdateTip: new best=0000000000006488914c16dc226f1d73d5dcd6c258c3bc926fa0f804909dbd1b height=117874 version=0x00000001 log2_work=61.645483 tx=403445 date='2011-04-11 22:19:06' progress=0.001212 cache=23.8MiB(165459txo)
2018-05-30 04:21:12 UpdateTip: new best=000000000000988f65c0d5b018241f0dd13ea6b73c6228efccbbb577b5791f06 height=117875 version=0x00000001 log2_work=61.645624 tx=403453 date='2011-04-11 22:21:40' progress=0.001212 cache=23.8MiB(165460txo)

...

Run the bitcoin-CLi GetBlockChainInfo command to display basic information about the status of bitcoin network nodes, wallets, and blockchain databases.


> bitcoin-cli getblockchaininfo
{
  "chain": "main",
  "blocks": 2867,
  "headers": 525050,
  "bestblockhash": "000000006d6af482c12555a44bed3a0d4bbadf0fa27274225a1ed808b8a7d405",
  "difficulty": 1,
  "mediantime": 1233666084,
  "verificationprogress": 8.75401245716694e-06,
  "initialblockdownload": true,
  "chainwork": "00000000000000000000000000000000000000000000000000000b340b340b34",
  "size_on_disk": 852350,
  "pruned": false,
  "softforks": [
    {
      "id": "bip34",
      "version": 2,
      "reject": {
        "status": false
      }
    },
    {
      "id": "bip66",
      "version": 3,
      "reject": {
        "status": false
      }
    },
    {
      "id": "bip65",
      "version": 4,
      "reject": {
        "status": false
      }
    }
  ],
  "bip9_softforks": {
    "csv": {
      "status": "defined",
      "startTime": 1462060800,
      "timeout": 1493596800,
      "since": 0
    },
    "segwit": {
      "status": "defined",
      "startTime": 1479168000,
      "timeout": 1510704000,
      "since": 0
    }
  },
  "warnings": ""
}

When you see this information, it means that your Bitcoin application has started. There are dozens of gigabytes of data, need to be synchronized!
Bitcoin is a bit more complicated to install than APT, but according to the official documentation it should work properly and the installation process should not be a major problem for technicians. Different common chains, different node software, different installation methods, the next article will cover the ethereum client Geth installation.
Reprint please indicate the source:

bitcoin比特币节点安装


This entry was posted in digital currency

(springmvc) Failed to load resource: the server responded with a status of 404 (Not Found)

Today, I plan to upload the plug-in function I wrote to Github, create a new Java project, which USES the Spring MVC framework, and then debug the page when I found that I could not find the static resource file, as shown in the figure below:

So I checked the path of the page resource on the JSP at the first time:

<link rel="stylesheet" type="text/css" href="css/amazeui.min.css">
	<link rel="stylesheet" type="text/css" href="css/amazeui.cropper.css">
	<link rel="stylesheet" type="text/css" href="css/custom_up_img.css">

After confirmation, the path was found to be correct:

Friends can refer to my file path, if the path is wrong, then you can change the path to solve the problem.
Then I go on to my question, which is obviously not a path problem, so what is the reason why the page cannot find the static file?I finally saw the console output the following message:

Interpretation, i.e., when the request distribution, did not find “/ ScreenshotForUpload/CSS/amazeui. Min. CSS” mapping (No mapping found for…) “And I found out what the problem was. It turns out that spring MVC is blocking the request of a page to a static resource, but your controller does not have the mapping of this path, so the page request to a static resource file is not issued correctly. So how do you solve this problem?The following methods are given for reference:
Solutions:
1. Adopt & lt; mvc:default-servlet-handler /> . Add the following sentence to the SPRING MVC XML configuration file: < mvc:default-servlet-handler /> . As shown in the figure below:

After joining, Spring MVC will screen the URL entering the DispatcherServlet, and if a request for static resources is found, the request will be processed by the default Servlet of the Web application server, and if it is not a static resource, then the DispatcherServlet will continue to process. This method is the fastest.
2. Use & lt; mvc:resources /> . You can use < mvc:resources /> , and put the static resources in the Web-inF directory (or wherever you like), then add the following configuration in springMVC-Servlet:

<mvc:resources location="/File floder" mapping="/mapping path"/>

Fill in the path according to the actual situation.
3. In the web.xml file, change the blocking path of Spring MVC to/SpringMVC /* (” SpringMVC “can be replaced with your preferred path), as shown in the figure below
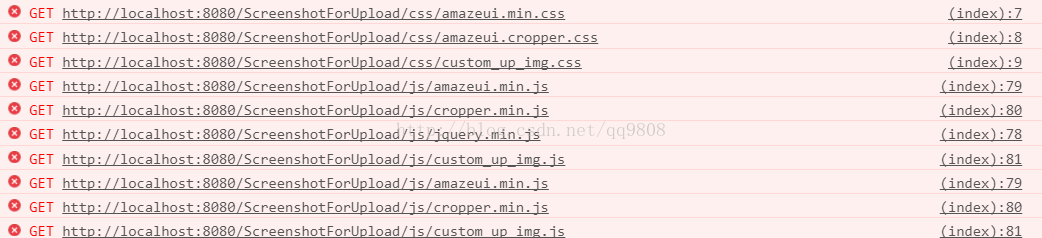
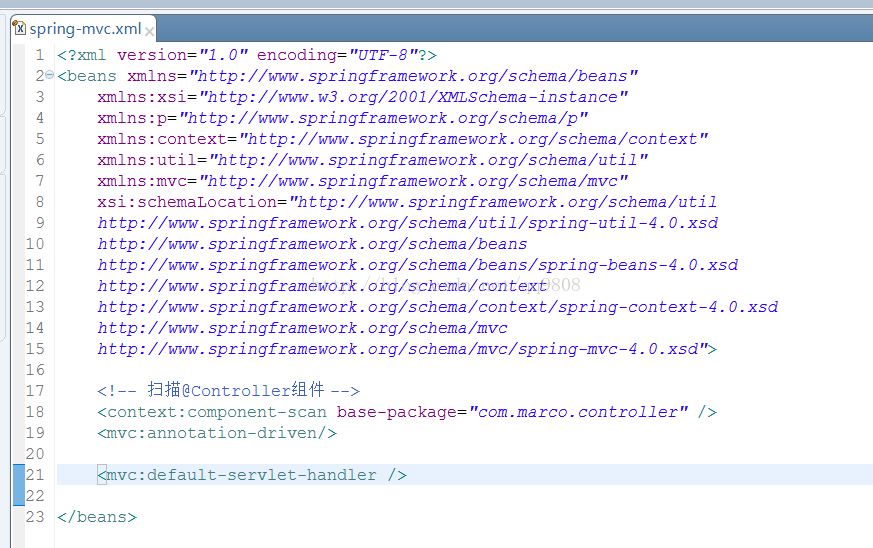
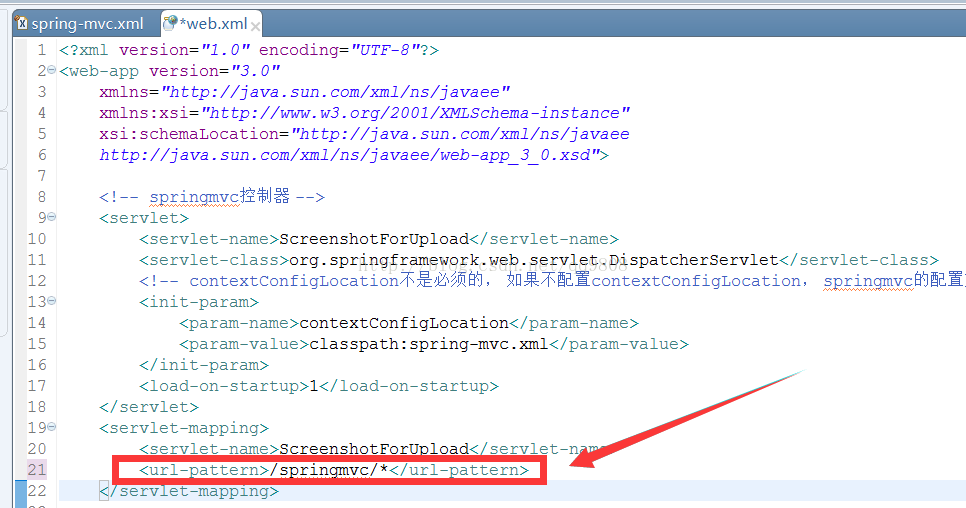
thus distinguishes “requests to Spring MVC” from “requests to static resource files”, but has the disadvantage that all your MVC requests must start with “/ SpringMVC “.
The problem that the static resource file cannot be found caused by Spring MVC can be said to be relatively secret. Novices may be unable to find the root of the problem for a while. I hope this article can provide you with help!

Git Pull Failed solution

Git Pull Failed solution
https://blog.csdn.net/zxl1033394132/article/details/50853013?utm_source=blogxgwz0
https://www.cnblogs.com/daiyanren/p/9615698.html
The git server has changed
. Fix: when the modified code is ready to submit the code, the code changed by others in the group needs to be merged in first

git stash;
git pull;
git stash pop;

Conflicts are displayed, and if there are conflicts, manually modify them, and then commit the code


The idea of operating
git stash


git pull

git stash pop;


Merge conflicts

Finally
git commit/push

Raspberry Pi 3 installation and software configuration issues collection

After hosting ali, toutiao, and Meituan interviews this year, I’ve made an important discovery… > > >

Permanent update address:
https://my.oschina.net/bysu/blog/1583968
System related information

bysu@bysu:~ $ inxi
CPU~Quad core ARMv7 rev 4 (v7l) (-MCP-) speed~1200 MHz Kernel~4.9.41-v7+ armv7l Up~14:21 Mem~102.5/927.3MB HDD~NA(-) Procs~291 Client~Shell inxi~2.3.5  
bysu@bysu:~ $ uname -a
Linux bysu 4.9.41-v7+ #1023 SMP Tue Aug 8 16:00:15 BST 2017 armv7l GNU/Linux

System article
 

Software installation configuration section

Samba related
Error executing restart service command.

bysu@bysu:~ $ sudo systemctl start samba
Failed to restart samba.service: Unit samba.service is masked.

For the solution, see here

bysu@bysu:~ $ sudo rm /lib/systemd/system/samba.service
bysu@bysu:~ $ sudo systemctl enable samba
samba.service is not a native service, redirecting to systemd-sysv-install.
Executing: /lib/systemd/systemd-sysv-install enable samba
update-rc.d: error: samba Default-Start contains no runlevels, aborting.
bysu@bysu:~ $ sudo systemctl start samba
bysu@bysu:~ $ sudo systemctl status  samba
● samba.service - LSB: ensure Samba daemons are started (nmbd, smbd and samba)
   Loaded: loaded (/etc/init.d/samba; generated; vendor preset: enabled)
   Active: active (exited) since Sat 2017-12-02 15:28:45 UTC; 9s ago
     Docs: man:systemd-sysv-generator(8)
  Process: 2525 ExecStart=/etc/init.d/samba start (code=exited, status=0/SUCCESS)

Dec 02 15:28:45 bysu systemd[1]: Starting LSB: ensure Samba daemons are started (nmbd, smbd and samba)...
Dec 02 15:28:45 bysu samba[2525]: Starting nmbd (via systemctl): nmbd.service.
Dec 02 15:28:45 bysu samba[2525]: Starting smbd (via systemctl): smbd.service.
Dec 02 15:28:45 bysu systemd[1]: Started LSB: ensure Samba daemons are started (nmbd, smbd and samba).


SSH write failed broken pipe

When SSH to a machine, it sometimes pops up:
Write failed: Broken pipe

It’s usually because the SSHD on the server sees that a connection has been closed at some point without a message, and then the client side breaks.

There are three solutions:
Add the following configuration in /etc/ssh/sshd_config of the server: ClientAliveInterval 60

2 if it is difficult to change the server, you can change the client setting: add config file in ~/.ssh/ folder, and add the following configuration: ServerAliveInterval 10, tell the SSH client to send a “keep-alive” packet to the other side every 10 seconds.
3 If you only want to use it temporarily for one operation, you can add an argument to the login command: sSH-O ServerAliveInterval=10 [email protected].

Original: http://blog.csdn.net/hongchangfirst/article/details/51308366
Author: hongchangfirst
Hongchangfirst homepage: http://blog.csdn.net/hongchangfirst