Be prepared to blog about a series of papers for your own convenience.
This is the first one
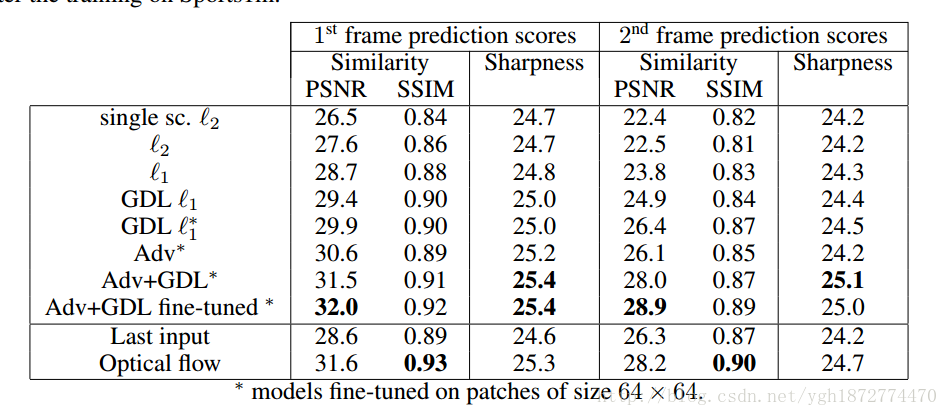
DEEP MULTI-SCALE VIDEO PREDICTION BEYOND MEAN SQUARE ERROR
In this paper, I mainly focus on the prediction generated by gan network
First of all, our input includes real pre-frame X, real pre-predicted frame Y, generator G, discriminator D
. When training the discriminator, we package the real X and Y as (X,Y)
. When training the generator, we package X and gaussian distribution Y ‘to get (X,G(X)) and use it as the training of
discriminator in the input
input discriminator
For real images, we define D(X,Y)=1 and
 . For real images, we define D(X,G(X))=0

Lbce stands for cross entropy
Generator training
for generating images, let D(X,G(X))=1
Then the stochastic gradient descent method was used for training
Training network
generator, mapped to (m+n)*h*w-> (m+n)*h*w
discriminator, mapping to (m+n)*h*w-> [0, 1]
Experimental results:
data set: UCF101
1 frame and 2 frame prediction
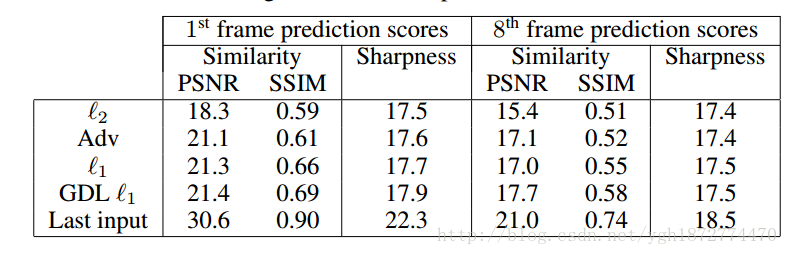
1 frame and 8 frame prediction
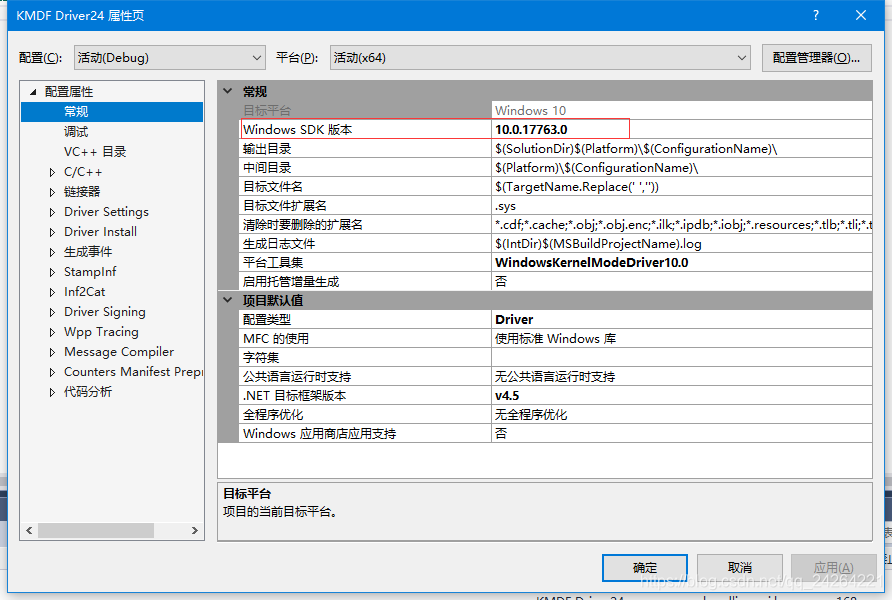
Win10 vs 2017 prompt cannot open include file: “windows. H”: no such file or director

As shown in the red box. Then right click on the project properties and configure properties -& GT; Routine. The Windows SDK version selects the version you just installed
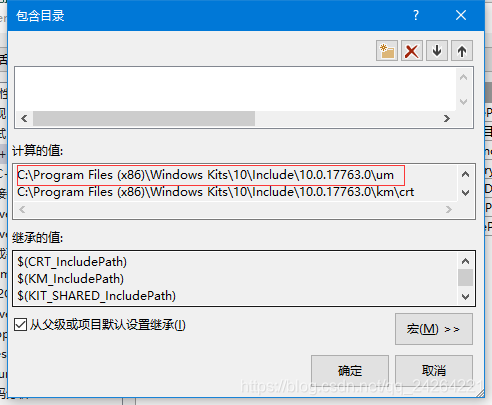
Test to see if it can be included, if not. VC++ directory on the above property page -> Open in the include directory, see if the UM folder is in it, and if not, add it to the include directory. Windows.h Files are in this directory C:\Program Files (x86)\Windows Kits\10\Include\10.0.17763.0\um\windows.h
How to Install Python 3 in Centos7 Quickly
Download and install python3
sudo yum -y install python3
Using PIP Download
sudo python3 -m pip install numpy
Check the PIP list
sudo python3 -m pip list
Write the execute PY file
vim hello.py
sudo chmod 755 hello.py #Set permissions
./hello.py #Executing the py file
Difference between isempty method and isblank method in stringutils
preface
When we say a string is empty, it’s just an empty array with no characters. Such as:
String a = "";A can be called an empty string. Since String is stored as a char array underneath Java, the null String is represented as a char array
private final char value[] = new char[0];But in actual work, we need to do some validation on the string, such as: whether null, whether null, whether to remove Spaces, line breaks, TAB characters and so on is not empty. We usually make these judgments through the framework’s utility classes, such as the Apache Commons JAR package. Here are two common string validation methods and their differences.
PS: in the process of writing project, recently found that a lot of places to be sentenced to empty operation, then can sometimes be invocation chain is longer, if use the if the else come to empty, empty code will be more light, this is not good for later maintenance, and we found empty may not consider a scene, this will result in a null pointer. I now strongly recommend using the third party JAR’s utility classes to do this. For example, take the value of a key from a Map, you can use MapUtils class; Use the StringUtils class for nulling strings; Nulling a collection using CollectionUtils and so on. These classes are available through the introduction of apache’s Commons package family.
isEmpty()
public static boolean isEmpty(String str) {
    return str == null || str.length() == 0;
}
isBlank()
public static boolean isBlank(String str) {
        int strLen;
        if (str != null && (strLen = str.length()) != 0) {
            for(int i = 0; i < strLen; ++i) {
                if (!Character.isWhitespace(str.charAt(i))) {
                    return false;
                }
            }
            return true;
        } else {
            return true;
        }
    }
conclusion
Through the comparison of the above codes, we can see:
1. IsEmpty does not ignore the space parameter, based on whether it isEmpty and whether it exists.
2. IsBlank is a judgment on isEmpty (strings are Spaces, tabs, TAB) based on isEmpty. (more commonly used)
you can look at the following example to feel.
StringUtils.isEmpty("yyy") = false
StringUtils.isEmpty("") = true
StringUtils.isEmpty("   ") = false

StringUtils.isBlank("yyy") = false
StringUtils.isBlank("") = true
StringUtils.isBlank(" ") = trueApawn class, add axis mapping to control apawn movement
APawn class, add axis mapping to enable control of APawn movement
MyPawn.h
// Fill out your copyright notice in the Description page of Project Settings.

#pragma once

#include "CoreMinimal.h"
#include "GameFramework/Pawn.h"
#include "Components/StaticMeshComponent.h"
#include "Camera/CameraComponent.h"
#include "MyPawn.generated.h"

UCLASS()
class FIRSTDEMO_API AMyPawn : public APawn
{
	GENERATED_BODY()

public:
	// Sets default values for this pawn's properties
	AMyPawn();

protected:
	// Called when the game starts or when spawned
	virtual void BeginPlay() override;

public:
	// Called every frame
	virtual void Tick(float DeltaTime) override;

	// Called to bind functionality to input
	virtual void SetupPlayerInputComponent(class UInputComponent* PlayerInputComponent) override;

	UPROPERTY(VisibleAnywhere)
	UStaticMeshComponent* MyStaticMesh;

	UPROPERTY(VisibleAnywhere)
	UCameraComponent* MyCamera;

	UPROPERTY(EditAnywhere)
	float MaxSpeed;//add pawn movement speed parameter.

private:
	// add axis mapping function, MoveForward, MoveRight, Velocity
	//Set to private variables, handled in the Pawn class itself, no need to expose them to outsiders.
	void MoveForward(float Value);
	void MoveRight(float Value);
	FVector Velocity;

};
MyPawn.cpp
// Fill out your copyright notice in the Description page of Project Settings.


#include "MyPawn.h"
#include "Components/InputComponent.h"

// Sets default values
AMyPawn::AMyPawn()
{
 	// Set this pawn to call Tick() every frame.  You can turn this off to improve performance if you don't need it.
	PrimaryActorTick.bCanEverTick = true;

	RootComponent=CreateDefaultSubobject<USceneComponent>(TEXT("RootComponent"));

	MyStaticMesh = CreateDefaultSubobject<UStaticMeshComponent>(TEXT("MyStaticMesh"));
	MyStaticMesh->SetupAttachment(GetRootComponent());

	MyCamera = CreateDefaultSubobject<UCameraComponent>(TEXT("MyCamera"));
	MyCamera->SetupAttachment(GetRootComponent());

	MyCamera->SetRelativeLocation(FVector(-300.f, 0.f, 300.f));
	MyCamera->SetRelativeRotation(FRotator(-45.f, 0.f, 0.f));

	AutoPossessPlayer = EAutoReceiveInput::Player0;

	MaxSpeed = 100.f;
	Velocity = FVector::ZeroVector;

}

// Called when the game starts or when spawned
void AMyPawn::BeginPlay()
{
	Super::BeginPlay();

}

// Called every frame
void AMyPawn::Tick(float DeltaTime)
{
	Super::Tick(DeltaTime);
	//Add offset function to tick.
	AddActorLocalOffset(Velocity * DeltaTime, true);

}

// Called to bind functionality to input
void AMyPawn::SetupPlayerInputComponent(UInputComponent* PlayerInputComponent)
{
	Super::SetupPlayerInputComponent(PlayerInputComponent);

	// Bind player input to axis mapping, axis mapping and function name should correspond to each other
	PlayerInputComponent->BindAxis(TEXT("MoveForward"), this, &AMyPawn::MoveForward);
	PlayerInputComponent->BindAxis(TEXT("MoveRight"), this, &AMyPawn::MoveRight);

}

void AMyPawn::MoveForward(float Value)
{
	//Forward speed, use Clamp to limit value to -1,1, place too large a value in the Ue4 editor, resulting in a bug.
	Velocity.X = FMath::Clamp(Value, -1.f, 1.f) * MaxSpeed;
}

void AMyPawn::MoveRight(float Value)
{
	// Speed to the right, use Clamp to limit value to -1,1, place too large a value in the Ue4 editor, resulting in a bug.
	Velocity.Y = FMath::Clamp(Value, -1.f, 1.f) * MaxSpeed;
}
How to keep textview and ImageView on the same line
Effect: text on the left, icon on the right
When text is short, an icon relies only on text
When the text is long, the text wraps and the icon is on the right
  <TextView
        android:id="@+id/chargingTitle"
        android:layout_width="wrap_content"
        android:layout_height="wrap_content"
        android:layout_marginStart="24dp"
        android:layout_marginTop="10dp"
        app:layout_constrainedWidth="true"
        app:layout_constraintHorizontal_bias="0"
        app:layout_constraintHorizontal_chainStyle="packed"
        app:layout_constraintEnd_toStartOf="@+id/chargingPrepareIcon"
        app:layout_constraintStart_toStartOf="parent"
        app:layout_constraintTop_toBottomOf="@+id/toolbar_layout"
        />

    <ImageView
        android:id="@+id/chargingPrepareIcon"
        android:layout_width="wrap_content"
        android:layout_height="wrap_content"
        android:src="@drawable/base_icon_warning"
        android:layout_marginStart="8dp"
        android:layout_marginEnd="24dp"
        app:layout_constraintEnd_toEndOf="parent"
        app:layout_constraintStart_toEndOf="@+id/chargingTitle"
        app:layout_constraintTop_toTopOf="@+id/chargingTitle"
        app:layout_constraintBottom_toBottomOf="@+id/chargingTitle"
        />
If the text is too long in the ConstraintLayout, the TextView will exceed the constraint.
Easyconnect MAC ultimate solution
Here’s my solution:
1. Use the uninstall tool to check which files are there. I used Lemon, please have a look at my screenshot

2. If you look at the daemons for EasyConnect, you can see that there are two daemons here
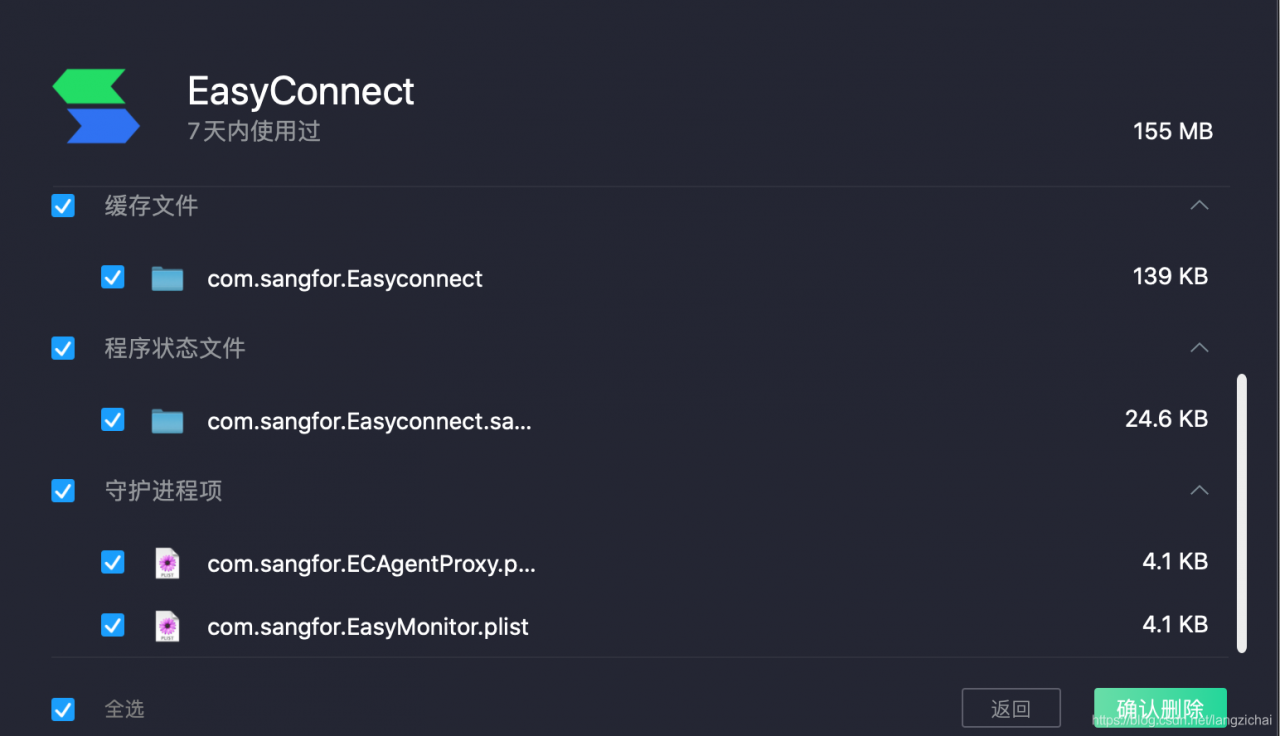
3. The most important step is to add these two daemons to your boot.
Well, why don’t you come and try it
Tomcat web compression configuration
Modify %TOMCAT_HOME%/conf/server.xml, the first Connector node of the file. The specific node to be modified is as follows:
< The Connector port = “80” protocol = “HTTP/1.1”
ConnectionTimeout = “20000”
The redirectPort = “8443”/& gt;
The modified code is as follows:
< The Connector port = “80” protocol = “HTTP/1.1”
ConnectionTimeout = “20000”
The redirectPort = “8443” URIEncoding = “utf-8”
Compression will = “on” compressionMinSize = “2048”
NoCompressionUserAgents = “gozilla, traviata”
CompressableMimeType = “text/HTML, text/XML, text/javascript,
Text/CSS, text/plain “/ & gt;
The following attributes have been added
1. Compression = “on”
2. CompressionMinSize = “2048” with compressed output content size enabled, which is 2KB by default
3. NoCompressionUserAgents = “gozilla, traviata” browsers to be excluded;
4, compressableMimeType = “text/HTML, text/XML, text/javascript, text/CSS, text/plain” compression type
After the modification, restart Tomcat, and finally check the website.
Vsftpd: 500 oops: vsftpd: refusing to run with writable root inside chroot() error
500 OOPS: vsftpd: refusing to run with writable root inside chroot ()
This problem occurs in the latest update due to the following update:
- Add stronger checks for the configuration error of running with a writeable root directory inside a chroot(). This may bite people who carelessly turned on chroot_local_user but such is life.
Since 2.3.5, VSFTPD has enhanced security checks so that if a user is restricted to his or her home directory, the user’s home directory can no longer have write permissions! If the check finds that write permissions are still available, the error is reported.
To fix this error, remove write permissions from the user’s home directory with the command chmod A-w /home/user, and replace the directory with your own. Or you can add one of the following two items to the VSFTPD profile:
allow_writeable_chroot=YES
##Configure VLAN partition based on IP subnet
By configuring the VLAN based on IP subnet, the packet sent by the specified network segment or IP address is transmitted in the specified VLAN, which reduces the initial configuration task of the network administrator and facilitates the management. 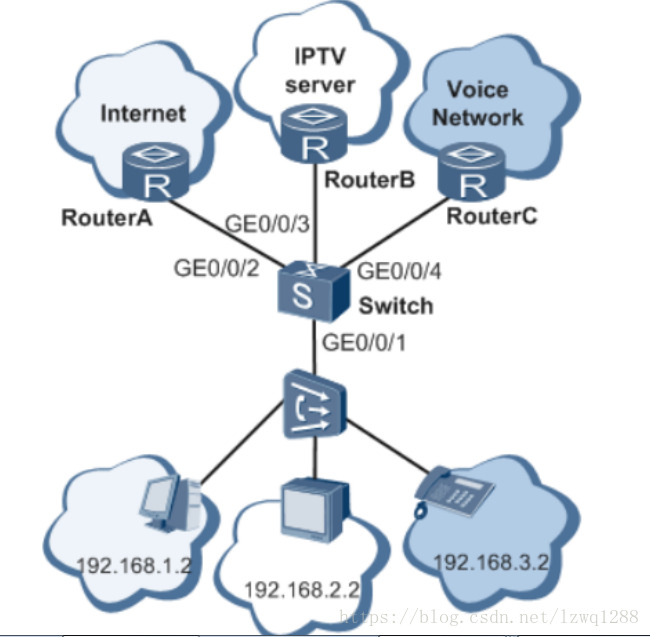 has a variety of businesses, such as IPTV, VoIP, Internet, etc. Each business USES different IP addresses. In order to facilitate management, it is necessary to divide the same type of business into the same VLAN and different types of business into different VLans.
Switch receives user messages including data, IPTV, voice and other services. The IP address
address of user devices is different. Now it is necessary to divide different types of business into different vlans and shunt them to different remote servers
through different VLAN ids to achieve business interoperability.
configuration idea
USES the following idea to configure the VLAN based on IP subnet partition:
creates a VLAN to determine the VLAN to which each service belongs.
associates IP subnets and vlans. The
switch determines the VLAN based on the source IP address or the specified network segment in the message. New sites do not need much
configuration when they are connected to the network, and switches automatically partition each site into a different VLAN based on its network address.
allows IP subnetwork-based vlans to pass through the current port.
configure the priority of VLAN partitioning to ensure that the priority is selected to divide the VLAN based on the IP subnet.
enables VLAN partitioning based on IP subnet.
data preparation
to complete this configuration example, prepare the following data.
configuration interface ge0/0/1 is untagged with VLAN100, VLAN200 and VLAN300.
configuration interface ge0/0/2, ge0/0/3 and ge0/0/4 are tagged with VLAN100, VLAN200
and VLAN300, respectively. Create VLAN
create VLAN100, VLAN200, and VLAN300 on the Switch.
system-view
[Quidway] vlan batch 100 200 300
configuration interface
configure interface ge0/0/1 on Switch as Hybrid type, and add VLAN100, VLAN200 and
VLAN300.
[Quidway] interface gigabitethernet 0/0/1
[Quidway-GigabitEthernet0/0/1] port link-type hybrid
[Quidway-GigabitEthernet0/0/1] port hybrid untagged vlan 100 200 300
[quidway-gigabitethernet0/0/1] quit
configure the interface ge0/0/2 on the Switch to join VLAN100.
[Quidway] interface gigabitethernet 0/0/2
[Quidway-GigabitEthernet0/0/2] port link-type trunk
[Quidway-GigabitEthernet0/0/2] port trunk allow-pass vlan 100
[quidway-gigabitethernet0/0/2] quit
configure the interface ge0/0/3 on the Switch to join VLAN200.
[Quidway] interface gigabitethernet 0/0/3
[Quidway-GigabitEthernet0/0/3] port link-type trunk
[Quidway-GigabitEthernet0/0/3] port trunk allow-pass vlan 200
Quidway-gigabitethernet0/0/3] quit
configure the interface ge0/0/4 on the Switch to join VLAN300.
[Quidway] interface gigabitethernet 0/0/4
[Quidway-GigabitEthernet0/0/4] port link-type trunk
[Quidway-GigabitEthernet0/0/4] port trunk allow-pass vlan 300
Quidway-gigabitethernet0/0/4] quit
configure the interface ge0/0/1 on the Switch so that VLAN function can be divided based on IP subnet.
[Quidway] interface gigabitethernet 0/0/1
[quidway-gigabitethernet0/0/1] enable
[quidway-gigabitethernet0/0/1] quit
configuration based on IP subnet partition vlan
to configure VLAN100 and IP address on the Switch 192.168.1.2 Association, priority 2.
[Quidway] vlan100
[quidway-vlan100] ip-subnet-vlan 1 IP 192.168.1.2 24 priority 2
[quidway-vlan100] quit
configure VLAN200 to be associated with IP address 192.168.2.2 on the Switch with priority 3.
[Quidway] vlan200
[quidway-vlan200] ip-subnet-vlan 1 IP 192.168.2.2 24 priority 3
[quidway-vlan200] quit
configure VLAN300 to associate with IP address 192.168.3.2 on the Switch with priority 4.
[Quidway] vlan300
[Quidway] vlan 1 IP 192.168.3.2 24 priority 4
[quidway-vlan300] quit
verify configuration result
execute the following command on the Switch
[Quidway] display ip-subnet-vlan vlan all
CDH HDFS webui browser authentication (after Kerberos authentication is enabled)

1. Open firefox and enter: about:config in the address bar to enter the Settings page (not available in other browsers)
2. Search for “net.negotiate -auth. Trusted -uris” to change the value to your server host name. 3. Search for “net.auth.use-sspi” and double click to change the value to false.
4. Install KFW (no private kfw-4.1-amdc64.msi)
5. Copy the contents of a clustered /etc/krb5.conf file to C:\ProgramData\MIT\ os5\krb.ini and delete the path-related configuration.
[logging]

 [libdefaults]
  default_realm = HADOOP.COM
  dns_lookup_realm = false
  dns_lookup_kdc = false
  ticket_lifetime = 24h
  renew_lifetime = 7d
  forwardable = true
  udp_preference_limit = 1

[realms]
 HADOOP.COM = {
  kdc = plum01
  admin_server = plum01
 }

[domain_realm]
Uncaught Error: _registerComponent(…): Target container is not a DOM element
Uncaught error:_registerComponent(…): target container is not DOM element
<script type="text/babel">
    var SessionPage = React.createClass({

        getInitialState: function () {
            var context = {
                context: {}
            };
            return context;
        },

        componentDidMount: function () {
            this.serverRequest = $.ajax({
                url: this.props.url,
                data: {},
                type: 'GET',
                dataType: 'json',
                success: function (data) {
                    this.setState({
                        context: data
                    })
                }.bind(this), // If you don't bind it, the this inside the method is $.ajax({this object}), and the bind incoming this should be the component. You can console the output and see.
                error: function (msg) {
                    console.log("error:" + msg);
                }.bind(this)
            })
        },

        componentWillUnmount: function () {
            this.serverRequest.abort()
        },


        render: function () {
            var creatItem = function (it) {
                return (<code>JSON.stringify(it)</code>)
            };

            return (
                    <div>{creatItem(this.state.context)}</div>
            );
        }
    });

    ReactDOM.render(<SessionPage url="/api/session"/>);
</script>
It’s just a problem of not finding DOM nodes.
To:
ReactDOM.render(< SessionPage url=”/api/session”/> , document.getElementById(“App”));