1. Make sure all of the following are correct when installing.
    /** The name of the database for WordPress */
    define( 'DB_NAME', 'database_name_here' );

    /** MySQL database username */
    define( 'DB_USER', 'username_here' );

    /** MySQL database password */
    define( 'DB_PASSWORD', 'password_here' );

    /** MySQL hostname */
    define( 'DB_HOST', 'localhost' );

    /** Database Charset to use in creating database tables. */
    define( 'DB_CHARSET', 'utf8' );

    /** The Database Collate type. Don't change this if in doubt. */
    define( 'DB_COLLATE', '' );
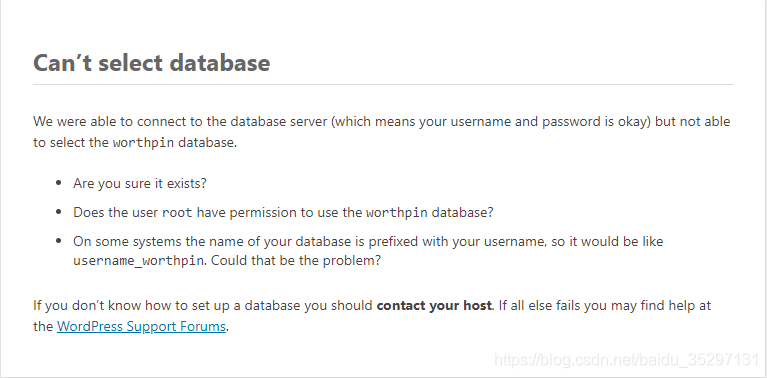
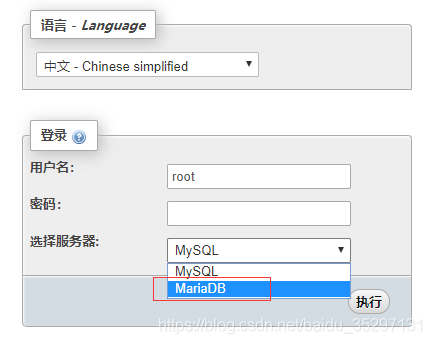
, then maybe you my hand is out of control switched the database to Mariadb, because wamp USES Mysql by default. Even though you have set up a corresponding database in Mariadb and have authorized it, it still doesn’t work.
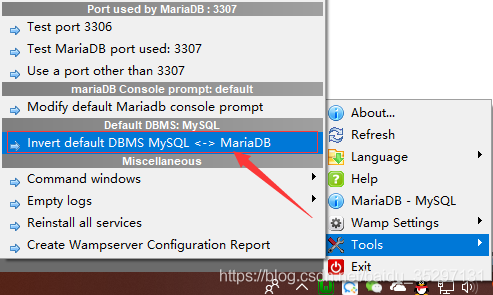
switch back, right click, as shown in the picture below:
failed: Error during WebSocket handshake: Unexpected response code: 200
Thoroughly solve check_ NRPE: Error – Could not complete SSL handshake.
Steps to solve the problem:
1. Ensure that opensSH, OpensSL, opensSL-Devel versions are consistent.
On centOS, you can run:
yum install openssl openssl-devel2. The allowed address of nagios monitoring terminal and the nrPE target terminal are configured correctly. For example, the configuration on the destination side
(command: vim/usr/local/nagios/etc/nrpe CFG) :
allowed_hosts=127.0.0.1,192.168.177.174MySQL operation and maintenance slave_ skip_ errors
mysql during master-slave replication, due to various reasons, the slave server may encounter SQL errors in BINLOG execution. By default, the server will stop the replication process, no longer synchronize, and wait until the user handles it by himself.
slave-skip-errors is used to define the error number that can be automatically skipped from the server during the replication process. When the error number defined during the replication process is encountered, it can be automatically skipped and directly execute the following SQL statement.
2 Official Reference
| Command-Line Format | –slave-skip-errors=name |
| System Variable Name | slave_skip_errors |
| Variable Scope | Global |
| Dynamic Variable | No |
| Permitted Values | |
| Type | string |
| Default | OFF |
| Valid Values | OFF |
| [list of error codes] | |
| all | |
| ddl_exist_errors |
The slave_skip_errors option has four values available, which are:
Off, all, ErorCode, DDL_exist_errors.
by default, this parameter value is off, we can list the specific error code, you can also choose all, mysql5.6 and MySQL Cluster NDB ddl_exist_errors version 7.3 and subsequent increase the parameter, the parameter contains a series of error code (1007100 8105 0105 1105 4106 0106 1106 8109 4114 6)
some error codes represent the following errors:
Database exists, database creation failed
Database does not exist, database deletion failed
Data table exists. Failed to create data table
Data table does not exist. Deleting data table failed
1054: The field does not exist, or the program file conflicts with the database
1060: Field duplicates and cannot be inserted
1061: Duplicate key name
1068: Multiple primary keys are defined
1094: Location thread ID
1146: Data table missing, please restore database
1053: The primary server went down during replication
1062: Primary key conflict Duplicate entry ‘%s’ for key %d
My. Written in CNF:
slave_skip_errors=1062,1053
slave_skip_errors=all
slave_skip_errors=ddl_exist_errors
As a mysql startup parameter:
--slave-skip-errors=1062,1053
--slave-skip-errors=all
--slave-skip-errors=ddl_exist_errors
View the value of this parameter from the database:
mysql> show variables like 'slave_skip%';
+-------------------+-------+
| Variable_name     | Value |
+-------------------+-------+
| slave_skip_errors | 1007  |
+-------------------+-------+
3. Analysis of Examples
3.1 test instructions
configure mysql master-slave synchronization, and then write data on the slave, causing master-slave inconsistency.
3.2 prepare test table structure
create table on host:
create table replication (c1 int not null primary key, c2 varchar(10));3.3 Preparation of test data
inserts the underlying data on the host
mysql> insert into replication values (1, 'test1');
mysql> insert into replication values (2, 'test2');
At this point, the host has two records
from the machine replication table. 3.4 starts testing
and inserts one record
from the machine
mysql> insert into replication values (3, 'test3');Then do the same on the host
mysql> insert into replication values (3, 'test3');View the replication status on the slave
mysql> show slave status \G
*************************** 1. row ***************************
               Slave_IO_State: Waiting for master to send event
                  Master_Host: 192.168.1.222
                  Master_User: repl
                  Master_Port: 3306
                Connect_Retry: 60
              Master_Log_File: mysql-bin.000003
          Read_Master_Log_Pos: 16700
               Relay_Log_File: mysql-relay-bin.000003
                Relay_Log_Pos: 16595
        Relay_Master_Log_File: mysql-bin.000003
             Slave_IO_Running: Yes
            Slave_SQL_Running: No
              Replicate_Do_DB:
          Replicate_Ignore_DB:
           Replicate_Do_Table:
       Replicate_Ignore_Table: mysql.ibbackup_binlog_marker
      Replicate_Wild_Do_Table:
  Replicate_Wild_Ignore_Table: mysql.backup_%
                   Last_Errno: 1062
                   Last_Error: Error 'Duplicate entry '3' for key 'PRIMARY'' on query. Default database: 'test'. Query: 'insert into replication values (3, 'test3')'
                 Skip_Counter: 0
          Exec_Master_Log_Pos: 16425
              Relay_Log_Space: 17544
You can see that the SQL thread has stopped working Slave_SQL_Running: No
error number is: Last_Errno: 1062
Error message: Last_Error: Error ‘Duplicate entry ‘3’ for key ‘PRIMARY’ on query.default database: ‘test’. Query: ‘insert into replication values (3, ‘test3′)’
if we add the following option in my.cnf, we can skip this error and the data synchronization continues.
[mysqld]
slave_skip_errors=1062
The specific test method is the same as above, you can verify by yourself.
4 Some explanations for copying errors from machine while recovering from BACKUP
Meb, the mysql Enterprise edition backup tool, provides online hot standby function. If DDL operation is performed during the backup process, the slave machine may be abnormal when it needs to restore from the backup of the host machine, thus causing the slave machine to fail to synchronize data. Reason from the machine need to recover from a backup file when recovery (DDL statements contained in the backup process execution), synchronization is not from perfect after the last position synchronization, but from the last position of the DDL synchronization, if again the DDL statements from the machine will not result in a conflict, which synchronous continue, if can lead to conflict, synchronization is terminated. The solution to this conflict is to add a line to the my.cnF file
[mysqld]
slave_skip_errors=ddl_exist_errors
5 Matters needing Attention
5.1 this parameter is a global static parameter, which cannot be dynamically adjusted. It can take effect by restarting mysql server after adding this parameter list in my.cnf.
5.2 it must be noted that if this parameter is started improperly, it is likely to cause the data in the master-slave database to be out of sync. In the application, it needs to be based on the actual situation. If the data integrity requirements are not very strict, then this option can indeed reduce the maintenance cost
* * * * * * * * * * * * * * * * * * * * * * * * * * * * * * * * * * * * * * * * * * * * * * * * * * * * * * * * * * * * * * * * * * * * * * * * * * * * * * * * * * * * * * * *
the original address: http://blog.csdn.net/jesseyoung/article/details/40585809
the blog home page: http://blog.csdn.net/jesseyoung
****************************************************************************************
Windows 10 installation python.msi Error 2502 / 2503 solution
I also solved the specific steps through the previous methods as follows (click to view) :
Win10 installation mSI prompt 2502, 2503 error code (successfully resolved)
However, when I installed Python today, I could not solve it according to the previous methods. I searched again by myself, and finally solved the following problems:
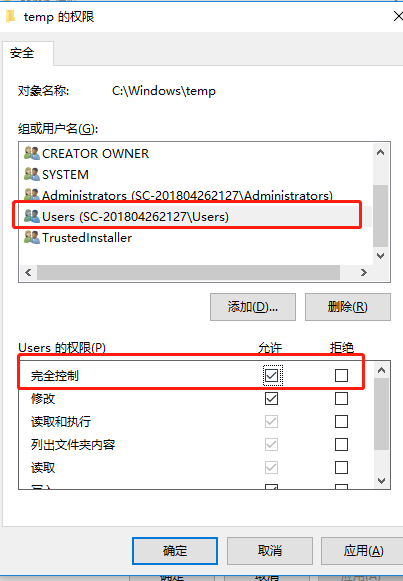
The reason is that the C:\Windows\Temp folder NTFS has the wrong permissions. It is OK to change its User permissions to full control.

I changed the full control permission of the TEMp myself
And then just reinstall it

Socket error 10057 problem_ Error record
There are two other points to note about transplantation
problem:
1. The getsockopt implementation from Berkeley returns 0, and the error waiting for processing is returned in the variable errno; But Solaris will have getsockopt return -1 and errno set as the error to be handled; We have to deal with both cases;
2. Portability issues in platforms with different socket implementations when dealing with non-blocking connect. First, it is possible that the connection has already been established and the other party’s data has already arrived before the select call. In this case, when the connection succeeds, the socket will be both readable and writable. This is the same as if the connection failed. At this point we also have to read the error value through getsockopt
The simple code is as follows, for reference only:
BOOL ConnectServer(int robot_num)
{
char errnum[10] = {0};
int err = -1;
int error = -1;
int errlen = sizeof(error);
int no1 = robot_num;
fd_set wset;
struct timeval tm;
tm.tv_sec = 5;
tm.tv_usec = 0;
FD_ZERO(& wset);
FD_SET(sHost[no1],& wset);
// set server address
servaddr. sin_family =AF_INET;
servAddr. Sin_addr. S_addr = inet_addr (192.168.1.104, “”); //& IP [no1-1][0]
servaddr.sin_port = htons(6665); //atoi(& The port [no1-1] [0])
// connect server
retVal = connect (sHost [no], (LPSOCKADDR) & amp; servAddr, sizeof(servAddr));
err = WSAGetLastError();
if(SOCKET_ERROR == retVal)
{
{
if(WSAEWOULDBLOCK == err || WSAEINVAL == err) // there is no more non-blocking operation
{
if(select(0,NULL,&); wset,NULL,& tm) < = 0){// Error timeout or connection failure; Return 0, representing timeout
printf(“error code is %s\n”,strerror(errno));
closesocket(sHost[no1]);
}
if( ! FD_ISSET(sHost[no1],& Wset)){// If the value in the set, non-zero;
printf(“error code is %s\n”,strerror(errno));
closesocket(sHost[no1]);
}
getsockopt(sHost[no1],SOL_SOCKET,SO_ERROR,(char*)& error,& errlen);
if (error ! = 0)
{
printf(“Connect failed! \n”);
bConnecting = FALSE;
}else{
printf(“Connect successfully! \n”);
bConnecting = TRUE;
}
}else if (WSAEISCONN == err)// connection complete
{
printf(” connection complete \n”);
}else if (WSAENOTCONN == err)// connection not complete
{
printf(“socket is not connected \n”);
} else// for other reasons, the connection fails
{
printf (” connect err = % d \ n “, err); // trying an already in progress operation on a non-blocking socket
printf(” other reason, connection failed \n”);
}
}
if (retVal == 0)// successfully Connect
{
printf(“Connect successfully! \n”);
bConnecting = TRUE;
}
return bConnecting;
}
PHP reports “parse error: syntax error, unexpected T”_ The solution of “variable”
The error was reported on line 30.
Description:
Syntax error, unexpected T_VARIABLE is a common error in PHP development, and also the lowest level error, if you see the following error:
Parse error: syntax error, unexpected T_VARIABLE in D:\test\controllers\admin.php on line 30
This error is caused by string spelling and often the omission of a “; “at the end of a sentence. As a result of. So you need to check the string spelling of this line carefully, and the problem will be solved.
【Oracle】 ORA-00257: archiver error. Connect internal only, until freed
ORA-00257: archiver error. Connect internal only, until freedThe main reason for this error is that there are too many archived logs, which leads to insufficient disk space. It can be solved by deleting logs or increasing space. The specific operation is as follows :(this error is solved by deleting logs here)
1. First log in to Oracle at the terminal using the following command
sqlplus /nolog
connect /as sysdba
2. Execute the following statement and check the use of Flash Recovery Area. Archivelog is already very large, close to 100.
select * from V$FLASH_RECOVERY_AREA_USAGE;3. Use the following command to query the storage directory of Archivelog and backup it if necessary.
show parameter recover;4. Delete the log files in the corresponding directory
5. After the log document is deleted, the control file must be maintained using RMAN, otherwise the space will still not be released. The terminal enters RMAN maintenance with the following command:
rman target sys/passCheck for useless Archivelog:
crosscheck archivelog all;Delete all Archivelog as of the previous day:
delete archivelog until time 'sysdate-1';6. Query the use of Flash Recovery Area again, and you will find that a lot of space is released. At this point, the error has been resolved
C language error: expected declaration or statement at end of input
May be wrong:
1. A function or variable is not declared before it is used.
2. A parenthesis is missing somewhere.
DB2 SQL Error: SQLCODE=-104, SQLSTATE=42601, SQLERRMC=;;,?,?,?,?,?,?,?,?);END-OF-STATEMENT
DB2 SQL Error: SQLCODE=-104, SQLSTATE=42601, SQLERRMC=;; ,?,?,
?,?,?,?,?,?) ; END-OF-STATEMENT
Han… At the end, I don’t know what happened, I added a;
stay web.xml Configure error page in
In Java Web projects, sometimes we need to give a user prompt when an error occurs, or display site maintainer information, or replace the error with another expression to ease the mood. This can be implemented using the error-page tag of Web.xml. As there are many related materials, this article is only a simple guide.
It is important to note that Error-Page is supported as long as it is a Java Web project, regardless of the introduction of framework plug-ins, etc.
Body:
One, according to the error number to specify the jump.
1) Create an error handling page.
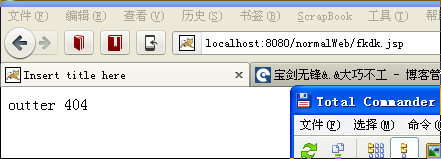
Create “/ Web-inf /404.html” (or “/404.html”). Open “404.html” and add the contact information of the maintainer.
2) Add the error-Page tag.
Add “error-Page” child node to “Web-app”, and the content is as follows:
Xml code
![]()
- < error-page> & lt; error-code> 404< /error-code> & lt; location> /WEB-INF/404.html< /location> & lt; /error-page>
3) Deployment tests.
Just type in a non-existent URL. You can see that the 404.html is displayed correctly.
Note:
Put 404.html under WebRoot/ or WebRoot/ Web-inf /.
Second, specify a jump according to the exception type.
1) Create an exception handling page (take null pointer exception as an example).
A) Create the servlet “Hello” under the default package “SRC/” directory.
B) Modify doGet(,) to call this.dopost (,) directly.
C) Insert 2 lines of code between comments in doPost(,). As shown below.
Java code
![]()
- out.println(“, using the POST method”); // Test Snippet Object obj = null; Out.println (obj. ToString ());// & lt; – the test out. Println (” & lt; /BODY>” );
Make a NullPointerException by hand.
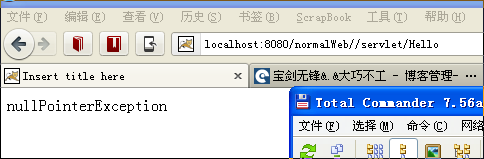
D) to create “nullPointerException. HTML”, and write “nullPointerException” in the content.
2) Add the error-Page tag.
A) Add the servlet configuration as follows:
Xml code
![]()
- < servlet> & lt; servlet-name> Hello< /servlet-name> & lt; servlet-class> Hello< /servlet-class> & lt; /servlet> & lt; servlet-mapping> & lt; servlet-name> Hello< /servlet-name> & lt; url-pattern> /servlet/Hello< /url-pattern> & lt; /servlet-mapping>
B) Add error-Page:
Xml code
![]()
- < error-page> & lt; exception-type> java.lang.NullPointerException< /exception-type> & lt; location> /WEB-INF/nullPointerException.html< /location> & lt; /error-page>
3) Deployment tests.
After deployment, access to “http://localhost:8080/myJavaWeb/servlet/Hello”. You can see “nullPointerException. HTML page.
(end)
[perfect test] nexus6 FastBoot
The final decision is to brush the machine
Since you’ve been manually root before, let’s briefly describe the process.
Reference: http://www.muzisoft.com/shuaji/85161.html
First: You need tools
First need to enter Fastboot mode: http://jiyouhui.it168.com/thread-435764-1-1.html
Nexus6 can use Fastboot tool: http://jiyouhui.it168.com/thread-435762-1-1.html
this tutorial applicable models:
– the Nexus 6
a: Use the Fastboot command to write the mirror parts of the system:
The corresponding partition to be painted & GT; < The image to be painted in a directory & GT;
tip:
brush mirror, due to the use of the CMD command, the computer is not intelligent, you must put the mirror in the fastboot tool root directory to be able to brush… It’s a hassle. What can I do?!
Remember the fastboot space flash space system space, do not mistake, the space must be entered, do not enter the space will report an error!
If the driver doesn’t connect: Download the MOTO driver
When the driver connection enters the fastboot mode normally, it will be found that when the machine is swiped,
Error: update package missing system.img reports this error
This is because there is a problem with loading img images when swiping. Google compressed most img images into a zip compression package, the file name is image-hammerhead-lrx21o. Zip
.
brush command as follows:
fastboot flash recovery recovery.img
fastboot flash boot boot.img
fastboot flash system system.img
fastboot flash cache cache.img
fastboot flash userdata userdata.img
fastboot reboot
So I simply modified the code for fastboot-all.bat
@ECHO OFF
:: Copyright 2012 The Android Open Source Project
::
:: Licensed under the Apache License, Version 2.0 (the "License");
:: you may not use this file except in compliance with the License.
:: You may obtain a copy of the License at
::
::      http://www.apache.org/licenses/LICENSE-2.0
::
:: Unless required by applicable law or agreed to in writing, software
:: distributed under the License is distributed on an "AS IS" BASIS,
:: WITHOUT WARRANTIES OR CONDITIONS OF ANY KIND, either express or implied.
:: See the License for the specific language governing permissions and
:: limitations under the License.

PATH=%PATH%;"%SYSTEMROOT%\System32"
fastboot flash bootloader bootloader-shamu-moto-apq8084-71.08.img
fastboot reboot-bootloader
ping -n 5 127.0.0.1 >nul
fastboot flash radio radio-shamu-d4.0-9625-02.98.img
fastboot reboot-bootloader
ping -n 5 127.0.0.1 >nul
::fastboot -w update image-shamu-lmy47e.zip
fastboot flash recovery recovery.img
fastboot flash boot boot.img
fastboot flash system system.img
fastboot flash cache cache.img
fastboot flash userdata userdata.img
echo Press any key to exit...
pause >nul
exit
Restart after the run is over, OK! After a long afternoon, I hope I can help you