MSB4036 “SetEnvironmentVariable” not found
Error reason: stylistic Microsoft. CodeAnalysis. The Targets to make mistakes
Solution: Replace this file in the path: C:\Program Files (x86)\MSBuild\Microsoft\VisualStudio\v14.0\CodeAnalysis
The original blogger and file link: https://blog.csdn.net/u014411348/article/details/103487246
Category Archives: How to Fix
OpenGL programming error analysis
C :\ Program Files (x86)\ Microsoft Visual Studio 11.0\ VC \ Include \ GL \glew.h 84 1 consoleApplication8
Solution:
#if defined(__gl_h_) || defined(__GL_H__) || defined(__X_GL_H)
#error gl.h included before glew.h
#include <GL/glew.h>
#include <GL/glut.h>
Glew.h is written in front of GLUT.
error
1> ConsoleApplication8.obj: error LNK2019: Cannot resolve external symbol __imp__glewInit@0, which is found in the function “void __cdecl init(void)” (?
1> init @@yaxxz)
1>; ConsoleApplication8.obj: error LNK2019: Cannot resolve external symbol __imp__glewGetErrorString@4, which is found in the function “void __cdecl init(void)” (?
1> init @@yaxxz)
1>; ConsoleApplication8.obj: error LNK2001: Unable to resolve external symbol __imp____glewBindBuffer
1>; ConsoleApplication8.obj: error LNK2001: Unable to resolve external symbol __imp____ glewbufferData
1>; ConsoleApplication8.obj: error LNK2001: Unable to resolve external symbol __imp____glewGenBuffers
1>; ConsoleApplication8.obj: error LNK2001: Unable to resolve external symbol __imp____glewAttachShader
1>; ConsoleApplication8.obj: error LNK2001: Unable to resolve external symbol __imp____ glewcompileShader
1>; ConsoleApplication8.obj: error LNK2001: Unable to resolve external symbol __imp____glewCreateProgram
1>; ConsoleApplication8.obj: error LNK2001: Unable to resolve external symbol __imp____glewCreateShader
1>; ConsoleApplication8.obj: error LNK2001: Unable to resolve external symbol __imp____glewDeleteShader
1>; ConsoleApplication8. Obj: error LNK2001: cannot resolve the external symbol of __imp____glewEnableVertexAttribArray
1 & gt; ConsoleApplication8.obj: error LNK2001: Unable to resolve external symbol __imp____glewGetProgramInfoLog
; ConsoleApplication8.obj: error LNK2001: Unable to resolve external symbol __imp____glewGetProgramiv
1>; ConsoleApplication8.obj: error LNK2001: Unable to resolve external symbol __imp____ glewgetShaderInfolog
1>; ConsoleApplication8.obj: error LNK2001: Unable to resolve external symbol __imp____glewGetShaderiv
1>; ConsoleApplication8.obj: error LNK2001: Unable to resolve external symbol __imp____glewLinkProgram
1>; ConsoleApplication8.obj: error LNK2001: Unable to resolve external symbol __imp____glewShaderSource
1>; ConsoleApplication8.obj: error LNK2001: Unable to resolve external symbol __imp____glewUseProgram
1>; ConsoleApplication8.obj: error LNK2001: Unable to parse external symbol __imp____ glewvertexattribute
; ConsoleApplication8.obj: error LNK2001: Unable to resolve external symbol __imp____ glewbindVertexArray
1>; ConsoleApplication8.obj: error LNK2001: Unable to resolve external symbol __imp____ glewGenvertexArrays
Solution:
#pragma comment(lib,"glew32.lib")Error:
1> ConsoleApplication8.obj: error LNK2019: Cannot resolve external symbol _glutInit@8, which is referenced in function _main
1> ConsoleApplication8.obj: error LNK2019: Cannot resolve external symbol _glutInitDisplayMode@4, which is referenced in function _main
1> ConsoleApplication8.obj: error LNK2019: Cannot resolve external symbol _glutInitWindowPosition@8, which is referenced in function _main
1> ConsoleApplication8.obj: error LNK2019: Cannot resolve external symbol _glutInitWindowSize@8, which is referenced in function _main
1> ConsoleApplication8.obj: error LNK2019: Cannot resolve external symbol _glutMainLoop@0, which is referenced in function _main
1> ConsoleApplication8.obj: error LNK2019: Cannot resolve external symbol _glutCreateWindow@4, which is referenced in function _main
1> ConsoleApplication8.obj: error LNK2019: Cannot resolve external symbol _glutSwapBuffers@0, which is displayed in the function “void __cdecl display(void)” (?Display @@yaxxz)
1> ConsoleApplication8.obj: error LNK2019: Cannot resolve external symbol _glutDisplayFunc@4, which is referenced in function _main
1> ConsoleApplication8.obj: error LNK2019: Cannot resolve external symbol _glutKeyboardFunc@4, which is referenced in function _main
Solution:
#pragma comment(lib,"glut32.lib") error:
1> ConsoleApplication8.obj: error LNK2019: Cannot resolve external symbol __imp__glClear@4, which is displayed in the function “void __cdecl display(void)” (?Display @@yaxxz) is referenced in
1> init @@yaxxz)
1>; ConsoleApplication8.obj: error LNK2019: Cannot resolve external symbol __imp__glDrawArrays@12, which is displayed in the function “void __cdecl display(void)” (?Display @@yaxxz) is referenced in
1>; ConsoleApplication8.obj: error LNK2019: Unable to resolve external symbol __imp__glGetString@4, which is used in the function “void __cdecl initShader(char const *,char const *)” (?InitShader@@YAXPBD0@Z) is referenced
Solution:
#pragma comment(lib,"OpenGL32.lib")
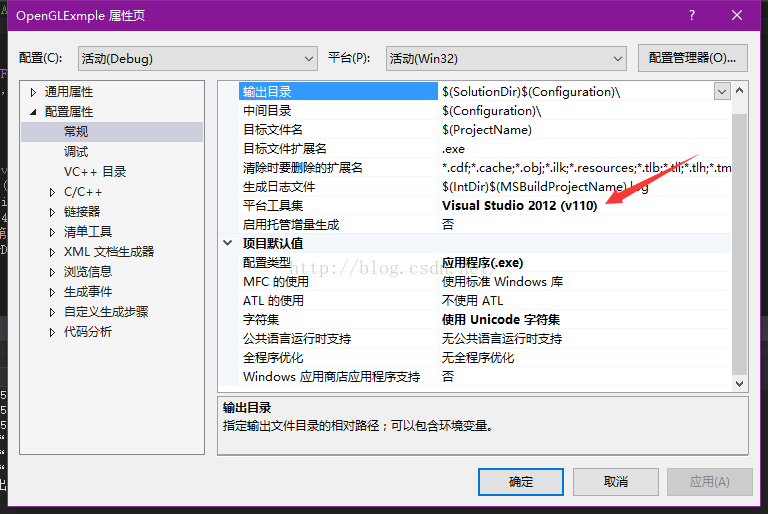
After the vs2013 + OpenGL environment is set up, there is an error in running the first program
The computer reinstalled the secondary system, so I reconfigured the OpenGL environment. After the configuration is completed, I wrote an OpenGL program and found the following error message:

Solutions:
1. Add #define GLUT_DISABLE_ATEXIT_HACK before #include
2. Compile with Visual Studio 2012(V110) environment
Solutions:
1. Add #define GLUT_DISABLE_ATEXIT_HACK before #include
2. Compile with Visual Studio 2012(V110) environment
Solution to the failure of creating bitmap with multithreaded OpenGL
Multithreaded OpenGL failed to create a bitmap solution
July 08, 2010
[b]
[b]
[b]
Recently, I have been working on OpenGL multithreading. The problem I have encountered is that using OpenGL Glgentextures to draw bitmaps in multithreading is not effective. I searched on the Internet for three days and asked a lot of netizens and technical groups, but without exception, I did not get the answer.
Finally, I found relevant information when I searched the Internet yesterday. The solutions are as follows. If you also encounter this problem, I hope I can help you.
Translated from:
[b] [/ b] [b] http://zhidao.baidu.com/question/77393242.html [/ b]
You call it in your thread
wglMakeCurrent to connect the HDC to the currently available HGLRC. Remember, OpenGL’s HGLRC can only be used in one thread at a time, so it is thread-safe. You must call wglMakeCurrent before the thread terminates (NULL, NULL).
if this doesn’t work in your version
suggests you use it when entering threads
wglCreateContext (HDC);
wglMakeCurrent (HDC, HGLRC);
thread exit before use
wglMakeCurrent (NULL, NULL);
wglDeleteContext (HGLRC);
This is usually fine
= = = = = = = = = = = = = = = = = = = = = = = = = = = = = = = = = = = = = = = = = = = = = = = = =
This is fine if you create this control dynamically in your thread
if you are using message thread creation is not line, you can’t use in you create your own thread
= = = = = = = = = = = = = = = = = = = = = = = = = = = = = = = = = = = = = = = = = = = = = = = = =
the reason I said above, OPENGL is thread-safe, its rendering context cannot be used in multiple threads at the same time; In addition: to develop OpenGL procedures, if you use the MFC framework, it is recommended that you first understand MFC; If it is pure SDK development, it is necessary to focus on the study of OpenGL to the running environment requirements. Maybe you have a higher version of VS that provides a TIMER control. This is a TIMER control that sends a WM_TIMER message to your window every once in a while. If you are not familiar with Timer, I suggest you look into the Windows messaging mechanism first; Remember, OpenGL is not for beginners; There’s no basis, and even if you write code, you don’t know why it all works the way it does; And multithreading programming is a difficult point, not only to solve the synchronization problem, debugging is also very difficult, often encounter some puzzling problems. Just like your question, this problem is caused by your lack of clarity about the OpenGL implementation requirements.
Translated from:
[b] [/ b] [b] http://blog.sina.com.cn/s/blog_4bb59dc40100fa57.html [/ b]
wglMakeCurrent:
function sets OpenGL’s current thread (thread dependent) rendering environment. All subsequent OpenGL calls from this thread are drawn on the device identified by this HDC. You can also use the wglMakeCurrent function to change the current rendering environment of the calling thread so that it is no longer in the current rendering environment.
note:
HDC parameter must be drawn on an OpenGL enabled surface. It does not need to be the HDC that wGLCreateContext passed in when it created HGLRC, but it must be the same device and have the same pixel format. GDI-converted HDCs will not be supported by the rendering environment. The current render environment will use the HDC device environment until it is no longer the current render environment.
Before switching to the new render environment, OpenGL will wash out all render environments prior to the current calling thread.
A thread can have a rendering environment. So a multithreaded process can have multiple rendering environments. A thread must set up a current rendering environment before calling any OpenGL function. Otherwise all OpenGL calls will be ignored.
The render environment can only belong to one thread at a time. You cannot make a render environment belong to multiple threads at the same time.
An application can generate multiple drawings from different current rendering environments in different threads, and it supports device environments where each thread has its own rendering environment.
If an error occurs, the wglMakeCurrent function will make the render environment not the current render environment of the thread before returning.
Translated from:
[b] [/ b] [b] http://topic.csdn.net/u/20080408/17/54b76b63-1c46-4340-80ef-2b5bc4859f0c.html [/ b]
the original is because the OpenGL Context can only be one thread has at the same time, in the creation of OpenGL window was occupied by the main thread. The solution is to use the function wglMakecurrent (HDC HDC,HGLRC HGLRC), which can associate the OpenGL Context with the thread calling the function: add wglMakecurrent (NULL,NULL) to the main thread, unassociate it, and then use wglMakecurrent (HDC,HGLRC) at the beginning of the child thread to get the Context.
I am in a story about a multithreaded OpenGL English information, you may have seen the original mainly solve with two threads at the same time operating OpenGL: a rendering, create a display list. The way he uses it is that the render thread gets the Context at render time, releases it when it’s done, and another thread takes up the Context… And so on.
I reckon I can even use wglMakeCurrent switching, implement multiple threads at the same time to drawing on a window! Not exactly at the same time, of course, but in turns. This is not very efficient, though, except to prevent the user interface thread from being blocked by too much graphing.
— — — — — — — — — — — — — — — — — — — — — — — — — — — — — — — — — — — — — — — — — — — — — — —
= glgentextuples (1, (UINT*)& M_nTexID = m_nTexID = m_nTexID = m_nTexID = m_nTexID = m_nTexID
the original is in the child thread of hDC and hRC, and then the child thread running through return hDC and hRC, don’t know what I’m saying you understand don’t understand, don’t understand can you give me a message. Ha ha
OpenGL vs2019 configuration (method 1)
OpenGL VS2019 configuration process
The overall configuration process and tools refer to the content of Learnopengl, but I jumped into the pit during the process, and spent some time to climb the pit. I recorded the configuration process in my blog, which is convenient for future reference and passers-by to climb the pit. LearnOpenGL materials address: https://learnopengl.com/Getting-started/Creating-a-window
Tool installation process
1. The development tool VS2019 (to install the component C++), the detailed installation process is “omitted”.
2. Download GLFW, link address: https://www.glfw.org/download.html. Here is to download the 64-bit source file package, into a specified directory, I put the D disk, directory is “D:\OpenGL”, and then decompress. As shown in the figure:

3. Download the Cmake and installation, link address: https://cmake.org/download/. Download the 32 bit installation file here, after downloading the default installation can be. After installation, open the CMake software and configure it through the GUI. The specific configuration is as follows :(1) Select the directory after GLFW decompression in Where is the source code; (2) Create a new build directory in the unzips directory and fill it in “Where to Build the Binaries”; (3) Once the source and destination folders are set, click the
The overall configuration process and tools refer to the content of Learnopengl, but I jumped into the pit during the process, and spent some time to climb the pit. I recorded the configuration process in my blog, which is convenient for future reference and passers-by to climb the pit. LearnOpenGL materials address: https://learnopengl.com/Getting-started/Creating-a-window
Tool installation process
1. The development tool VS2019 (to install the component C++), the detailed installation process is “omitted”.
2. Download GLFW, link address: https://www.glfw.org/download.html. Here is to download the 64-bit source file package, into a specified directory, I put the D disk, directory is “D:\OpenGL”, and then decompress. As shown in the figure:
3. Download the Cmake and installation, link address: https://cmake.org/download/. Download the 32 bit installation file here, after downloading the default installation can be. After installation, open the CMake software and configure it through the GUI. The specific configuration is as follows :(1) Select the directory after GLFW decompression in Where is the source code; (2) Create a new build directory in the unzips directory and fill it in “Where to Build the Binaries”; (3) Once the source and destination folders are set, click the
Configuretton so that CMAKE can read the required Settings and source code. Then we must choose the generator of the project, and because we are using the Visual Studio 2019, so we will select the 16 option Visual Studio (Visual Studio 2019, also known as Visual Studio (16) (4) the CMake will display possible build options to configure the generated library, click on the Generate , The resulting project file will be generated in your buildlder. 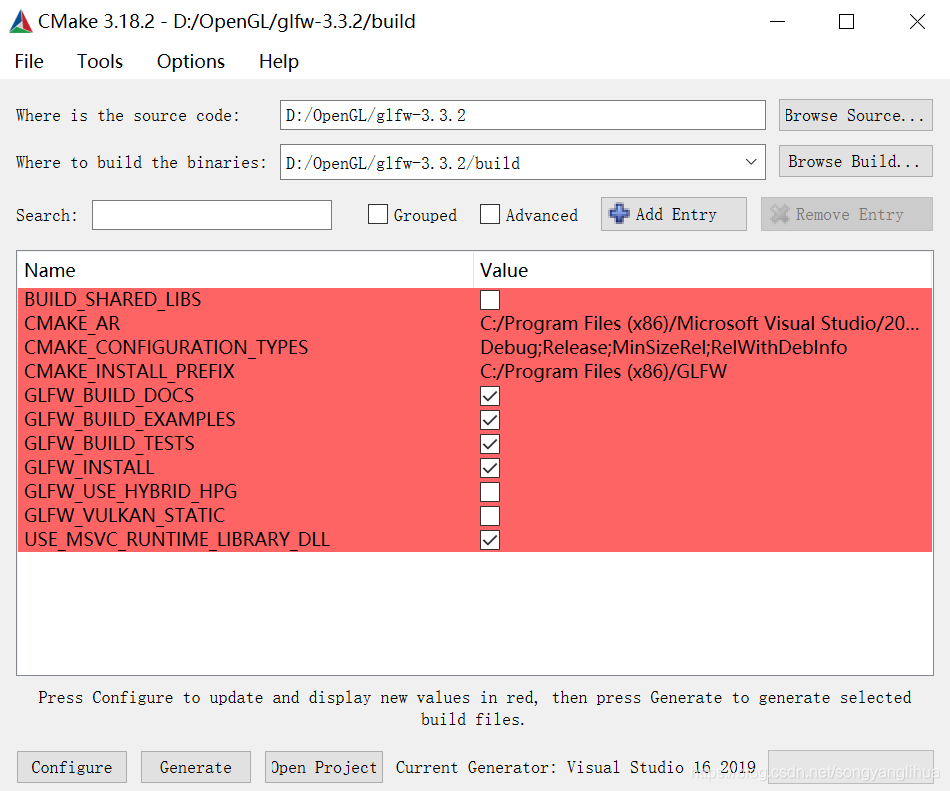
4. You can now find a file named glfw.sln the buildlder and open it using Visual Studio 2019. Because CMake generates a project file that already contains the correct configuration Settings, we just need to build the solution. CMake should have configured the solution automatically so that it can compile to a 64-bit library. Now click Build the solution. This will give us a compiled library file glfw3.libich can be found in build/ SRC /Debugmed. Once the library is generated, we need to make sure that the IDE knows where to find the library and the inclusion files for OpenGL programs.
5. We create a new folder in the d-root directory to hold all the header files/libraries from the third party libraries, which can then be referenced from the IDE/compiler. For example, create the directory "OpenGlResources" under disk D, which contains Libsd i>de folders>here we store all the library files and headers for the OpenGL project, respectively. The requirement now is that each time we create a new project, we have to tell the IDE where to find these directories. Put the produced glfw3.lible into "D:\OpenGLResources\Libs".

Project configuration process
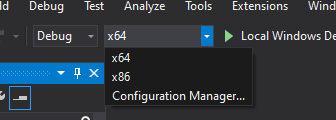
1. First, let's open Visual Studio and create a new project. If multiple options are provided, select C ++ and use Empty Projectdon't forget to give your Project an appropriate name). Since we will be doing everything in 64-bit mode, and the project is 32-bit by default, we need to change the drop-down menu at the top next to Debug from x86 to x64:
2. In Solution Explorer, right-click on the project and add a C++ file, which can be named "main.cpp".
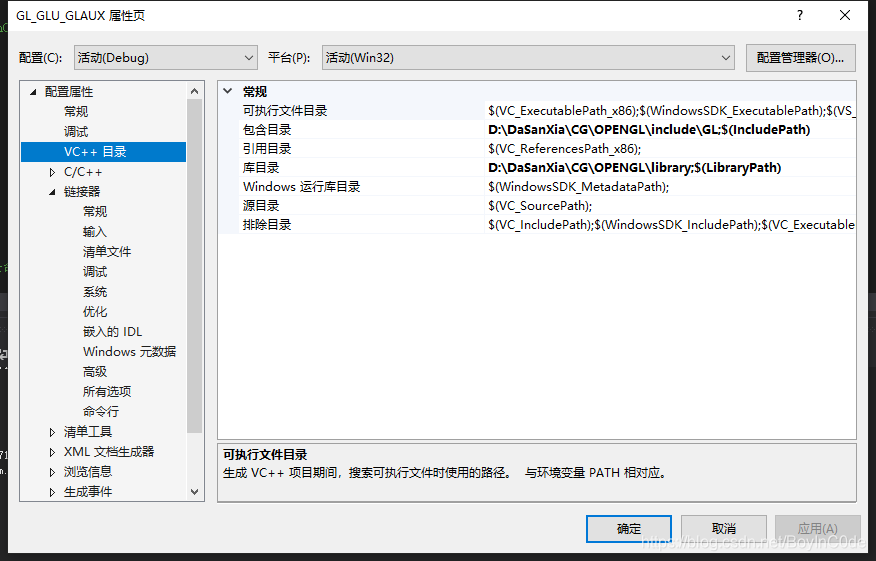
Right-click on a project name in Solution Explorer and go to a VC++ Directoriesgure:

Add the "Libs" and "Include" Directories in "D:\OpenGLResources" for Include Directories and Library Directories, respectively. As shown in the figure:
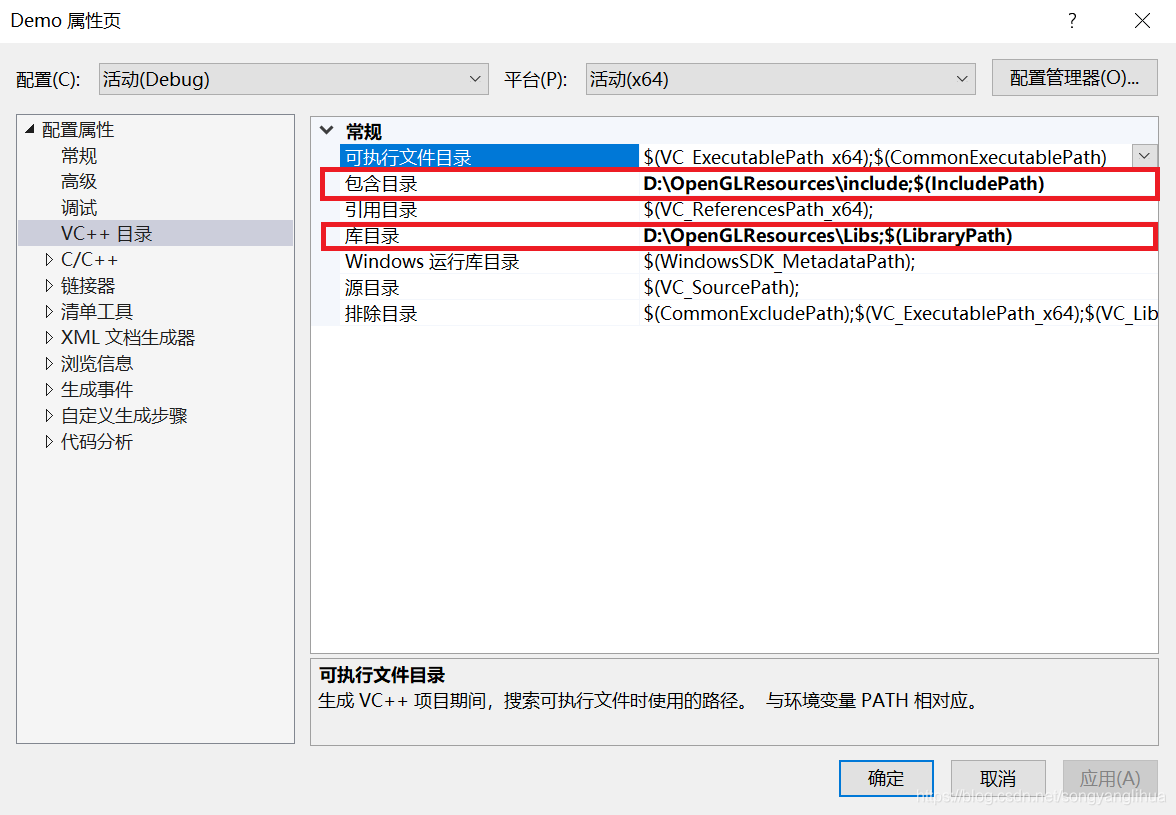
Here, you can add as many additional directories as you need, and from then on, the IDE will also search for these directories when it searches libraries and header files. Once Includentains folders in GLFW, you can find all header files for GLFW by Include &>; GLFW/.. > . The same goes for library directories.
4. Because the VS now can find all the necessary documents, so we can finally through to the would TAB and GLFW link to project the Input :
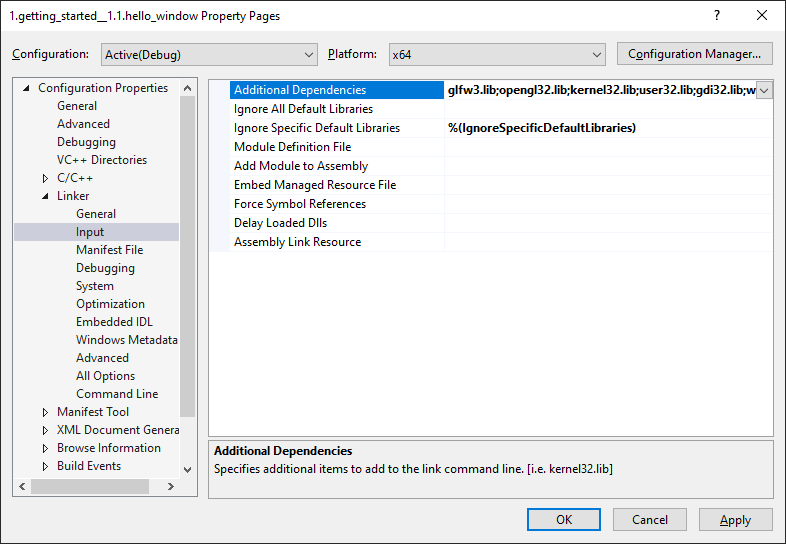
Then, to link to the library, you must specify the name of the library for the linker. Because the library name is glfw3. Lib , we add it to the Additional Dependencies field (manually or using the & lt; Edit.. > option), and from this point on, GLFW will be linked at compile time. In addition to GLFW, we should also add a link entry openGL32.lib to the OpenGL library. If you are using Windows, the OpenGL library engl32.lib c> with the Microsoft SDK and is installed by default when you install Visual Studio. Since this chapter uses the VS compiler and is on Windows, we will add opengl32.lib the linker Settings. Note that the 64-bit equivalent to the OpenGL library is called openGL32.lib.
This completes the setup and configuration of GLFW.
5. Go to the Glad Web service, make sure the language is set to C ++ and select the OpenGL version of at least 3.3 in the "API" section (this is the version we will be using; Higher versions are also available). Also, make sure that the configuration file is set to Core and the Build Loader option is checked. Ignore the extension for a moment, and then click Build to generate the result library file.
Glad should now have provided you with a ZIP file containing two include folders and a glad.cle. Copy both include folders (gladd k> /code>) into> include (s) directory, that is, "D:\OpenGLResources\include". Then add the glad.cle to your project.
After completing the above steps, you should be able to add the following include directive at the top of the "main.cpp" file:
#include < glad/glad.h>
The Compile button should not give you any errors.
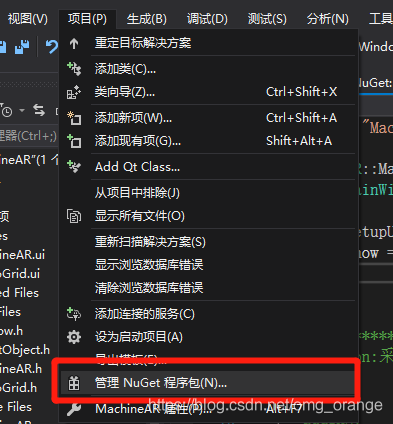
Vs2019 nuget configuring OpenGL
The OpenGL library is not well configured, so we will configure it. The OpenGL library is not well configured. Before, the configuration libraries were all header files, and the libraries were a bunch of things to set up. Microsoft has come up with a great solution called NuGet
opens in the browse search nupengl, will find the following two packages
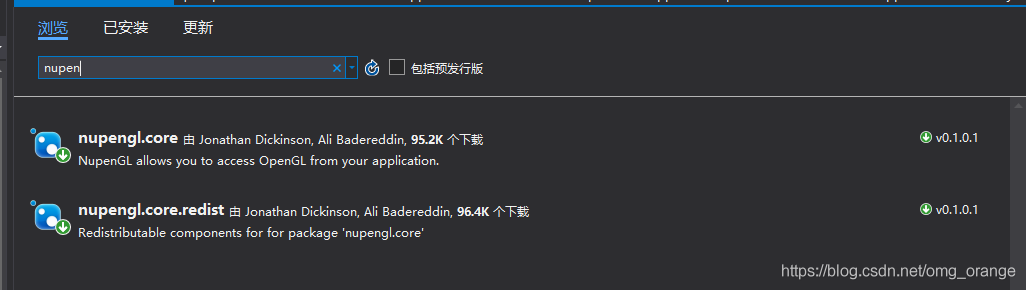 respectively selected two packages, click “install” on the right side. After installing both packages successfully, you will see that there are two more folders in the Packages folder under the project folder, which are the packages that we imported. Now you can use OpenGL functions by adding the corresponding header files in the program. There is no need to configure them in the project properties.
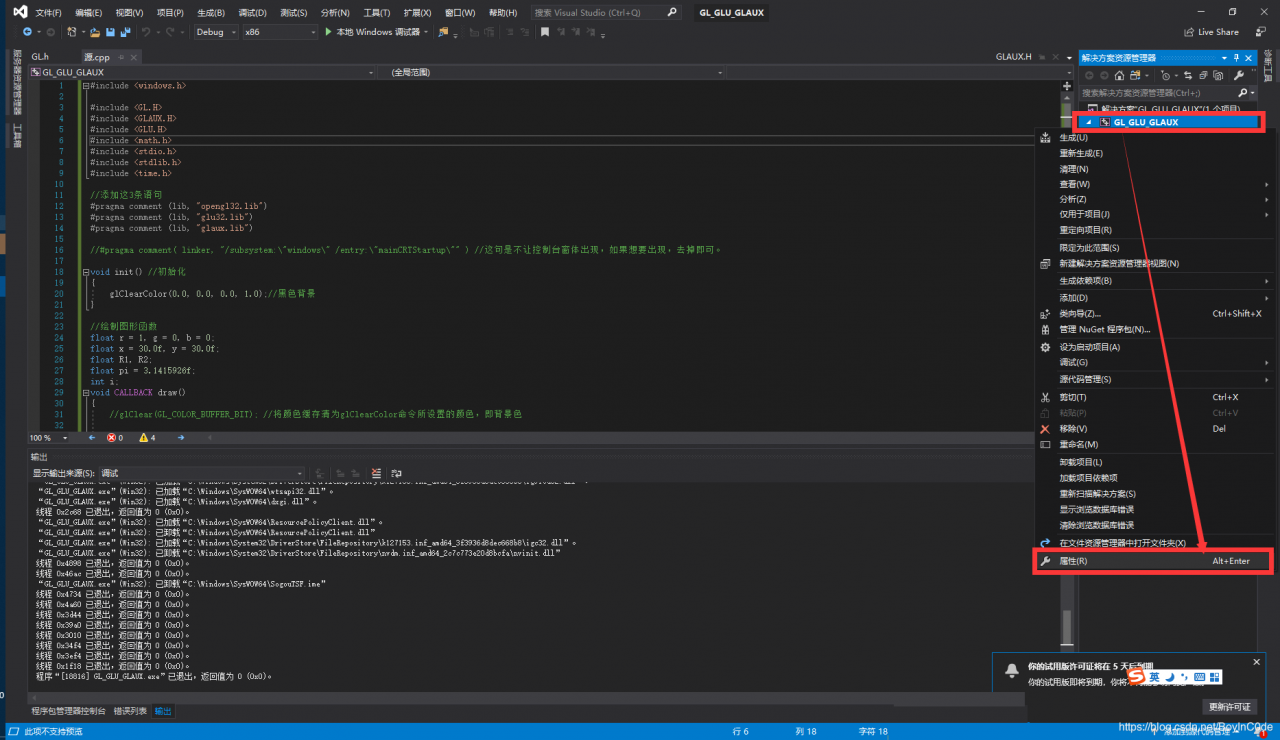
Visual studio 2019 + OpenGL environment configuration
Using the
- gl.hglu.hglaux.h
Download Directory:
https://download.csdn.net/download/boyinc0de/11171372
in
The following:
Include directory corresponding to downloaded files, unzipped include folder
The library directory corresponds to the downloaded files and the unzipped Library folder
VS2019 may report an error.
1> Glaux. Lib (tk.obj) : error LNK2019: Cannot resolve external symbol _sscanf, which is referenced in the function _GetRegistrySysColors@8
1> Glaux. Lib (tk.obj) : error LNK2019: Unresolvable external symbol _vsprintf, which is referenced in the function _PrintMessage
VS2015 compilation will cause this problem, the solution is in the project properties ->; The linker – & gt; Input – & gt; Add a dependency legacy_stdio_defines.lib to the attached dependency;
Here’s a reference:
https://blog.csdn.net/qqsqqsqqs318/article/details/58156094
= = = = = = = = = = = = = = = = = = = = = = = = = = = = = = = = = = = = = = = = = = = = = = = = = = = = = = = = = = = = = = = = = = = = = = = = = = = = = = = = = = = = = = = = = = = =
In later experiments, we used the GLUT library, and I put the configuration procedure in the following:
https://www.jianshu.com/p/be32da974d8c
PS: I just put the.dll file in the Debug folder of the project where the.exe is located. I don’t want to copy everything to the system files
Start error: field xmapper in com.xxx.service . impl.xxxServiceImpl required a bean of type
SpringBoot error:
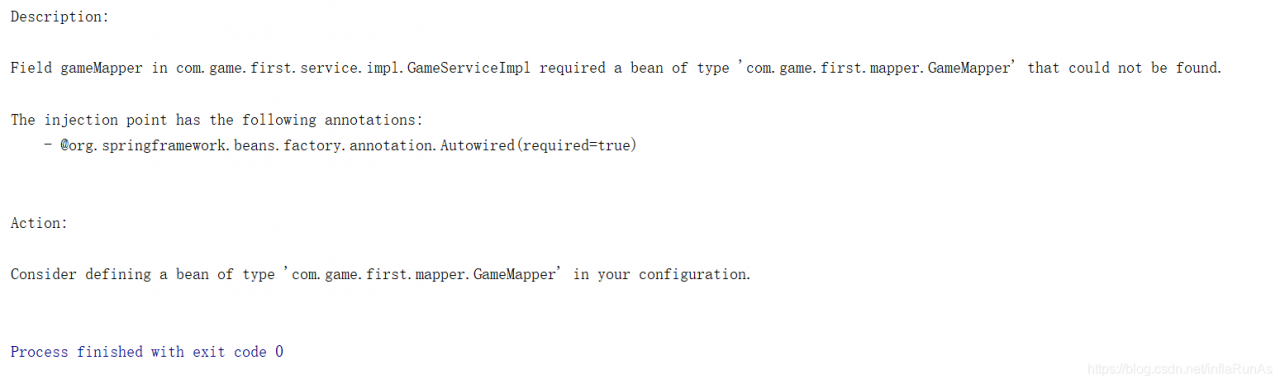
Error cause: Missing comment
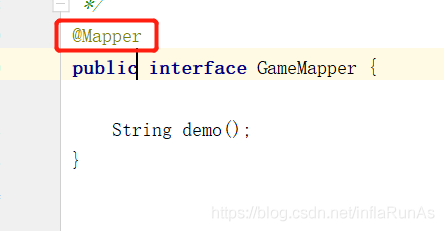
Error cause: Missing comment
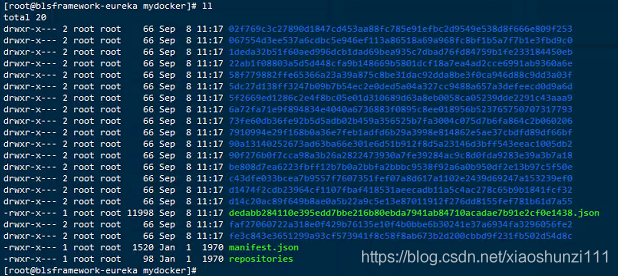
Docker load loading mirror message JSON no such file or directory error
1. Problem description, ordinary image export and load
Export: docker save-o gz_dockernlfsmorev2.0.tar gz_docker:morev2.0
No such file or directory :docker load-i gz_dockerlnfsmorev2.0.tar

At first, it was thought that tar was missing, but later, SHA added the password to eliminate this reason;
After searching on Baidu, most of the answers they gave were “save” versus “load export” and “import”. Failure to do so, however, will not solve the problem. Because I’m using save and load and it’s OK. So the solution was abandoned. If you look at the kernel: cat /proc/version, docker version: docker-v
Later I wondered if the Linux kernel version and Docker version were incompatible.
First: Ubuntu Series, Docker Version: Docker Version 18.06.1-CE, Build E68FC7A, Kernel: Linux Version 4.15.0-112- Generic (buildd@lcy01-amd64-021) (GCC Version 5.4.0 20160609 (Ubuntu 5.4.0-6Ubuntu 1~16.04.12)) #113~16.04.1-Ubuntu SMP Fri Jul 10 04:37:08 UTC 2020
Docker version: Docker version 19.03.1, build 74B1E89E8A kernel: El7.x86_64 ([email protected]) (GCC Version 4.8.5 20150623 (Red Hat 4.8.5-39) (GCC)) #1 SMP Tue Mar 31 23:36:51 UTC 2020
Linux version 3.10.0-1127.el7.x86_64 ([email protected]) (GCC version 4.8.5 20150623 (Red Hat 4.5.3-39) (GCC))
The first and second sets load OK, the problem is the third set; Then I suspected that the Docker version was too high, so I updated the third Docker to Docker version 18.06.1-CE. Results: However, it was not useful. Excluded version incompatibilities;
At the moment their state of mind to collapse, finally calm down, re-comb the train of thought; Open the road to change destiny against heaven;
mkdir mydocker
1.tar-zxvf gz_dockerlnfsmorev2.0.tar MyDocker
2. CD mydocker
3. tar-cvf gz_dockerlnfsmorev2.0.tar *
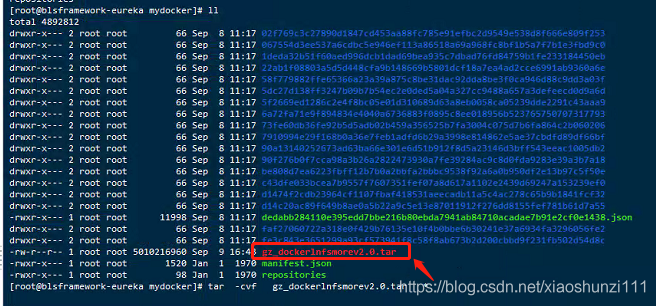
4. The docker load -i gz_dockerlnfsmorev2. 0. The tar
Until this problem is completely solved;
Note that when re-tar-cvf, be sure to compress the file in the current directory where it was extracted. Otherwise, no such file or directory will also be reported
Export: docker save-o gz_dockernlfsmorev2.0.tar gz_docker:morev2.0
No such file or directory :docker load-i gz_dockerlnfsmorev2.0.tar
At first, it was thought that tar was missing, but later, SHA added the password to eliminate this reason;
After searching on Baidu, most of the answers they gave were “save” versus “load export” and “import”. Failure to do so, however, will not solve the problem. Because I’m using save and load and it’s OK. So the solution was abandoned. If you look at the kernel: cat /proc/version, docker version: docker-v
Later I wondered if the Linux kernel version and Docker version were incompatible.
First: Ubuntu Series, Docker Version: Docker Version 18.06.1-CE, Build E68FC7A, Kernel: Linux Version 4.15.0-112- Generic (buildd@lcy01-amd64-021) (GCC Version 5.4.0 20160609 (Ubuntu 5.4.0-6Ubuntu 1~16.04.12)) #113~16.04.1-Ubuntu SMP Fri Jul 10 04:37:08 UTC 2020
Docker version: Docker version 19.03.1, build 74B1E89E8A kernel: El7.x86_64 ([email protected]) (GCC Version 4.8.5 20150623 (Red Hat 4.8.5-39) (GCC)) #1 SMP Tue Mar 31 23:36:51 UTC 2020
Linux version 3.10.0-1127.el7.x86_64 ([email protected]) (GCC version 4.8.5 20150623 (Red Hat 4.5.3-39) (GCC))
The first and second sets load OK, the problem is the third set; Then I suspected that the Docker version was too high, so I updated the third Docker to Docker version 18.06.1-CE. Results: However, it was not useful. Excluded version incompatibilities;
At the moment their state of mind to collapse, finally calm down, re-comb the train of thought; Open the road to change destiny against heaven;
mkdir mydocker
1.tar-zxvf gz_dockerlnfsmorev2.0.tar MyDocker
2. CD mydocker
3. tar-cvf gz_dockerlnfsmorev2.0.tar *
4. The docker load -i gz_dockerlnfsmorev2. 0. The tar
Until this problem is completely solved;
Note that when re-tar-cvf, be sure to compress the file in the current directory where it was extracted. Otherwise, no such file or directory will also be reported
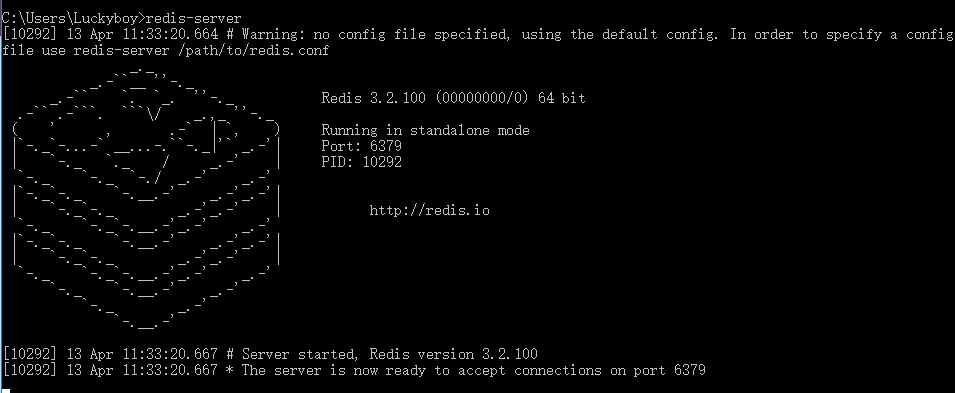
No such file or directory error when redis is started under Windows
This problem occurs because the Redis server is already started and you can test it by entering the command shown in the figure

Redis-CLI is the client that starts Redis. If you do not configure the environment variables, you will need to go to the installation directory of Redis
To run this command, otherwise an error will occur. If you type ping into the Redis client and it returns Pong, you can prove it
The Redis server has started. But if the reader needs to be reassured by an interface like the one shown below, follow the image
The following operations are performed:
This can be done with the following command:
(1) Redis-cli. Exe enters the client of Redis. If no environment variables are configured, it needs to enter the installation directory of Redis to execute
(2) The original server of Redis was shutdown with shutdown
(3) Exit the client
(4) Redis -server.exe Redis.Windows.conf Restarts the Redis server
If you do not configure a Redis environment variable, you will need to go to the installation directory of Redis to execute the above command. After executing the above commands,
You can see the above interface after the subsequent redis-server execution
Cannot chdir: no such file or directory solution
ah Cannot open: No such file or directory


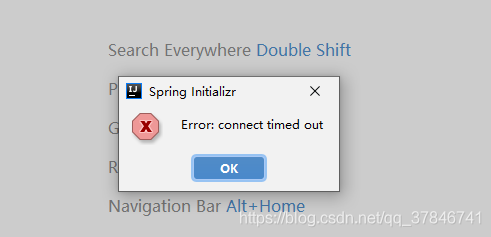
3. Idea creates a springboot project, and spring initializer reports an error Error:connect timed out
Error: Connect timed out when creating SpringBoot + Maven project today.
Check the problem of HTTP proxy of IDEA, the solution is as follows:
The first kind of
1. Open the file – Settings
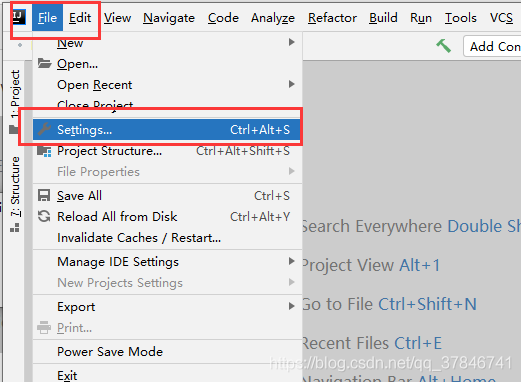
2. Select Appearance& Behavior — System Settings — HTTP Proxy — Check Connection on the right — type https://start.spring.io
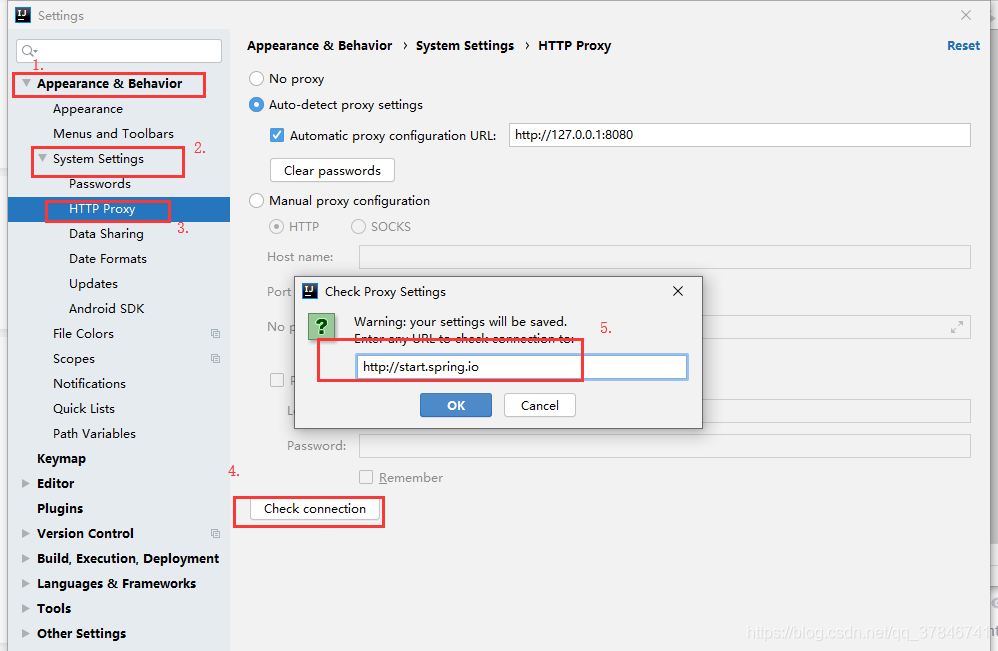
If it does, you can rewrite the build project.
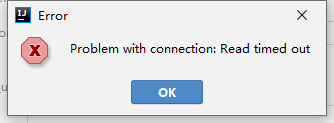
If the connection fails and the following image is shown, you can try method two.
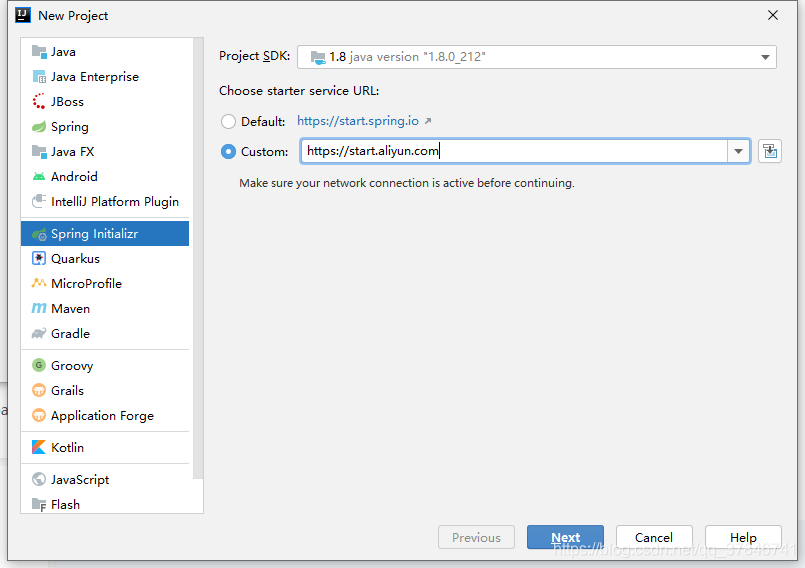
The second,
1. When creating a new project, select the source of Ali Cloud under Spring Initializr and enter https://start.aliyun.com under Custom
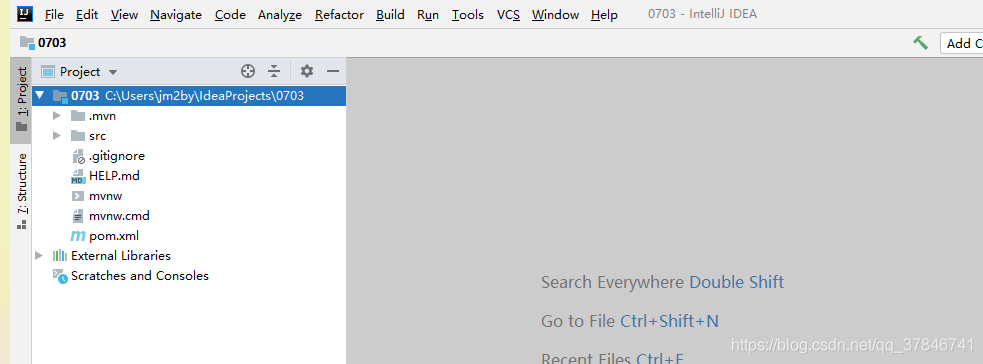
Create a new project with SpringBoot + Maven
2. Create successfully!
Check the problem of HTTP proxy of IDEA, the solution is as follows:
The first kind of
1. Open the file – Settings
2. Select Appearance& Behavior — System Settings — HTTP Proxy — Check Connection on the right — type https://start.spring.io
If it does, you can rewrite the build project.
If the connection fails and the following image is shown, you can try method two.
The second,
1. When creating a new project, select the source of Ali Cloud under Spring Initializr and enter https://start.aliyun.com under Custom
Create a new project with SpringBoot + Maven
2. Create successfully!