Category Archives: How to Fix

fatal error LNK2019[UNK]fatalerror LNK1120

The reason for the error is as follows:

① You use other people’s libraries, such as opencv library, OpenGL library and other third-party libraries. The common situation is that you only include the header file, but there is no import file

② You don’t use other people’s libraries. Some of Microsoft’s own libraries may also have such problems. At this time, the common situation is that the header file of the failed function is in the included directory of the project property, but the corresponding library file is not in the default library directory of the project property. For example, create view glcontext (struct HDC) in FAQ style__ *) function is such a case. This function is defined in the header file wingdi. H. This header file is in the default included directory in the project properties, but the corresponding library file opengl32. Lib is not in the library directory

③ You use your own library file. I haven’t tried this situation. I’ve seen some comments on the Internet

Fatal error lnk1120 cause:

① . contains only the header file, only the declaration of this function, but not the implementation of this function (the implementation is generally placed in the cpp file). So it can only be compiled, and the connection is not successful.

② Another reason is that the declaration and implementation of the function are put in the header file. Generally, the declaration should be put in the header file and the implementation in the cpp file. In this way, each file that contains the header file will have an implementation of the function. When connecting, the connector does not know which implementation to connect, so an error is reported.


Photoshop CS6 detailed installation of graphic tutorial

catalog

Step 0: preparation

Step 1: install Photoshop CS61

Step 2: Activate


Step 0: preparation

First, go to Baidu cloud link: https://pan.baidu.com/s/1kXchn07 Password: dslu; download PS CS6 compressed package, Download do not want to unzip, put well do not move.

Then enter Baidu cloud link: https://pan.baidu.com/s/1htn2zoK Password: hpq7; download cracking tools, after downloading the computer unplug the cable, disconnect the wireless

Step 1: install Photoshop CS61

Unzip the downloaded Photoshop CS6 compressed file, and double-click to open the“ Setup.exe ”[location: Photoshop_ 13_ LS3\Adobe CS6];

Select ignore;

3. After initializing the installation program, the Photoshop CS6 installation program will pop up. To install it by trial, select trial;

4 [acceptance];

5 prompt us to log in, click [log in] (I have logged in here, this interface may be different from your interface, but it does not affect the installation);

If you don’t have an adobe ID account, you can click the button in the yellow box indicated by the yellow arrow to register. It’s as simple as registering a forum account. Just fill in some information;

7 after the login operation, click the button in the box indicated by the arrow to customize Photoshop The directory where CS6 needs to be installed can also be left unchanged by default (remember your installation location and use it later); then click [install] (if you are a 64 bit system friend, there will be Photoshop CS6 and Photoshop CS6 (64bit) installation contents, you can choose to install both or only one);

8. During the installation, it needs to wait about 10 minutes;

9. After installation, click close.

END

Step 2: Activate

Note: after the installation, you must run Photoshop CS6 for the first time, and click the [start trial] button in the trial interface (if you don’t go through this step, the cracked Photoshop CS6 is the ordinary version, not the extended version.) , and then close Photoshop CS6;

Decompress the downloaded crack file, Xiaobian here is the 32-bit operating system, so we need to copy the 32-bit crack patch“ amtlib.dll ”[location: under the “32-bit cracking patch” folder] (if you are a 64 bit student, select the “64 bit cracking patch” folder“ amtlib.dll ”);

Open the installation directory: find “Adobe Photoshop CS6” in all programs in the start menu, right-click it, and then click properties;

Click Find target in the pop-up attribute box;

After clicking find target, a folder will pop up. Right click in a blank place and select paste to overlay the source file;

Prompt “Confirm File replacement” and select [yes];

Installation completed, the following is the software interface, come to try it!


PIP3 upgrade tutorial of Python 3.5.2 under ubantu16

You are using pip version 8.1.1, however version 10.0.1 is available. You should consider upgrading via the ‘pip install –upgrade pip’ install。

Upgrade PIP3

1. Input upgrade command

sudo pip3 install –upgrade pip

Note: if you only do this step, an error will still be reported in the next installation. The error is about: cannot import name ‘main’. So you need to modify the/usr/bin/PIP3 file, see Step 2.  

2. Modify the configuration file

sudo gedit /usr/bin/pip3

Change to read as follows (last line and penultimate line)

#!/usr/bin/python3
# GENERATED BY DEBIAN

import sys

# Run the main entry point, similarly to how setuptools does it, but because
# we didn't install the actual entry point from setup.py, don't use the
# pkg_resources API.
from pip import __main__
if __name__ == '__main__':
    sys.exit(__main__.main())


The Ubuntu status bar shows the network speed, memory and CPU utilization ratio

Install indicator sysmonitor

1. Add source

sudo add-apt-repository ppa:fossfreedom/indicator-sysmonitor

2. Update source

sudo apt update

3. Installation

sudo apt install indicator-sysmonitor

Start monitor-4

nohup indicator-sysmonitor &

Note: when starting with nohup, the indicator sysmonitor will not exit when closing the terminal.

Chrome setting — Disable web security to solve cross domain problems

We can change the Chrome browser settings by using the chrome command line startup parameters. Please refer to this article for the specific startup parameters. https://code.google.com/p/xiaody/wiki/ChromiumCommandLineSwitches

Here is the – disable web security parameter. This parameter can reduce the security of Chrome browser, disable the homology policy, and facilitate the local debugging of developers.

The steps are as follows:

1. Close all chrome browsers.

2. Create a new chrome shortcut, right-click properties, select target in Shortcut tab, and add – args – disable web security – user data dir

3. Then start chrome

Win10 installation git click git bash flash back problem solution

Git is an open source distributed version control system, which can effectively and quickly handle the project version management from very small to very large. Through git, you can upload the code to GitHub, and control the version through GitHub iteration. And the use of every software, always inseparable from the installation, the original git installation is very fast, belongs to the “fool type” installation type. But Xiaobian found that there was no problem when installing it in Xiaobian’s notebook, but when it came to the desktop, it was found that there was a problem. The same win10 system, why the effect is not the same?
After Xiaobian asked Du Niang, someone said C/window/system32/drivers on Du Niang/ null.sysnull.sys This system file is corrupted. So I copied one from other computers, and it still didn’t solve the problem after I covered it. So, Xiaobian continued to ask Du Niang, and found a real solution. Xiaobian’s personal test was effective, so I’d like to introduce it to you.
1. In Windows/system32/ cmd.exe Open CMD, run SC query null

2. Start the service manually, and run SC start null
to find that the small blackboard reported an error:
[SC] startservice failed 577:
Windows cannot verify the digital signature of this file. Some software or hardware has been changed recently. It is possible that the wrong signature or damaged file has been installed, or the installed file may be malicious software of unknown origin.
After that, copy one from another system null.sys And cover the original C: windows, system32, drivers\ null.sys File, and then start the null service. If you want to test null.sys Whether it is normal or not, run SC start null. If the display is similar to the following, it indicates that the startup is successful.
SERVICE_ NAME: null
TYPE : 1 KERNEL_ DRIVER
STATE : 4 RUNNING
(STOPPABLE, NOT_ PAUSABLE, IGNORES_ SHUTDOWN)
WIN32_ EXIT_ CODE : 0 (0x0)
SERVICE_ EXIT_ CODE : 0 (0x0)
CHECKPOINT : 0x0
WAIT_ Hit: 0x0
PID: 0
flags:
after that, right-click git bash here to find that there is no flash back.
It’s useful to make a personal test null.sys File address:
link: https://pan.baidu.com/s/1UtcZizm-iFcVk4OKrnFJVg Password: 1q4d

Reprinted:
1 http://www.cnblogs.com/ricklz/p/9216395.html

A simple method of generating secret key by GIT and configuring SSH public key

First install git, then right-click in any blank space on the desktop and select git base here, as shown in the following figure:
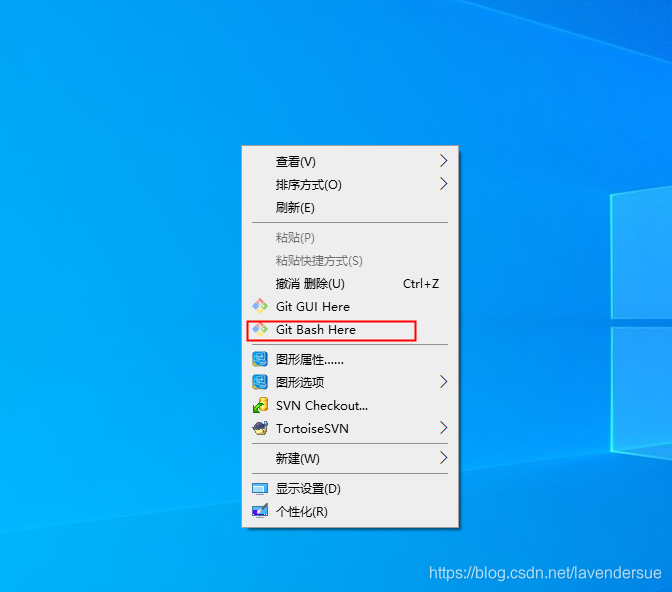
① mode 1: input command: Cd ~ and then input: SSH- keygen.exe Then press enter, press enter again, and press enter three times at enter:
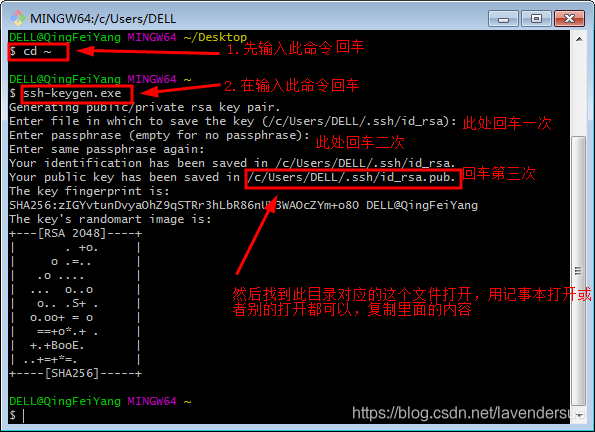
② mode 2: input: SSH keygen – O – t RSA – B 4096 – C “ [email protected] ”Then press enter, press enter again, at enter, press enter three times (same as mode one)

Then find the ID corresponding to the directory above_ rsa.pub You can open the public key file, open it in Notepad or other ways, copy the contents
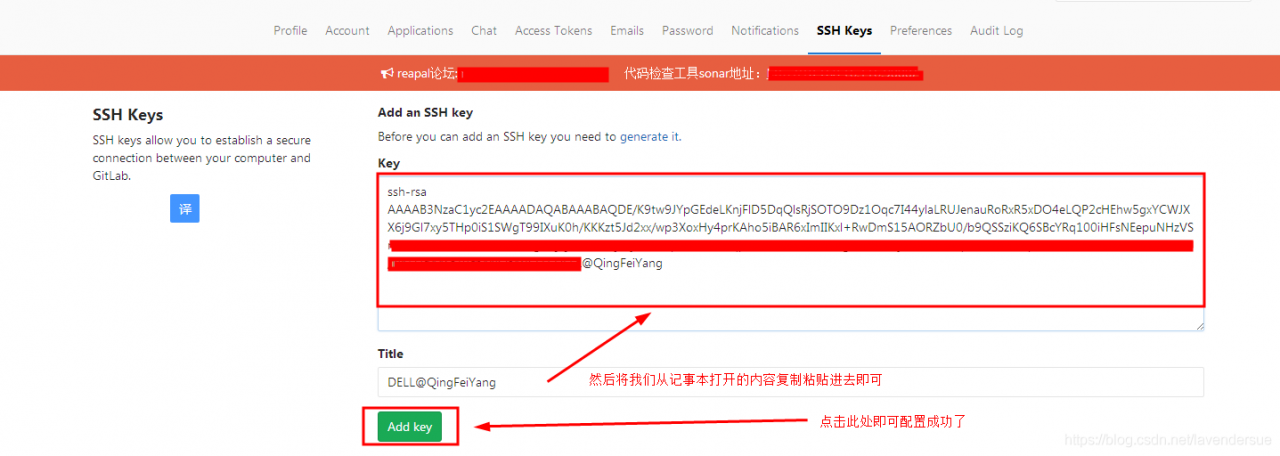
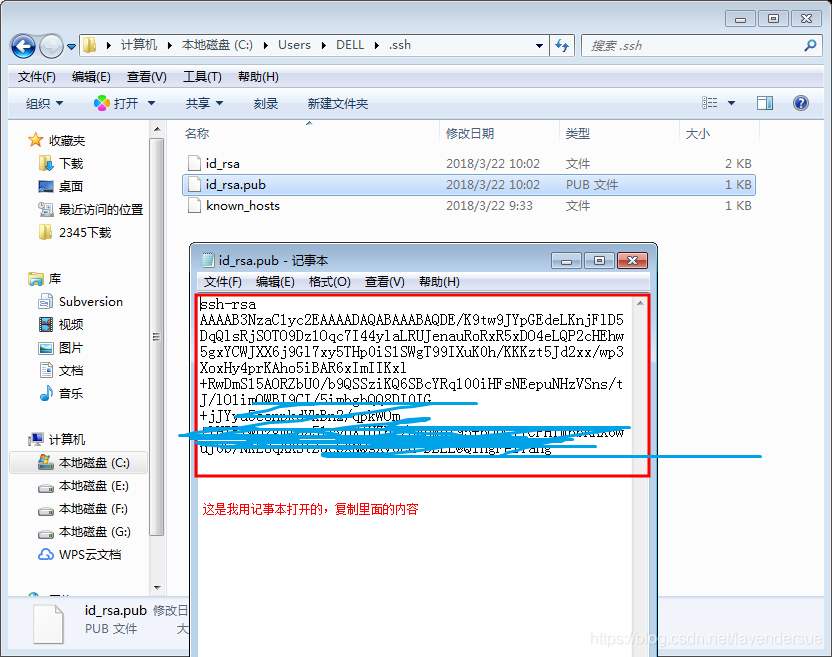
, find the settings in your remote warehouse, and configure SSH to succeed
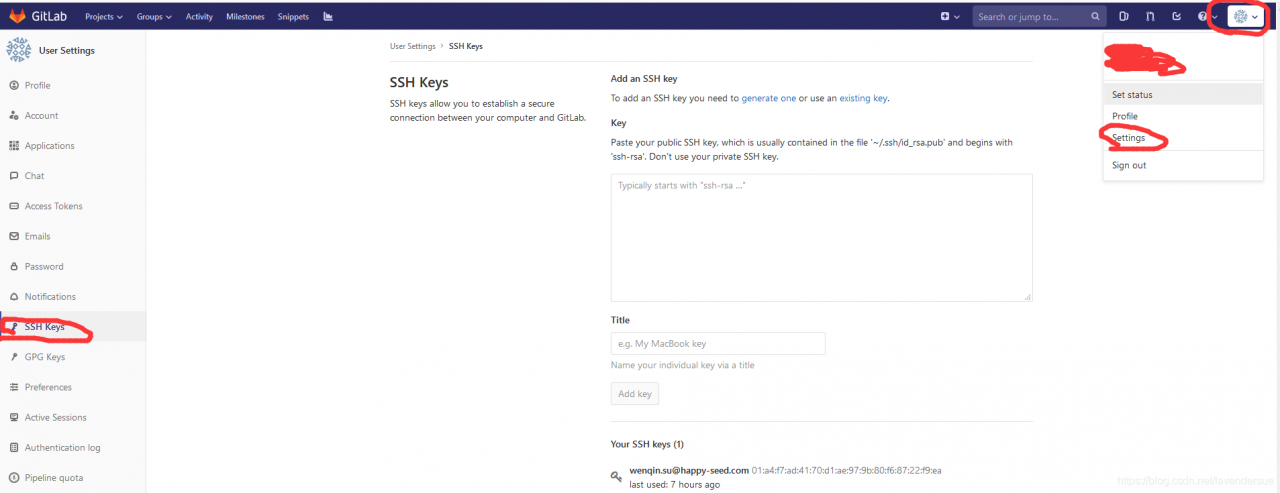
, reprint address (detailed steps address:

https://blog.csdn.net/xiayiye5/article/details/79652296https :// blog.csdn.net/r8hzgemq/article/details/49897905

Solution to node sass installation failure

When NPM installs the node sass dependency, the github.com Download the. Node file from the. Due to the problems of domestic network environment, the download time may be very long, even leading to timeout failure.

Method 1:

Use Taobao image:

npm install -g cnpm --registry=https://registry.npm.taobao.org

Method 2: if the use of Taobao mirror still failed

Delete the entire dependent node_ Use cnpm I to download the modules file again

Method 3:

    unload node sass

    npm uninstall node-sass
    
      then install with cnpm: you must first uninstall the installed node sass, otherwise you cannot install the new node sass

      cnpm install node-sass
      

      After that, start the Vue project again.

NPM and Node.js Version incompatibility

Today, when Xiaobian was installing dependency, he suddenly reported the following error:
. Well, although Xiaobian passed CET-4, he didn’t know which ocean to throw him into, so he went to Baidu to translate.
The result of translation is: the possible node tar or NPM version is the same as node.js This version of is not compatible. Then Xiaobian searches for answers on Baidu, saying that NPM will be downgraded, and the error prompt also says that Xiaobian should mention the version of NPM to be greater than 5.5.1 or less than 5.4.0. However, goose, Xiaobian according to it said downgrade or upgrade operation a wave as fierce as a tiger, the result, ha ha.
So, Xiaobian saw another article on Du Niang. Well, it solved the problem perfectly, so I shared it with you. Xiaobian also took notes.
NPM error

WARNING: You are likely using a version of node-tar or npm that is incompatible with this version of Node.js.
Please use either the version of npm that is bundled with Node.js, or a version of npm (> 5.5.1 or < 5.4.0) or node-tar (> 4.0.1) that is compatible with Node.js 9 and above.
npm[12696]: c:\ws\src\node_zlib.cc:568: Assertion `args.Length() == 7 && "init(windowBits, level, memLevel, strategy, writeResult, writeCallback," " dictionary)"' failed. 
 1: 00007FF7EA10363F napi_wrap+128063
 2: 00007FF7EA0A2836 v8::base::CPU::has_sse+35142
 3: 00007FF7EA0A2B53 v8::base::CPU::has_sse+35939
 4: 00007FF7EA021197 v8::internal::Debug::break_frame_id+84983
 5: 00007FF7EA86DBE0 v8::internal::Builtins::builtin_handle+323456
 6: 00007FF7EA86D127 v8::internal::Builtins::builtin_handle+320711
 7: 00007FF7EA86D468 v8::internal::Builtins::builtin_handle+321544
 8: 00007FF7EA86D26E v8::internal::Builtins::builtin_handle+321038
 9: 00007FF7EAD04EDD v8::internal::SetupIsolateDelegate::SetupHeap+546893
10: 00007FF7EAC89D8C v8::internal::SetupIsolateDelegate::SetupHeap+42748
11: 00007FF7EAC85320 v8::internal::SetupIsolateDelegate::SetupHeap+23696
12: 00007FF7EAD695C0 v8::internal::SetupIsolateDelegate::SetupHeap+958256
15: 00007FF7EAC852F7 v8::internal::SetupIsolateDelegate::SetupHeap+23655
16: 00007FF7EAD695C0 v8::internal::SetupIsolateDelegate::SetupHeap+958256
17: 00007FF7EAC89D8C v8::internal::SetupIsolateDelegate::SetupHeap+42748
18: 00007FF7EAC89D8C v8::internal::SetupIsolateDelegate::SetupHeap+42748
19: 00007FF7EAC89D8C v8::internal::SetupIsolateDelegate::SetupHeap+42748
20: 00007FF7EAC830BC v8::internal::SetupIsolateDelegate::SetupHeap+14892
21: 00007FF7EAC89D8C v8::internal::SetupIsolateDelegate::SetupHeap+42748
22: 00007FF7EAC89D8C v8::internal::SetupIsolateDelegate::SetupHeap+42748

Solution:
1. Uninstall node.js
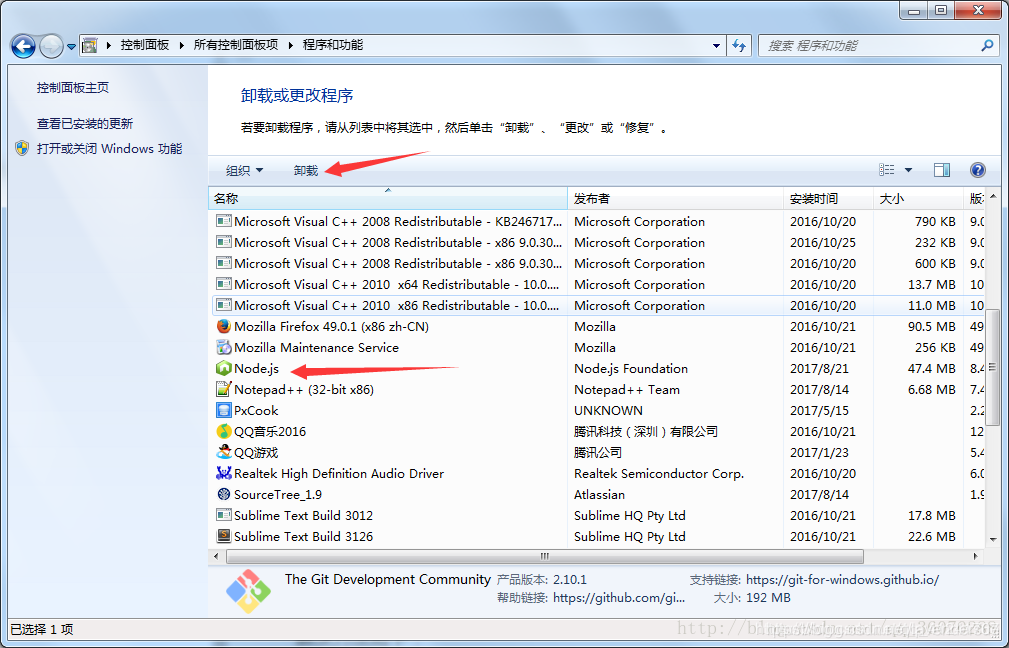
2 Delete the NPM and NPM cache (this step can’t be omitted) under C:: (users/administrator/appdata/roaming)
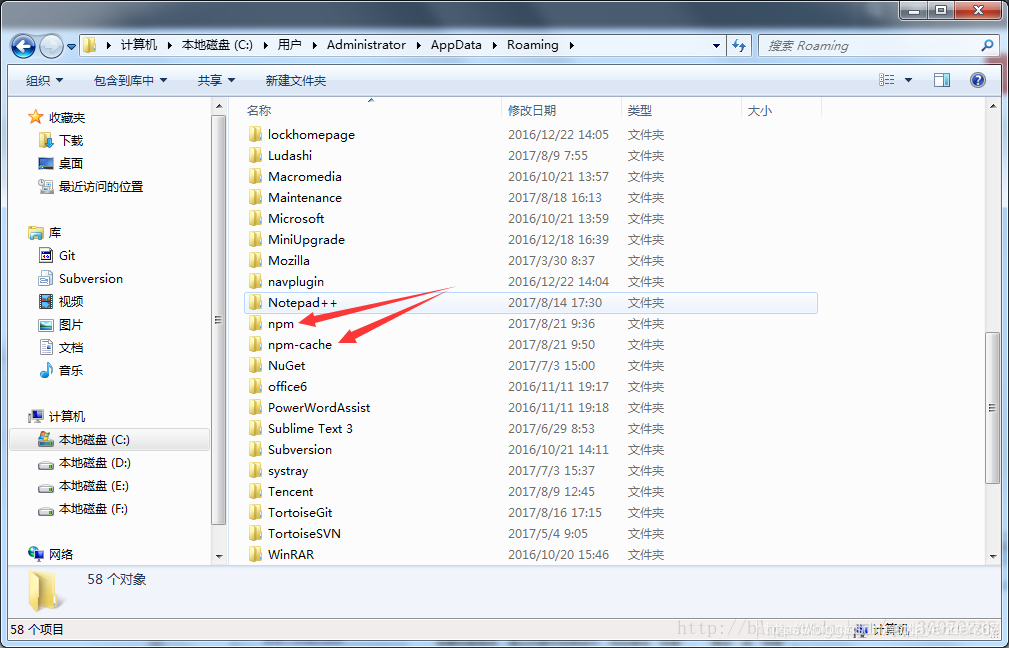
3. Re install nodejs. Please download the installation files from the official website and click here.
Official website address: https://nodejs.org/zh-cn/download/

4. Open the small blackboard and enter node – V and NPM – V respectively to see the corresponding version number

However, the version of nodejs installed by Xiaobian is 12.16.3, and the corresponding version of NPM is 6.14.4. Ah, in this way, Xiaobian reported another error when running NPMI in other projects: exceeding the maximum stack

Maximum call stack size exceeded

Xiaobian asked Du Niang again that the solution is to go back to a lower version of NMP, that is, to downgrade it. Ah, as a result, only the node corresponding to the lower version of NPM can be installed.

Reprint address: https://blog.csdn.net/qq_ 41241767/article/details/89465508

Lock mechanism in Oracle

In order to explore lock, I set up a test table test, the structure and test data are as follows:
sql & gt; select * from test;

        ID NAME
———- ———-
         6 yoxi
         2 robinson
         2 tttt
         3 david
         4 jason
         5 lucy
         1 test

7 rows selected.

Row share if row share locking is performed on a table, other sessions cannot perform exclusive locking on the table, but they can perform any other locking. That is to say, if a session performs row share lock on the table, other sessions can be executed except drop command.
In session 1:
sql & gt; lock table test in row share mode;
the table is locked.
Session 2:
sql & gt; lock table test in row share mode;
the table is locked.
SQL & gt; commit;
commit completed.
SQL & gt; lock table test in row exclusive mode;
the table is locked.
SQL & gt; commit;
commit completed.
SQL & gt; lock table test in share mode;
the table is locked.
SQL & gt; commit;
submit complete
sql & gt; lock table test in exclusive mode nowait;
lock table test in exclusive mode nowait
*
error in line 1:
ora-00054: the resource is busy, but the specified nowait method is used to obtain the resource
sql & gt; update test set id = 10;
7 lines have been updated.
SQL & gt; rollback;
rollback completed.
SQL & gt; drop table test;
drop table test
*
error in line 1:
ora-00054: the resource is busy, but it is specified to obtain the resource by nowait// in fact, the drop table command will perform exclusive locking on the table
row exclusive when executing insert, update, Delete will obtain a row exclusive lock, which has all the characteristics of row share. If a session obtains a row exclusive lock, then other sessions cannot perform exclusive lock on the table or share lock on the table. DML operation can be performed on the table, but drop is not allowed;

In session 1, the
sql & gt; lock table test in row exclusive mode;
table is locked.
Session 2:
sql & gt; lock table test in row share mode;
the table is locked.
SQL & gt; commit;
commit completed.
SQL & gt; lock table test in row exclusive mode;
the table is locked.
SQL & gt; commit;
commit completed.
SQL & gt; lock table test in share mode nowait;
lock table test in share mode nowait
*
error in line 1:
ora-00054: the resource is busy, but it is specified to get the resource in nowait mode
sql & gt; lock table test in exclusive mode nowait;
Lock table test in exclusive mode nowait
*
error in line 1:
ora-00054: the resource is busy, but the nowait mode is specified to obtain the resource

Share (shared lock) when a session has a share lock on a table, other sessions cannot lock the table in exclusive, row exclusive mode. In other words, if row exclusive is not available, insert, update, delete and drop operations cannot be performed.
In session 1, the
sql & gt; lock table test in share mode;
table is locked.
In session 2, the
sql & gt; lock table test in row share mode;
table is locked.
SQL & gt; lock table test in row exclusive mode nowait;
error in line 1:
ora-00054: the resource is busy, but the specified nowait method is used to get the resource
sql & gt; lock table test in share mode;
the table is locked.
SQL & gt; commit;
commit completed.
SQL & gt; lock table test in exclusive mode nowait;
lock table test in exclusive mode nowait
*
error in line 1:
ora-00054: the resource is busy, but it is specified to get the resource in nowait mode

Exclusive (exclusive lock) when the drop command is executed, an exclusive lock is generated. As the name suggests, as long as a session has an exclusive lock on a table, other sessions cannot lock the table.
In session 1, the
sql & gt; lock table test in exclusive mode;
table is locked.
In session 2,
sql & gt; lock table test in row share mode nowait;
lock table test in row share mode nowait
*
there is an error in line 1:
ora-00054: the resource is busy, but the specified nowait method is used to obtain the resource
other locks do not need to be tested, because row share cannot obtain other locks, let alone other locks

Share row exclusive: if a session obtains a share row exclusive lock, other sessions can only obtain the row share lock on the table, that is to say, other sessions can’t perform insert, update, delete or drop operations on the table. Row share locking is good for nothing except preventing drop…
sql & gt; lock table test in share in session 1 Row exclusive mode;
the table is locked.
In session 2
sql & gt; lock table test in row share mode nowait;
the table is locked.
SQL & gt; commit;
commit completed.
SQL & gt; lock table test in row exclusive mode nowait;
lock table test in row exclusive mode nowait
*
error in line 1:
ora-00054: the resource is busy, but it is specified to get the resource in nowait mode
sql & gt; lock table test in share mode nowait;
Error in lock table test in share mode nowait
*
line 1:
ora-00054: the resource is busy, but the specified nowait method is used to obtain the resource
sql & gt; lock table test in exclusive mode nowait;
error in lock table test in exclusive mode nowait
*
line 1:
ora-00054: the resource is busy, However, it is specified to obtain resources in nowait mode

To sum up:

1. If a table is locked by a session, no matter what the lock is, the other session will not be able to obtain the exclusive lock for the table, that is, the table cannot be deleted. In fact, it is very easy to be the same. If someone is using that table, you must delete it

2. If row exclusive locking can be performed on a table, DML operation can certainly be performed

3. Share lock can be understood in this way. As the name suggests, share lock is used for sharing. Since it is shared, other users can only view it and cannot change it.

4. We can understand exclusive lock in this way. As the name suggests, exclusive lock is exclusive. Other users can only view it and cannot modify it.

Note: the lock command above can only get TM (table) lock

There are two kinds of locks generated by update, delete and insert. One is TM lock, the other is TX lock. TX lock means transaction lock

Select….. For update will also get a TX lock and a row exclusive lock
as well

Reprint address: http://blog.csdn.net/robinson1988/article/details/4675371

How can Oracle query tables of other users without adding a table user name

Question: how can Oracle access other users’ tables without adding a table user name

Reasons: 1. Convenient access to common tables

2. Hide the users of the table

3. Limit authority

Solution:

1、 Create consent word

         CREATE [PUBLIC] SYNONYM synonym_ name FOR [schema.] object[@db_ link];

2、 Create view

        create view DF_ YHJB_ BZ  as select * from MIS.DF_ YHJB_ BZ

3、 Modify current_ Schema parameter

The schema used to switch the current session. When parsing the object name, if there is no qualified schema name before the object name, Oracle will automatically query the matching objects under this schema.

for example, when the “Scott” user executes the “select * from EMPs;” statement, Oracle will query the “EMPs” table under the “Scott” architecture by default; however, if the “alter session set” current_ Schema = XX; the current schema of the session is changed. When this statement is executed, Oracle will query the EMPs table under XX schema.