Error:'cp950' codec can't encode byte 0x8c

in position 403:illegal multibyte sequence
Solution: encoding =’utf-8 ‘
hosts_para_file = open(os.path.join(tmdPath,'hosts'), 'r+', encoding='utf-8')Error:'cp950' codec can't encode byte 0x8c
in position 403:illegal multibyte sequence
Solution: encoding =’utf-8 ‘
hosts_para_file = open(os.path.join(tmdPath,'hosts'), 'r+', encoding='utf-8')Background: the following problems occur when the project switches the interface through the menu bar. Although it does not affect the switching of the interface and the use of the system, it will affect the robustness of the system

Reason: the problem shown in the screenshot above is the problem when the system switches routes, mainly due to the version of Vue router. The callback form of Vue router above 3.0 is in the form of promise API, and a promise is returned. If no error is caught, the console will always show the warning above.
Solutions:
1. Install a lower version of Vue router or catch throw in errors
2. Delete node_ Modules folder, and then use “cnpm install” to re install the dependency
3. If the Vue router installed is still the wrong version when downloading the dependency package again, how to solve it?The solution is also very simple. Run NPMI Vue in the project directory- [email protected] -S is enough
4. If you don’t want to change the version of Vue router or it’s still useless, add the following lines in main.js or router.js in SRC folder of project directory:
import Router from 'vue-router'

const originalPush = Router.prototype.push
Router.prototype.push = function push(location) {
  return originalPush.call(this, location).catch(err => err)
}
If you have any questions or suggestions, you are welcome to leave a message in the comment area ([
20202020999999999999999999999999999999999999999999999999999999999999999999999999999999999999999999999999999999999999999999999999999999993333333333333399999999999999999333333333333333333333339999999999999936816931243;’24207;’ 29616;’39064;’ 38169;’35823s;

2121213333333333333999888883333333333333333333333333333333333333333333333333333333333333333333333333333333333333333333333333333333333333333333333————–9999999999993333333333———————————————————-4.run
“209150;”26377;”23558;” wonder 29256;”21040;” 8″261744;”28982;”202155;” 32622;”docker38236;” 206873;”3279138271e;
202020202020202020202020202020202020202020202020202020202020202020202020202020202020202020202020202020202020202020202020202020202020202020202020202020202020202020202020202033333202020202020202020202020202020202020202020202020202020202020202020202020202020202020202020202020202020202020202020202020202020202020202020202020202020202020202020202020202020202020202020202020202020202020202020202020202;’39064;
“Darkness, Darkness, Darkness, Darkness, Darkness, Darkness, Darkness, Darkness, Darkness, Darkness, Darkness, Darkness, Darkness.”
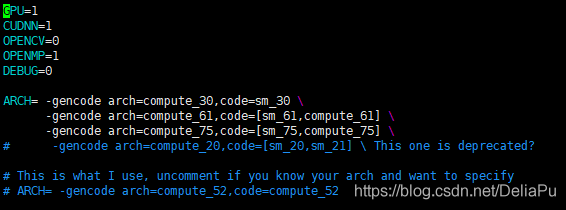
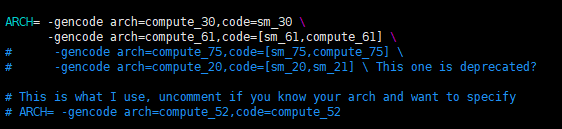
“20462;” 25913;”ARCH32622;” 19982;”26174;” 21345;”21495;” 21305;”2130555;” 3579797;”30528;” 27880;”25481;” 75735793;”darknet;”2652482;”20915;” 3838382;”39064;
“38468;” 26174;”21345;” 31639;”
GeForce TITAN
| 8.6 | |||||
| NVIDIA TITAN RTX | 7.5 | ||||
| GeForce RTX 2080 Ti | 7.5 | NVIDIA TITAN Xp | 6.1 | ||
| NVIDIA TITAN X | 6 <<<<<<<<<<<<<<<<<<<<<<< | GeForce GTX TITAN X | 5.2 | ||
| GeForce GTX TITAN Z | 3.5 | ||||
| GeForce GTX TITAN Black | 3.5 | 5.2 | |||
| GeForce GTX 950 | 5.2 | ||||
| GeForce GTX 780 Ti | 3.5 | GeForce GTX 7505.0 | |||
| GeForce GTX 690 | GeForce GTX 680 | GeForce GTX 680 | 3.0GeForce GTX GTX <<<<<<<<<<<<<<<<<<<<<<<<<<<<<<<<<<<<<<<<<<<<<<<<<<<<<<<<<<<<<<<<<<<<<<<<<<<<<<<<<<<<<<<<<<<<<<<<<<<<<<<<<<<<<<<<<<<<<<<<<<<<<<<<<<<<<<<<<<<<<<<<<<<<<<<<<<<<<<<<<<<<<<<<<<<<<<<<<<<<<<<<<<<<<<<<<<<<<<<< | GeForce GTX 650 Ti | 3.0 |
| GeForce GTX 650 | 3.0 | ||||
| GeForce GTX 560 Ti | 2.1 | ||||
| 2.0 | |||||
| GeForce GTX 580 | 2.0 | GeForce GTX 570 | 2.0 | GeForce GTX GTX GTX <<<<<<<<<<<<<<<<<<<<<<<<<<<<<<<<<<<<<<<<<<<<<<<<<<<<<<<<<<<<<<<<<<<<<<<<<<<<<<<<<<<<<<<<<<<<<<<<<<<<<<<<<<<<<<<<<<<<<<<<<<<<<<<<<<<<<<<<<<<<<<<<<<<<<<<<<<<<<<<<<<<<<<<<<<<<<<<<<<<<<<<<<<<<<<<<<<<<<<< | GeForce GT 730 | 3.5 |
| GeForce GT 730 DDR3128 <<<<<<<<<<<<<<<<<<<<<<<<<<<<<<<<<<<<<<<<<<<<<<<<<<<<<<<<<<<<<<<<<<<<<<<<<<<<<<<<<<<<<<<<<<<<<<<<<<<<<<<<<<<<<<<<<<<<<<<<<<<<<<<<<<<<<<<<<<<<<<<<<<<<<<<<<<<<<<<<<<<<<<<<<<<<<<<<<<<<<<<<<<<<<<<<<<<<<<< | |||||
| GeForce GT 620 | 2.1 | ||||
| GeForce GT 610 | 2.1 | ||||
| GeForce GT 520 | 2.1 |
Using “assemble” option to patch binary files in IDA, you will receive an invalid operation error every time you enter an arithmetic instruction with calculated offset. For example:
mov [bp-4], bx Invalid operate error occurred
however
mov ax, bxsuccess. The official explanation is that the function support of modification instruction is relatively small, so it needs to be modified by other methods.
Xcode12 simulator compilation error
After upgrading Xcode to 12.0.1, the following error occurred in simulator compilation
Could not find module ‘xxxxxxx’ for target ‘arm64-apple-ios-simulator’; found: x86_ 64-apple-ios-simulator, x86_ 64
many methods have been found on the Internet, but they can’t be solved. Later, they have been solved through research. Here’s a record
First of all, make clear the concept
There is an architecture option in
So here comes the question…. The problem I encountered was that I filled in arm64 arm64e in 4, so the compiler simulator kept reporting errors, and then changed all kinds of things, including the architecture of the third Library in pods.
Solution
although Standard Architecture (x86) is set in 1_ However, the effective architecture in 4 is arm64, arm64e, so only arm64 can be used for the simulator. (it is said that the simulator of xcode12 supports arm64, but my computer is i5, so this one doesn’t use arm64). So the module he compiled is for ‘arm64 Apple IOS simulator’, but the simulator is found: x86_ 64-apple-ios-simulator。 So I made a mistake
Pod component
post_install do |installer|
installer.pods_project.targets.each do |target|
    target.build_configurations.each do |config|
        if config.name == 'Debug'
          config.build_settings["VALID_ARCHS"] = "arm64 arm64e x86_64 i386"
        else
          config.build_settings["VALID_ARCHS"] = "arm64 arm64e"
        end
    end
end
end
Finally, the project clean recompile, OK
reference material:
https://forums.xilinx.com/t5/Embedded-Development-Tools/Drivers-and-Makefiles-problems-in-Vitis-2020-2/td-p/1188742
https://forums.xilinx.com/t5/Embedded-Development-Tools/Vitis-2019-2-LWIP-Echo-Server-Template-Build-Error/td-p/1124509
Working environment:
2020.2vitis
Main contents:
1. Out of date problem in platform
2. Platform adds a custom IP core, and makefile appears Error, use version 1 makefile to solve the problem
3. After using version 1 makefile to solve the platform compilation problem, the undefined reference error appears in the application, and version 2 makefile is used
(therefore, if you need to change Makefile, please modify it according to different versions of Vitis. Mine is version 2 of Vitis 2020.2.)
Problem 1. The platform has an out of date problem
After vivado exports the hardware platform xsa, we add it to the platform project of Vitis. We need to check whether the platform version is out of date. If it is out of date, we need to update it.
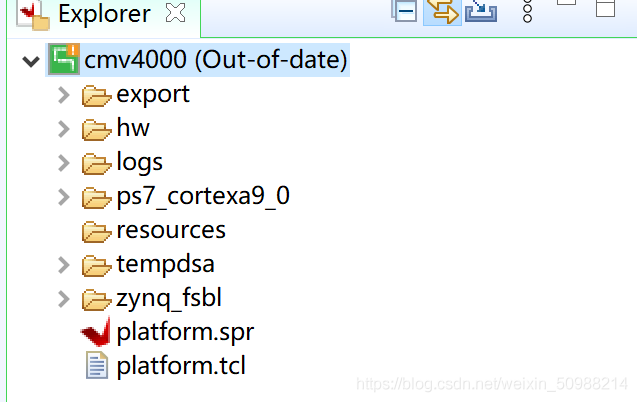
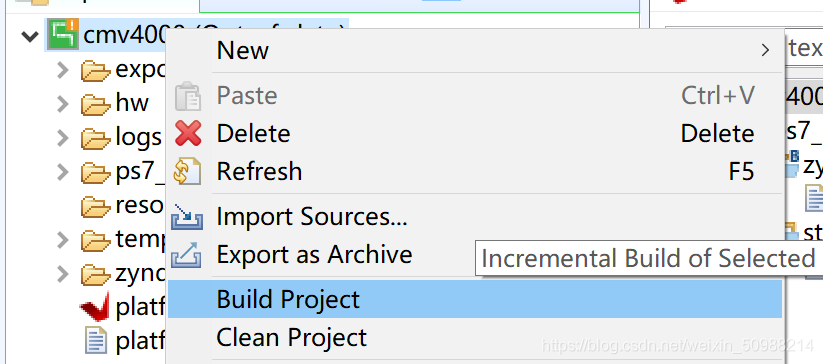
If out of date occurs, the direct way is to clean the platform and compile the build project. Generally speaking, as long as the compilation passes, the out of data flag will disappear, and you can add an application project for writing.
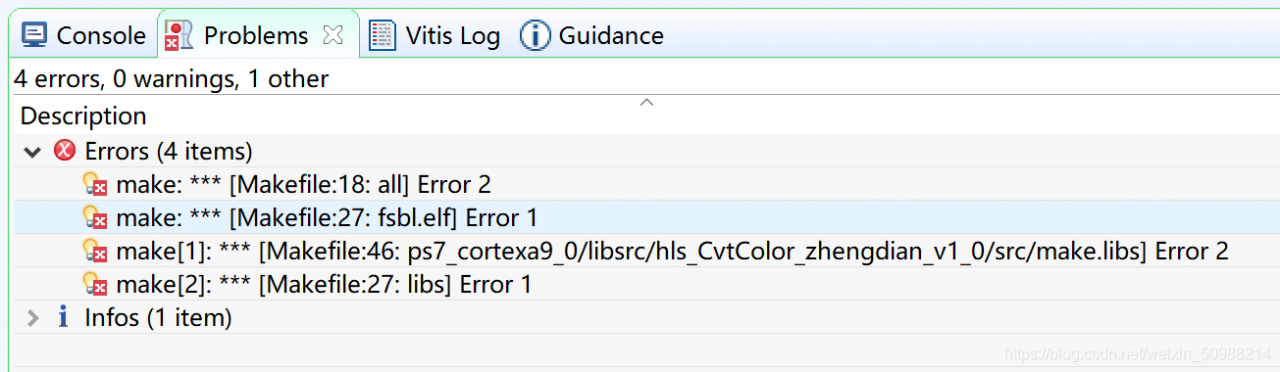
Problem 2. The platform failed to compile, resulting in makefile error
After many times of clean and build operations on platform project, the following problems are prompted: makefile error. All the problems point to makefile.
(the following part is about my own hard journey to solve the problem, which ended in failure. The final solution is at the end, please drag it to the end by yourself)
Possible solutions for online search:
1. As Xilinx forum said, modify the make file
2. It may be due to the system. Win10 will report an error. Therefore, it can be implemented with Vitis on Linux
3. Version mismatch vivado hls2018 should be more Vitis hls2020
Try (to find out the problem by comparison)
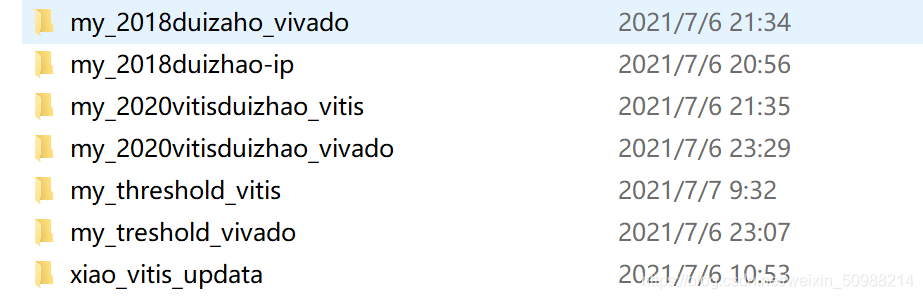
1. The vivado provided by elder martial brother directly exports the hardware, and there is corresponding driver in the driver (see desktop, Fuxian), successful!!!!
2. Using the simplest HLS generated in 2018_ Color IP, export hardware. There is a corresponding driver in the driver, (desktop, my) report an error
3、(my_ treshold_ Vivado folder) uses the HLS generated in 2018_ color,hls_ Threshold: export the hardware, and the corresponding driver (desktop, my) in the driver reports an error. Therefore, it is not the difficulty of IP core writing.
4. Use the gravity method IP core written by myself to report black box and error in vivado part.
We are still investigating the causes.
5. Updata folder: updata try to use the effect of updating xsa file directly in senior brother’s Vitis project. Failure.
Update method website:
0 https://forums.xilinx.com/t5/Design-and-Debug-Techniques-Blog/Step-By-Step-Guide-To-Xilinx-SDK-Project-Migration-To-Vitis/ba-p/1050061
6. Find a simple Vitis project, interface two streams, simple addition and subtraction assignment in the middle. The IP core (my) is derived from 2020.2 Vitis HLS and 2018.3 vivado HLS_ 2018duizaho_ Vivado: the vivado project with the 2018vivado example core; my_ 2020vitis_ Vivado: the vivado project of the 2020 Vitis core, which contains the xsa of the + CVT core vitis_ Xsa of the example core exports the hardware platforms of these two projects to Vitis, all through..
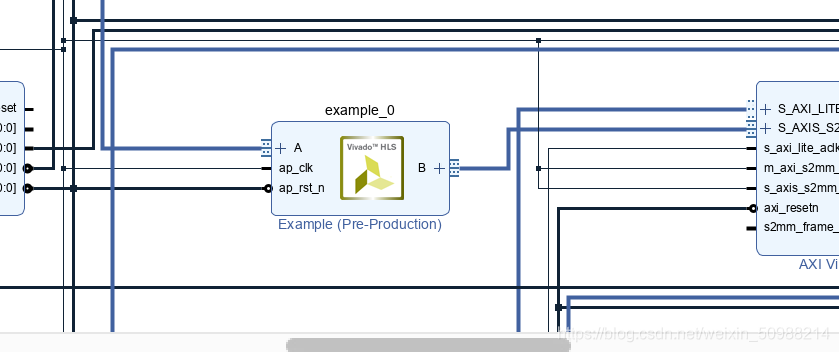
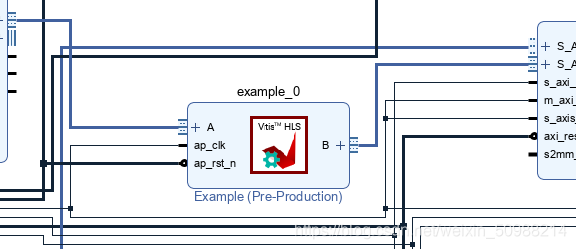
This part is to explore whether using different versions of HLS implementation is the cause of the problem.
(compared with vivado project, the program used for the first time is too simple to generate driver in Vitis, and both of them pass the test.)
Set up the control group picture
Results and summary of the control experiment
Finally, it ended in failure. It is mainly suggested that Vitis HLS after calling the vision library, call the function to generate driver for comparison, and we can see the effect, because of time, about Vitis. After HLS vision, we are trying.
The final solution:
Special thanks to the author of this post, will show the details, thank you!!!
reference: https://forums.xilinx.com/t5/Embedded-Development-Tools/Drivers-and-Makefiles-problems-in-Vitis-2020-2/td-p/1188742
reason:
In vivado 2020.2, 2018.3 vivado is added HLS custom IP core. In 2020, the content of makefile has changed, resulting in an error when compiling the makefile of this IP. The makefile file in the IP file needs to be modified manually.
resolvent:
Varas’s method on Xilinx forum solved this problem. Thank you very much.
To ensure that the corrected makefile is replaced in the three directories of the platform:
In addition, there are two different makefiles according to different versions of Vitis.
Version 1:
I only changed two of the lines: the content of. O changed to the following two lines. Other locations such as the clean section have not been changed.
OBJECTS = $(addsuffix .o, $(basename $(wildcard *.c)))
ASSEMBLY_OBJECTS = $(addsuffix .o, $(basename $(wildcard *.S)))
After these three major changes, your project will be built correctly and your custom IP will work!
The following is the makefile file required, you can modify it according to the original code.
COMPILER=
ARCHIVER=
CP=cp
COMPILER_FLAGS=
EXTRA_COMPILER_FLAGS=
LIB=libxil.a

RELEASEDIR=../../../lib
INCLUDEDIR=../../../include
INCLUDES=-I./. -I${INCLUDEDIR}

INCLUDEFILES=*.h
LIBSOURCES=*.c
OBJECTS = $(addsuffix .o, $(basename $(wildcard *.c)))
ASSEMBLY_OBJECTS = $(addsuffix .o, $(basename $(wildcard *.S)))

libs:
	echo "<CustomIP_name>..."
	$(COMPILER) $(COMPILER_FLAGS) $(EXTRA_COMPILER_FLAGS) $(INCLUDES) $(LIBSOURCES)
	$(ARCHIVER) -r ${RELEASEDIR}/${LIB} ${OBJECTS} ${ASSEMBLY_OBJECTS}
	make clean

include:
	${CP} $(INCLUDEFILES) $(INCLUDEDIR)

clean:
	rm -rf ${OBJECTS} ${ASSEMBLY_OBJECTS}
Problems with this version:
In the later application compilation, if the new IP core function is not used, there will be no problem. However, once the new IP kernel function is used, an error will be reported:

Compile small, error message for the following figure 1, 2


If the compilation is large, the error is:
![]()
The reasons are as follows:
https://forums.xilinx.com/t5/Embedded-Development-Tools/Vitis-2019-2-LWIP-Echo-Server-Template-Build-Error/td-p/1124509
The main reason is:
If you prompt that the missing functions have been compiled in the BSP file, you can see them in the. O file. If it’s compiled correctly, the only reason for missing function errors in the linker is that the correct libxil. A file is not linked.
The core problem is that makefile is not written correctly.
So do I have to use the makefile of version 2 (copied from the makefile of other functions) or change the three parts mentioned above
DRIVER_LIB_VERSION = 1.0
COMPILER=
ARCHIVER=
CP=cp
COMPILER_FLAGS=
EXTRA_COMPILER_FLAGS=
LIB=libxil.a

CC_FLAGS = $(COMPILER_FLAGS)
ECC_FLAGS = $(EXTRA_COMPILER_FLAGS)

RELEASEDIR=../../../lib/
INCLUDEDIR=../../../include/
INCLUDES=-I./. -I$(INCLUDEDIR)

SRCFILES:=$(wildcard *.c)

OBJECTS = $(addprefix $(RELEASEDIR), $(addsuffix .o, $(basename $(wildcard *.c))))

libs: $(OBJECTS)

DEPFILES := $(SRCFILES:%.c=$(RELEASEDIR)%.d)

include $(wildcard $(DEPFILES))

include $(wildcard ../../../../dep.mk)

$(RELEASEDIR)%.o: %.c
	${COMPILER} $(CC_FLAGS) $(ECC_FLAGS) $(INCLUDES) $(DEPENDENCY_FLAGS) $< -o $@

.PHONY: include
include: $(addprefix $(INCLUDEDIR),$(wildcard *.h))

$(INCLUDEDIR)%.h: %.h
	$(CP) $< $@

clean:
	rm -rf ${OBJECTS}
	rm -rf $(DEPFILES)
Using this version to compile, platform and application do not report errors
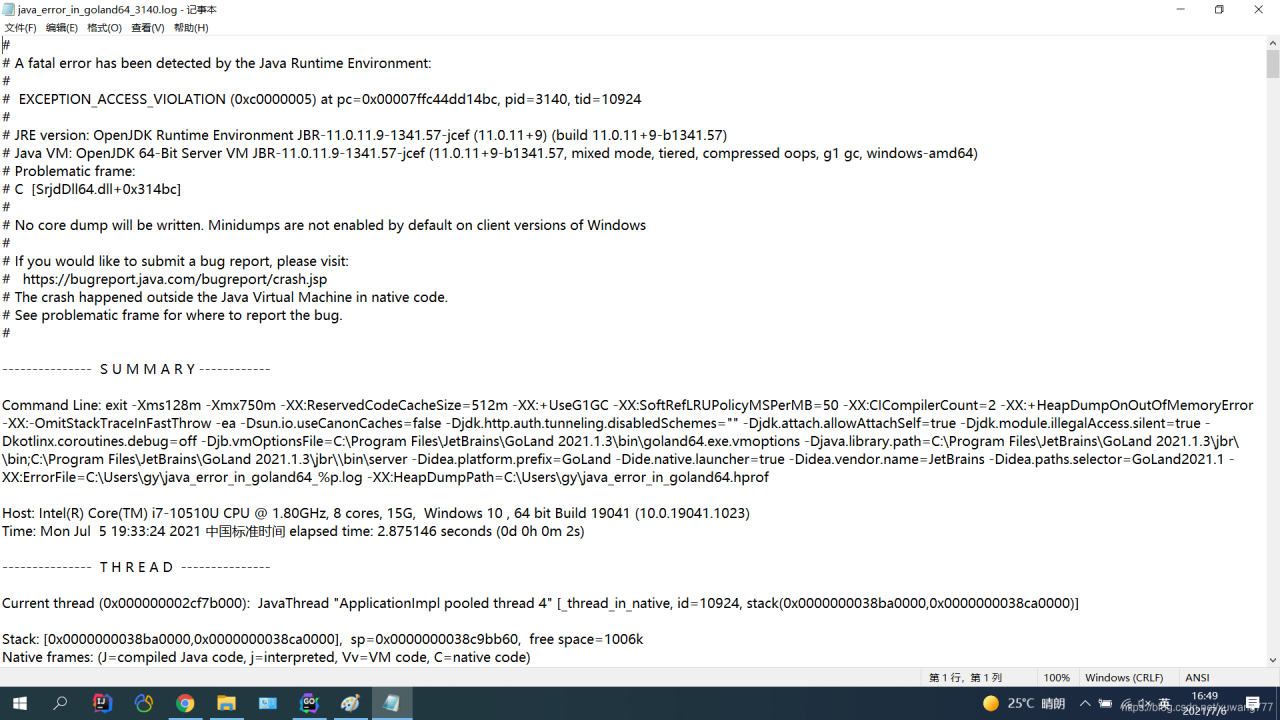
Win10, open GoLand, flash back. Many exception files are found under C/user/XX /
Problematic frame:
# C [ SrjdDll64.dll+0x314bc]
#
# No core dump will be written. Minidumps are not enabled by default on client versions of Windows
Previously, I thought that there was a problem with the memory setting of the JVM. After changing it, I found that it was fruitless. Finally, I found that it might be a problem with conflicting versions. Then I installed the version of GoLand 2019 to solve the problem.
This error is because there are two mappers with the same class name in your project, but it is very likely that the mapper that spring told you is not right. It may be other mappers, and each mapper will search globally.
It is generally caused by the lack of installation permission of the software package
solve:
1. Put the software package node-v14.17.3-x64.msi on the desktop, download address: https://nodejs.org/en/download/
2. Run as a management manager:
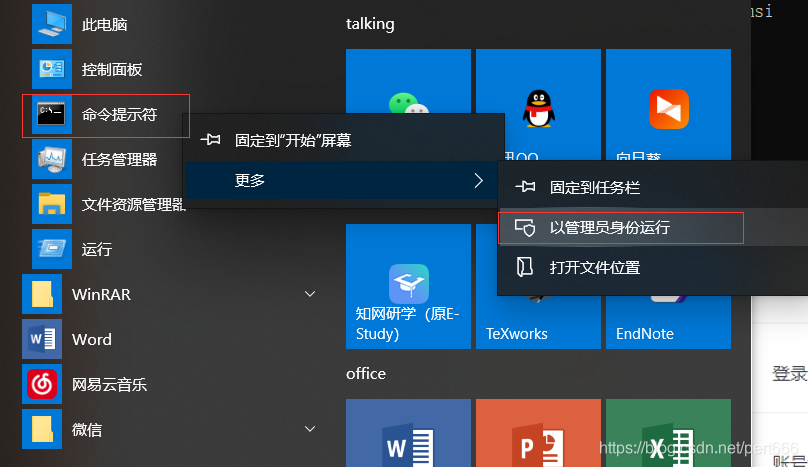
3. Install in the specified directory
C:\Windows>cd C:\Users\pert\Desktop
C:\Users\pert\Desktop>msiexec /package node-v14.17.3-x64.msi
This is how to install the software
Next, configure the environment variables and specify the directory
reference resources https://blog.csdn.net/antma/article/details/86104068
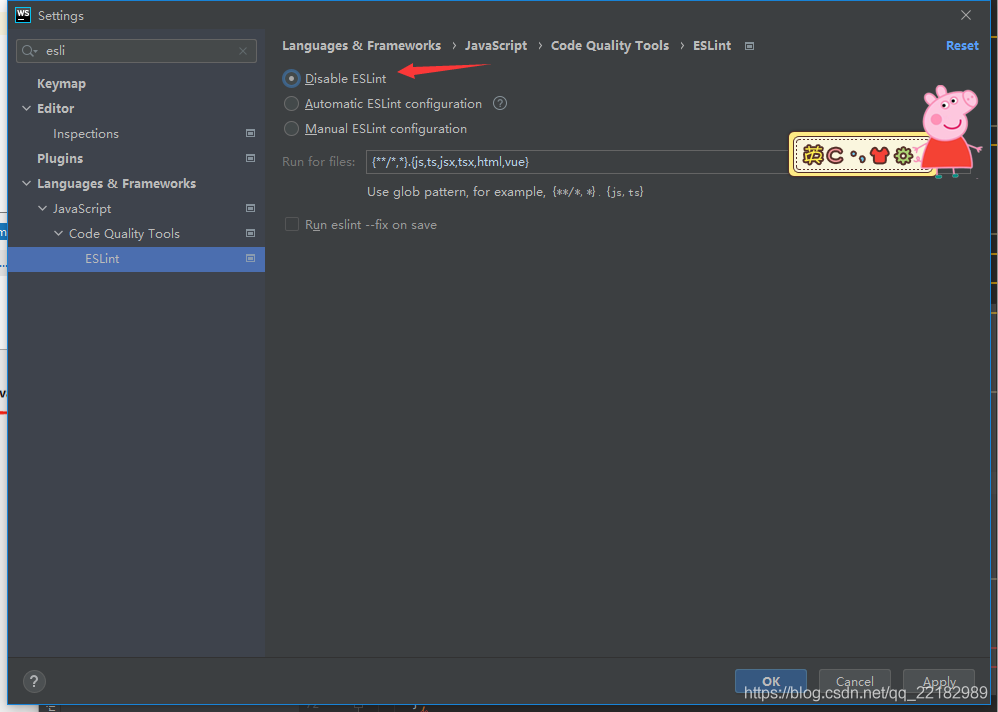
Error:
eslint: expected space or tab after ‘/ /’ in comment
Eslint is very strict. Where the space is not right or not written in accordance with the format, there will always be a red prompt.
Directly find eslint in setting and turn it off
When I debug, I find that method thread 'Java. Lang. NullPointerException' exception. Cannot evaluate com. Sun. Proxy. $proxy0. Tostring() will appear, but it does not affect the normal operation of the program. It should be because the object generated during dynamic proxy may not have tostring() method, and the information is printed through toString in debug mode. So it also explains why the real proxy object can be returned in the invoke method