Category Archives: Examples

Windows Core Audio APIs: How to Progress Loopback Recording and Generate WAV File

Example Code as below:

#include <iostream>
#include <fstream>
#include <vector>

#include <mmdeviceapi.h>
#include <combaseapi.h>
#include <atlbase.h>
#include <Functiondiscoverykeys_devpkey.h>
#include <Audioclient.h>
#include <Audiopolicy.h>

// Use the RAII technique to automatically call CoUninitialize
class CoInitializeGuard {
public:
    CoInitializeGuard()
    {
        _hr = CoInitializeEx(nullptr, COINIT::COINIT_MULTITHREADED);
    }

    ~CoInitializeGuard()
    {
        if (_hr == S_OK || _hr == S_FALSE) {
            CoUninitialize();
        }
    }

    HRESULT result() const { return _hr; }

private:
    HRESULT _hr;
};

constexpr inline void exit_on_failed(HRESULT hr);
void printEndpoints(CComPtr<IMMDeviceCollection> pColletion);
std::string wchars_to_mbs(const wchar_t* s);

int main()
{
    HRESULT hr{};

    CoInitializeGuard coInitializeGuard;
    exit_on_failed(coInitializeGuard.result());

    // COM objects are wrapped in CComPtr, which will automatically call Release
    // COM interface allocated heap variables are wrapped in CComHeapPtr, which automatically calls CoTaskMemFree
    CComPtr<IMMDeviceEnumerator> pEnumerator;
    hr = pEnumerator.CoCreateInstance(__uuidof(MMDeviceEnumerator));
    exit_on_failed(hr);

    // Print all available audio devices
    //CComPtr<IMMDeviceCollection> pColletion;
    //hr = pEnumerator->EnumAudioEndpoints(eRender, DEVICE_STATE_ACTIVE, &pColletion);
    //exit_on_failed(hr);
    //printEndpoints(pColletion);

    // Using the default Audio Endpoint, eRender indicates an audio playback device, not a recording device
    CComPtr<IMMDevice> pEndpoint;
    hr = pEnumerator->GetDefaultAudioEndpoint(eRender, eConsole, &pEndpoint);
    exit_on_failed(hr);

    // Print out the name of the playback device, which may contain Chinese
    CComPtr<IPropertyStore> pProps;
    hr = pEndpoint->OpenPropertyStore(STGM_READ, &pProps);
    exit_on_failed(hr);
    PROPVARIANT varName;
    PropVariantInit(&varName);
    hr = pProps->GetValue(PKEY_Device_FriendlyName, &varName);
    exit_on_failed(hr);
    std::cout << "select audio endpoint: " << wchars_to_mbs(varName.pwszVal) << std::endl;
    PropVariantClear(&varName);

    // Get IAudioClient object from IMMDevice object 
    CComPtr<IAudioClient> pAudioClient;
    hr = pEndpoint->Activate(__uuidof(IAudioClient), CLSCTX_ALL, nullptr, (void**)&pAudioClient);
    exit_on_failed(hr);

    // Get audio playback device format information
    CComHeapPtr<WAVEFORMATEX> pDeviceFormat;
    pAudioClient->GetMixFormat(&pDeviceFormat);

    constexpr int REFTIMES_PER_SEC = 10000000;      // 1 reference_time = 100ns
    constexpr int REFTIMES_PER_MILLISEC = 10000;

    // Initialize the IAudioClient object
    const REFERENCE_TIME hnsRequestedDuration = 2 * REFTIMES_PER_SEC; // 1s
    hr = pAudioClient->Initialize(AUDCLNT_SHAREMODE_SHARED, AUDCLNT_STREAMFLAGS_LOOPBACK, hnsRequestedDuration, 0, pDeviceFormat, nullptr);
    exit_on_failed(hr);

    // Get buffer size
    UINT32 bufferFrameCount{};
    hr = pAudioClient->GetBufferSize(&bufferFrameCount);
    exit_on_failed(hr);

    // Get the IAudioCaptureClient object from the IAudioClient object, which means that the audio playback device is treated as a recording device
    CComPtr<IAudioCaptureClient> pCaptureClient;
    hr = pAudioClient->GetService(__uuidof(IAudioCaptureClient), (void**)&pCaptureClient);
    exit_on_failed(hr);
    
    // Start recording
    hr = pAudioClient->Start();
    exit_on_failed(hr);

    const REFERENCE_TIME hnsActualDuration = (long long)REFTIMES_PER_SEC * bufferFrameCount / pDeviceFormat->nSamplesPerSec;

    std::ofstream ofile("./out.wav", std::ios::binary);
    if (!ofile) {
        exit(-1);
    }

    // Write various header information

    constexpr UINT32 sizePlaceholder{};
    // master RIFF chunk
    ofile.write("RIFF", 4);
    ofile.write((const char*)&sizePlaceholder, 4);
    ofile.write("WAVE", 4);
    // 12

    // fmt chunk
    ofile.write("fmt ", 4);
    UINT32 fmt_ckSize = sizeof(WAVEFORMATEX) + pDeviceFormat->cbSize;
    ofile.write((const char*)&fmt_ckSize, 4);
    {
        auto p = pDeviceFormat.Detach();
        ofile.write((const char*)p, fmt_ckSize);
        pDeviceFormat.Attach(p);
    }
    // 8 + fmt_ckSize

    // fact chunk
    bool has_fact_chunt = pDeviceFormat->wFormatTag != WAVE_FORMAT_PCM;
    if (has_fact_chunt) {
        ofile.write("fact", 4);
        UINT32 fact_ckSize = 4;
        ofile.write((const char*)&fact_ckSize, 4);
        DWORD dwSampleLength{};
        ofile.write((const char*)&dwSampleLength, 4);
    }
    // 12

    // data chunk
    ofile.write("data", 4);
    ofile.write((const char*)&sizePlaceholder, 4);

    UINT32 data_ckSize = 0; // samples data 的大小
    UINT32 frame_count = 0; // Frame Rate

    constexpr int max_duration = 60;    // Recording 60s
    int seconds{}; // the time that has been recorded

    time_t t_begin = time(NULL);

    // UINT32 
    do {
        // sleep for a certain time to prevent high CPU usage
        Sleep(9);

        BYTE* pData{}; // samples data
        UINT32 numFramesAvailable{}; // how many frames are available in the buffer
        DWORD dwFlags{};

        hr = pCaptureClient->GetBuffer(&pData, &numFramesAvailable, &dwFlags, NULL, NULL);
        exit_on_failed(hr);

        int frame_bytes = pDeviceFormat->nChannels * pDeviceFormat->wBitsPerSample / 8;
        int count = numFramesAvailable * frame_bytes;
        ofile.write((const char*)pData, count);
        data_ckSize += count;
        frame_count += numFramesAvailable;
        seconds = frame_count / pDeviceFormat->nSamplesPerSec;
        std::cout << "numFramesAvailable: " << numFramesAvailable << " seconds: " << seconds << std::endl;

        hr = pCaptureClient->ReleaseBuffer(numFramesAvailable);
        exit_on_failed(hr);

    } while (seconds < max_duration);

    // Detect how long it actually took, actual time - max_duration = delay
    time_t t_end = time(NULL);
    std::cout << "use wall clock: " << t_end - t_begin << "s" << std::endl;

    if (data_ckSize % 2) {
        ofile.put(0);
        ++data_ckSize;
    }

    UINT32 wave_ckSize = 4 + (8 + fmt_ckSize) + (8 + data_ckSize);
    ofile.seekp(4);
    ofile.write((const char*)&wave_ckSize, 4);

    if (has_fact_chunt) {
        ofile.seekp(12 + (8 + fmt_ckSize) + 8);
        ofile.write((const char*)&frame_count, 4);
    }

    ofile.seekp(12 + (8 + fmt_ckSize) + 12 + 4);
    ofile.write((const char*)&data_ckSize, 4);

    ofile.close();

    //All COM objects and Heaps are automatically released
}

void printEndpoints(CComPtr<IMMDeviceCollection> pColletion)
{
    HRESULT hr{};

    UINT count{};
    hr = pColletion->GetCount(&count);
    exit_on_failed(hr);

    for (UINT i = 0; i < count; ++i) {
        CComPtr<IMMDevice> pEndpoint;
        hr = pColletion->Item(i, &pEndpoint);
        exit_on_failed(hr);

        CComHeapPtr<WCHAR> pwszID;
        hr = pEndpoint->GetId(&pwszID);
        exit_on_failed(hr);

        CComPtr<IPropertyStore> pProps;
        hr = pEndpoint->OpenPropertyStore(STGM_READ, &pProps);
        exit_on_failed(hr);

        PROPVARIANT varName;
        PropVariantInit(&varName);
        hr = pProps->GetValue(PKEY_Device_FriendlyName, &varName);
        exit_on_failed(hr);

        std::cout << wchars_to_mbs(varName.pwszVal) << std::endl;

        PropVariantClear(&varName);
    }
}

constexpr inline void exit_on_failed(HRESULT hr) {
    if (FAILED(hr)) {
        exit(-1);
    }
}

// Chinese characters will have encoding problems, all converted to narrow characters
std::string wchars_to_mbs(const wchar_t* src)
{
    UINT cp = GetACP();
    int ccWideChar = (int)wcslen(src);
    int n = WideCharToMultiByte(cp, 0, src, ccWideChar, 0, 0, 0, 0);

    std::vector<char> buf(n);
    WideCharToMultiByte(cp, 0, src, ccWideChar, buf.data(), (int)buf.size(), 0, 0);
    std::string dst(buf.data(), buf.size());
    return dst;
}

Reference:

COM Coding Practices
Audio File Format Specifications
Core Audio APIs
Loopback Recording
Flutter & Dart every() Method Example

Flutter & Dart: every() method example

A few examples of using the every() method ( Iterable class) in Dart (and Flutter) . The purpose of this method is to check whether each element of a given iteration satisfies one or more conditions (using a test function):

bool every(
   bool test(
     E element
   )
)

1. Check that each number in the list is divisible by 3 :

void main() {
  var myList = [0, 3, 6, 9, 18, 21, 81, 120];
  bool result1 = myList.every((element){
    if(element %3 ==0){
      return true;
    } else {
      return false; 
    }
  }); 
  
  // expectation: true
  print(result1); 
}

output:

true

2. Check that each name in the list contains the “m” character :

void main() {
  var names = ['Obama', 'Trump', 'Biden', 'Pompeo']; 
  bool hasM = names.every((element) {
     if(element.contains('m')) return true;
     return false;
  });
  
  print(hasM);
}

output:

false

You can find more details about every() method in the official documentation.

Flutter & Dart Enumeration Example

Flutter & Dart: Enumeration Example

This article will show you how to use enums (also known as enums or enum types) in Dart and Flutter.

Overview

An enumeration in Dart is a set of symbolic names (members) bound to a unique constant value. In an enumeration, members can be compared by identity, and the enumeration itself can be iterated over.

An enumeration can be declared using the enum keyword:

enum Aniaml {dog, cat, chicken, dragon}

Each value of the enumeration has an index. The index of the first value is 0.

You can retrieve all values ​​of an enumeration using the values ​​constant:

print(Aniaml.values);
// [Aniaml.dog, Aniaml.cat, Aniaml.chicken, Aniaml.dragon]

a complete example

coding:

// Declare enum
enum Gender {
  Male,
  Female
}// Make a class
class Person {
  final String name;
  final int age;
  final Gender gender;
  
  Person(this.name, this.age, this.gender); 
}// Create an instance
final personA = Person("John Doe", 40, Gender.Male);void main(){
  if(personA.gender == Gender.Male){
    print("Hello gentleman!");
  } else {
    print("Hello lady!");
  }
}

output:

Hello gentleman!

Flutter & Dart: Check if a date is between two other dates

To check if a date is between two other dates in Flutter and Dart, you can use the isBefore( ) and isAfter() methods of the DateTime class .

example

import 'package:flutter/foundation.dart';
​
DateTime dateA = DateTime(1900, 9, 14);
DateTime dateB = DateTime(2000, 10, 15);
​
DateTime dateC = DateTime(1984, 12, 20);
DateTime dateD = DateTime.now();void main() {
  if (dateA.isBefore(dateC) && dateB.isAfter(dateC)) {
    debugPrint("dateC is between dateA and dateB");
  } else {
    debugPrint("dateC isn't between dateA and dateC");
  }if (dateA.isBefore(dateD) && dateB.isAfter(dateD)) {
    debugPrint("dateD is between dateA and dateB");
  } else {
    debugPrint("dateD isn't between dateA and dateC");
  }
}

output:

dateC is between dateA and dateB
dateD isn't between dateA and dateC

You can find more information about DateTime class in the official documentation.

Flutter & Dart Regular Expression Examples

Flutter & Dart: Regular Expression Examples

Example 1: Email Verification

coding:

void main() {
  RegExp exp = new RegExp(
      r"^[a-zA-Z0-9.!#$%&'*+/=?^_`{|}~-]+@[a-zA-Z0-9-]+(?:\.[a-zA-Z0-9-]+)*$",
      caseSensitive: false);// Try it
  String email1 = "[email protected]";
  String email2 = "test@gmail";
  String email3 = "test#gmail.com";if (exp.hasMatch(email1)) {
    print("Email1 OK");
  }if (exp.hasMatch(email2)) {
    print("Email2 OK");
  }if (exp.hasMatch(email3)) {
    print("Email3 OK");
  }
}

output:

Email1 OK
Email2 OK

Example 2: IP address verification

coding:

void main() {
  RegExp ipExp = new RegExp(r"^(?!0)(?!.*\.$)((1?\d?\d|25[0-5]|2[0-4]\d)(\.|$)){4}$", caseSensitive: false, multiLine: false);
  
  // Try it
  // Expectation: true
  if(ipExp.hasMatch('192.168.1.2')){
    print('192.168.1.2 is valid'); 
  }
  
  // Expectation: false
  if(ipExp.hasMatch('192.168.111111.55555')){
    print('192.168.111111.55555 is valid');
  }
}

output:

192.168.1.2 is valid

Example 3: URL Validation

coding:

void main() {
  RegExp urlExp = RegExp(r"(http|ftp|https)://[\w-]+(\.[\w-]+)+([\w.,@?^=%&amp;:/~+#-]*[\w@?^=%&amp;/~+#-])?");
  
  String url1 = "https://www.kindacode.com/cat/mobile/flutter/"; // valid
  
  String url2 = "https://kindacode/cat/mobile/flutter/"; // invalid
  
  if(urlExp.hasMatch(url1)) {
    print('Url1 looks good!');
  }
  
  if(urlExp.hasMatch(url2)) {
    print("Url2 looks good!");
  }
}

output:

Url1 looks good!

Example 4: Domain Validation

void main() {
  RegExp  domainExp = RegExp(r"^[a-z0-9]+([\-\.]{1}[a-z0-9]+)*\.[a-z]{2,6}$");
  
  String domain1 = "www.kindacode.com"; // valid
  String domain2 = "www.amazon.co.uk"; // valid
  String domain3 = "hello world!"; // invalid
  
  if(domainExp.hasMatch(domain1)){
    print('domain1 is valid');
  }
  
  if(domainExp.hasMatch(domain2)){
    print('domain2 is valid');
  }
  
  if(domainExp.hasMatch(domain3)){
    print('domain3 is valid');
  }
}

output:

domain1 is valid
domain2 is valid

Flutter & Dart: Conditionally remove elements from a list

To remove elements from a list based on one or more conditions, you can use the built-in removeWhere() method.

example

Suppose we have a list of products and the task is to remove all products with a price higher than 100:

// Define how a product looks like
class Product {
  final double id;
  final String name;
  final double price;
  Product(this.id, this.name, this.price);
}

void main() {
  // Generate the product list
  List<Product> products = [
    Product(1, "Product A", 50),
    Product(2, "Product B", 101),
    Product(3, "Product C", 200),
    Product(4, "Product D", 90),
    Product(5, "Product E", 400),
    Product(6, "Product F", 777)
  ];

  // remove products whose prices are more than 100
  products.removeWhere((product) => product.price > 100);

  // Print the result
  print("Product(s) whose prices are less than 100:");
  for (var product in products) {
    print(product.name);
  }
}

output:

Product(s) whose prices are less than 100:
Product A
Product D

Reference : removeWhere method (dart.dev).

Summarize

We’ve gone through some examples of using regular expressions in Dart that can be very useful in many common use cases. If you want to learn more about Dart and Flutter, you can follow me.

File class details (get the file name, size, path, create, etc.)

Overview

java.io.FileClasses are abstract representations of file and directory pathnames, and are mainly used for operations such as file and directory creation, search, and deletion.

Construction method

  • public File(String pathname): Creates a new File instance by converting the given pathname string to an abstract pathname.
  • public File(String parent, String child): Creates a new File instance from the parent pathname string and child pathname string .
  • public File(File parent, String child): Creates a new File instance from the parent abstract pathname and child pathname strings .
  • The construction example, the code is as follows:
// File path name
String pathname = "D:\\aaa.txt";
File file1 = new File(pathname); 

// File path name
String pathname2 = "D:\\aaa\\bbb.txt";
File file2 = new File(pathname2); 

// By parent path and child path string
 String parent = "d:\\aaa";
 String child = "bbb.txt";
 File file3 = new File(parent, child);

// By parent File object and child path string
File parentDir = new File("d:\\aaa");
String child = "bbb.txt";
File file4 = new File(parentDir, child);

💡Tips:

  1. A File object represents a file or directory that actually exists on the hard disk.
  2. Regardless of whether there is a file or directory in the path, it does not affect the creation of the File object.

Common method

How to get features

  • public String getAbsolutePath(): Returns the absolute pathname string of this File.
  • public String getPath(): Convert this File to a pathname string.
  • public String getName()  : Returns the name of the file or directory represented by this File.
  • public long length()  : Returns the length of the file represented by this File.
    Method demonstration, the code is as follows:
public class FileGet {
    public static void main(String[] args) {
        File f = new File("d:/aaa/bbb.java");     
        System.out.println("Absolute path to the file:"+f.getAbsolutePath());
        System.out.println("File construction path:"+f.getPath());
        System.out.println("File name: "+f.getName()); 
        System.out.println("File length: "+f.length()+"bytes");

        File f2 = new File("d:/aaa");     
        System.out.println("Absolute path to directory:"+f2.getAbsolutePath());
        System.out.println("Directory construction path:"+f2.getPath());
        System.out.println("Catalog Name:"+f2.getName());
        System.out.println("Directory length:"+f2.length());
    }
}

Output results.
File absolute path :d:\aaa\bbb. java
File construction path :d:\aaa\bbb. java
File name :bbb. java
File length :636 bytes

Directory absolute path :d:\aaa
Directory construction path :d:\aaa
Directory name :aaa
Directory length:4096

Description in the API: length(), which indicates the length of the file. But the File object represents a directory, the return value is unspecified.

Absolute and relative paths

  • Absolute path : The path starting from the drive letter, this is a complete path.
  • Relative path : The path relative to the project directory, this is a convenient path and is often used in development.
public class FilePath {
    public static void main(String[] args) {
      	//The bbb.java file under the D drive
        File f = new File("D:\\bbb.java");
        System.out.println(f.getAbsolutePath());
      	
		// The bbb.java file under the project
        File f2 = new File("bbb.java");
        System.out.println(f2.getAbsolutePath());
    }
}
Output results.
D:\bbb.java
D:\idea_project_test4\bbb.java

How to judge function

  • public boolean exists(): Whether the file or directory represented by this File actually exists.
  • public boolean isDirectory(): Whether this File represents a directory.
  • public boolean isFile(): Whether this File represents a file or not.

Method demonstration, the code is as follows:

public class FileIs {
    public static void main(String[] args) {
        File f = new File("d:\\aaa\\bbb.java");
        File f2 = new File("d:\\aaa");
        System.out.println("d:\\aaa\\bbb.java Does it exist:"+f.exists());
        System.out.println("d:\\aaa Does it exist:"+f2.exists());
      	// Determine if it is a file or a directory
        System.out.println("d:\\aaa file?:"+f2.isFile());
        System.out.println("d:\\aaa Catalog?:"+f2.isDirectory());
    }
}
Outcome:
d:\aaa\bbb.java Does it exist:true
d:\aaa Does it exist:true
d:\aaa file?:false
d:\aaa Catalog?:true

How to create a delete function

  • public boolean createNewFile(): Creates a new empty file if and only if a file with that name does not already exist.
  • public boolean delete(): Deletes the file or directory represented by this File.
  • public boolean mkdir(): Creates the directory represented by this File.
  • public boolean mkdirs(): Creates the directory represented by this File, including any required but non-existing parent directories.

Method demonstration, the code is as follows:

public class FileCreateDelete {
    public static void main(String[] args) throws IOException {
        File f = new File("aaa.txt");
        System.out.println("Does it exist:"+f.exists()); // false
        System.out.println("Whether to create:"+f.createNewFile()); // true
        System.out.println("Does it exist:"+f.exists()); // true
		
      	File f2= new File("newDir");	
        System.out.println("Does it exist:"+f2.exists());// false
        System.out.println("Whether to create:"+f2.mkdir());	// true
        System.out.println("Does it exist:"+f2.exists());// true

      	File f3= new File("newDira\\newDirb");
        System.out.println(f3.mkdir());// false
        File f4= new File("newDira\\newDirb");
        System.out.println(f4.mkdirs());// true
      
       	System.out.println(f.delete());// true
      
        System.out.println(f2.delete());// true
        System.out.println(f4.delete());// false
    }
}

💡Description in API: delete method, if this File represents a directory, the directory must be empty to delete.

directory traversal

  • public String[] list(): Returns a String array representing all subfiles or directories in the File directory.
  • public File[] listFiles(): Returns a File array, representing all subfiles or directories in the File directory.
public class FileFor {
    public static void main(String[] args) {
        File dir = new File("d:\\java_code");
      
      	//Get the names of the files and folders in the current directory.
		String[] names = dir.list();
		for(String name : names){
			System.out.println(name);
		}
        //Get the file and folder objects in the current directory, as long as you get the file object, then you can get more information
        File[] files = dir.listFiles();
        for (File file : files) {
            System.out.println(file);
        }
    }
}

💡Tips:
The File object that calls the listFiles method must represent the actual directory, otherwise it returns null and cannot be traversed.

Websocket Front-end Call Example

<!DOCTYPE html>
<html lang="en">
<head>
<meta charset="UTF-8">
<meta name="viewport" content="width=device-width, initial-scale=1.0">
<meta http-equiv="X-UA-Compatible" content="ie=edge">
<title>Document</title>
</head>
<body>
Welcome<br/><input id="text" type="text"/>
<button onclick="send()">Send message</button>
<hr/>
<button onclick="closeWebSocket()">Close WebSocket connection</button>
<hr/>
<div id="message"></div>
</body>
<script>
var websocket = null;
// determine if the current browser supports WebSocket
if ('WebSocket' in window) {
	websocket = new WebSocket("ws://localhost:8080/wsServer");
}
else {
	alert('The current browser does not support websocket')
}

// Callback method for connection error
websocket.onerror = function () {
	setMessageInnerHTML("An error occurred with the WebSocket connection");
};

// Callback method for successful connection establishment
websocket.onopen = function () {
	setMessageInnerHTML("WebSocket connection successful");
}

// Callback method for received message
websocket.onmessage = function (event) {
	setMessageInnerHTML(event.data);
}

// Callback method for closing the connection
websocket.onclose = function () {
	setMessageInnerHTML("WebSocket connection closed");
}

// Listen to the window close event and actively close the websocket connection when the window is closed to prevent the window from being closed before the connection is broken, which will throw an exception on the server side.
window.onbeforeunload = function () {
	closeWebSocket();
}
 
// Display the message on the web page
function setMessageInnerHTML(innerHTML) {
	document.getElementById('message').innerHTML += innerHTML + '<br/>';
}
 
//Close the WebSocket connection
function closeWebSocket() {
	websocket.close();
}
 
//Send a message

function send() {
var message = document.getElementById('text').value;
	websocket.send(message);
}
</script>

</html>

Hutool Excel Import & Export Example

Download and generate excel template

Example code:

① Entity class of template:

@Getter
@Setter
@ToString
@SuperBuilder
@NoArgsConstructor
public class WsWorkerTemplate{
    @ApiModelProperty(value = "NAME")
    private String workerName;

    @ApiModelProperty(value = "Phone Number")
    private String workerPhone;
    
    @ApiModelProperty(value = "ID number")
    private String workerIdcard;
}

② Class to generate template:

    @ApiOperation("Download generated excel template")
    @GetMapping("/downloadExcel")
    public void downloadExcel(HttpServletResponse response) throws IOException {

        WsWorkerTemplate wsWorker = new WsWorkerTemplate();
//        wsWorker.setWorkerName("张三");
//        wsWorker.setWorkerPhone("15992714704");
//        wsWorker.setWorkerIdcard("130501197512158843");
        List<WsWorkerTemplate> rows = CollUtil.newArrayList(wsWorker);

        // Create writer by tool class, default create xls format
        ExcelWriter writer = ExcelUtil.getWriter();
        // custom header alias
        writer.addHeaderAlias("workerName", "Name");
        writer.addHeaderAlias("workerPhone", "mobile number");
        writer.addHeaderAlias("workerIdcard", "ID number");
        // merge the header row after the cell, using the default header style
        String content = "Instructions for filling out the form: \n\t" +
                "1, name: 2 to 15 Chinese characters; \n\t" +
                "2, cell phone number: 11-digit cell phone number format; \n\t" +
                "3, ID number: 18-bit second-generation ID number; \n\t";
        writer.merge(2,content,false);
        //set the column width
        writer.setColumnWidth(-1,30);

        writer.setRowHeight(0,80);
        // write the content at once, use the default style, and force the output headers
        writer.write(rows, true);
        //out is the OutputStream, the target stream to write out to
        // response is the HttpServletResponse object
        response.setContentType("application/vnd.ms-excel;charset=utf-8");
        //test.xls is the name of the file that pops up the download dialog box, it can't be Chinese, please encode it yourself
        //response.setHeader("Content-Disposition", "attachment;filename=test-file.xls");
        String excelName="worker.xls";
        // When setting response.setHeader, if it contains Chinese characters, it must be converted to ISO8859-1 format, otherwise the set Chinese will be incorrect.
        response.setHeader("content-disposition", "attachment;filename="+new String(excelName.getBytes("gb2312"), "ISO8859-1"));
        ServletOutputStream out = response.getOutputStream();
        writer.flush(out, true);
        // Close the writer and free memory
        writer.close();
        // Remember to close the output servlet stream here
        IoUtil.close(out);
    }

excel import

 /**
     * Batch Import
     *
     * @param file
     * @return
     */
    public ResultObj<Object> importWorker(@RequestParam("file") MultipartFile file, String worksiteId) {
        ResultObj<Object> resultObj = new ResultObj<Object>();
        String message1 = "";
        List<String> strList = new LinkedList<>();
        List<WsWorker> list = new LinkedList<>();
        try {
            InputStream inputStream = file.getInputStream();
            list = getWsWorkerExcel(inputStream);
            if (list != null && list.size() > 0) {
                    for (WsWorker w : list) {
                        w.setWorksiteId(worksiteId);
                        w.setCheckResult(0);
                        wsWorkerMapper.insertSelective(w);
                    }
                    resultObj.setStatus(200);
                    resultObj.setMsg("import successfully");
              }
        } catch (IOException e) {
            e.printStackTrace();
        }
        return resultObj;
    }

Get Excel data:

  public List<WsWorker> getWsWorkerExcel(InputStream inputStream) {

        ExcelReader reader = ExcelUtil.getReader(inputStream);
        reader.addHeaderAlias("Name", "workerName");
        reader.addHeaderAlias("Phone Number", "workerPhone");
        reader.addHeaderAlias("ID Number", "workerIdcard");

        List<WsWorker> workers = reader.read(1, 2, WsWorker.class);
        return workers;
    }

torch.max Example (How to Use)

torch.max(input, dim)

pred = torch.max(input, dim)

Returns the maximum value per row (dim = 1) or column (dim = 0).

_, pred = torch.max(input, dim)

Only the position of the maximum value in each row (dim = 1) or column (dim = 0) is returned.

Example:

import torch

# Construct a 5x3 randomly initialized matrix
x = torch.rand(5, 3)
print('input: ', x)
print('-'*10)
y1 = torch.max(x, 1)
print('max by row: ', y1)
print('-'*10)
y2 = torch.max(x, 0)
print('max by col: ', y2)
print('-'*10)
_, y3 = torch.max(x, 1)
print('max index by row: ', y3)
print('-'*10)
_, y4 = torch.max(x, 0)
print('max index by col: ', y4)

Output result:

input:  tensor([[0.5504, 0.3160, 0.2448],
        [0.8694, 0.3295, 0.2085],
        [0.5530, 0.9984, 0.3531],
        [0.2874, 0.1025, 0.9419],
        [0.0867, 0.4234, 0.8334]])
----------
max by row:  torch.return_types.max(
values=tensor([0.5504, 0.8694, 0.9984, 0.9419, 0.8334]),
indices=tensor([0, 0, 1, 2, 2]))
----------
max by col:  torch.return_types.max(
values=tensor([0.8694, 0.9984, 0.9419]),
indices=tensor([1, 2, 3]))
----------
max index by row:  tensor([0, 0, 1, 2, 2])
----------
max index by col:  tensor([1, 2, 3])

MultipartFile Upload an Image Example

 /**
     * Adding data to the general meal master table
     */
    @ApiOperation(value = "Add General Meal Master Table")
    @ApiResponses(value = {
            @ApiResponse(code = 200, message = "The operation was successful, returning the new general meal master table, which is saved in the data collection element"),
            @ApiResponse(code = 500, message = "Internal error, message returned by msg field")
    })
    @RequestMapping(value = "saveDishesTable",method=RequestMethod.POST)
    @ResponseBody
    public R<DishesTable> saveDishesTable (DishesTable dishesTable, MultipartFile file, HttpServletRequest request){
        try {
            //The full path to this file is divided into two parts: the path to the home folder + the file name

            //Manually create the home folder under 1001-services/src/mian/resources
            //get the path to the downloaded file on the server-> that is, the path to the newly created home folder
            String path = request.getSession().getServletContext().getRealPath("home");
            if(file!=null){
                //Get the name of the file saved to the server
                String fileName = file.getOriginalFilename();
                //splice the path â€" path of home folder + file name
                File dir= new File(path,fileName);
                //write the uploaded file to the specified file on the server
                file.transferTo(dir);
                //returns a canonical pathname string representing the file or directory with the same abstract pathname - "that is, the path is converted to a string form
                String directory = dir.getCanonicalPath();
                //cut the string, starting from the back of the home folder - "get the string corresponding to the filename
                //directory.indexOf("home") means find the subscript of the letter h of home
                //directory.substring(directory.indexOf("home"),directory.length()) means cut from the subscript of h to the last one
                // The result of the final cut is in this form: home/3c2c1cc2-49f1-44c4-b98d-34be8fe09b35.jpg
                String str = directory.substring(directory.indexOf("home"),directory.length());
                dishesTable.setDishesPictures(str);
            }

            DishesTable savedishesTable = dishesTableService.saveDishesTable(dishesTable);
            return R.ok(savedishesTable);
        }catch(Exception e){
            logger.error("Failed to add common meals master table interface error : {}", e);
            e.printStackTrace();
            return R.error("Failed to add common meal master table----->"+e.getMessage());
        }
    }

Base64 Image Compression Example

Compress picture size

@Log4j2
public class Base64Util {

    /**
     * Compressed images within 100k
     *
     * @param base64Img
     * @return
     */
    public static String resizeImageTo100K(String base64Img) {
        try {
            BufferedImage src = base64String2BufferedImage(base64Img);
            BufferedImage output = Thumbnails.of(src).size(src.getWidth()/3, src.getHeight()/3).asBufferedImage();
            String base64 = imageToBase64(output);
            if (base64.length() - base64.length()/8 * 2 > 40000) {
                output = Thumbnails.of(output).scale(1/(base64.length()/40000)).asBufferedImage();
                base64 = imageToBase64(output);
            }
            return base64;
        } catch (Exception e) {
            return base64Img;
        }
    }


    /**
     * base64 convert to BufferedImage
     *
     * @param base64string
     * @return
     */
    public static BufferedImage base64String2BufferedImage(String base64string) {
        BufferedImage image = null;
        try {
            InputStream stream = BaseToInputStream(base64string);
            image = ImageIO.read(stream);
        } catch (IOException e) {
            log.info("");
        }
        return image;
    }

    /**
     * Base64 convert to InputStream
     *
     * @param base64string
     * @return
     */
    private static InputStream BaseToInputStream(String base64string) {
        ByteArrayInputStream stream = null;
        try {
            BASE64Decoder decoder = new BASE64Decoder();
            byte[] bytes1 = decoder.decodeBuffer(base64string);
            stream = new ByteArrayInputStream(bytes1);
        } catch (Exception e) {
            // TODO: handle exception
        }
        return stream;
    }

    /**
     * BufferedImage switch to base64
     *
     * @param bufferedImage
     * @return
     */
    public static String imageToBase64(BufferedImage bufferedImage) {
        Base64 encoder = new Base64();
        ByteArrayOutputStream baos = new ByteArrayOutputStream();
        try {
            ImageIO.write(bufferedImage, "jpg", baos);
        } catch (IOException e) {
            log.info("");
        }
        return new String(encoder.encode((baos.toByteArray())));
    }

}

Opentelemetry + Jaeger Python Version Cross Service Call Example

Opentelemetry Python version cross service invocation example

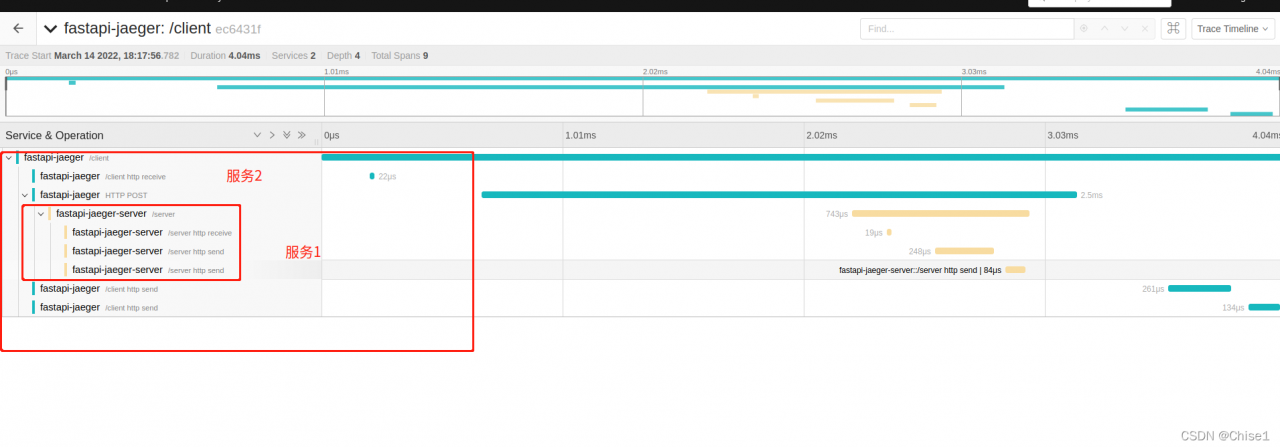
When calling opentelemetry across services, you need to import opentelemetry-instrumentation-requests, and then use request to cross service requests. (note that aiohttp-client should be used if it is asynchronous)
I use Jaeger on the server, which is deployed directly through the docker of all-in-one. The code is as follows:

docker run -d --name jaeger \
  -e COLLECTOR_ZIPKIN_HOST_PORT=:9411 \
  -p 5775:5775/udp \
  -p 6831:6831/udp \
  -p 6832:6832/udp \
  -p 5778:5778 \
  -p 16686:16686 \
  -p 14250:14250 \
  -p 14268:14268 \
  -p 14269:14269 \
  -p 9411:9411 \
  jaegertracing/all-in-one:1.32

After starting Jaeger, visit the following page: http://localhost:16686

Python needs to start two services to demonstrate cross service invocation. The framework I use is fastapi, so I need to install opentelemetry-instrumentation-fastapi
call service 1 by service 2
Service 1:

import fastapi
from opentelemetry import trace
from opentelemetry.instrumentation.fastapi import FastAPIInstrumentor
from fastapi import Body
from pybase.lib.tracer.jaeger_ import register_to_jaeger
from pydantic import BaseModel

app = fastapi.FastAPI()


class UserInfo(BaseModel):
    name: str


tracer = trace.get_tracer(__name__)


@app.post("/server")
async def server(userinfo: str = Body(...), name: str = Body(..., )):
    return {"message": f"hello {userinfo},{name}"}


FastAPIInstrumentor.instrument_app(app)
if __name__ == '__main__':
    register_to_jaeger("fastapi-jaeger-server", "localhost")
    import uvicorn

    uvicorn.run(app,port=8001)

Service 2

import fastapi
import requests
from opentelemetry import trace
from opentelemetry.instrumentation.fastapi import FastAPIInstrumentor
from fastapi import Body
from opentelemetry.instrumentation.requests import RequestsInstrumentor
RequestsInstrumentor().instrument()
from pybase.lib.tracer.jaeger_ import register_to_jaeger
from pydantic import BaseModel

app = fastapi.FastAPI()


class UserInfo(BaseModel):
    name: str


tracer = trace.get_tracer(__name__)


@app.post("/foobar")
async def foobar(userinfo: str = Body(...), name: str = Body(..., )):
    with tracer.start_as_current_span("foo"):
        with tracer.start_as_current_span("bar"):
            with tracer.start_as_current_span("baz"):
                print("Hello world from OpenTelemetry Python!")
    return {"message": f"hello {userinfo},{name}"}
@app.post("/foobar2")
async def foobar2(userinfo: str = Body(...), name: str = Body(..., )):
    return {"message": f"hello {userinfo},{name}"}

@app.post("/client")
def client(userinfo: str = Body(...), name: str = Body(..., )):

    res=requests.post("http://127.0.0.1:8001/server",json={
        "userinfo":userinfo,"name":name
    })
    return res.json()


FastAPIInstrumentor.instrument_app(app)
if __name__ == '__main__':
    register_to_jaeger("fastapi-jaeger", "localhost")
    import uvicorn

    uvicorn.run(app)

A function that depends on register_ to_ jaeger:

from opentelemetry import trace
from opentelemetry.exporter.jaeger.thrift import JaegerExporter
from opentelemetry.sdk.resources import SERVICE_NAME, Resource
from opentelemetry.sdk.trace import TracerProvider
from opentelemetry.sdk.trace.export import BatchSpanProcessor


def register_to_jaeger(service_name: str, jaeger_host: str, jaeger_port: int = 6831):
    """
    Register the service to jaeger so that tracer-related information can be sent to the jaeger server
    Args:
        service_name: the registered service name
        jaeger_host: jaeger address
        jaeger_port:

    Returns: TracerProvider

    """
    provider = TracerProvider(
        resource=Resource.create({SERVICE_NAME: service_name})
    )
    trace.set_tracer_provider(
        provider
    )

    # create a JaegerExporter
    jaeger_exporter = JaegerExporter(
        agent_host_name=jaeger_host,
        agent_port=jaeger_port,
    )

    # Create a BatchSpanProcessor and add the exporter to it
    span_processor = BatchSpanProcessor(jaeger_exporter)

    # add to the tracer
    trace.get_tracer_provider().add_span_processor(span_processor)

Then execute:

curl -X 'POST' \
  'http://127.0.0.1:8000/client' \
  -H 'accept: application/json' \
  -H 'Content-Type: application/json' \
  -d '{
  "userinfo": "string",
  "name": "string"
}'

You can get the following results:
if you have any questions, please correct them.
Matplotlib Draw 3D scatter Diagram Example

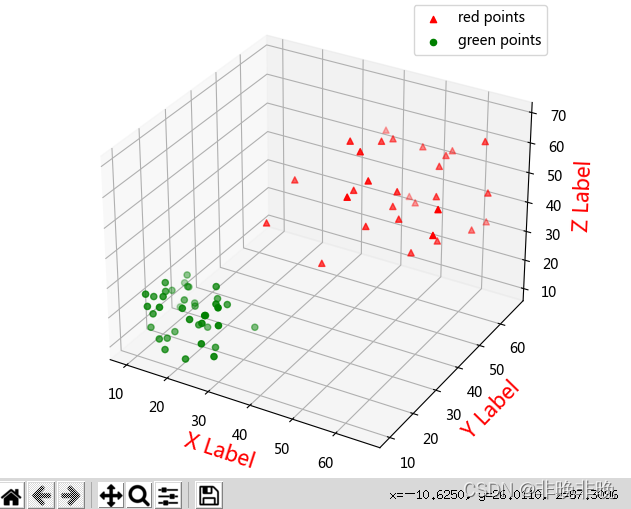
In the following code, it is shown that two different color scatter plots are drawn at the same time in the same coordinate system

import numpy as np
import matplotlib.pyplot as plt
from mpl_toolkits.mplot3d import Axes3D

#Generate random data
data1 = np.random.randint(30, 70, size=(30, 3)) #30*3 dimensional random integers of [30,70]
data2 = np.random.randint(10, 30, size=(40, 3)) #40*3 dimensions of [10, 30] random integers

x1 = data1[:, 0]
y1 = data1[:, 1]
z1 = data1[:, 2]

x2 = data2[:, 0]
y2 = data2[:, 1]
z2 = data2[:, 2]


# Plot a scatter plot
fig = plt.figure()
ax = Axes3D(fig)

'''
marker: shape, default round ball ('^' inverted triangle shape.)
c:color, default cyan

'''
ax.scatter(x1, y1, z1, c='r', marker = "^", label='red points')
ax.scatter(x2, y2, z2, c='g', label='green points')

# Plot the legend
ax.legend(loc='best')

# Add axes
ax.set_zlabel('Z Label', fontdict={'size': 15, 'color': 'red'}) 
ax.set_ylabel('Y Label', fontdict={'size': 15, 'color': 'red'})
ax.set_xlabel('X Label', fontdict={'size': 15, 'color': 'red'})
plt.show()

The results show that: