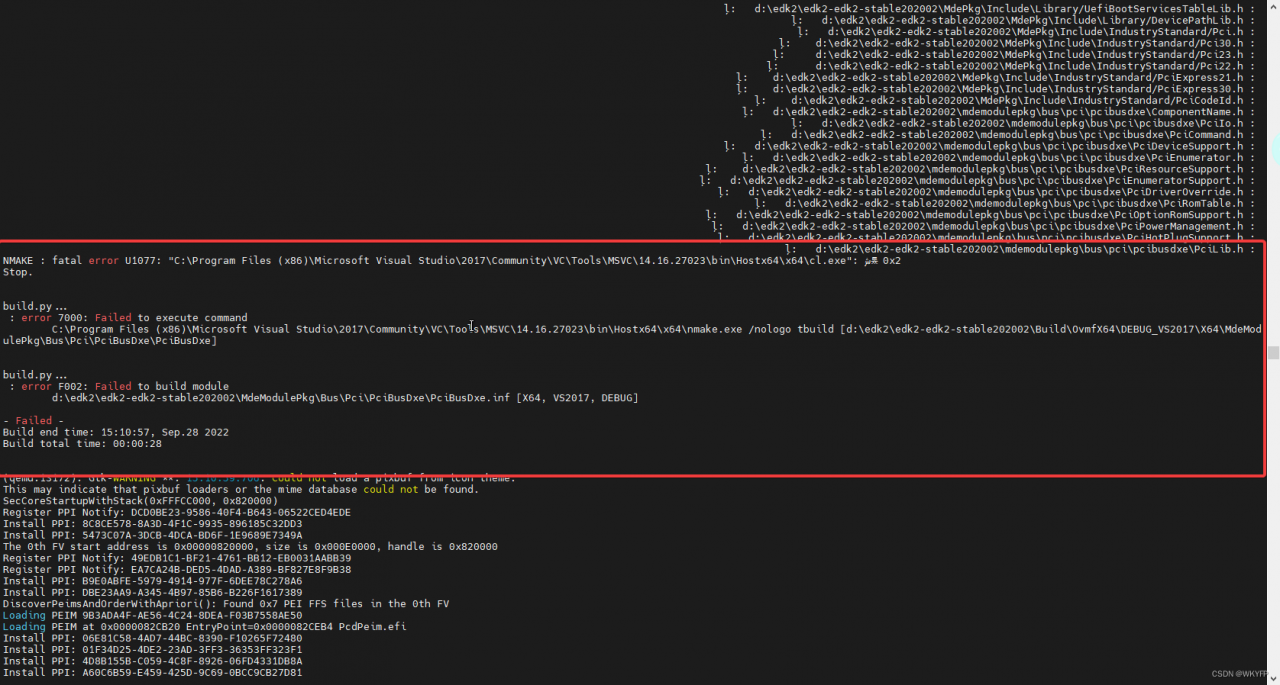
Project scenario:
STM8L151G4XX MCU IAR engineering compilation error
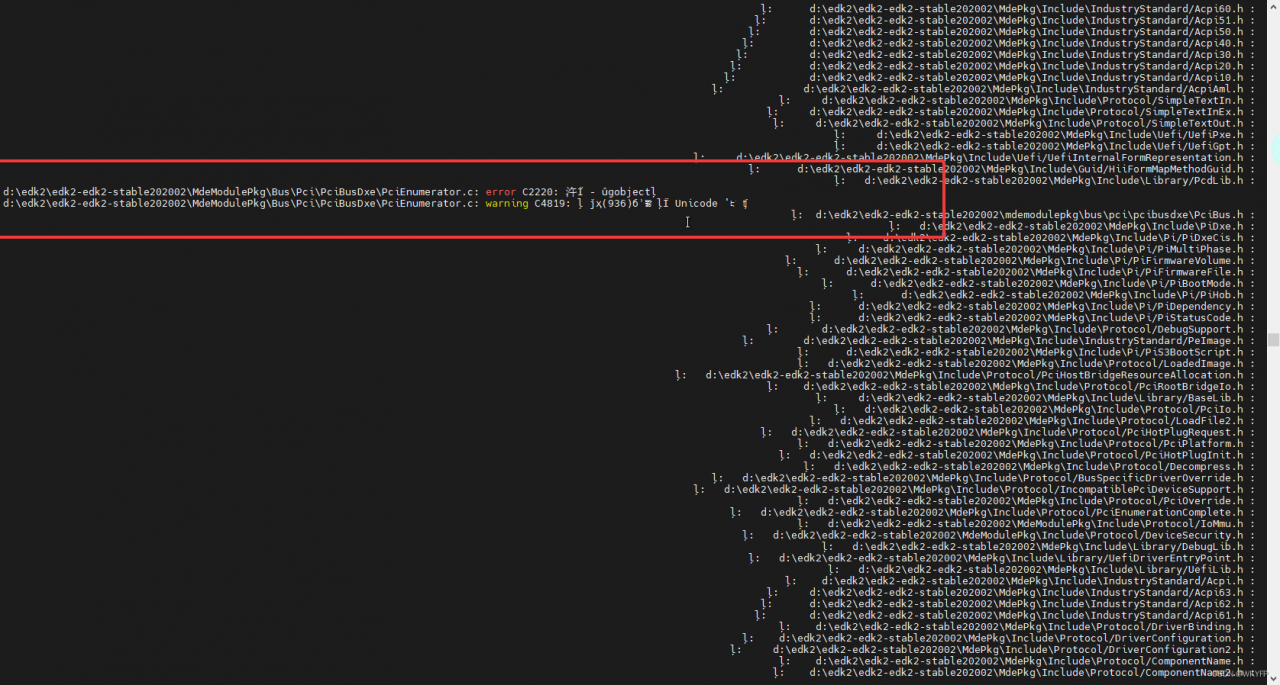
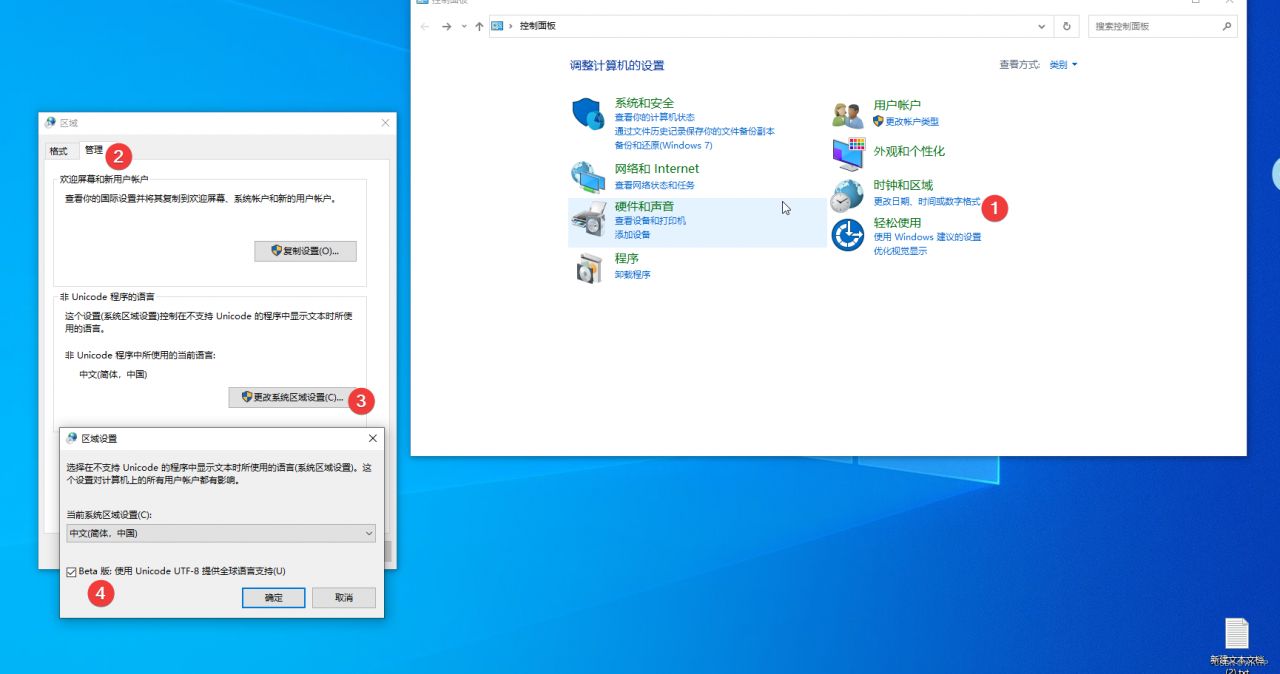
Problem description
Fatal Error[Pe035]: #error directive: “Please select first the target STM8L device used in your application (in stm8l15x.h file)”
Open stm8l15x.h, and we can see the following code:
#if !defined (STM8L15X_MD) && !defined (STM8L15X_MDP) && !defined (STM8L15X_HD) && !defined (STM8L15X_LD) \
&& !defined (STM8L05X_LD_VL) && !defined (STM8L05X_MD_VL) && !defined (STM8L05X_HD_VL) && !defined (STM8AL31_L_MD)
 #error "Please select first the target STM8L device used in your application (in stm8l15x.h file)"
#endif
/* Uncomment the line below according to the target STM8L15x device used in your
application
*/
/* #define STM8L15X_LD */ /*!< STM8L15X_LD: STM8L15x Low density devices */
/* #define STM8L15X_MD */ /*!< STM8L15X_MD: STM8L15x Medium density devices */
/* #define STM8L15X_MDP */ /*!< STM8L15X_MDP: STM8L15x Medium density plus devices */
/* #define STM8L15X_HD */ /*!< STM8L15X_HD: STM8L15x/16x High density devices */
/* #define STM8L05X_LD_VL */ /*!< STM8L05X_LD_VL: STM8L051xx3 Low density value line devices */
/* #define STM8L05X_MD_VL */ /*!< STM8L05X_MD_VL: STM8L052xx6 Medium density value line devices */
/* #define STM8L05X_HD_VL */ /*!< STM8L05X_HD_VL: STM8L052xx8 High density value line devices */
/* #define STM8AL31_L_MD */ /*!< STM8AL31_L_MD: STM8AL3x Medium density devices */
/* Tip: To avoid modifying this file each time you need to switch between these
devices, you can define the device in your toolchain compiler preprocessor.
- Low density STM8L15x devices are STM8L151C3, STM8L151K3, STM8L151G3, STM8L151F3,
STM8L151C2, STM8L151K2, STM8L151G2 and STM8L151F2 microcontrollers where the
Flash memory density ranges between 4 and 8 Kbytes.
- Medium density STM8L15x devices are STM8L151C4, STM8L151C6, STM8L152C4,
STM8L152C6, STM8L151K4, STM8L151K6, STM8L152K4, STM8L152K6, STM8L151G4,
STM8L151G6, STM8L152G4 and STM8L152G6 microcontrollers where the Flash memory
density ranges between 16 and 32 Kbytes.
- Medium density Plus devices are STM8L151R6, STM8L152R6 microcontrollers where
the Flash memory density is fixed and equal to 32 Kbytes and a wider range of
peripheral than the medium density devices.
- High density STM8L15x devices are STM8L151x8, STM8L152x8, STM8L162R8 and STM8L162M8
microcontrollers where the Flash memory density is fixed and equal to 64 Kbytes with
the same peripheral set than Medium Density Plus devices.
- Value line low density STM8L05xx devices are STM8L051x3 microcontrollers
with 8-KB Flash
- Value line medium density STM8L05xx devices are STM8L052x6 microcontrollers
with 32-KB Flash
- Value line high density STM8L05xx devices: STM8L052x8 microcontrollers
with 64-KB Flash
- Medium density STM8AL31xx/STM8AL3Lxx devices: STM8AL3168, STM8AL3166,
STM8AL3148,STM8AL3146, STM8AL3138, STM8AL3136, STM8AL3L68, STM8AL3L66,
STM8AL3L48, STM8AL3L46 microcontrollers with 8-KB, 16-KB or 32-KB Flash
*/
Solution:
Method 1:
Modify directly in the stm8l15x.h file, delete the comment symbols of the macro definition needed, take STM8L151G4XX as an example, according to the above description, the model belongs to Medium density.
/* Uncomment the line below according to the target STM8L15x device used in your
   application
  */
/* #define STM8L15X_LD */     /*!< STM8L15X_LD: STM8L15x Low density devices */
 #define STM8L15X_MD   		/*!< STM8L15X_MD: STM8L15x Medium density devices */
/* #define STM8L15X_MDP */    /*!< STM8L15X_MDP: STM8L15x Medium density plus devices */
/* #define STM8L15X_HD */     /*!< STM8L15X_HD: STM8L15x/16x High density devices */
/* #define STM8L05X_LD_VL */  /*!< STM8L05X_LD_VL: STM8L051xx3 Low density value line devices */
/* #define STM8L05X_MD_VL */  /*!< STM8L05X_MD_VL: STM8L052xx6 Medium density value line devices */
/* #define STM8L05X_HD_VL */  /*!< STM8L05X_HD_VL: STM8L052xx8 High density value line devices */
/* #define STM8AL31_L_MD */   /*!< STM8AL31_L_MD: STM8AL3x Medium density devices */
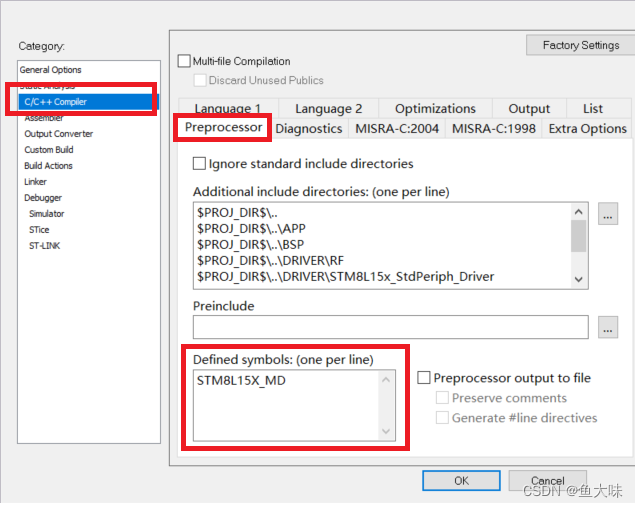
Method 2:
Set the path: Options->C/C++ Compiler->Preprocessor-Defined symbols