Author Archives: Robins

Asynchronous loading method of Baidu map

The purpose of asynchronous loading is to improve the rendering performance of web pages in some scenarios.
Common synchronous loading code:

<!DOCTYPE html>
<html lang="en">
<head>
    <meta charset="UTF-8">
    <meta http-equiv="X-UA-Compatible" content="IE=edge">
    <meta name="viewport" content="width=device-width, initial-scale=1.0">
    <title>Document</title>
    <script type="text/javascript"
        src="https://api.map.baidu.com/api?v=1.0&type=webgl&ak=Your%20key"></script>
    <style>
        html,
        body,
        #map {
            width: 100%;
            height: 100%;
            margin: 0;
            padding: 0;
        }
    </style>
</head>
<body>
    <div id="map"></div>
    <script>
        var map = new BMapGL.Map('map');
        var point = new BMapGL.Point(116.404, 39.915);
        map.centerAndZoom(point, 10);
        map.enableScrollWheelZoom(true);
    </script>
</body>
</html>

Asynchronous loading method:
idea is to avoid initialization loaded directly, but put the initialization process in the init () function (), for other contents page finished loading, add script tags and callback function calls the init function

<!DOCTYPE html>
<html lang="en">
<head>
    <meta charset="UTF-8">
    <meta http-equiv="X-UA-Compatible" content="IE=edge">
    <meta name="viewport" content="width=device-width, initial-scale=1.0">
    <title>Document</title>
    <style>
        html,
        body,
        #map {
            width: 100%;
            height: 100%;
            margin: 0;
            padding: 0;
        }
    </style>
</head>
<body>
    <div id="map"></div>
    <script>
        function init(){
            var map = new BMapGL.Map('map');
            var point = new BMapGL.Point(116.404, 39.915);
            map.centerAndZoom(point, 10);
            map.enableScrollWheelZoom(true);
        }
        window.onload = function(){
            var script = document.createElement('script')
            script.src="https://api.map.baidu.com/api?v=1.0&type=webgl&ak=Your%20key&callback=init"
            document.head.appendChild(script)
        }
        
    </script>
</body>
</html>

How to Install Mongdb4.X in Windows

The installation
windows
After the installation is complete, locate the data directory under the installation directory and create a folder named db in the data directory

Open the cmd command line, move the directory to the bin directory under the MongoDB installation directory, and enter the command
mongod --dbpath <dblocations>
mongod --dbpath D:\MongoDB\data\db

Open your browser and enter the address

http://localhost:27017

The following is a success

It looks like you are trying to access MongoDB over HTTP on the native driver port.

Open the service
Go to the bin directory under the installation directory
perform

-> mongod *--dbpath D:\MongoDB\data\db*
-> mongo   or    mongo --host=127.0.0.1 --port=27017
-> show databases;   //If you see the database information, it is successful

Mac: How to Install homebrew, nginx, PHP and MySQL

1. Install homebrew

/usr/bin/ruby -e "$(curl -fsSL https://raw.githubusercontent.com/Homebrew/install/master/install)"

2. Install nginx

brew install nginx
nginx -s reload|reopen|stop|quit #Reload Configuration|Restart|Stop|Exit nginx

Nginx-t # tests the configuration for syntax errors
Use this sentence if it is prompted that the PID is missing
Nginx – c “/ usr/local/etc/nginx/nginx. Conf.” ”
nginx
Brew services start nginx
: brew services stop nginx
brew services restart nginx
: brew services restart nginx
3. Install PHP7

brew install php70 --without-apache --with-fpm

PHP
Brew services start PHP
: brew services stop PHP
brew services restart PHP
: brew services start PHP
: brew services stop PHP
: brew services restart PHP
4. Installation of mysql

brew install mysql

cp /usr/local/opt/mysql/support-files/my-default.cnf /etc/my.cnf
brew services start mysql (run)
brew services stop mysql (stop)
mysql
Run: brew services start mysql
Stop: brew services stop mysql
Restart: brew services restart mysql

Nginx installation in MAC


1 brew install nginx (brew search nginx nginx version query)
2/usr/local/Cellar/nginx/1.6.2 for nginx start path
/usr/local/etc/nginx/nginx. Conf for configuration file path (a copy of the late to the position of their own needs, so that the configuration of different projects make a distinction between)
    

Win10, add sublime text in the right mouse button menu to open

Environment: Win10; Take Sublime Text for example


Use the shortcut key Win + R to open Command and type Regedit to open the registry.
Find the shell in “*” in “HKEY_CLASSES_ROOT”, right-click and create a new item “Edit with Sublime Text”, and right-click on “Edit with Sublime Text” and create a new item “Command”;
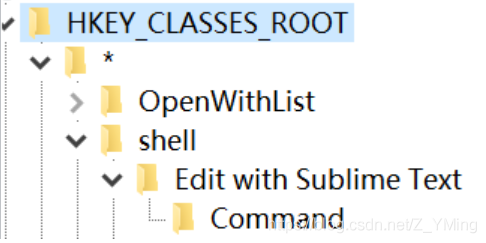
Create a new string value in “Edit with Sublime Text” and name it “Icon”. The value is the installation path of ST, but be sure to add “,0 “after it;
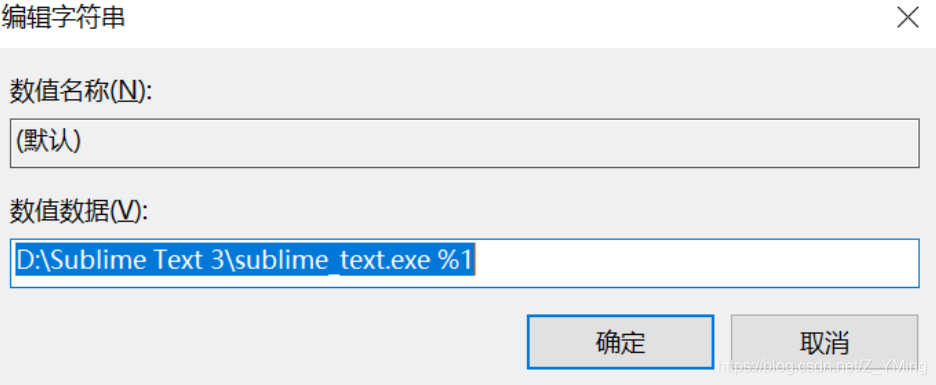
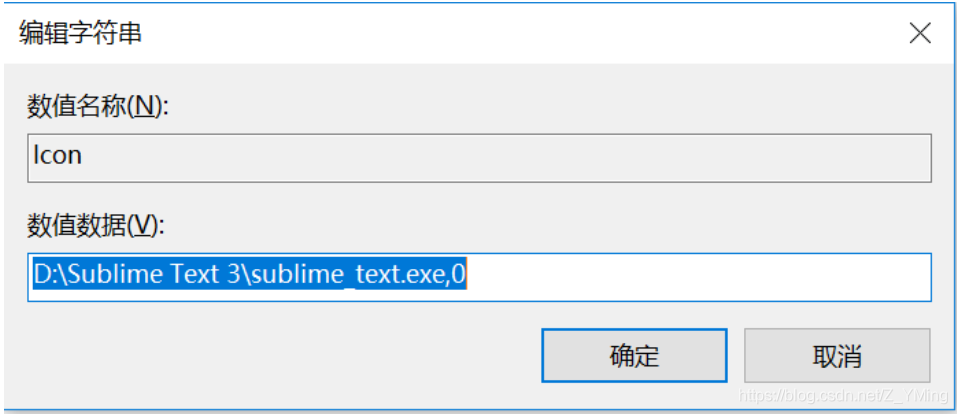
double-click to edit the default values in the “Command”, add value for the same installation path of ST, but the back to add “% 1” – pay attention to the space;

Sublime text add to right mouse button function

D:\ AppFiles\\ SubLimeText3 \ SubLimeText3 \ SubLimeText3 \ SubLimeText3 \ SubLimeText3 \ SubLimeText3 \ SubLimeText3 \ SubLimeText3 \ SubLimeText3 \ SubLimeText3 \ SubLimeText3 \ SubLimeText3 \ SubLimeText3 \ SubLimeText3 \ SubLimeText3 \ SubLimeText3 \

Windows Registry Editor Version 5.00
[HKEY_CLASSES_ROOT\*\shell\SublimeText3]
@="Edit with SublimeText3"
"Icon"="D:\\AppFiles\\SublimeText3\\sublime_text.exe,0"
[HKEY_CLASSES_ROOT\*\shell\SublimeText3\command]
@="D:\\AppFiles\\SublimeText3\\sublime_text.exe \"%1\""
[HKEY_CLASSES_ROOT\Directory\shell\SublimeText3]
@="Edit with SublimeText3"
"Icon"="D:\\AppFiles\\SublimeText3\\sublime_text.exe,0"
[HKEY_CLASSES_ROOT\Directory\shell\SublimeText3\command]
@="D:\\AppFiles\\SublimeText3\\sublime_text.exe \"%1\""

Note: Sublime Text 3 space paths and space filenames are problematic
Note that %1 must be enclosed in English double quotation marks. Otherwise, you will not be able to right-click files containing space paths or files with space filenames.

Advanced parameter search of GitHub

GitHub’s advanced parameter search

    in:name example — “example” in:readme example — “example” in:readme — “example” in:description example — “example” stars:>; 1000 – star> 1000forks:> 1000 – fork> 1000pushed:> 2019-09-01 — Language: Java — Projects written in Java

1、 Java 8 date and local date

Java8 datetime API, add LocalDate, LocalDateTime, LocalTime and other thread-safe classes:
LocalDate: only the date, such as: 2019-07-13LocalTime: only the time, such as: 08:30LocalDateTime: date + time, such as: 2019-07-13 08:30
1. CONVERT DATE TO LOCALDATE

    public static LocalDate date2LocalDate(Date date) {
        if(null == date) {
            return null;
        }
        return date.toInstant().atZone(ZoneId.systemDefault()).toLocalDate();
    }

2. CONVERT LOCALDATE TO DATE


    public static Date localDate2Date(LocalDate localDate) {
        if(null == localDate) {
            return null;
        }
        ZonedDateTime zonedDateTime = localDate.atStartOfDay(ZoneId.systemDefault());
        return Date.from(zonedDateTime.toInstant());
    }

2.LocalDateTime is converted to Date

    public static Date localDateTime2Date(LocalDateTime localDateTime) {
        return Date.from(localDateTime.atZone(ZoneId.systemDefault()).toInstant());
    }

3. LocalDate format

    public static String formatDate(Date date) {
        LocalDate localDate = date.toInstant().atZone(ZoneId.systemDefault()).toLocalDate();
        return localDate.format(DateTimeFormatter.ofPattern("yyyy-MM-dd"));
    }

Setting the root password of windows 10 Ubuntu subsystem

Windows 10 installs the Ubuntu subsystem. When it is opened for the first time, it will let the user set his or her own user name and password, but this newly created user is not root user.
>

> Here’s how:
zhangyun@DESKTOP-J39LRR2:~$sudo passwd
sudo] password for zhangyun:
n>assword:
Retype>password:
passwd:
4 passwd: password updated successfully

Root password of windows 10 WSL Ubuntu system

The root password for Windows 10 WSL Ubuntu system
After installing Ubuntu, you realize that you do not have a root password. If you do not know the password, you will not be able to access the root user.
to the search on the net, the original is the way it is:
the Ubuntu’s default root password is random, namely each have switched on a new root password.
we can command in a terminal input sudo passwd , and then enter the current user password, the terminal will be prompted to enter a new password and we confirm that the new password is root password.
> root>> code>>
> su root>
>
> su root> >
Reprinted from: https://www.jianshu.com/p/e43e11d6ba09