Operating system: windows10
problem discovery: switch to the tensorflow 2.0.0 installation environment in CMD and enter PIP list. It is found that the corresponding version of tensorflow estimator is 2.5.0, which is inconsistent with the tensorflow version
solution: upgrade or lower the tensorflow estimator to a version consistent with tensorflow
if my version is tensorflow 2.0.0, type CONDA install tensorflow estimator = = 2.0.0 in CMD, and different versions will be seated according to their numbers
as shown in the following figure:

restart the Spyder console and it should be all right
Author Archives: Robins
[Solved] Hive Warehouse error: com.google.common.base.Preconditions.checkArgument
Question:
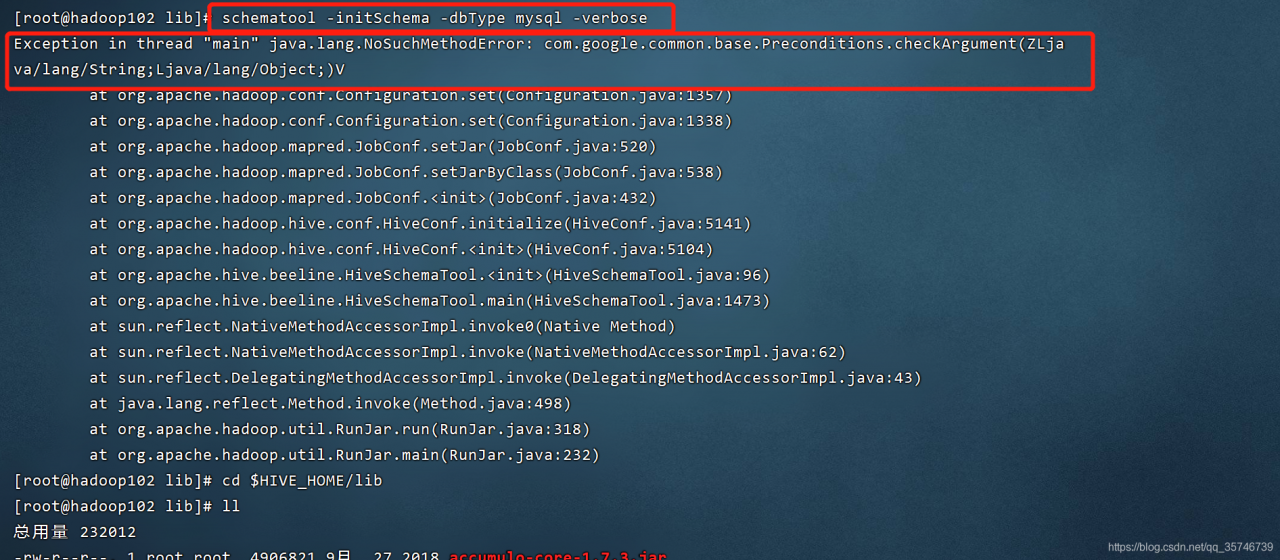
Hive reports an error during initialization
Solution:
After troubleshooting, it is found that the version of guava.jar in hive is inconsistent with that in Hadoop. It is OK to replace it with the same version
cp $HADOOP_HOME/share/hadoop/common/lib/guava-27.0-jre.jar $HIVE_HOME/lib/
rm $HIVE_HOME/lib/guava-19.0.jar[Solved] Ktolin Android Project Compile Error: w: Runtime JAR files in the classpath should have the same version. These file
I haven’t opened the Android project for a while; Open compilation and report an error
w: Runtime JAR files in the classpath should have the same version. These files were found in the classpath:
e: D:/software/Gradle_ workplace/caches/modules-2/files-2.1/org.jetbrains.kotlin/kotlin-stdlib-common/1.5.10/6b84d926e28493be69daf673e40076f89492ef7/kotlin-stdlib-common-1.5.10.jar!/ META-INF/kotlin-stdlib-common.kotlin_ Module: module was compiled with an incompatible version of kotlin. The binary version of its metadata is 1.5.1, expected version is 1.1.13.
insert a picture description here

the final solution is:
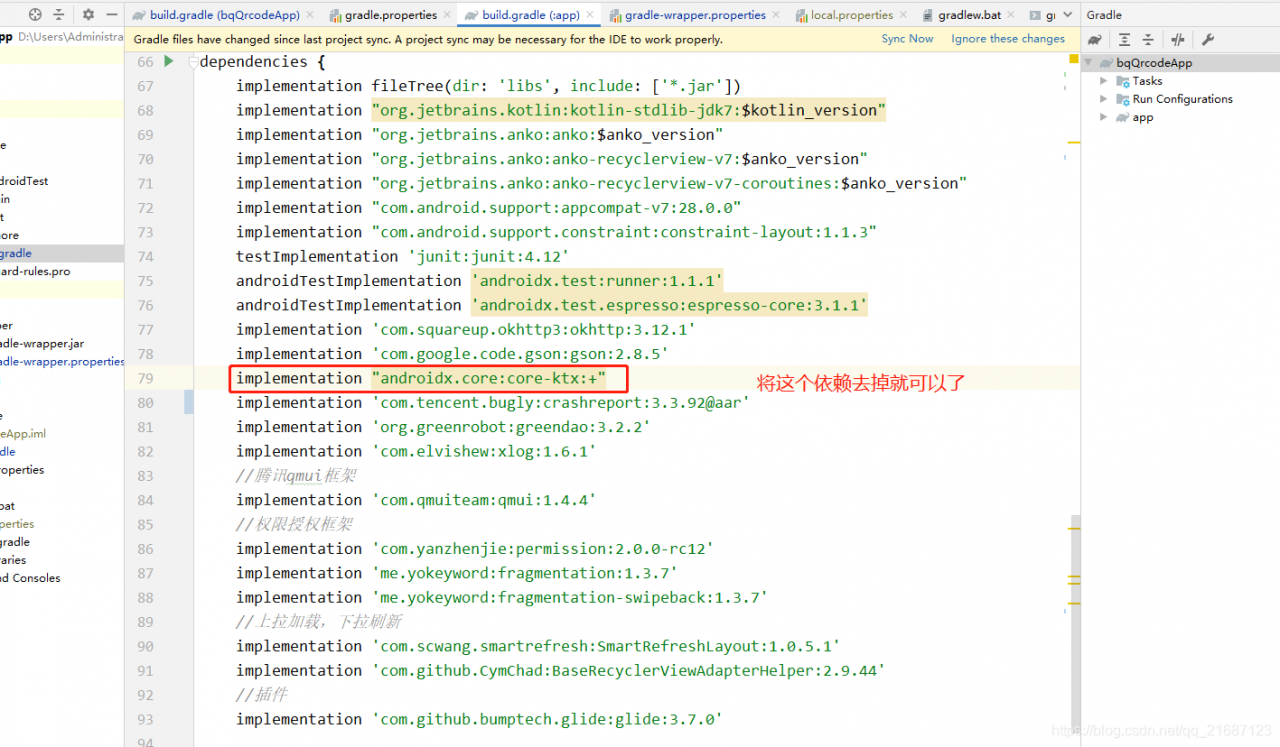
add this dependency; Implementation “androidx. Core: core KTX: +”
remove it and you can compile it;
Feeling is conflict; Moreover, this feeling at the beginning of Android x is prone to conflict sometimes. After all, the dependence on the new package name feels unstable. If there is a problem in the future, just lean in this direction;
The boss who knows the problem can also give advice;
Environment:
kotlin version is 1.3.11
JDK is 1.8
gradle is 4.6
Android studio is 4.1.3
[Solved] Java.lang.IllegalStateException: getReader() has already been called for this request
For the project, it is necessary to obtain the data in the request body in the interceptor for data verification, because the @ requestbody annotation is used in the self-defined controller, resulting in an error in the project. The content of the error is: Java. Lang. IllegalStateException: getreader() has already been called for this request
After consulting the data, it is found that the getReader and getinputstream in the request are obtained by stream. After reading once, they can’t be used again. The solution is:
Step 1: define a filter in which a self-defined request is passed in. The self-defined request inherits the wrapper class httpservletrequestwrapper and rewrites the getinputstream and getReader methods
the filter code is as follows:
package com.chinastock.filter;

import com.chinastock.util.CustomHttpServletRequestWrapper;

import javax.servlet.*;
import javax.servlet.http.HttpServletRequest;
import java.io.IOException;

/**
 * @author zhoule
 * @description: handle request
 */
public class IMTAFilter implements Filter {
    @Override
    public void doFilter(ServletRequest servletRequest, ServletResponse servletResponse, FilterChain filterChain) throws IOException, ServletException {
        ServletRequest requestWrapper = null;
        if(servletRequest instanceof HttpServletRequest) {
            requestWrapper = new CustomHttpServletRequestWrapper((HttpServletRequest) servletRequest);
        }
        if(requestWrapper == null) {
            filterChain.doFilter(servletRequest, servletResponse);
        } else {
            filterChain.doFilter(requestWrapper, servletResponse);
        }
    }
}
The custom request code is as follows:
import javax.servlet.ReadListener;
import javax.servlet.ServletInputStream;
import javax.servlet.http.HttpServletRequest;
import javax.servlet.http.HttpServletRequestWrapper;
import java.io.*;
import java.nio.charset.StandardCharsets;

/**
 * @author zhoule
 * @description: Custom request wrapper for processing messages in the request body
 */
public class CustomHttpServletRequestWrapper extends HttpServletRequestWrapper {
    private byte[] body;

    public CustomHttpServletRequestWrapper(HttpServletRequest request) throws IOException
    {
        super(request);

        BufferedReader reader = request.getReader();
        try (StringWriter writer = new StringWriter()) {
            int read;
            char[] buf = new char[1024 * 8];
            while ((read = reader.read(buf)) != -1) {
                writer.write(buf, 0, read);
            }
            this.body = writer.getBuffer().toString().getBytes();
        }
    }

    public String getBody(){
        return new String(body, StandardCharsets.UTF_8);
    }

    @Override
    public ServletInputStream getInputStream() throws IOException
    {
        final ByteArrayInputStream byteArrayInputStream = new ByteArrayInputStream(body);
        return new ServletInputStream()
        {
            @Override
            public boolean isFinished() {
                return false;
            }

            @Override
            public boolean isReady() {
                return false;
            }

            @Override
            public void setReadListener(ReadListener readListener) {

            }

            public int read() throws IOException
            {
                return byteArrayInputStream.read();
            }
        };
    }

    @Override
    public BufferedReader getReader() throws IOException
    {
        return new BufferedReader(new InputStreamReader(this.getInputStream()));
    }
}
The second step is to write the interceptor of the project. Some codes of the interceptor are as follows:
    @Override
    public boolean preHandle(HttpServletRequest request, HttpServletResponse response, Object handler) throws Exception {
        CustomHttpServletRequestWrapper wrapper = (CustomHttpServletRequestWrapper) request;
        String body = wrapper.getBody();
        System.out.println(body);
        return true;
    }
Defining a bean of type ‘org.springframework.data.redis.core.RedisTemplate‘ in your configuration.
The spring-boot integration redis startup project reports an error with the following message:
defining a bean of type 'org.springframework.data.redis.core.RedisTemplate' in your configuration.
orConsider defining a bean of type 'org.springframework.data.redis.core.StringRedisTemplate' in your configuration.
Modify the pom file
Change the
        <dependency>
            <groupId>org.springframework.data</groupId>
            <artifactId>spring-data-redis</artifactId>
        </dependency>
is changed to
        <dependency>
            <groupId>org.springframework.boot</groupId>
            <artifactId>spring-boot-starter-data-redis</artifactId>
        </dependency>
After modification, if you want to customize redistemplate, you can refer to the following configuration
    @Bean
    public RedisTemplate<String, Object> template(RedisConnectionFactory factory) {
        // Create RedisTemplate<String, Object>object
        RedisTemplate<String, Object> template = new RedisTemplate<>();
        // Configuring the connection factory
        template.setConnectionFactory(factory);
        // Define the Jackson2JsonRedisSerializer serialization object
        Jackson2JsonRedisSerializer<Object> jacksonSeial = new Jackson2JsonRedisSerializer<>(Object.class);
        ObjectMapper om = new ObjectMapper();
        // Specify the field, field, get and set to be serialized, and the range of modifiers, ANY of which are included in private and public
        om.setVisibility(PropertyAccessor.ALL, JsonAutoDetect.Visibility.ANY);
        // Specify the type of serialized input, the class must be non-final modified, final modified class, such as String, Integer, etc. will report an exception
        om.activateDefaultTyping(LaissezFaireSubTypeValidator.instance, ObjectMapper.DefaultTyping.NON_FINAL, JsonTypeInfo.As.WRAPPER_ARRAY);
        jacksonSeial.setObjectMapper(om);
        StringRedisSerializer stringSerial = new StringRedisSerializer();
        // redis key Serialization method used stringSerial
        template.setKeySerializer(stringSerial);
        // redis value Serialization method usedjackson
        template.setValueSerializer(jacksonSeial);
        // redis hash key Serialization method usedstringSerial
        template.setHashKeySerializer(stringSerial);
        // redis hash value Serialization method usedjackson
        template.setHashValueSerializer(jacksonSeial);
        template.afterPropertiesSet();
        return template;
    }
[Solved] error: ‘::main’ must return ‘int’ void main()
Because of the compiler, some compilers require that the int() function must have an int return value
Change void main() to int main(), and add return 0 to the end:
int main()
{
  ......//content
  return 0;
}
Compilation succeeded.
Quartus ii 13.1 compilation does not pass: Error (119013): Current license file does not support the EP4CE10F17C8 device
If the previous line of error is warning (292000): FLEXlm software error: Invalid (inconsistent) license key. The license key and data for the feature… The computer may be 64 bits, and then the cracking program is installed into 32 bits. As long as the broken version in the original license.dat and bin is deleted (preferably permanently deleted) and replaced with 64 bits, the compilation can succeed.
Nginx manager jupyter notebook v1.0.0 http websocket
v1.0.0
Environment introduction
1、 The virtual machine on this machine. There is jupyter in the virtual machine
2、 Jupyter notebook web server is an online editor
3、 A proxy server on this machine, such as nginx
Configuration steps
1、 Virtual machine
Start the virtual machine
2、 Jupyter
Set the root directory of the file
sudo GEDIT (VIM) ~ /. Jupyter/jupyter_ notebook_ config.py
c.NotebookApp.notebook_dir = '/path/to/jupyter'
sudo gedit(vim)~/.jupyter/jupyter notebook config.py
c.NotebookApp.allow_origin = '*' # allow cors
3、 Nginx
Start nginx configuration nginx.conf excerpt
# Actual tcp/websocket server address
    upstream jupyter_url {
        server virtual machine ip:8888;
    }

    server {
        listen       8000;
        server_name  localhost;

        charset utf-8;

      location/{
          proxy_pass http://jupyter_url;
          proxy_http_version 1.1;
          proxy_set_header Upgrade $http_upgrade;
          proxy_set_header Connection "upgrade";
      }
	}
Test effect
Visit: nginxip: 8000
‘c’ argument looks like a single numeric RGB or RGBA sequence, which should be avoided as value-mapp
When Python draws a line chart, using scatter, the use of parameter C = ” will cause warning:
ax.scatter(x_value,y_value,c=(0,0.2,0),s=10)
‘c’ argument looks like a single numeric RGB or RGBA sequence, which should be avoided as value-mapping will have precedence in case its length matches with ‘x’ & ‘y’. Please use a 2-D array with a single row if you really want to specify the same RGB or RGBA value for all points.
It may be a problem with the version of matplotlib, higher versions no longer report a warning.
You can change the original statement to the following one.
ax.scatter(x_value,y_value,color=(0,0.2,0),s=10)
Or let the log display only errors of error level:
from matplotlib.axes._axes import _log as matplotlib_axes_logger
matplotlib_axes_logger.setLevel('ERROR')
Hope to help you through sharing, thank you.
Ab3dmot vehicle pedestrian recognition (How to Use)
Code base: https://github.com/xinshuoweng/AB3DMOT
Setting up environment:
Ubuntu 16.04, Python 3.7.6 in anaconda, python 1.2 + CUDA 9.2
refer to pointrcnn environment setting up and running for the pre research environment
Kitti object tracking dataset Download
Dataset official website: http://www.cvlibs.net/datasets/kitti/eval_Tracking. PHP
when pre researching according to the project description, you only need to download the image_ 02 dataset:
http://www.cvlibs.net/download.php?file=data_tracking_image_2.zip
Xinshuo_Pytoolbox preparation
The project requires the author’s toolkit https://github.com/xinshuoweng/Xinshuo_ Pytoolbox
you need to install the package described in its requirements.txt, and then put all the folders directly into the ab3dmot folder
step
  1. install dependeny:
$ cd path/to/AB3DMOT
$ pip install -r requirements.txt

  2. Inference - run our tracker on the KITTI MOT validation set with the provided detection:
$ python main.py pointrcnn_Car_val
$ python main.py pointrcnn_Pedestrian_val
$ python main.py pointrcnn_Cyclist_val
Just select one, e.g. pedestrian

  3. Extract the files in the image_2 package to data/KITTI/resources

  4. Change the variable seq_list in visualization.py to the sample number you want to visualize, e.g.
seq_list = ['0000', '0001', '0002', '0003', '0004', '0005', '0006', '0007', '0008']

  5. execute python visualization.py pointrcnn_Pedestrian_val (corresponds to pointrcnn_Pedestrian_val in step 2)

  6. Check the results in results/pointrcnn_Pedestrian_val/trk_image_vis
Effect evaluation
It is easy to recognize cuboids/columns as vehicles/pedestrians, especially when recognizing vehicles, but this misjudgment generally occurs outside the road area, – and the number of continuous frames is very small; It is possible to distinguish cyclists as ordinary pedestrians; There is no obvious missing judgment, but the tracking is likely to be interrupted when occlusion occurs, resulting in unstable tracking object ID;
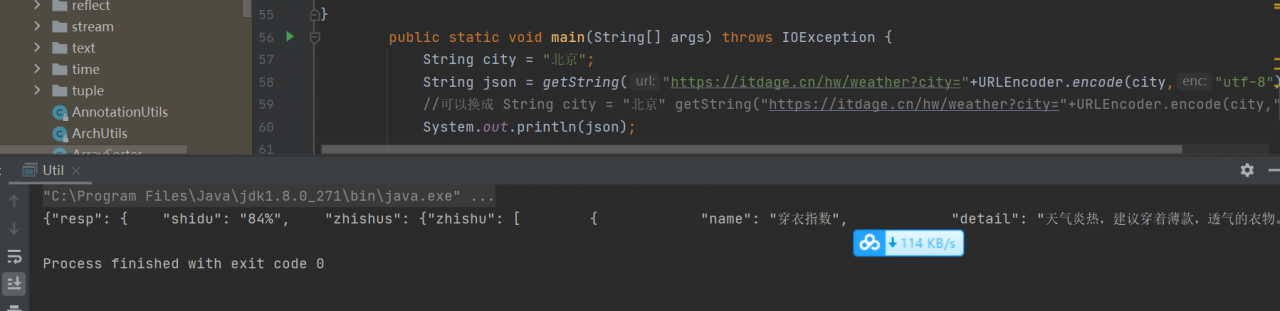
[PROJECT] itdage java to get the weather and send text messages
Output JSON data:
    public class Util {
        //
        public static String getString(String url) throws IOException {
            try {
                URL u = new URL(url);

                //
                URLConnection conn = u.openConnection();
                InputStream in = conn.getInputStream();
                BufferedReader br = new BufferedReader(new InputStreamReader(in, "UTF-8"));
                StringBuffer sf = new StringBuffer();
                String text = null;
                while((text = br.readLine()) != null)
                {
                    sf.append(text);
                }
                return sf.toString();
            }
            catch (Exception e)
            {
                e.printStackTrace();
            }
            return null;

        }

        public static void main(String[] args) throws IOException {
            String json = getString("https://itdage.cn/hw/weather?city=%E6%9D%AD%E5%B7%9E");
            System.out.println(json);
        }

}

Note:
   //change to
    String city = "北京" json = getString("https://itdage.cn/hw/weather?city="+URLEncoder.encode(city,"utf-8")
send message:
Test sending fixed content first
        public static void main(String[] args) throws IOException {
            String city = "北京";
            String name="b( ̄▽ ̄)d 宝";
            name = URLEncoder.encode(name,"utf-8");
     //       String json = getString("https://itdage.cn/hw/weather?city="+URLEncoder.encode(city,"utf-8"));
       //z     System.out.println(json);

            //String phoneNumber = "19976883561";
            String s1 = "天晴";
            s1 = URLEncoder.encode(s1,"utf-8");
                String s2 = "30-32";
                String s3 = "Relex";
            s2 = URLEncoder.encode(s2,"utf-8");
s3 = URLEncoder.encode(s3,"utf-8");
                String json2 = getString("https://itdage.cn/hw/hwSms?name="+name+"&phoneNumber="+phoneNumber+"&s1="+s1+"&s2="+s2+"&s3="+s3);
            System.out.println(json2);

        }
Output OK, SMS can be seen on the mobile phone
Use one thread to execute the task:
public class SNStask {
    private static Boolean flag;
private static Thread t1;
    public static void start(long time,String name,String phoneNumber,String city)
    {
        if(!flag)
        {

            t1 = new Thread()
            {
@Override
                public void run() {
    flag = true;
    task:
    while (flag) {
        String text = Util.send(name, phoneNumber, city);
        if (!"OK".equals(text)) {
            continue;
        }
        try {
            Thread.sleep(time);

        } catch (InterruptedException e) {
            e.printStackTrace();
            break task;
        }
    }
}
        };
            t1.start();
        }
    }
    public static  void end(){
        flag = false;
        if(t1 != null)
        {
            t1.interrupt();
        }
    }
}
Set access path:
@WebServlet("/start")
public class StartServlet extends HttpServlet {
    protected void doPost(HttpServletRequest request, HttpServletResponse response) throws ServletException, UnsupportedEncodingException {
        request.setCharacterEncoding("utf-8");
        response.setContentType("text/json;charset=utf-8");
        String name = request.getParameter("name");
        String phoneNumber = request.getParameter("phoneNumber");
        String city = request.getParameter("city");
        SNStask.start(time,name,phoneNumber,city);
    }

}
The Linux setroubleshootd process occupies too much memory [How to Solve]
Question:
The server found a problem: the memory is full, and even swap is completely occupied.
Solution:
The system has 8g memory, and the setroubleshootd process occupies 4G. This process is the daemon of SELinux. Just close SELinux.
vi /etc/selinux/config
#Comment out
#SELINUX=enforce
#Comment out
#SELINUXTYPE=targeted
#Add
SELINUX=disabled
Modify the configuration file and restart to take effect