Author Archives: Robins

Failed to start firewalld.service: Unit is masked [How to Solve]

Centos7 failed to start firewall: Failed to start firewalld.service: Unit is masked.

Solution:

The error “Failed to start firewalld.service: Unit is masked.” appears when you run “systemctl start firewalld”. The service needs to be unlocked:

systemctl unmask firewalld.service
systemctl start firewalld

Manifest merger failed with multiple errors, see logs [How to Solve]

When developing Android, you sometimes encounter such problems

Error:Execution failed for task ':app:processBaiduDebugMainManifest'.
> Manifest merger failed with multiple errors, see logs

The processing method is as follows:
Enter the command line first, and pay attention to adding ./ on Mac when entering the command,

./gradlew processBaiduDebugMainManifest –stacktrace

Here processBaiduDebugMainManifest will replace according to the specific information of your error report, and may also encounter the problem of no permission, as shown in the following figure

The simplest solution is to add bash before the command. The complete command is:

bash ./gradlew processBaiduDebugMainManifest –stacktrace

This command will get more log information.

With specific error information, you can purposefully solve the problem.

[Solved] devTools failed to load sourcemap: Could not parse content for map

devTools failed to load sourcemap: Could not parse content for map

Error
Console report an error: devTools failed to load sourcemap: Could not parse content for map

Solution:
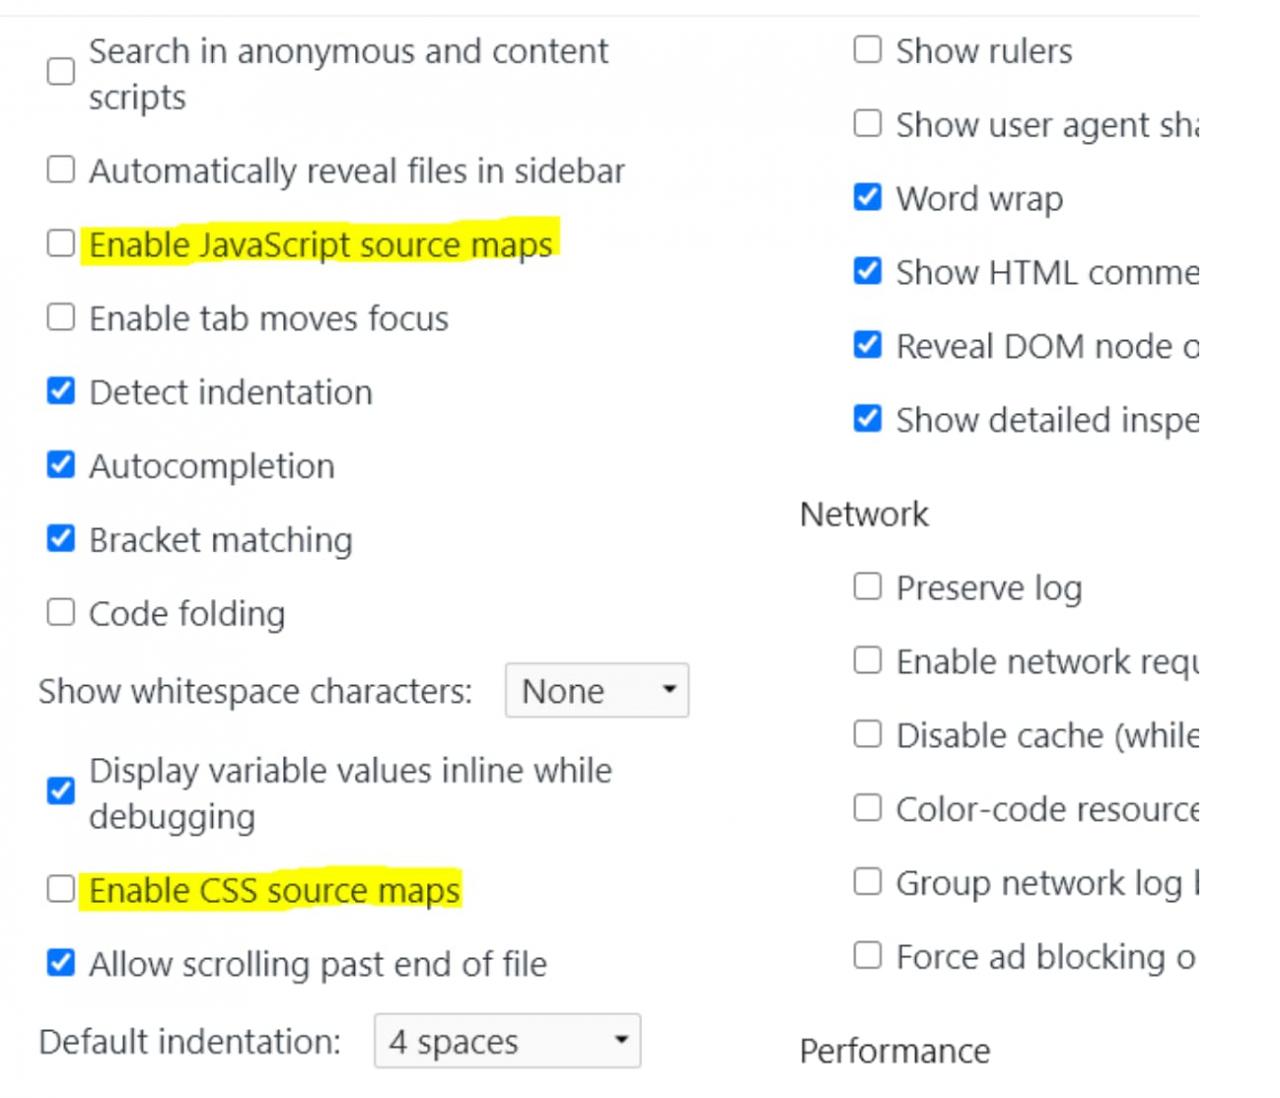
Console settings, just uncheck the source map
Enable JavaScript source maps
Enable CSS source maps

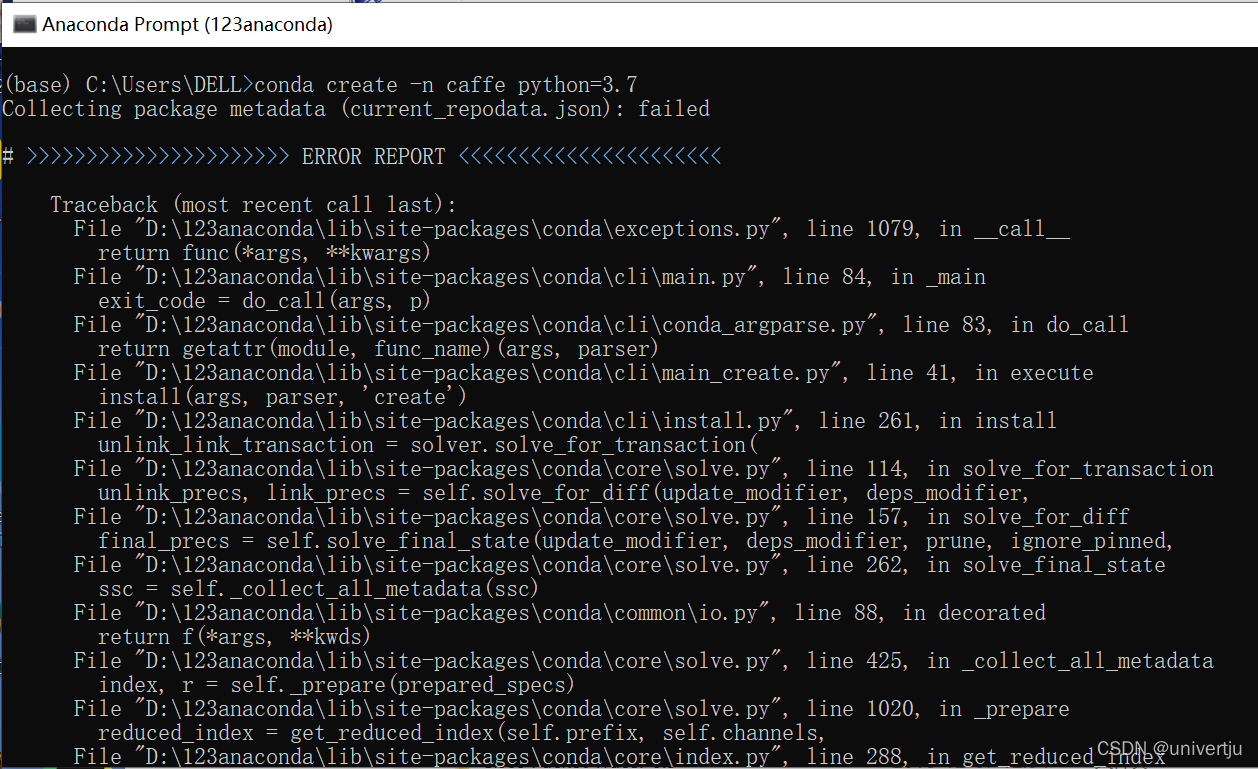
Failed to Create New Environment Error: Collecting package metadata (current_repodata.json): failed.

Recently, due to the need to set up a new environment for the GUI interface, an error occurred in the header line during the process of creating a new environment. 

The significance of creating a new environment
As each project requires different libraries and their versions, running the project in the root directory will be much more complicated, which is why many people will choose to use a virtual environment. That is, suppose you do project A with package versions PyQt5=’5.5.1′ and sklearn=’0.22.1′, and project B with package versions PyQt5=’5.6.1′ and sklearn=’0.23.1′, then you have to uninstall PyQt5 5.5.1 and sklearn0.22.1 and install PyQt5 5.6.1′ and sklearn0.23.1, but then you have to uninstall the previous package version to do something like project 1, so it’s a lot of trouble to go back and forth, so why not create virtual environment A with PyQt5 5.5.1 and sklearn0.22.1, virtual environment B with PyQt5 5.6.1′ and sklearn0.23.1, and do project A will use virtual environment A, and project B will use virtual environment B, which will not interfere with each other and improve the convenience a lot.

Question restatement:

If you have reinstalled anaconda, a file named .condarc will be automatically generated in the user directory on the C drive.
When using the commands conda install and conda create, the following problem occurs: Collecting package metadata (current_repodata.json): failed
First, a few words about the role of the .condarc file.

.condarc starts with a dot and generally indicates the configuration file for the conda application, in the user’s home directory (windows: C:\\users\\\username\\, linux: /home/username/).

For the .condarc configuration file, which is an optional (optional) runtime configuration file, this file is not available by default and is only created automatically after you have executed the conda config command. This file is the configuration file for conda in YAML format. For example, you can set the channel to install the package, whether to automatically update conda, whether to allow other channels, and other settings.

Solution:

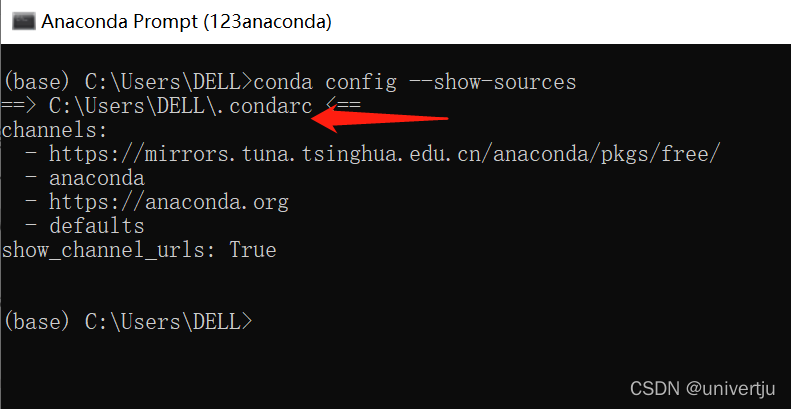
1. Open Anaconda Prompt and enter the following command

conda config --show-sources

As shown in the figure, the running result is displayed that the .condarc file is in the C:\Users\DELL folder
2. Delete .condarc file
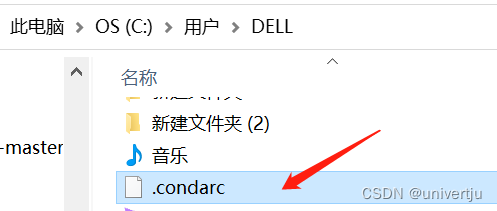
The problem was solved successfully!!!

[Solved] Failed to configure a DataSource: ‘url‘ attribute is not specified and no embedded datasource

Springboot does not specify the “url” property, and cannot configure an embedded data source. Cause: Unable to determine the appropriate driver class

When you open a new springboot project:

Description:

Failed to configure a DataSource: 'url' attribute is not specified and no embedded datasource could be configured.

Reason: Failed to determine a suitable driver class


Action:

Consider the following:
    If you want an embedded database (H2, HSQL or Derby), please put it on the classpath.
    If you have database settings to be loaded from a particular profile you may need to activate it (no profiles are currently active).

First, check whether the yml data source configuration file is correct, account password, etc…

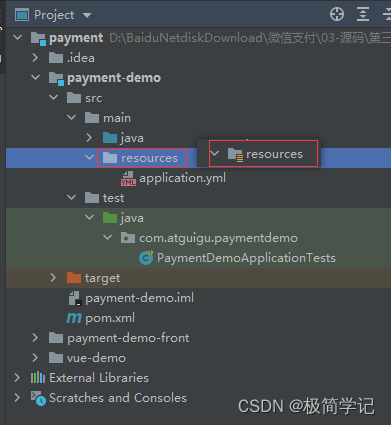
I found that there is no resource file in the target file. A closer look shows that there is no icon in the resource file.

Solution:

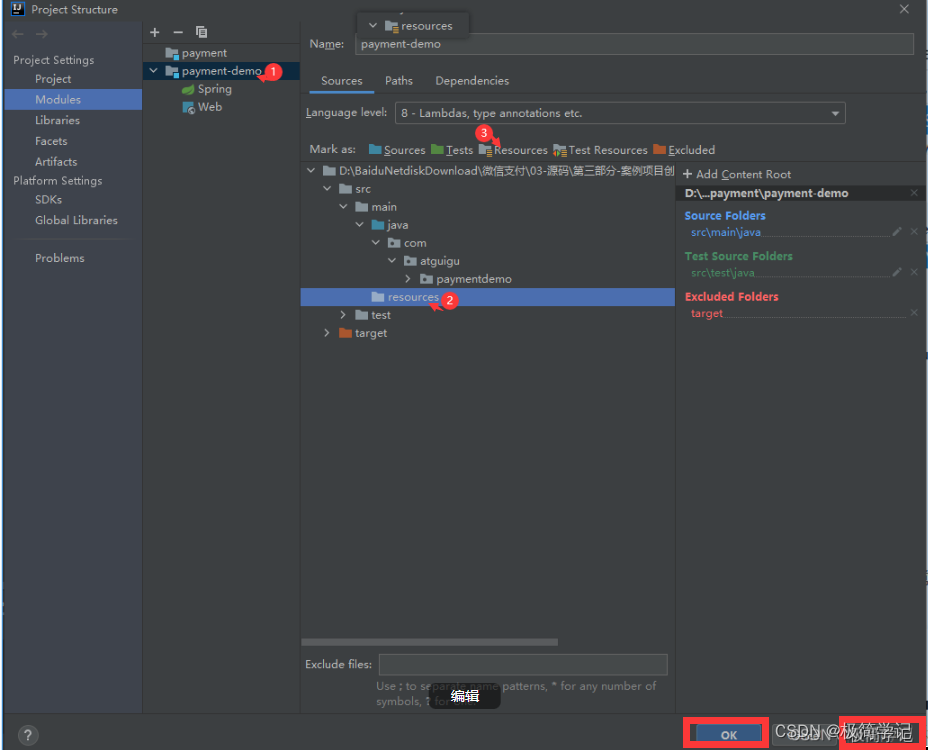
Step 1: Select the corresponding item and right-click: Open Module Settings

Step 2: Click in sequence according to the corresponding steps, and finally don’t forget to Apply

If other startup errors fail, you can leave a comment!

APK Install Error: Failure [INSTALL_FAILED_TEST_ONLY: installPackageLI]

When using the AS autorun, the test APK: app-debug.apk will be automatically generated under the app\build\outputs\apk\debug folder.

Use the command adb install app-debug.apk reports an error: Failure [INSTALL_FAILED_TEST_ONLY: installPackageLI]

Solution:

1. Add the -t parameter: Enter the command adb install -t app-debug.apk

2. In the gradle.properties (project root or gradle global configuration directory ~/.gradle/) file add

android.injected.testOnly=false
Causes.

Android Studio 3.0 will automatically add the android:testOnly=”true” property to the application tag of the debug apk’s manifest file

[Solved] Failed to configure a DataSource: ‘url‘ attribute is not specified and no embedded datasource could

springboot if the project pom introduced SpringBoot integrated mybatis framework dependencies, you must configure the database connection information, otherwise the start will report an error, the error is as follows:

***************************
APPLICATION FAILED TO START
***************************

Description:

Failed to configure a DataSource: 'url' attribute is not specified and no embedded datasource could be configured.

Reason: Failed to determine a suitable driver class


Action:

Consider the following:
    If you want an embedded database (H2, HSQL or Derby), please put it on the classpath.
    If you have database settings to be loaded from a particular profile you may need to activate it (no profiles are currently active).


Solution:

Remove the related dependencies in pom

        <dependency>
            <groupId>org.mybatis.spring.boot</groupId>
            <artifactId>mybatis-spring-boot-starter</artifactId>
            <version>2.1.4</version>
        </dependency>

python3 ./gen_ldc_version_info.py > utils/ldc_version_info_.d make: *** [utils/ldc_version_info_.d] Error 1

1.  Error

python3 ./gen_ldc_version_info.py > utils/ldc_version_info_.d make: *** [utils/ldc_version_info_.d] Error 1


2. Solution:

wget -c https://github.com/ldc-developers/ldc/releases/download/v1.30.0/ldc2-1.30.0-linux-x86_64.tar.xz
tar -xJvf ldc2-1.30.0-linux-x86_64.tar.xz
cd ldc2-1.30.0-linux-x86_64/bin
echo "export PATH=`pwd`:$PATH" >> /etc/profile
source /etc/profile

It will be OK! if the solution does not work for you. please leave a comment and let me know.

[Solved] hbase Create Sheet Error: ERROR: org.apache.hadoop.hbase.PleaseHoldException: Master is initializing

The reason for this problem is that the old metadata information was not deleted when hbase was reinstalled, so use zookeeper to delete the hbase metadata and restart hbase.

Solution:

Go to the zookeeper directory under bin

zkCli.sh -server localhost:2181

If the command is not found, you can change it to

. /zkCli.sh -server localhost:2181

Then delete all hbase related files

Restart hbase

hbase shell

now you can create the sheet successfully!