Author Archives: Robins

Python error: typeerror: ‘Int’ object is not subscribable

Check the error line, the error is generally in the integer subscript:
Such as:

a = 4
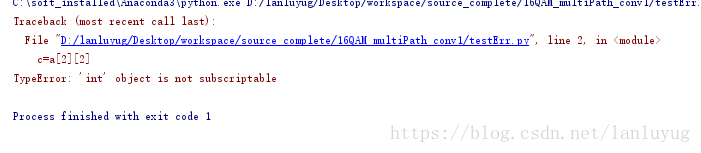
c=a[2]

Error: line 2, in < module>
c = a [2]
TypeError: ‘int’ object is not subscriptable
Take the more complicated one: two dimensions
 

a = [1,2,3,4]
c=a[2][2]

It’s a one-dimensional array, but it takes an array index, and then it adds a index, same problem.

VBA error values in Excel

The cell error value can be inserted into the cell, or the CVErr function can be used to test whether the cell value is an error value. The cell error value can be one of the following XlCVError constants.

constant

error number

cell error values

xlErrDiv0

2007

0 # DIV /!
xlErrNA 2042 #N/A
xlErrName 2029 #NAME?
xlErrNull 2000 #NULL!
xlErrNum 2036 #NUM!
xlErrRef 2023 #REF!
xlErrValue 2015 #VALUE!

Excel VBA tutorial: Cell error values · Examples
This example inserts seven cell error values into the A1:A7 cell area of Sheet1.


myArray = Array(xlErrDiv0, xlErrNA, xlErrName, xlErrNull, _
    xlErrNum, xlErrRef, xlErrValue)
For i = 1 To 7
    Worksheets("Sheet1").Cells(i, 1).Value = CVErr(myArray(i - 1))
Next i

This example checks whether the active cell in Sheet1 contains a cell error value and, if so, displays a message. This example serves as a model structure for error handlers for cell error values.


Worksheets("Sheet1").Activate
If IsError(ActiveCell.Value) Then
    errval = ActiveCell.Value
    Select Case errval
        Case CVErr(xlErrDiv0)
            MsgBox "#DIV/0! error"
        Case CVErr(xlErrNA)
            MsgBox "#N/A error"
        Case CVErr(xlErrName)
            MsgBox "#NAME?error"
        Case CVErr(xlErrNull)
            MsgBox "#NULL! error"
        Case CVErr(xlErrNum)
            MsgBox "#NUM! error"
        Case CVErr(xlErrRef)
            MsgBox "#REF! error"
        Case CVErr(xlErrValue)
            MsgBox "#VALUE! error"
        Case Else
            MsgBox "This should never happen!!"
    End Select
End If

os.remove (file) error windowserror: [error 32]

Remove the currently playing video while the video is playing, an error will occur.
WindowsError: [Error 32]
The process cannot access the file because another program has locked a portion of the file. When a file is opened (video is played), it cannot be renamed or deleted.
Method one:
use
Try:
except Exception,e:
raise
else:
pass
finally:
Pass the

The server just without updating PID file and can’t connect to local MySQL server through socket are solved

1. Report an error when logging into mysql

$ mysql -u root -p
Enter password:
ERROR 2002 (HY000): Can't connect to local MySQL server through socket '/tmp/mysql.sock' (2)

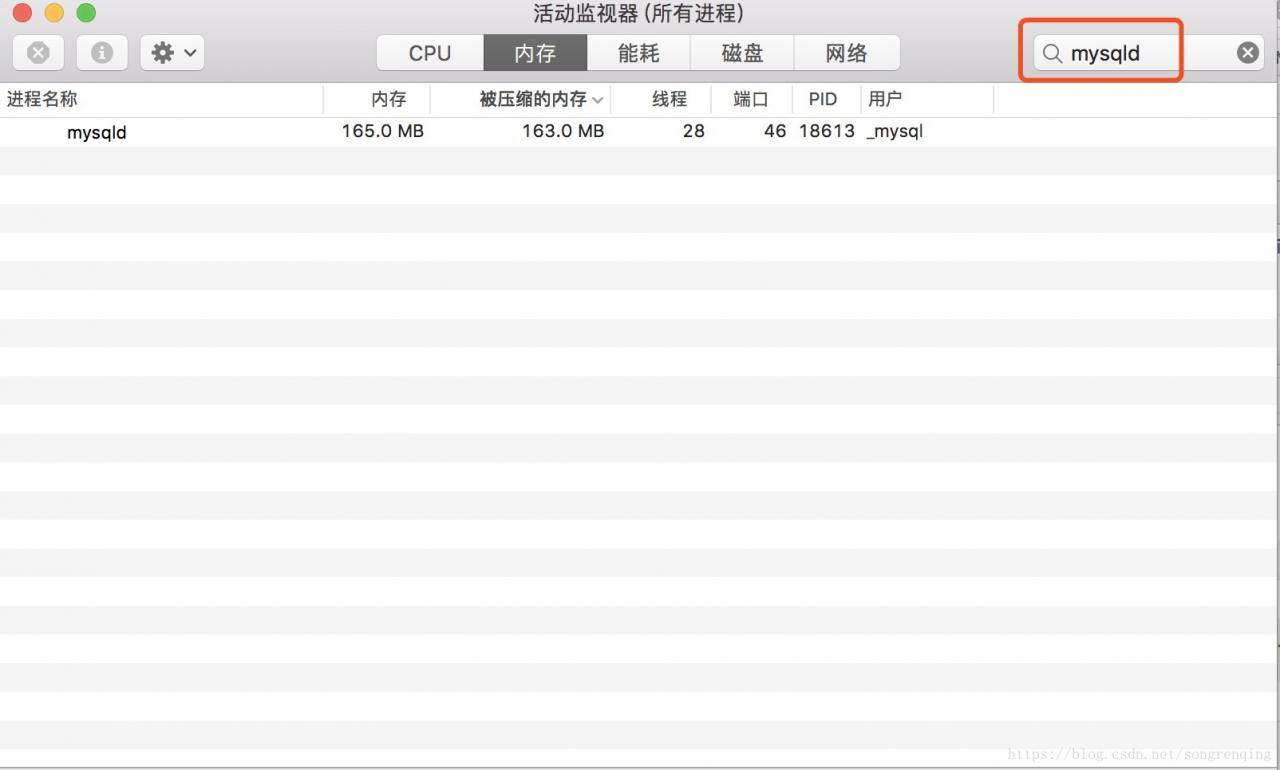
This error occurs because MySQL has not been started. To verify this guess, you can turn on the activity monitor and search mySQld, which cannot be found. Since I took the screenshot after fixing the problem myself, the mySQld process was already started when I searched.
Or type a command to view mysql.server Status

$ mysql.server status
/usr/local/mysql/support-files/mysql.server: line 365: pidof: command not found
 ERROR! MySQL is not running

As you can see, MySQL is not running. Since MySQL isn’t running, we definitely need to start MySQL.
Second, MySQL startup also reported an error

$mysql.server start
Starting MySQL
. ERROR! The server quit without updating PID file (/usr/local/var/mysql/XXXX.local.pid).

The boot report is wrong, is the permission not enough?So first change the permissions of /usr/local/var/mysql

sudo chown -R _mysql:mysql /usr/local/var/mysql

Once the permissions are resolved, test it with SUdo and restart it
3. Start sudo

$ sudo mysql.server start
Password:
Starting MySQL
.. SUCCESS! 

Surprisingly, MySQL started successfully, and then logged in again

$ mysql -u root -p
Enter password: 
Welcome to the MySQL monitor.  Commands end with ; or \g.
Your MySQL connection id is 2
Server version: 5.7.21-log Homebrew

Copyright (c) 2000, 2018, Oracle and/or its affiliates. All rights reserved.

Oracle is a registered trademark of Oracle Corporation and/or its
affiliates. Other names may be trademarks of their respective
owners.

Type 'help;' or '\h' for help. Type '\c' to clear the current input statement.

Summary: The problem of Can’t connect to local MySQL Server through socket is caused by MySQL not being started. The Server Quit without updating The PID file is due to permissions problem, which is solved and The first problem is solved accordingly.
Of course, due to different environment configuration and different installation methods, there will be some differences in the solution, but the cause of the problem should be the same. I am a Mac, homebrew installed mysql, through this method, successfully solved the problem.
Refer to the information on StackOverflow:
MySql server startup error ‘The server quit without updating PID file ‘
For a newbie: ERROR 2002 (HY000): Can’t connect to local MySQL server through socket ‘/tmp/mysql.sock’
 

[Android test] solution for error closed after the carriage return of the ADB shell

2019 Unicorn enterprise heavily recruited Python engineer standard & GT; > >

Phenomenon 1: In the process of Monkey test by connecting USB with mobile phone, start a CMD window to input again, and error Closed appears after ADB shell returns. In some cases, this can happen with some cell phones.
Phenomenon 2: Unable to install ***. Apk on device ‘019417a3’: Unable to open Sync Connection!
Personally, I think the reasons for both phenomena are the same.
The solution is as follows:

One: Restart your computer, then look up your phone on your computer and start Eclipse
Second: Mobile phone – Settings – applications – development – USB debugging on and off again
Third: restart the phone, usb debugging on and off again.
Fourth: Try “adb kill-server” and then “adb start-Server “under CMD.
Personally, the second and third methods are more practical

Reproduced in: https://my.oschina.net/u/199776/blog/330604

How to Add Dfrours Model

ROS URDF adds sensor model
Add sensor model
Add camera
The corresponding model file is camera.xacro, which reads as follows

<?xml version="1.0"?>
<robot xmlns:xacro="http://www.ros.org/wiki/xacro" name="camera">

    <xacro:macro name="usb_camera" params="prefix:=camera">
        <link name="${prefix}_link">
            <inertial>
                <mass value="0.1" />
                <origin xyz="0 0 0" />
                <inertia ixx="0.01" ixy="0.0" ixz="0.0"
                         iyy="0.01" iyz="0.0"
                         izz="0.01" />
            </inertial>

            <visual>
                <origin xyz=" 0 0 0 " rpy="0 0 0" />
                <geometry>
                    <box size="0.01 0.04 0.04" />
                </geometry>
                <material name="black"/>
            </visual>

            <collision>
                <origin xyz="0.0 0.0 0.0" rpy="0 0 0" />
                <geometry>
                    <box size="0.01 0.04 0.04" />
                </geometry>
            </collision>
        </link>
    </xacro:macro>

</robot>

The above code USES a macro called USB_camera to describe the camera, and the input parameter is the name of the camera.
Create a top-level XACro file that splicing together the robot and camera modules. The contents of the top-level file mrobot_with_camera.urdf.xacro are as follows, where the contents of the robot ontology description file mrobot_body.urdf.xacro can be found in the previous blog.

<?xml version="1.0"?>
<robot name="mrobot" xmlns:xacro="http://www.ros.org/wiki/xacro">

    <xacro:include filename="$(find mrobot_description)/urdf/mrobot_body.urdf.xacro" />
    <xacro:include filename="$(find mrobot_description)/urdf/camera.xacro" />

    <xacro:property name="camera_offset_x" value="0.1" />
    <xacro:property name="camera_offset_y" value="0" />
    <xacro:property name="camera_offset_z" value="0.02" />

    <!-- MRobot Robotics Platform-->
    <mrobot_body/>

    <!-- Camera -->
    <joint name="camera_joint" type="fixed">
        <origin xyz="${camera_offset_x} ${camera_offset_y} ${camera_offset_z}" rpy="0 0 0" />
        <parent link="plate_2_link"/>
        <child link="camera_link"/>
    </joint>

    <xacro:usb_camera prefix="camera"/>

</robot>

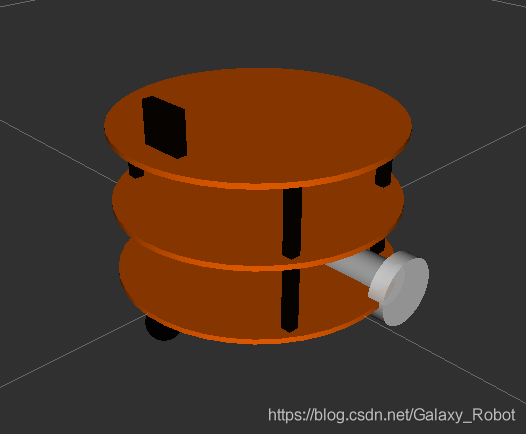
Display the model in RVIz, as shown in the figure below

 roslaunch mrobot_description display_mrobot_with_camera_xacro.launch 


Add it
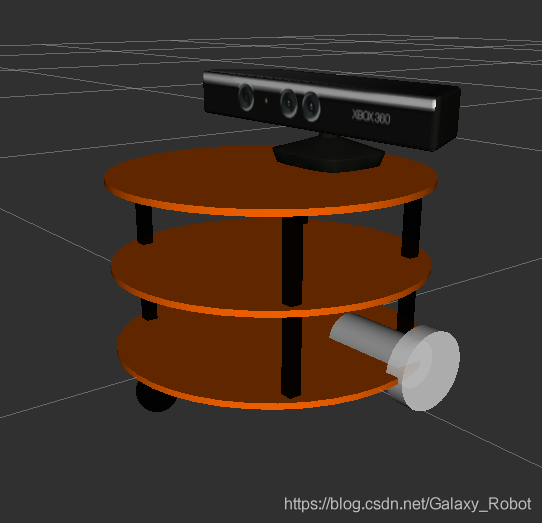
Kinect is a commonly used RGB-D camera, and the XACro file is shown below

<?xml version="1.0"?>
<robot xmlns:xacro="http://www.ros.org/wiki/xacro" name="kinect_camera">

    <xacro:macro name="kinect_camera" params="prefix:=camera">
        <link name="${prefix}_link">
            <origin xyz="0 0 0" rpy="0 0 0"/>
            <visual>
                <origin xyz="0 0 0" rpy="0 0 ${M_PI/2}"/>
                <geometry>
                    <mesh filename="package://mrobot_description/meshes/kinect.dae" />
                </geometry>
            </visual>
            <collision>
                <geometry>
                    <box size="0.07 0.3 0.09"/>
                </geometry>
            </collision>
        </link>

        <joint name="${prefix}_optical_joint" type="fixed">
            <origin xyz="0 0 0" rpy="-1.5708 0 -1.5708"/>
            <parent link="${prefix}_link"/>
            <child link="${prefix}_frame_optical"/>
        </joint>

        <link name="${prefix}_frame_optical"/>
    </xacro:macro>

</robot>

You can import the mesh file of the model by setting the label in visualization. And then the Kinect and the robot were put together. The top-level Xacro file, mrobot_with_kinet.urdf.xacro, has the following contents

<?xml version="1.0"?>
<robot name="mrobot" xmlns:xacro="http://www.ros.org/wiki/xacro">

    <xacro:include filename="$(find mrobot_description)/urdf/mrobot_body.urdf.xacro" />
    <xacro:include filename="$(find mrobot_description)/urdf/kinect.xacro" />

    <xacro:property name="kinect_offset_x" value="-0.06" />
    <xacro:property name="kinect_offset_y" value="0" />
    <xacro:property name="kinect_offset_z" value="0.035" />

    <!-- MRobot Robotics Platform-->
    <mrobot_body/>

    <!-- Kinect -->
    <joint name="kinect_frame_joint" type="fixed">
        <origin xyz="${kinect_offset_x} ${kinect_offset_y} ${kinect_offset_z}" rpy="0 0 0" />
        <parent link="plate_2_link"/>
        <child link="camera_link"/>
    </joint>
    <xacro:kinect_camera prefix="camera"/>

</robot>

The results displayed in RVIz are shown below

other sensors can be modeled in a similar way.

How to Fix Failed to load resource: the server responded with a status of 404()

Problem: Failed to Load Resource: The server required you with a status of 404 () In SpringMVC, you might encounter a page access 27) and discover that all static resources are 27) blocked because all static resources are 27) blocked by default (JS, CSS). HTML, image, video, audio) for static resources, you need to manually configure the static resource filter.
Solution:
The first:
web.xml

<servlet-mapping>
		<servlet-name>default</servlet-name>
		<url-pattern>*.jpg</url-pattern>
	</servlet-mapping>
	<servlet-mapping>
		<servlet-name>default</servlet-name>
		<url-pattern>*.js</url-pattern>
	</servlet-mapping>
	<servlet-mapping>
		<servlet-name>default</servlet-name>
		<url-pattern>*.css</url-pattern>
</servlet-mapping>

The second:
spingmvc.xml

<!-- Accessing Static Resource Configuration -->
    <mvc:resources location="/static/" mapping="/static/**" />

Extracting JDBC tool class: JDBC utils

## Extraction of JDBC tool classes: JDBCUtils
* :: Purpose: to simplify writing
* :: Analysis.
	1. Register the driver and also extract
	2. Extract a method to get a connected object
* :: Requirements: do not want to pass parameters (cumbersome), but also need to ensure the generality of the tool class
* :: Resolution: configuration file
		jdbc.properties
			url=
			user=
			password= 
3. Extract a method to release resources

Create jDBc.properties in the SRC directory

url=jdbc:mysql:///db3
user=root
password=123456
driver=com.mysql.cj.jdbc.Driver

JDBCUtils.java

package cn.itcast.utils;

import jdk.swing.interop.SwingInterOpUtils;

import java.io.FileInputStream;
import java.io.FileReader;
import java.io.IOException;
import java.net.URI;
import java.net.URL;
import java.sql.*;
import java.util.Properties;

// JDBC Tool
public class JDBCUtils {

    private static String url;
    private static String user;
    private static String password;
    private static String driver;

    // The file is read only once to get these values. Using static code blocks
    static {
        // Read the resource file, get the value.
        try {
            // Create the Properties collection class.
            Properties pro = new Properties();
            // The way to get the files in the src path - >ClassLoader class loader
            ClassLoader classLoader = JDBCUtils.class.getClassLoader();
            URL res = classLoader.getResource("jdbc.properties");
            String path = res.getPath();
            System.out.println(path);
            // 2. Load the file.
            pro.load(new FileReader(path));

            // 3. Get the data and assign a value.
            url = pro.getProperty("url");
            user = pro.getProperty("user");
            password = pro.getProperty("password");
            driver = pro.getProperty("driver");

            // 4. Registration drive
            Class.forName(driver);
        } catch (IOException | ClassNotFoundException e) {
            e.printStackTrace();
        }
    }

    // Get connection, return connection object
    public static Connection getConnection() throws SQLException {
        return DriverManager.getConnection(url,user,password);
    }
    // Release of resources
    public static void close(Statement stmt, Connection conn){
        if(stmt != null){
            try {
                stmt.close();
            } catch (SQLException throwables) {
                throwables.printStackTrace();
            }
        }

        if(conn != null){
            try {
                conn.close();
            } catch (SQLException throwables) {
                throwables.printStackTrace();
            }
        }
    }

    // Release of resources
    public static void close(ResultSet rs, Statement stmt, Connection conn){
        if(rs != null){
            try {
                rs.close();
            } catch (SQLException throwables) {
                throwables.printStackTrace();
            }
        }

        if(stmt != null){
            try {
                stmt.close();
            } catch (SQLException throwables) {
                throwables.printStackTrace();
            }
        }

        if(conn != null){
            try {
                conn.close();
            } catch (SQLException throwables) {
                throwables.printStackTrace();
            }
        }
    }
}

jdbcdemo.java

    // Demo JDBC tool class
    // Query all emp objects.
    public List<Emp> findAll() {

        Connection conn = null;
        Statement stmt = null;
        ResultSet rs = null;
        List<Emp> list = null;

        try {
            conn = JDBCUtils.getConnection();
            // 3. Defining sql
            String sql = "select * from emp";
            // 4. Get the object to execute sql.
            stmt = conn.createStatement();
            // 5. execute sql
            rs = stmt.executeQuery(sql);
            // 6. traverse the result set, encapsulate the object, load the set
            Emp emp = null;
            list = new ArrayList<Emp>();
            while(rs.next()){
                // Access to data
                int id = rs.getInt("id");
                String ename = rs.getString("ename");
                int job_id = rs.getInt("job_id");
                int mgr = rs.getInt("mgr");
                Date joindate = rs.getDate("joindate");
                double salary = rs.getDouble("salary");
                double bounds = rs.getDouble("bounds");
                int dept_id = rs.getInt("dept_id");

                // Create an emp object and assign it a value.
                emp = new Emp();
                emp.setEname(ename);
                emp.setJob_id(job_id);
                emp.setMgr(mgr);
                emp.setJoindate(joindate);
                emp.setSalary(salary);
                emp.setBounds(bounds);
                emp.setDept_id(dept_id);

                // load a collection
                list.add(emp);
            }
        }catch (SQLException e){
            e.printStackTrace();
        }finally {
            JDBCUtils.close(rs,stmt,conn);
        }
        return list;
    } 

Commit failed – exit code 1 received, with output: ‘>running pre-commit hook: npm run precommit (Fixed)

Commit failed – exit code 1 received, with output: ‘> running pre-commit hook: npm run precommit

Solution:

delete the pre-commit file and go to the project.git folder — hooks — delete, and then commit the code again.

Reference to address: https://blog.csdn.net/m18633778874/article/details/87448059?Ops_request_misc = % 257 b % 2522 request 2522% % 255 fid % 253 a 2522% % 2522% % 2522160532515819724835827479% % 2522 SCM 252 c 253 a % 252220140713.130102334 PC % 255 fall. The 2522% % 257 d & amp; request_id=160532515819724835827479& biz_id=0& utm_medium=distribute.pc_search_result.none-task-blog-2allfirst_rank_v2~rank_v28-1-87448059.pc_first_rank_v2_rank_v28& Utm_term = Commit + failed + + exit + code + 1 + re& SPM = 1018.2118.3001.4449

ERROR: Could not find a version that satisfies the requirement pytest-runner (from versions: none)

Commands executed:

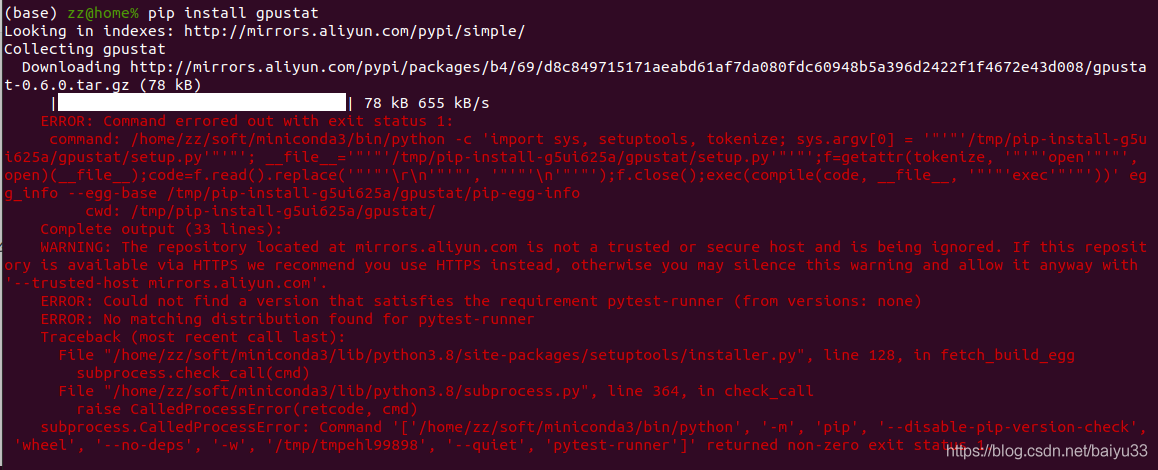
pip install gpustat


Key error of prompt:

ERROR: Could not find a version that satisfies the requirement pytest-runner (from versions: none)

Environmental Description:
PIP source: With the aliyunMiniconda environment configured in ~/.pip/pip.conf, Python 3.8.2 PIP is 20.0.2 (the latest PIP is 20.2.4, so it feels like it shouldn’t be a PIP version issue)
Tried:
rm-rf ~/. Cache/PIP , [invalid] to install other packages: PIP uninstall easybox; PIP install easybox, [no problem] other blogs on the network, referring to the switch source [not suitable]
The solution:
imagine that the PIP output means that pytest-runner is not installed (so why doesn’t PIP install pytest-runner instead of complaining here?Not clear). Then execute:

pip install pytest-runner
pip install gpustat

Command successfully executed, you can use gpustat to check the status of the video card:

Start flume agent and the solution of “a fatal error occurred while running” appears

The following error occurred when the log console was started after the installation of FluME

2020-11-13 18:10:23,564 ERROR [main] node.Application: A fatal error occurred while running. Exception follows.
java.lang.NullPointerException
	at java.io.File.<init>(File.java:277)
	at org.apache.flume.node.Application.main(Application.java:299)

I was also confused at that time. The steps were executed according to the tutorial in the book, including configuration and commands. I also checked that there was no problem

a1.sources = r1
a1.sinks = k1
a1.channels = c1
# Describe/configure the source
a1.sources.r1.type = avro
a1.sources.r1.channels = c1
a1.sources.r1.bind = 0.0.0.0
a1.sources.r1.port = 4141
# Describe the sink
a1.sinks.k1.type = logger
# Use a channel which buffers events in memory
a1.channels.c1.type = memory
a1.channels.c1.capacity = 1000
a1.channels.c1.transactionCapacity = 100
# Bind the source and sink to the channel
a1.sources.r1.channels = c1
a1.sinks.k1.channel = c1

(its path is/usr/local/flume/conf/avro. Conf, configuration file path to clear, need to use in the solution)
The command I used before is

/usr/local/flume/bin/flume-ng agent -c . -f /usr/local/flume/conf/avro.conf -n a1 -Dflume.root.logger=INFO,console

When the error occurs, search the web for a solution and find it on StackOverflow, changing the command

flume-ng agent --conf /usr/local/flume/conf --conf-file /usr/local/flume/conf/avro.conf --name a1 -Dflume.root.logger=INFO,console

Type this command to start again and resolve.

Django reads the txt file in view

Problem description:
In view, you want to load a TXT of block-words to block out dirty words.
but cannot find the file
Solutions:
Use the full path, put TXT under the same path as view.py, and add the first two lines

module_dir = os.path.dirname(__file__)
file_path = os.path.join(module_dir, 'block-words.txt')  # full path to text.
block_words = pd.read_csv(file_path,header=None)

Subsequent operation:
Use find to match, replacing all matched words with asterisks

for word inblock_words[0]:
    if info.find(word) != -1:
        info = info.replace(word, '*' * len(word))